


Komentáře / Otázky (12)
![]() Marianne napsala:
Marianne napsala:
Skal man benytte plastikpose og nål til tommeltot hver gang en filtet luffe baskes?
31.03.2023 - 21:49Odpověď DROPS Design :
Hej Marianne, hvis du vil vaske den igen, så skal den vaskes i hånden, så den ikke fileter mere og da behøver du ikke bruge en plasticpose :)
13.04.2023 - 10:22
![]() Andrea napsala:
Andrea napsala:
I just finished these -the pattern is so easy to follow! Although if you knit the smallest size in in one colour, like I did, 150 grams of Alaska are enough!
08.01.2023 - 16:00
![]() Gunilla napsala:
Gunilla napsala:
Vid 16 cm påbörjas ökning för tumme. När ökningen är gjord ska arbetet mäta 23 cm. Jag kommer upp i 19 cm! Vad har jag missat?
28.08.2022 - 21:43Odpověď DROPS Design :
Hei Gunilla. Stemmer strikkefastheten din i høyden? Om du har riktig antall masker, kan du fortsette til ca 23 cm. mvh DROPS Design
29.08.2022 - 13:21
![]() Alice Skjønberg napsala:
Alice Skjønberg napsala:
Strikker største størrelsen, og stusser på lengde på tommel. På oppgitte mål står det at tommel før toving skal måle 20 cm fra tommelgropen. Men i mønsteret står det at det skal felles når tommel måler 9,5 cm. Hva er riktig? PS synes 9-10 cm før toving virker lite…
20.02.2022 - 10:53Odpověď DROPS Design :
Hei Alice. Det er ikke mål fra tommelgrop og opp tommelen (altså lengden på tommelen), men fra tommelgrop og lengden på selve votten/opp fingrene, den skal være 20 cm før toving. Om du er usikker på om 9-10 cm på tommelen blir lite, kan du evnt tove tovene i tørketrommel (om du har). Da kan du sjekke underveis i "toveprossessen" om de vil passe eller ikke. Evnt strikke en prøvelapp og sjekke hvor mye din vaskemaskin vil tove. mvh DROPS Design
21.02.2022 - 13:34
![]() Sabine napsala:
Sabine napsala:
Diese Fäustlinge habe ich in Größe S mit Drops Air gestrickt. Als sie aus der Waschmaschine kamen, sahen sie aus, als wären sie für ein Kleinkind. Aber sie ließen sich gut auf die meine Größe und in die richtige Passform dehnen. Vielen, lieben Dank, für die leicht verständliche Anleitung.
08.02.2022 - 16:29
![]() Kari napsala:
Kari napsala:
Mitt første vottepar! Problemer med matte'n her: Strikker damestr m/l og har felt 6 m etter ferdig mønster = 38 m. Men så starter økningen ifb med tommel - øk 1 m på hver side av merketråden 3 ganger... I mitt hode skal det da bli økt 6 m tilsammen som da bli totalt 44 - mens mønsteret sier at det da skal bli 46 m etter øking! Hva er det jeg ikke forstår? Takk
14.09.2020 - 10:40Odpověď DROPS Design :
Hei Kari. Du har kanskje glemt å telle med den første økningen. Det skal økes med 1 maske på hver side av masken med merketråd = 40 masker etter 1.økningen. Så skal økningen gjentas på utsiden av de økte maskene på hver 2.omgang 3 ganger til = 46 masker. God Fornøyelse!
14.09.2020 - 14:15
![]() Marie Nilsson napsala:
Marie Nilsson napsala:
X-413 modell vantar i Alaska garn Det står i mönstret att man skall avmaska vid 36cm på stolek S/M stämmer det?
29.11.2018 - 19:58Odpověď DROPS Design :
Hei Marie. Når arbeidet måler 36 cm skal du strikke 2 og 2 masker sammen, når arbeidet måler 38 cm feller du av. God fornøyelse.
30.11.2018 - 14:27
![]() Marie-Andrée Benoit napsala:
Marie-Andrée Benoit napsala:
Bonjour,\r\nC\'est pour les moufles Touch of Gold. Pour faire le pouce, c\'est écrit \"Augmenter ensuite une maille de chaque coté de la maille avec le marqueur, répéter ces augmentations de part et d\'autres des augmentations encore 4fois tous les 2 tours.
26.09.2018 - 21:45Odpověď DROPS Design :
Bonjour Mme Benoît, cette vidéo montre comment tricoter le pouce d'une moufle - suivez bien les indications du modèle avec le nombre d'augmentations etc. à faire, la vidéo montre juste la technique. Bon tricot!
27.09.2018 - 08:25
![]() Debbie napsala:
Debbie napsala:
I cannot figure out how to do the thumb gusset even with the help of the two videos that are available. Can you help me with this. I just need clearer instructions on where to increase in each row.
06.12.2017 - 04:05Odpověď DROPS Design :
Dear Debbie, you increase first on each side of st with marker: inc, st with marker, inc. On next inc row, increase on either side of these 3 sts: inc, K1, st with marker, K1, inc, then on next increase row work: inc, K2, st with marker, K2, inc, repeat these inc until there will be 11-13 sts (see size) for thumb, ie last increase will be: inc, K4-5, st with marker, K4-5, inc = 11-13 sts for thumb. Happy knitting!
06.12.2017 - 09:41
![]() Maria Moreira napsala:
Maria Moreira napsala:
Boa tarde Venho pedir ajuda do seguinte; há possibilidade de obter um vídeo de como apanhar malhas caídas no ponto inglês. Obrigada Maria
10.12.2016 - 19:50Odpověď DROPS Design :
Bom dia, Esteja atenta aos próximos vídeos. Pode ser que haja algum que ensine a apanhar malhas caídas no ponto inglês. Bom tricô!
12.12.2016 - 12:05
|
||||||||||
Touch of Gold#touchofgoldmittens |
||||||||||
 |
 |
|||||||||
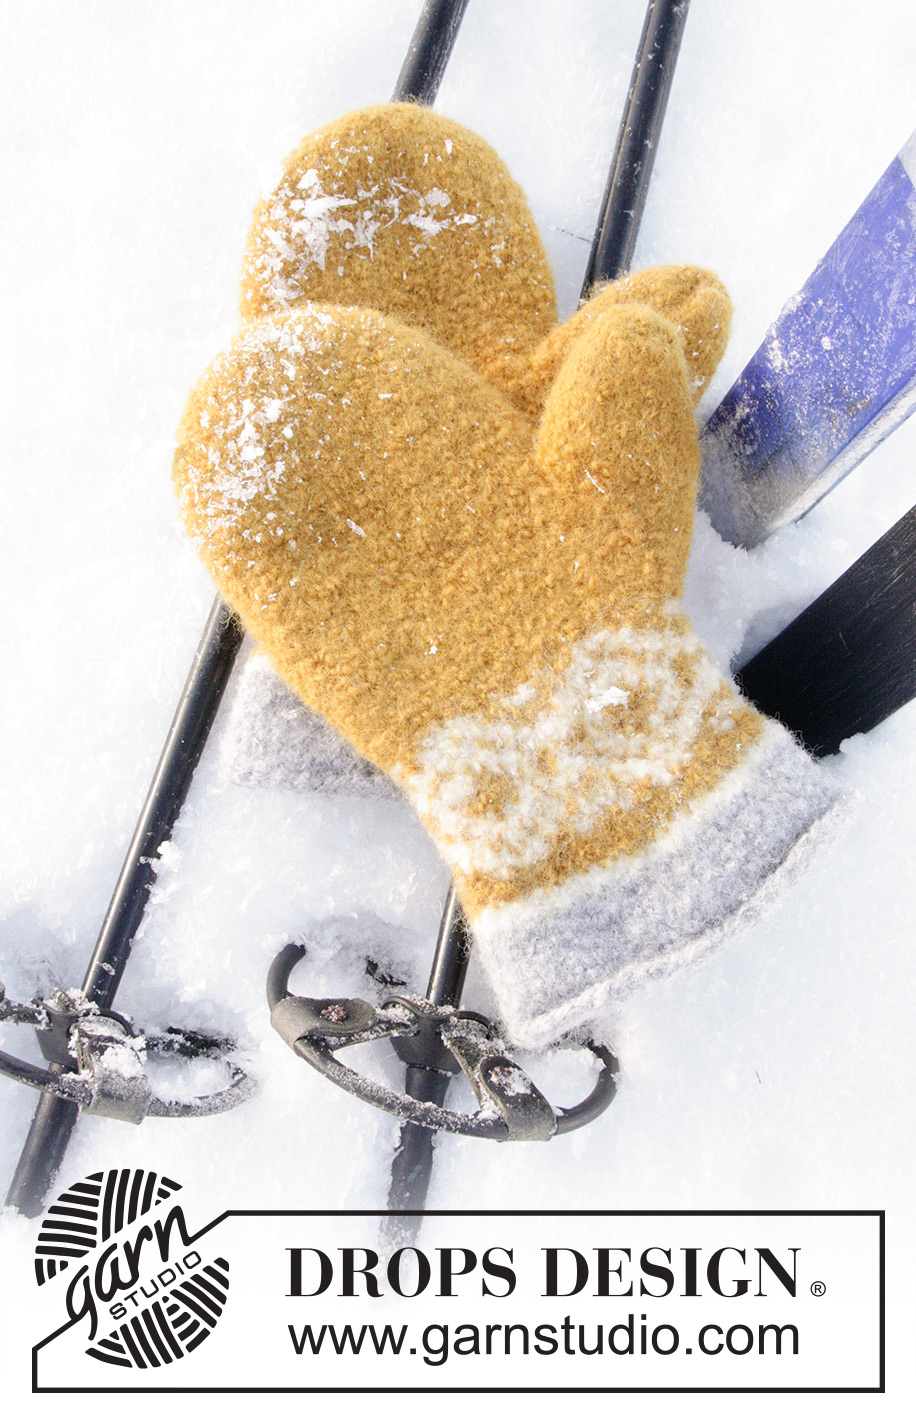
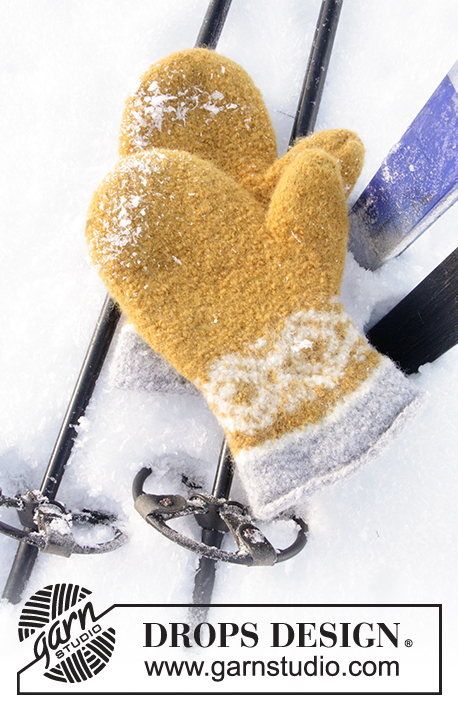
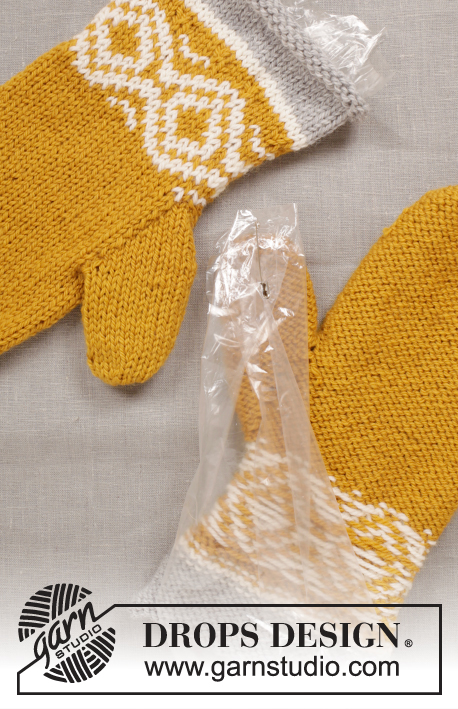
DROPS Velikonoce: plstěné rukavice – palčáky s norským vzorem pletené z příze "Alaska".
DROPS Extra 0-1245 |
||||||||||
|
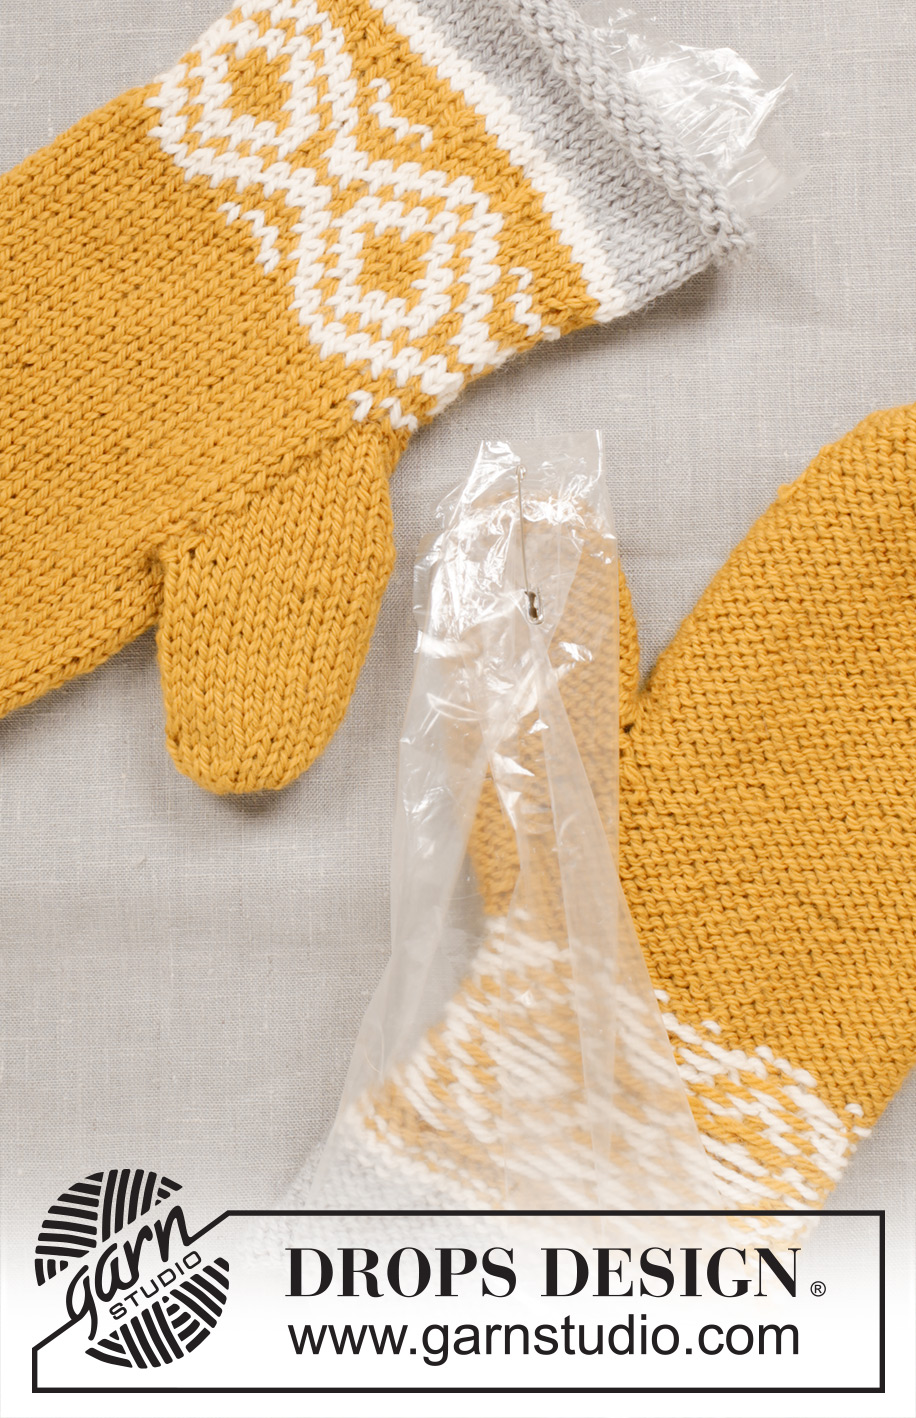
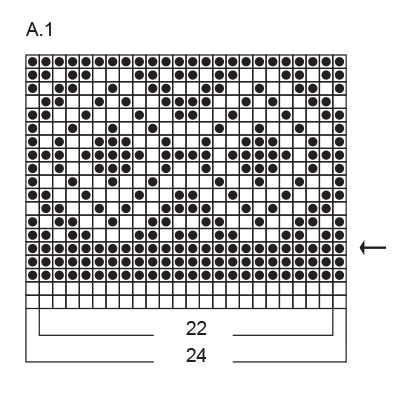
VZOR: Viz schéma A.1 (zvolte si schéma pro požadovanou velikost). Celý vzor pleteme lícovým žerzejem. TIP - PŘIDÁVÁNÍ: Přidáváme rozpletením 1 oka na 2. ---------------------------------------------------------- RUKAVICE – PALČÁKY: Pleteme v kruhových řadách na ponožkových jehlicích přízí Alaska. Na ponožkové jehlice č. 5,5 nahodíme světle šedou přízí 52-52-56 (56-56) ok. Celou rukavici pleteme lícovým žerzejem. Ve výši 5-6-7 (7-8) cm pleteme v kruhových řadách vzor A.1 – SOUČASNĚ ujmeme v 5. řadě vzoru rovnoměrně 8 ok (ujímáme spletením 2 ok hladce) = 44-44-48 (48-48) ok. Po dokončení celé 1 sekvence vzoru (na výšku) pokračujeme hořčicovou přízí a touto barvou rukavici dopleteme. SOUČASNĚ v 1. kruhové řadě ujmeme rovnoměrně 6-6-8 (8-6) ok = 38-38-40 (40-42) ok. Ve výši 15-16-17 (17-18) cm si označíme 19.-19.-20. (20.-21.) oko v kruhové řadě (= palec). Pak přidáme 1 oko na každé straně označeného oka a toto přidávání opakujeme v každé 2. kruhové řadě – přidáváme vždy na vnější straně už přidaných ok (mezi přidáními vzniká klín) – ještě 3-3-4 (4-4)x – viz TIP - PŘIDÁVÁNÍ = 46-46-50 (50-52) ok. Po posledním přidání odložíme přidaná oka + označené oko + 1 oko na každé straně těchto ok (klínu) na pomocnou jehlici = 11-11-13 (13-13) ok palce. V další kruhové řadě nahodíme nad odloženými oky 3 oka nová = 38-38-40 (40-42) ok. Díl měří asi 21-23-25 (25-26) cm. Pokračujeme lícovým žerzejem v kruhových řadách. Ve výši 36-38-42 (42-44) cm spleteme každá 2 oka hladce = 19-19-20 (20-21) ok. Ve výši 38-40-44 (44-46) cm opět spleteme každá 2 oka hladce (pokud počet ok není sudý, upleteme zbylé oko hladce) = na jehlici zbývá 10-10-10 (10-11) ok. Přízi odstřihneme, protáhneme zbylými oky, stáhneme a zapošijeme. PALEC: Pleteme v kruhových řadách na ponožkových jehlicích lícovým žerzejem. Odložených 11-11-13 (13-13) ok palce vrátíme z pomocné jehlice zpět na ponožkové jehlice č. 5,5 a navíc k nim nabereme 5 nových ok z okraje za nimi (= 3 přidaná oka na dlani) = 16-16-18 (18-18) ok. Když je palec vysoký asi 6-6-6,5 (6,5-7) cm od klínu, ujmeme rovnoměrně 4-4-6 (6-6) ok (ujímáme spletením 2 ok hladce) = 12 ok. Upleteme 2 kruhové řady. V následující kruhové řadě ujmeme rovnoměrně 4 oka = 8 ok. Ve výši 8,5-8,5-9 (9-9,5) cm spleteme každá 2 oka hladce = 4 oka. Přízi odstřihneme, protáhneme zbylými oky, stáhneme a zapošijeme. Stejným způsobem upleteme i druhou rukavici. PLSTĚNÍ: Upletenou rukavici převrátíme rubem ven a do palce vložíme igelitový sáček, aby se nezplstil dohromady. Sáček přichytíme pomocí zavíracího špendlíku – POZN.: špendlík zapíchneme svisle směrem ke špičce palce, abychom jej mohli po zplstění rukavice snadno odstranit. Rukavici opět převrátíme lícem ven. Rukavice vložíme do pračky. Teplotu nastavíme na 40 stupňů, přidáme prací prášek bez enzymů a bělidel a pereme běžným programem vč. odstředění, nepředepíráme. Po vyprání vytvarujeme mokrou rukavici do požadovaného tvaru a necháme uschnout. Při opakovaném praní pereme programem pro jemné/vlněné prádlo. PO ZPLSTĚNÍ: Pokud se výrobek dostatečně nezplstil (tj. nesrazil) hned napoprvé a je stále moc velký, vyperte jej v pračce ještě jednou. Pro zesílení účinku můžete přidat froté ručník (cca 50 x 70 cm), který zvýší tření během praní. - POZOR: Nepoužívejte zkrácený program. Pokud se výrobek zplstil (tj. srazil) až příliš a je teď moc malý, můžete jej znovu namočit a zkusit vypnout do potřebných rozměrů. Je-li výrobek už suchý, nejprve jej namočte. Pamatujte ale – každé další praní už se řídí obecnými pokyny pro šetrné praní vlněných výrobků. |
||||||||||
Vysvětlivky ke schématu |
||||||||||
|
||||||||||
|
||||||||||
Dokončili jste tento model?Pak označte své fotky tagem #dropspattern #touchofgoldmittens nebo je pošlete do galerie #dropsfan. Potřebujete s tímto návodem poradit?Otevřete-li si návod na stránce garnstudio.com, najdete tam 19 výukových video-ukázek, Komentáře/Dotazy a další užitečné informace. © 1982-2025 DROPS Design A/S. Vyhrazujeme si veškerá práva. Tento dokument, včetně všech jeho dílčích částí, podléhá autorským právům. Podrobnější komentář k možnostem užití našich návodů najdete dole pod každým návodem na našich stránkách. |
||||||||||


V oblasti pletené a háčkované módy působí DROPS Design více než 40 let. Díky tomu vám můžeme nabídnout jednu z nejrozsáhlejších kolekcí modelů s bezplatnými návody dostupnými na internetu - navíc v 17 jazycích. K dnešnímu dni máme na 314 katalogů a 11821 návodů celkem - z nich je už 7047 dostupných v [češtině].
Přidejte komentář k návodu DROPS Extra 0-1245
Rádi bychom věděli, co si o tomto modelu myslíte!
Pokud se chcete na něco zeptat, dbejte prosím na to, abyste ve formuláři níže vybrali správnou kategorii - díky tomu se dříve dozvíte, co potřebujete vědět. Povinná pole jsou označena *.