
Looking for a yarn?


Comments / Questions (12)
![]() Elizabeth Durand wrote:
Elizabeth Durand wrote:
Each of these big squares takes more than a single ball of yarn. When joining the second ball, do people tend to pay attention to matching the color repeat? Or do they start knitting where the second ball egins and let that become a design element?
30.01.2022 - 20:45DROPS Design answered:
Dear Elizabeth, it's your choice; you may pay attention, to make sure the colour matches or you may make it more original by starting exactly where the second ball begins. Happy knitting!
30.01.2022 - 21:36
![]() Karin wrote:
Karin wrote:
Hoe groot wordt de deken?
22.09.2021 - 17:48DROPS Design answered:
Dag Karin,
De deken bestaat uit 6 vierkanten van 50 x 50, dus de deken wordt 100 x 150 cm.
23.09.2021 - 10:32
![]() Åshild Margrethe Hansen wrote:
Åshild Margrethe Hansen wrote:
Finner ikke Drops Big Delight farge Sundet. Er den gått ut?
09.07.2021 - 13:21DROPS Design answered:
Hej Åshild. De färger som inte finns med på färgkartan har dessvärre utgått. Mvh DROPS Design
09.07.2021 - 14:02
![]() Bibi wrote:
Bibi wrote:
Hej. Når jeg er færdig med min dominorude, skal jeg så lukke af fra ret- eller vrangsider? På forhånd tak.
07.09.2018 - 11:23DROPS Design answered:
Hei Bibi. Du kan felle av fra rettsiden. God fornøyesle.
10.09.2018 - 10:00
![]() Elisabeth wrote:
Elisabeth wrote:
Har dere tips til hvordan strikke kantmaskene (første og siste maske), slik at sammensying av rutene blir penest/enklest mulig?
22.03.2016 - 19:26DROPS Design answered:
Hej Elisabeth, om du strikker kantmaskerne i rille, så kan du følge vor video som viser hvordan man syr sammen riller:
DROPS Knitting Tutorial: How to sew together pieces knit in garter from Garnstudio Drops design on Vimeo.
30.03.2016 - 15:32
![]() MASDEU wrote:
MASDEU wrote:
Le prix annoncée, ne correspond pas, parce que pour 10 pelotes nécessaires c'est le double.
23.02.2016 - 20:14DROPS Design answered:
Bonjour Mme Masdeu, c'est exact, la correction a été faite sur la base de 10 pelotes de 100 g, merci. Bon tricot!
24.02.2016 - 10:43
![]() Birgitte wrote:
Birgitte wrote:
Nu har jeg prøvet ordentligt, det bliver en firkant😆. Undskyld mange gange. Det er virkelig en smart måde at gøre det på. Igen undskyld . jeg var lidt hurtig på aftrækkeren
23.02.2016 - 19:39DROPS Design answered:
Hej Birgitte, Dejligt at høre at det fungerer! Rigtig god fornøjelse med det fine tæppe :)
24.02.2016 - 15:36Claudia Alarcon wrote:
Hola con respecto a este patrón, no entiendo cómo se forma el cuadrado?, pues según las indicaciones llega uno a 149 y ahí termina. Me pueden decir cómo se hacen las disminuciones? Gracias
23.02.2016 - 16:06DROPS Design answered:
Hola Claudia. El cuadrado se forma trabajando aum a ambos lados de lo que sería la diagonal del cuadrado comenzando por el vértice. No hay disminuciones. Te recomiendo hacer una muestra antes de empezar la labor.
26.02.2016 - 17:41
![]() Jane wrote:
Jane wrote:
OOPS! See my comment above - I have just tried your method of making a square and it CAN be pulled into shape once finished. APOLOGIES !!! I have only ever knitted domino squares the way I described because you can then pick up stitches down the edge and make another square next to it, without having to sew them together.
23.02.2016 - 15:31
![]() Jane wrote:
Jane wrote:
Sorry but these instructions are WRONG. They will make a TRIANGLE and NOT a domino square. To make a square, cast on 149 stitches. Then DECREASE one stitch each side of the middle stitch on alternate rows until you have three (3) stitches remaining. Knit these three stitches together.
23.02.2016 - 15:12
|
|
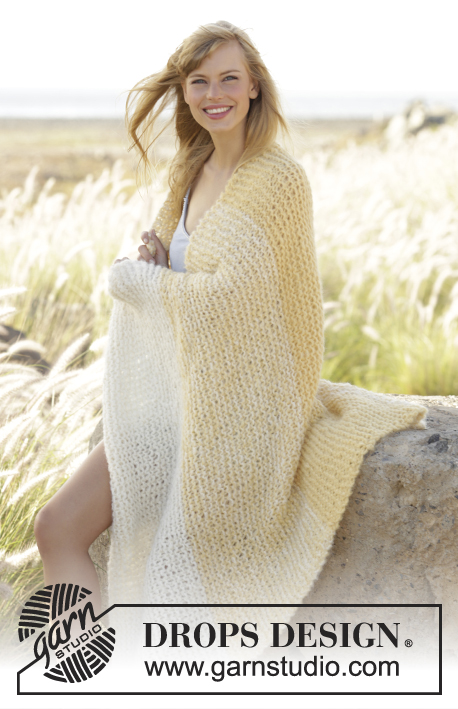
Sunset Fields#sunsetfieldsblanket |
|
|
|
|
Knitted DROPS blanket with domino squares in ”Big Delight”.
DROPS Extra 0-1236 |
|
|
DOMINO SQUARE: Insert 1 marker in the middle st. Row 1 (= WS): K all sts. Row 2 (= RS): K until st with marker, 1 YO, K 1 (st with marker), 1 YO, K the rest of row. Repeat 1st and 2nd row, i.e. inc 2 sts in the middle of the square on every other row (RS). On next row (WS) K all YOs. ---------------------------------------------------------- BLANKET: Blanket consists of 6 squares that are sewn into a blanket. One square measures approx. 50 x 50 cm / 19 3/4" x 19 3/4''. SQUARE: Work 3 squares in every color. Cast on 5 sts on circular needle size 6 mm / US 10 with Big Delight. Work in DOMINO SQUARE - see explanation above - back and forth. REMEMBER THE KNITTING GAUGE Work Domino square until there are 149 sts, bind off. ASSEMBLY: Sew tog square so that there are 3 squares vertically and 2 in width - see photo. Sew edge to edge with one stitch in every st. |
|
Have you finished this pattern?Tag your pictures with #dropspattern #sunsetfieldsblanket or submit them to the #dropsfan gallery. Do you need help with this pattern?You'll find 10 tutorial videos, a Comments/Questions area and more by visiting the pattern on garnstudio.com. © 1982-2025 DROPS Design A/S. We reserve all rights. This document, including all its sub-sections, has copyrights. Read more about what you can do with our patterns at the bottom of each pattern on our site. |


With over 40 years in knitting and crochet design, DROPS Design offers one of the most extensive collections of free patterns on the internet - translated to 17 languages. As of today we count 314 catalogs and 11822 patterns - 11812 of which are translated into English (US/in).
We work hard to bring you the best knitting and crochet have to offer, inspiration and advice as well as great quality yarns at incredible prices! Would you like to use our patterns for other than personal use? You can read what you are allowed to do in the Copyright text at the bottom of all our patterns. Happy crafting!
Post a comment to pattern DROPS Extra 0-1236
We would love to hear what you have to say about this pattern!
If you want to leave a question, please make sure you select the correct category in the form below, to speed up the answering process. Required fields are marked *.