DROPS Paris
DROPS Paris
100% Cotton
from 0.75 £ /50g
Get the yarn to make this pattern from 9.00£.

The yarn cost is calculated from the pattern’s smallest size and the yarn’s cheapest product type. Looking for an even better price? You might find it on the DROPS Deals!

DROPS Super Sale

Janis

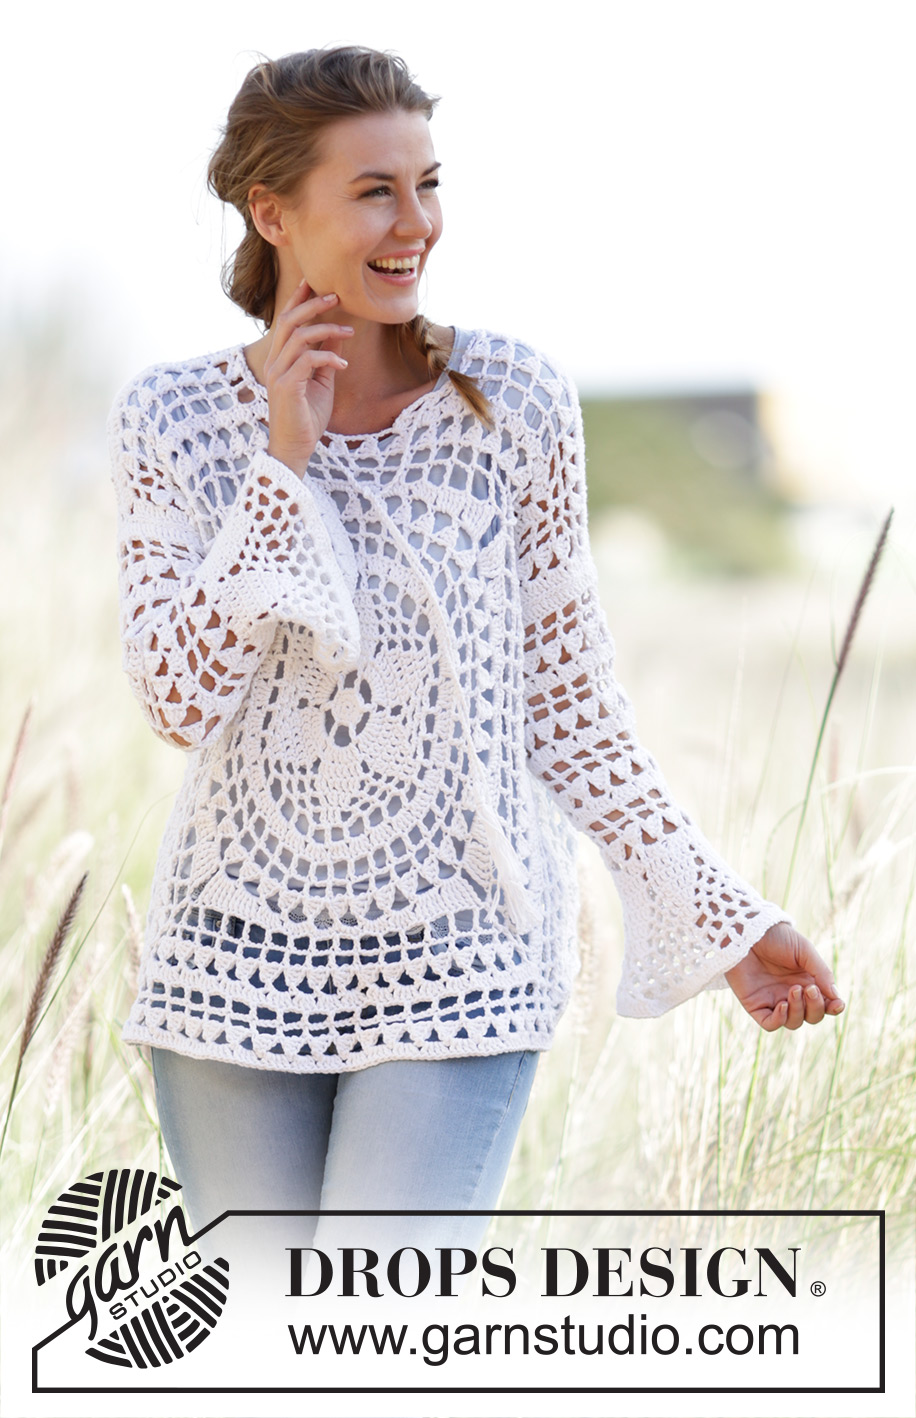
Crochet DROPS jumper worked in a square with flounce sleeves and lace pattern in ”Paris”. Size: S - XXXL.

DROPS 170-2
DROPS design: Pattern no w-573
Yarn group C or A + A
----------------------------------------------------------
Size: S - M - L - XL - XXL - XXXL
Materials:
DROPS PARIS from Garnstudio
600-650-750-800-900-950 g colour no 16, white

DROPS CROCHET HOOK SIZE 4.5 mm – or size needed to get 16 tr x 9 rows = 10 x 10 cm.

-------------------------------------------------------

Alternative Yarn – See how to change yarns here
Yarn Groups A to F – Use the same pattern and change the yarn here
Yarn usage using an alternative yarn – Use our yarn converter here

-------------------------------------------------------

DROPS Paris
DROPS Paris
100% Cotton
from 0.75 £ /50g
Get the yarn to make this pattern from 9.00£.

The yarn cost is calculated from the pattern’s smallest size and the yarn’s cheapest product type. Looking for an even better price? You might find it on the DROPS Deals!

DROPS Super Sale

SAVE 30% on 6 cotton favourites!
Valid until 12.04.2024

Pattern instructions

NOTE: This pattern is written in British English. All measurements in charts are in cm. For conversion from cm to inches - click here. There are different terms for crocheting in British and American English. If this pattern includes crochet, click for "crochet terms" here. For this pattern in American English, please click here.
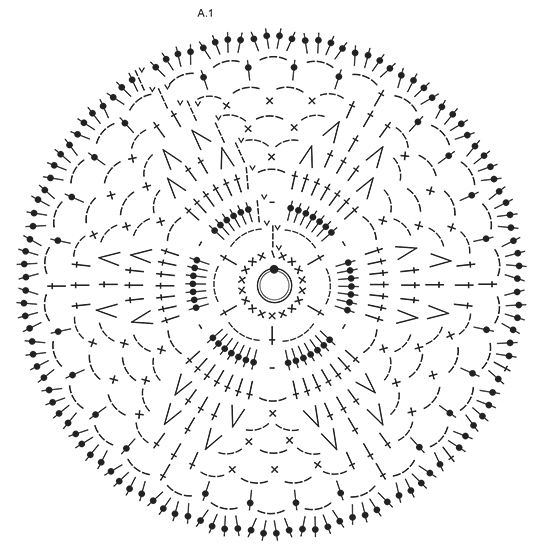
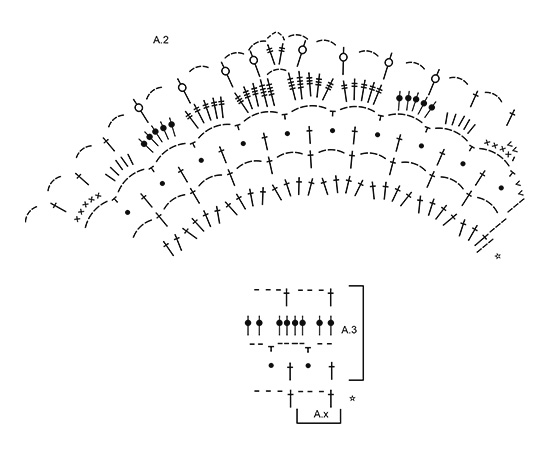
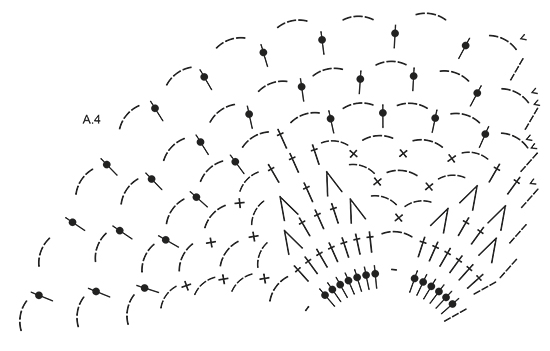
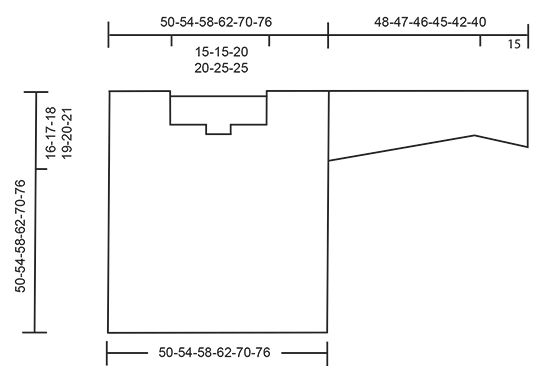
MAGIC CIRCLE:
To avoid hole in the middle beg with this technique:
Hold yarn end in the left hand and make a loop around left index finger (from left to right). Hold the loop with left thumb and index finger. Insert hook through loop, get the yarn from ball, pull yarn through loop, make 1 YO on hook and pull YO through st on hook = 1 dc, then work 8 dc around loop, finish with 1 sl st in first dc = 9 dc. Continue as explained in pattern – AT THE SAME TIME pull yarn end so that loop is tighten tog and the hole disappears.

CROCHET INFO:
Replace first dc on round with 1 ch. Finish round with one sl st in first ch from beg of round.
Replace first tr on round/row with 3 ch. Finish round with one sl st in third ch from beg of round.

PATTERN:
See diagrams A.1 to A.4.

QUADRUPLE TR: Make 4 YOs on hook, insert hook around ch-space and pull yarn around ch-space, * 1 YO on hook, pull yarn through the next 2 loops on hook *, repeat from *-* 4 more times = 1 loop on hook.

DECREASE TIP:
Dec 1 tr by working the next 2 tr tog as follows: Work 1 tr but wait with last pull through (= 2 loops on hook), then work next tr but on last pull through, pull yarn through all 3 loops on hook.
----------------------------------------------------------

JUMPER:

BACK PIECE:
Work back piece in a circle, then as a square from mid back. Work up along one side of square for shoulder/neck at the end.
Work a MAGIC CIRCLE on hook size 4.5 mm with Paris – see explanation above = 9 dc around circle. Then work according to A.1 (on first round in A1 work 2 dc in each of the 9 dc = 18 dc). REMEMBER THE CROCHET TENSION! READ CROCHET INFO! When A.1 has been worked, there are 120 tr on round and piece measures approx. 22 cm in diameter.

Then work according to A.2, work 4 repetitions of A.2 around the circle - beg on second round in A.2. NOTE: Sl sts at beg of A.2 are only worked at beg of round.

When A.2 has been worked, continue according to A.3. A.x shows 1 repetition of A.3 in width. Work A.3, in every corner work 1 dtr + 3 ch + 1 dtr, work 2 repetitions more of A.3 between every corner for every round worked. Continue with A.3 until piece measures 23-25-27-29-33-36 cm from centre (46-50-54-58-66-72 cm in total), there are now approx. 18-20-22-24-28-30 repetitions of A.3 along each side of square. Now work piece back and forth and dec for neck in the middle of the first side of square. Cut the yarn and skip the middle 6-6-8-8-10-10 repetitions (= neck) on the first side of square, continue A.3 with inc in the corners until row has been worked, do not work over the 6-6-8-8-10-10 repetitions skipped at beg of row. Fasten off, piece measures 25-27-29-31-35-38 cm from centre (50-54-58-62-70-76 cm in total), there are approx. 7-8-8-9-10-11 repetitions on each shoulder, and approx. 20-22-24-26-30-32 repetitions along each of the other 3 sides. Insert 1 marker in each side, 16-17-18-19-20-21 cm down from shoulder, this shows where sleeve is sewn in.

FRONT PIECE:
Work as back piece until piece measures 17-19-21-23-27-30 cm from centre (32-36-40-44-52-58 cm in total), there are now approx. 14-16-18-20-24-26 repetitions of A.3 along each side of square. Now work piece back and forth and dec for neck in the middle of the first side of square. Cut the yarn and skip the middle 2 repetitions (= neck) on the first side of square, continue with A.3 with inc in the corners until row has been worked, do not work over the 2 repetitions skipped at beg of row. Turn and work a row from WS. Cut the yarn, skip the first 2-2-3-3-4-4 repetitions, continue with A.3 and inc in the corners, but turn when 2-2-3-3-4-4 repetitions remain on row, 6-6-8-8-10-10 repetitions have been dec mid front for neck. Continue back and forth with A.3 and inc until piece measures 25-27-29-31-35-38 cm from centre (50-54-58-62-70-76 cm in total), there are approx. 7-8-8-9-10-11 repetitions on each shoulder, and approx. 20-22-24-26-30-32 repetitions along each of the other 3 sides, adjust according to back piece. Fasten off. Insert 1 marker in each side, 16-17-18-19-20-21 cm down from shoulder, this shows where sleeve is sewn in.

SLEEVE:
Sleeve is worked in the round, top down. Work 64-64-69-69-74-74 ch and form a ring with one sl st in first ch. Work 3 ch (= 1 tr), 1 tr in each of the next 6-6-3-3-0-0 ch, skip 1 ch, * work 1 tr in each of the next 7 ch, skip 1 st *, repeat from *-* the entire round = 56-56-60-60-64-64 tr. Remember CROCHET INFO! Then work in the round and according to A.3. On 3rd round in A.3 dec 8 tr evenly - READ DECREASE TIP. Repeat dec every time 3th round in diagram is worked 3 times in total = 32-32-36-36-40-40 tr. Work A.3 until piece measures 33-32-31-30-27-25 cm, finish after 2nd or 4th round in A.3. Work 40-40-40-48-48-48 tr in total around ch-spaces. Then work according to A.4 (5-5-5-6-6-6 repetitions in width, diagram shows 2 repetitions in width), work first round as follows: * Work 1 tr in each of the first 7 tr, 1 ch, skip 1 tr *, repeat from *-* 4-4-4-5-5-5 more times. NOTE: Sl sts at beg of A.4 are only worked at beg of round. Work A.4 1 time vertically. Work now 1 round with tr: 1 tr in each tr, 3 tr around each ch-space. Fasten off. Sleeve measures approx. 48-47-46-45-42-40 cm. Work another sleeve the same way.

ASSEMBLY:
Sew the shoulder seams. Sew side seams from markers in the side and down. Sew in sleeves.

TWINED STRING:
Cut 2 lengths of 3 metres each. Twine the strands tog until they resist, fold the string double so that it twines again. Make a knot at each end. Thread tie up and down around the neck. Cut 8 lengths of yarn of 20 cm. Thread the ends through the end of the tie and fold them double. Twine one of the strand around the top of tassel. Make another fringe in the other end of tie.

This pattern has been corrected.

Updated online: 17.05.2017
SLEEVE: ..... NOTE: Sl sts at beg of A.4 are only worked at beg of round. Work A.4 1 time vertically. Work now 1 round with tr: 1 tr in each tr, 3 tr around each ch-space. Fasten off. Sleeve measures approx. 48-47-46-45-42-40 cm. Work another sleeve the same way.
Updated online: 07.08.2017
Correction on last round in A.2.

Diagram

symbols = make a magic circle - see explanation in pattern


symbols = ch
symbols = sl st
symbols = dc around ch-space
symbols = dc in third ch at the top of picot
symbols = htr around ch-space
symbols = tr in st
symbols = tr around ch-space
symbols = dtr around ch-space
symbols = dtr in st
symbols = triple tr around ch-space
symbols = quadruple tr around ch-space - see explanation in pattern
symbols = picot: work 3 ch, 3 tr in first ch
symbols = this round has already been worked
symbols = work 2 tr tog
diagram
diagram
diagram
diagram
Do you have a question? See a list of frequently asked questions (FAQ)

Knitting tension is what determines the final measurements of your work, and is usually measured per 10 x 10 cm. It is provided like so: number of stitches in width x number of rows in height - eg: 19 stitches x 26 rows = 10 x 10 cm.

The knitting tension is very individual; some people knit/crochet loosely while others work tightly. You adjust the knitting tension with the needle size, which is why the suggested needle size is only meant as a guide! You need to adjust this (up or down) to ensure that YOUR knitting tension matches the knitting tension provided in the pattern. If you work with a different knitting tension than provided you will have a different yarn consumption, and your work will have different measurements than what the pattern suggests.

The knitting tension also determines which yarns can replace each other. As long as you achieve the same knitting tension you can replace one yarn with another.

See DROPS lesson: How to measure your tension/gauge

See DROPS video: How to make a gauge tension swatch

The required amount of yarn is provided in grams, eg: 450 g. To calculate how many balls you’ll need you first need to know how many grams are in 1 ball (25g, 50g or 100g). This information is available if you click on the individual yarn quality on our pages. Divide the amount required with the amount of each ball. For example, if each ball is 50g (the most common amount), the calculation will be as follows: 450 / 50 = 9 balls.

The important thing when changing from one yarn to another is that the knitting/crochet tension remains the same. This is so that the measurements of the finished piece will be the same as on the sketch provided. It is easier to achieve the same knitting tension using yarns from the same yarn group. It is also possible to work with multiple strands of a thinner yarn to achieve the knitting tension of a thicker one. Please try our yarn converter. We recommend you to always work a test swatch.

Please NOTE: when changing yarn the garment might have a different look and feel to the garment in the photo, due to individual properties and qualities of each yarn.

See DROPS lesson: Can I use a different yarn than the one mentioned in the pattern?

All our yarns are categorised into yarn groups (from A to F) according to thickness and knitting tension – group A contains the thinnest yarns and group F the thickest. This makes it easier for you to find alternative yarns to our patterns, should you wish to switch yarn. All yarns within the same group have a similar knitting tension and can easily replace each other. However, different yarn qualities have different structures and properties which will give the finished work a unique look and feel.

Click here for an overview of the yarns in each yarn group

At the top of all our patterns you’ll find a link to our yarn calculator, which is a helpful tool should you wish to use a different yarn than suggested. By filling in the yarn quality you wish to replace, the amount (in your size) and number of strands, the calculator will present good alternative yarns with the same knitting tension. Additionally it will tell you how much you’ll require in the new qualities and whether you’ll need to work with multiple strands. Most skeins are 50g (some are 25g or 100g).

If the pattern is worked with multiple colours, every colour will have to be calculated separately. Similarly, if the pattern is worked with several strands of different yarns (for example 1 strand Alpaca and 1 strand Kid-Silk) you will have to find alternatives for each, individually.

Click here to see our yarn calculator

Since different yarns have different qualities and textures we have chosen to keep the original yarn in our patterns. However, you can easily find options among our available qualities by using our yarn calculator, or simply pick a yarn from the same yarn group.

It is possible that some retailers still have discontinued yarns in stock, or that someone has a few skeins at home that they would like to find patterns for.

The yarn calculator will provide both alternative yarn as well as required amount in the new quality.

If you think it's hard to decide what size to make, it can be a good idea to measure a garment you own already and like the size of. Then you can pick the size by comparing those measures with the ones available in the pattern's size chart.

You'll find the size chart at the bottom of the pattern.

See DROPS lesson: How to read size chart

The needle size provided in the pattern serves only as a guide, the important thing is to follow the knitting tension. And since knitting tension is very individual, you will have to adjust the needle size to ensure that YOUR tension is the same as in the pattern – maybe you’ll have to adjust 1, or even 2 needle sizes, up or down to achieve the correct tension. For this, we recommend that you work test swatches.

Should you work with a different knitting tension than the one provided, the measurements of the finished garment might deviate from the measurement sketch.

See DROPS lesson: How to measure your tension/gauge

See DROPS video: How to make a tension/gauge swatch

Working a garment top-down provides more flexibility and room for personal adjustment. For example it is easier to try the garment on while working, as well as making adjustments to length of yoke and shoulder caps.

The instructions are carefully explaining every step, in the correct order. Diagrams are adjusted to the knitting direction and are worked as usual.

The diagram depicts all rows/rounds, and every stitch seen from the right side. It is read from bottom to top, from right to left. 1 square = 1 stitch.

When working back and forth, every other row is worked from the right side and every other row is worked from the wrong side. When working from the wrong side, the diagram will have to be worked reversed: from left to right, knit stitches are purled, purl stitches are knit etc.

When working in the round every round is worked from the right side and the diagram are worked from right to left on all rounds.

See DROPS lesson: How to read knitting diagrams

The diagram depicts all rows/rounds, and every stitch seen from the right side. It is worked from bottom to top, from right to left.

When working back and forth every other row is worked from the right side: from right to left and every other row is worked from the wrong side: from left to right.

When working in the round, every row in the diagram are worked from the right side, from right to left.

When working a circular diagram you start in the middle and work your way outwards, counter clockwise, row by row.

The rows usually start with a given number of chain stitches (equivalent to the height of the following stitch), this will either be depicted in the diagram or explained in the pattern.

See DROPS lesson: How to read crochet diagrams

Instructions for working several diagrams after each other on the same row/round, will often be written like so: “work A.1, A.2, A.3 a total of 0-0-2-3-4 times". This means you work A.1 once, then A.2 is worked once, and A.3 is repeated (in width) the number of times provided for your size – in this case like so: S = 0 times, M = 0 times, L=2 times, XL= 3 times and XXL = 4 times.

The diagrams are worked as usual: begin with the first row in A.1, then work the first row in A.2 etc.

See DROPS lesson: How to read knitting diagrams

See DROPS lesson: How to read crochet diagrams

The total width of the garment (from wrist-to-wrist) will be larger in the larger sizes, despite the actual sleeves being shorter. The larger sizes have longer sleeve caps and wider shoulders, so there will be a good fit in all sizes.

The measurement sketch/schematic drawing provides information regarding the full length of the garment. If it’s a jumper or a jacket the length is measured from the highest point on the shoulder closest to the neckline, and straight down to the bottom of the garment. It is NOT measured from the tip of shoulder. Similarly, the length of yoke is measured from the highest point on the shoulder and down to where yoke is split into body and sleeves.

On a jacket measures are never taken along bands, unless specifically stated. Always measure inside band stitches when measuring the length.

See DROPS lesson: How to read a schematic drawing

Diagrams are often repeated on the round or in height. 1 repeat is the diagram the way it appears in the pattern. If it says to work 5 repeats of A.1 in the round, then you work A.1 a total of 5 times after/next to each other in the round. If it says to work 2 repeats of A.1 vertically/in height you work the entire diagram once, then begin again at the start and work the entire diagram one more time.

Chain stitches are slightly narrower than other stitches and to avoid working the cast-on edge too tight, we simply chain more stitches to begin with. The stitch count will be adjusted on the following row to fit the pattern and measurement sketch.

The rib edge is more elastic and will contract slightly compared to, for example, stocking stitch. By increasing before the rib edge, you avoid a visible difference in width between the rib edge and the rest of the body.

It’s very easy to cast off too tightly, and by making yarn overs while casting off (and simultaneously casting these off) you avoid a too tight cast off edge.

See DROPS video: How to bind off with yarn overs (yo)

To achieve an even increase (or decrease) you can increase on, for example: every 3rd and 4th row alternately, like so: work 2 rows and increase on the 3rd row, work 3 rows and increase on the 4th. Repeat this until the increase is complete.

See DROPS lesson: Increase or decrease 1 st on every 3rd and 4th row alternately

Should you prefer to work in the round instead of back and forth, you may of course adjust the pattern. You’ll need to add steeks mid-front (usually 5 stitches), and follow the instructions. When you would normally turn and work from the wrong side, simply work across the steek and continue in the round. At the end you’ll cut the piece open, pick up stitches to work bands, and cover the cut edges.

See DROPS video: How to knit steeks and cut open

Should you prefer to work back and forth instead of in the round, you may of course adjust the pattern so you work the pieces separately and then assemble them at the end. Divide the stitches for the body in 2, add 1 edge stitch in each side (for sewing) and work the front and back pieces separately.

See DROPS lesson: Can I adapt a pattern for circular needles into straight needles?

Pattern repeats can vary slightly in the different sizes, in order to get the correct proportions. If you’re not working the exact same size as the garment in the photo, yours might deviate slightly. This has been carefully developed and adjusted so that the complete impression of the garment is the same in all sizes.

Make sure to follow instructions and diagrams for your size!

If you have found a pattern you like which is available in women’s size it’s not very difficult to convert it to men’s size. The biggest difference will be the length of sleeves and body. Start working on the women size that you think would fit across the chest. The additional length will be worked right before you cast off for the armhole/sleeve cap. If the pattern is worked top-down you can add the length right after the armhole or before the first decrease on sleeve.

Regarding additional yarn amount, this will depend on how much length you add, but it is better with a skein too many than too few.

All yarns will have excess fibres (from production) that might come off as lint or shedding. Brushed yarns (ie hairier yarns) have more of these loose, excess fibres, causing more shedding.

Shedding also depends on what is worn under or over the garment, and whether this pulls at the yarn fibres. It’s therefore not possible to guarantee that there will be no shedding

Below are some tips on how to get the best result when working with hairier yarns:

1. When the garment is finished (before you wash it) shake it vigorously so the looser hairs come off. NOTE: do NOT use a lint roller, brush or any method that pulls at the yarn.

2. Place the garment in a plastic bag and put it in your freezer - the temperature will cause the fibres to become less attached to each other, and excess fibres will come off easier.

3. Leave in the freezer for a few hours before taking it out and shaking it again.

4. Wash the garment according to the instructions on the yarn label.

Pilling is a natural process that happens to even the most exclusive of fibers. It's a natural sign of wear and tear that is hard to avoid, and that is most visible in high friction areas of your garment like a sweater's arms and cuffs.

You can make your garment look as new by removing the pilling, using a fabric comb or a pill/lint remover.

Still can't find the answer you need? Then scroll down and leave your question so one of our experts can try to help you. This will be done normally within 5 to 10 working days.
In the meantime, you can read the questions and answers that others have left to this pattern or join the DROPS Workshop on Facebook to get help from fellow knitters/crocheters!

You might also like...

Post a comment to pattern DROPS 170-2

We would love to hear what you have to say about this pattern!

If you want to leave a question, please make sure you select the correct category in the form below, to speed up the answering process. Required fields are marked *.

Comments / Questions (165)

country flag Hend wrote:

Greetings , I am working on the last row of A2 and it seems a bit inconsistent in that at first trc are made in the 4th st, but at the corner one of them is made at the 3rd st . Is this the way it is supposed to be? Second question : the row should start with 3 ch st right ? Thanks in advance.

20.04.2020 - 21:27

DROPS Design answered:

Dear Mrs Hend, you are skipping 3 sts each time you will crochet 3 chain stitches, except at the corner, this should fit nicely to a square. This video shows how to crochet A.3, so the diagram after last row on A.2, this might help you to see how the stitches in last row of A.2 look at. Happy crocheting!

21.04.2020 - 09:36

country flag Charlene Kuklis wrote:

I am working on the neck of the back and front and although I watched your video I don’t understand if I just work the shoulders back and forth or do I go all the way around the sides and up to the opposite side of the neck therefore increasing the width of the sides as well.

30.03.2020 - 03:49

DROPS Design answered:

Dear Mrs Kuklis, to shape neck, you skip the middle repeats for neck on first side of the square, work A.3 as before over end of first side + next 3 sides of square and finish row with beg of 1st side before the middle repeats for neck (= so that you have now some repeats on each side of first side, with 6 to 11 repeats skipped for neck in the middle of this side). Happy crocheting!

30.03.2020 - 11:27

country flag GHISLAINE wrote:

Bonjour, j'ai un mal fou à comprendre le début de la manche... On monte 64 ml et ensuite on fait 8 groupes de 7 brides soit 56 brides (jusque là tout va bien). Après il faut suivre le schéma A3. Or, celui-ci commence par "1 B - 3ml" ou "1 B - 1 picot". A quel niveau doit-on commencer le schéma ? Doit-il etre pris à l'envers vu que l'on crochète de haut vert le bas ? J'ai besoin d'aide .... Cordialement

18.03.2020 - 19:35

DROPS Design answered:

Bonjour Ghislaine, au 1er rang de A.3 vous allez sauter 3 brides du rang précédent (au lieu des 3 mailles en l'air du schéma), autrement dit vous crochetez: 1 bride, *1 picot, sautez 3 brides, 1 bride dans la bride suivante*, répétez de *-* tout le tour et terminez par 1 mc dans les 3 ml du début du tour au lieu d'1 b dans la bride suivante. Les diagrammes se crochètent de bas en haut, sauf indication contraire explicite. Bon crochet!

19.03.2020 - 09:45

country flag Sandra wrote:

Hallo. Wie kann ich die Teile denn am besten zusammennähen bzw. zusammenhäkeln? Hab mir gerade das Tutorial Häkelquadrate zusammennähen angeschaut. Ist das der beste Weg? Vielen Dank.

16.08.2019 - 17:08

DROPS Design answered:

Liebe Sandra, Sie können wie in diesem Videdozusammennähen, oder auch die Teilen mit Ketmaschen zusammenhäkeln, wie Sie am besten möchten. Viel Spaß beim häkeln!

19.08.2019 - 08:43

country flag Sandra wrote:

Hallo. Ich habe eine Frage zum Ärmel. Bei A3 werden in der dritten Runde insgesamt dreimal 8 Stb gleichmäßig abgenommen. D.h. die anschließenden Runden werden genauso weiter gehäkelt? Bis auf dass das Stb in Runde vier zum Beispiel in das zweite Stb anstatt das dritte Stb um den Lm Bogen eingestochen wird. Ist das korrekt?

14.08.2019 - 15:20

Sandra answered:

Die Frage hat sich erledigt. Danke

14.08.2019 - 15:59

country flag Elisabeth Adam wrote:

Beim rückenausschnitt wird nach der ersten Runde umgedreht? Und die zweite Reihe von A 3 gehäkelt ? Oder ? Es soll ja 1x A 3 gehäkelt werden . Oder die 2. Reihe neu ansetzen

03.08.2019 - 10:41

DROPS Design answered:

Liebe Frau Adam, Sie setzen für den Halsausschnitt des Rückenteils den Faden wie beschrieben neu an und häkeln nur noch 1 Reihe von A.3, das machen Sie von der Vorderseite. Beim Rückenteil muss also nicht gewendet werden, da nur 1 Reihe gehäkelt wird. Die mittleren Stäbchen der oberen Seite bleiben für den Halsausschnitt unbehäkelt. Beim Vorderteil wird dann jeweils gewendet, weil für den tieferen Halsausschnitt mehr Reihen von A.3 gehäkelt werden. Viel Spaß beim Weiterhäkeln!

04.08.2019 - 09:03

country flag Elisabeth Adam wrote:

Beim rückenausschnitt wird nach der ersten Runde umgedreht? Und die zweite Reihe von A 3 gehäkelt ? Oder ? Es soll ja 1x A 3 gehäkelt werden . Oder die 2. Reihe neu ansetzen

03.08.2019 - 10:41

DROPS Design answered:

Antwort siehe oben! :-)

04.08.2019 - 09:03

country flag Gerrie Donkers wrote:

Ik ben klaar met a3 tot aan dat ik nu op en neer moet gaan haken en minderen in het midden van het vierkant. Ik snap niet hoeveel ik moet minderen en hoeveel toeren ik dit moet doen.

26.07.2019 - 11:24

DROPS Design answered:

Dag Gerrie,

Je haat gewoon verder in A.3, maar je haakt niet over de middelste 6-6-8-8-10-10 patroonherhalingen. Dus je knipt de draad af, slaat het betreffende aantal herhalingen over en dan ga je verder met A.3 over de rest. Dit geldt voor het achterpand.

Bij het voorpand begin je eerder qua hoogte (zoals aangegeven) en sla je eerst minder patroon herhalingen en haak je over steeds minder patroonherhalingen door eerder het werk te keren, dan wel de draad af te knippen.

11.08.2019 - 16:42

country flag Sandra wrote:

Hallo. Ich habe ein Frage zum Muster A3. Ich hab mir zwar gerade das Video angesehen bin mir aber nicht ganz sicher. Die zweite Runde beginnt mit 2 Luftmaschen aber zwischen den festen Maschen werden dann immer 4 Luftmaschen gehäkelt oder? Nicht 2 und 4 im Wechsel. Und ich nehme an das gleiche gilt für die dritte Runde. Nur zu Beginn 2 Stäbchen und dann immer 4 Stück um die lm Kette. Vielen Dank

17.07.2019 - 11:19

DROPS Design answered:

Liebe Sandra, ja genau es sind 4 Lm zwischen den festen maschen, dh: 2 Luftmaschen am Anfang von A.x + 2 Luftmaschen am Ende von A.x sind 4 Luftmaschen für jeden Luftmaschenbogen (mit 1 feste Masche dazwischen). Viel Spaß beim häkeln!

17.07.2019 - 11:26

country flag Myriam wrote:

Als ik voor de mouw 8 stokjes minder in rij 3 en daarna weer doorga met rij 4 blijft het patroon toch even breed? Hoe minder ik de stokjes zodat de mouw daadwerkelijk smaller wordt?

30.04.2019 - 20:26

DROPS Design answered:

Dag Myriam,

Je mindert steeds 8 stokjes in de mouw en dat betekent dat je dientengevolge in de toer daarna 2 patroonherhalingen van A.x minder breit over de hele toer.

05.05.2019 - 17:59