
Popular categories
Looking for a yarn?


Comments / Questions (64)
![]() Cathy wrote:
Cathy wrote:
Bonjour, Merci d'indiquer vos prix sur vos articles car je ne sais combien coûte la robe MALLORCA en blanc et si il y a d'autres couleurs que le blanc et le gris merci
30.06.2025 - 16:08DROPS Design answered:
Bonjour Cathy, les explications de nos modèles sont gratuites, pour le prix du coton nécessaire pour la réaliser, tout va dépendre de la taille choisie, cf Fournitures sous l'onglet Explications; pour les couleurs disponibles, référez-vous au nuancier DROPS Muskat ou bien utilisez le convertisseur pour voir les autres alternatives si une autre couleur vous plaît davantage dans une autre qualité. Bon tricot!
01.07.2025 - 07:52
![]() Katty Ribbens wrote:
Katty Ribbens wrote:
Hoe kan je bij a5 a c b a5b herhalen?? Zit je midden in een steek??
10.04.2025 - 07:50DROPS Design answered:
Dag Katty,
Helaas begrijp ik je vraag niet helemaal. Je breit eerst A.5A, dan herhaal je A.5B in de breedte op de naald en je eindigt met A.5C
13.04.2025 - 09:33
![]() Heidi Krogh Lauritzen wrote:
Heidi Krogh Lauritzen wrote:
Jeg forstår ikke afsnittet A. 5A til A. 5C pind 3,5 og 7 skal man også starte A5A og A5C i disse pinde ? Er lidt forvirret 🤷♀️
31.03.2025 - 16:45DROPS Design answered:
Hei Heidi. Under RYG & FORSTK der du har skiftet til pinne 3,5 og skal strikke A.5A , A.5B og A.5C, skal du strikke A.5A over 7 masker, så skal du strikke/gjenta A.5B til det gjenstår 6 masker på pinnen. Så strikker du A.5C. Fremdeles usikker? Husk å oppgi hvilken str. du strikker, så kan vi gi et mer nøyaktig svar /maskeantall. mvh DROPS Design
07.04.2025 - 08:30
![]() Gun wrote:
Gun wrote:
Förlåt en kanske dum fråga men jag kan inte se när (var i möntret) jag stickar axelbanden? Jag har försökt rita upp efter beskrivningen men får det inte att stämma.
20.01.2025 - 21:24DROPS Design answered:
Hej Gun, hvis du følger mønsteret, så får du automatisk axelbanden når du starter udtagningerne, de strikkes som et raglanmønster. Men bare følg opskriften. Se skissen nederst i opskriften
23.01.2025 - 14:53
![]() Ingrid Bach wrote:
Ingrid Bach wrote:
Ich stricke gerade das Kleid Mallorca. Bei dem Muster A.6 sind 2 mal die Muster nach links verschoben in der 11 und 17 Reihe.Können sie mir bitte erklären, wie diese Reihen gestrickt werden? Vielen Dank für die Hilfe. MfG Ingrid Bach
21.02.2024 - 23:53DROPS Design answered:
Liebe Frau Bach, am Anfang dieser beiden Runden haben Sei die 2 ersten Maschen ab, ohne sie zu stricken; dann stricken Sie das Diagram wie gezeichnet: die letzte Masche stricken Sie zusammen mit den 2 ersten Maschen vom nächsten Rapport und am Ende der Runde mit den 2 ersten Maschen der Runden. Viel Spaß beim stricken!
22.02.2024 - 09:17
![]() Nathalie Lampe wrote:
Nathalie Lampe wrote:
Bonjour, J'aimerais réaliser le modèle Mallorca mais je n'ai jamais tricoter en rond, pourriez vous m'aider pour réaliser ce magnifique modèle avec de simples aiguilles, Merci d'avance.
17.07.2023 - 10:09DROPS Design answered:
Bonjour Nathalie, regardez la lecon DROPS ICI. Bon tricot!
17.07.2023 - 11:40
![]() Katrin wrote:
Katrin wrote:
Hallo, ich finde nicht wieviel gramm bzw, was für eine Lauflänge benötigt wird. Gibt es dazu irgndwo Angaben? Vielen Dank für die Hilfe.
22.04.2023 - 20:58DROPS Design answered:
Liebe Katrin, Garnmengen finden Sie für jede Größe in dem oberen Teil der Seite (Kopfzeilen), so brauchen Sie in S 650 g DROPS Muskat/50 g das Knäuel = 13 Knäuel in S. Viel Spaß beim stricken!
24.04.2023 - 09:59
![]() Cinzia wrote:
Cinzia wrote:
Buongiorno,vorrei un chiarimento per quanto riguarda la riga 11 del diagramma A6:come devo iniziare il giro, in quanto è rientrata di due maglie, ma se comincio secondo il diagramma con una maglia dritta lo schema non viene corretto. Grazie per il vostro aiuto Cinzia
03.01.2023 - 23:15DROPS Design answered:
Buonasera Cinzia, deve iniziare il giro 3 maglie dopo. Buon lavoro!
05.01.2023 - 23:11
![]() Ingeborg wrote:
Ingeborg wrote:
Hei! Jeg ønsker å hekle denne som en maxikjole. Jeg er normalt en litt stor 36 og er 170 cm høy. Hvilken størrelse anbefaler dere og hvilken lengde anbefaler dere for å få kjolen ankellang? På forhånd tusen takk for hjelpen!
18.08.2022 - 09:47DROPS Design answered:
Hei Ingeborg. Om du har en kjole fra før som du liker godt og som er ankellang, anbefaler jeg deg å måle den og sammenligne den med målskissen til denne kjolen. Da vil du finne den str. som vil passe deg. Det er litt tyngde i garnet DROPS Muskat og mulig den vil sige bittelitt, men siden kjolen er strikket ovenfra og ned kan prøve den underveis og avslutte når du syns lengden er der du vil ha den, minus et par cm. mvh DROPS Design
22.08.2022 - 10:41
![]() Cornelia Carlowitz wrote:
Cornelia Carlowitz wrote:
Hi, der Mustersatz A6, ist an 2 Stellen verschoben - es fehlen am Anfang der Zeile, 2 Zeichen und am Ende der Zeile, sind 2 Zeichen zu viel. Wie wird es in den beiden Zeilen gestrickt?
10.07.2022 - 00:16DROPS Design answered:
Liebe Frau Carlowitz, am Anfang dieser Runde heben Sie die 2 ersten Maschen ab - am Ende vom jeden Rapport stricken Sie die letzte Masche mit der 2 ersten maschen vom nächsten Rapport zusammen. Der Umschlag wird dann die 1. Masche der nächsten Runde vom nächsten Rapport sein. Viel Spaß beim stricken!
11.07.2022 - 08:31
|
||||||||||||||||||||||
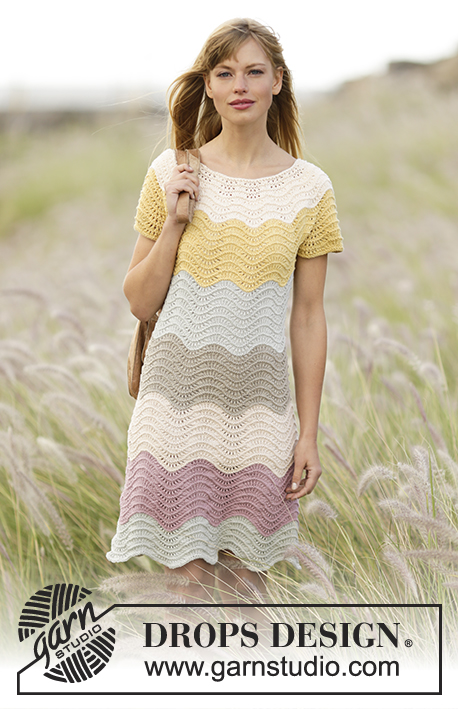
Mallorca#mallorcadress |
||||||||||||||||||||||
|
|
||||||||||||||||||||||
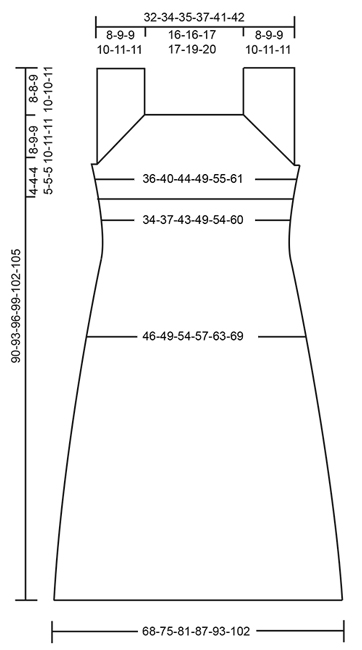
Knitted DROPS dress with lace pattern worked top down in ”Muskat”. Size: S - XXXL.
DROPS 169-25 |
||||||||||||||||||||||
|
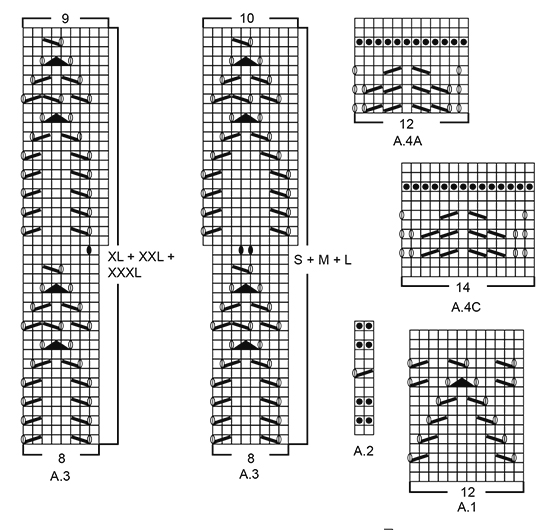
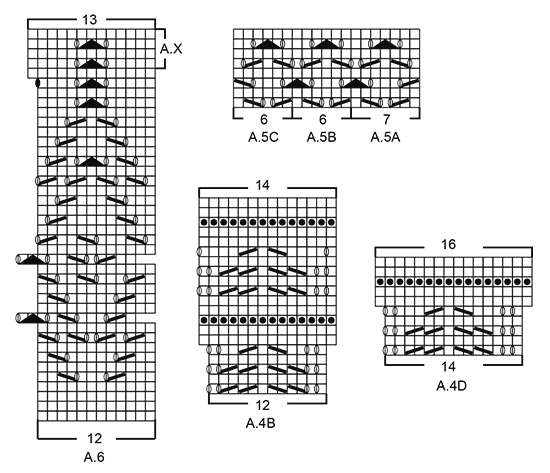
GARTER ST (back and forth): K all rows. 1 ridge = 2 rows K. GARTER ST (worked in the round): 1 ridge = 2 rounds. * K 1 round and P 1 round *, repeat from *-*. INCREASE TIP-1: Inc by making 1 YO on each side of st with marker in (= 2 sts inc). On next round K the YOs to make holes. DECREASE/INCREASE TIP (applies to distribution of dec/inc): To calculate how often dec/inc should be done, use the total no of sts on row (e.g. 154 sts) and divide by no of dec/inc to be done (e.g. 10) = 15.4. I.e. in this example K alternately approx. every 14th and 15th st and 15th and 16th st tog (when dec) or inc after alternately approx. every 15th and 16th st. NOTE: Inc 1 st by making 1 YO. On next round P YO twisted to avoid holes. PATTERN: See diagrams A.1 to A.6. Choose diagram for correct size. ---------------------------------------------------------- DRESS: The piece is worked top down. First work yoke at the front and back, back and forth in 2 parts, then slip sts tog and work piece in the round until finished measurements. YOKE AT THE BACK: Worked back and forth on circular needle. Cast on 71-71-77-81-85-91 sts on circular needle size 3.5 mm with Muskat. Switch to circular needle size 3 mm and insert 1 marker in the 18th-18th-20th-22nd-22nd-24th st in from each side (= 35-35-37-37-41-43 sts between markers). K 1 row from WS. Then work in GARTER ST - see explanation above, AT THE SAME TIME on first row from RS inc on each side of the 2 sts with markers - READ INCREASE TIP-1 (= 4 sts inc). Repeat inc every other row (i.e. every row from RS) 18-20-20-22-25-25 times in total = 143-151-157-169-185-191 sts on needle. REMEMBER THE KNITTING TENSION K 1 row from WS after last inc. Piece measures approx. 8-9-9-10-11-11 cm. Work next row as follows from RS: Cast off the first 35-37-39-43-46-48 sts (= strap), K the next 73-77-79-83-93-95 sts (the first of these sts is already on right needle), then cast off the last 35-37-39-43-46-48 sts (= strap), cut the yarn. Work next row as follows from WS: Cast on 3-5-9-12-14-20 new sts at beg of row, work the 73-77-79-83-93-95 sts from needle and cast on 3-5-9-12-14-20 new sts at the end of row = 79-87-97-107-121-135 sts. Work in garter st back and forth for 4-4-4-5-5-5 cm – AT THE SAME TIME after 3-3-3-4-4-4 cm, dec 1 st in each side by K tog the 2 second outermost sts in each side from RS = 77-85-95-105-119-133 sts. When ridges are done, adjust so that last row is a row with K from WS, put piece aside. YOKE AT THE FRONT: Cast on and work as yoke at the back. BODY: Slip sts from yoke front and back on to same circular needle size 3.5 mm = 154-170-190-210-238-266 sts. Work pattern in the round according to diagram A.1 and dec AT THE SAME TIME 10-14-10-6-10-14 sts evenly on 1st round – READ DECREASE/INCREASE TIP = 144-156-180-204-228-252 sts and 12-13-15-17-19-21 repetitions of 12 sts. When A.1 has been worked, work pattern in the round according to diagram A.2 while AT THE SAME TIME dec 0-4-4-4-4-4 sts evenly on 1st round = 144-152-176-200-224-248 sts. After A.2 work pattern in the round according to diagram A.3 (NOTE: Choose diagram for correct size = 18-19-22-25-28-31 repetitions of 8 sts). When A.3 has been worked 1 time vertically, there are 180-190-220-225-252-279 sts on needle. Switch to circular needle size 3 mm and work 2 ridges while inc 12-14-8-15-12-9 sts evenly on 1st round = 192-204-228-240-264-288 sts. Switch back to circular needle size 3.5 mm. Then work pattern in the round according to diagram A.4A (= 16-17-19-20-22-24 repetitions of 12 sts). When A.4A has been worked 1-2-2-2-2-2 times vertically, work A.4B. After A.4B there are 224-238-266-280-308-336 sts on needle. Now work pattern in the round according to diagram A.4C 1-3-3-3-4-4 times in total vertically, then work A.4D 1 time vertically = 256-272-304-320-352-384 sts on needle. Switch to circular needle size 3 mm and work 2 ridges while inc 3-5-3-5-3-1 sts evenly on 1st round = 259-277-307-325-355-385 sts. Switch back to circular needle size 3.5 mm and work 2 rounds in stocking st. Work next round as follows: Work A.5A (= 7 sts), repeat A.5B until 6 sts remain on round (= 41-44-49-52-57-62 repetitions of 6 sts) and finish with A.5C (= 6 sts). When A.5 has been worked 2 times vertically, switch to circular needle size 3 mm again. Work 2 ridges while AT THE SAME TIME inc 5-11-5-11-5-11 sts evenly on 1st round = 264-288-312-336-360-396 sts. After ridges change to circular needle size 3,5 and work pattern in the round according to diagram A.6 (= 22-24-26-28-30-33 repetitions of 12 sts). When A.6 has been worked one time vertically, there are 286-312-338-364-390-429 sts on needle. Then repeat A.X over A.6 until piece measures approx. 86-89-92-95-98-101 cm (or desired length, approx. 4 cm remain until finished measurements). Work 2 rounds in stocking st and finish with pattern according to diagram A.2 before LOOSELY casting off all sts. Dress measures approx. 90-93-96-99-102-105 cm from shoulder and down (measured flat). ASSEMBLY: Sew the shoulder seams. Sew side seams on yoke edge to edge in outer loops of edge sts so that the seam is flat. |
||||||||||||||||||||||
Diagram explanations |
||||||||||||||||||||||
|
||||||||||||||||||||||
|
||||||||||||||||||||||
|
||||||||||||||||||||||
|
||||||||||||||||||||||
Have you finished this pattern?Tag your pictures with #dropspattern #mallorcadress or submit them to the #dropsfan gallery. Do you need help with this pattern?You'll find 24 tutorial videos, a Comments/Questions area and more by visiting the pattern on garnstudio.com. © 1982-2025 DROPS Design A/S. We reserve all rights. This document, including all its sub-sections, has copyrights. Read more about what you can do with our patterns at the bottom of each pattern on our site. |
||||||||||||||||||||||


With over 40 years in knitting and crochet design, DROPS Design offers one of the most extensive collections of free patterns on the internet - translated to 17 languages. As of today we count 314 catalogues and 11822 patterns translated into English (UK/cm).
We work hard to bring you the best knitting and crochet have to offer, inspiration and advice as well as great quality yarns at incredible prices! Would you like to use our patterns for other than personal use? You can read what you are allowed to do in the Copyright text at the bottom of all our patterns. Happy crafting!
Post a comment to pattern DROPS 169-25
We would love to hear what you have to say about this pattern!
If you want to leave a question, please make sure you select the correct category in the form below, to speed up the answering process. Required fields are marked *.