
Popular categories
Looking for a yarn?


Comments / Questions (3)
![]() Britt Jantzen wrote:
Britt Jantzen wrote:
Hej. Har i en video der viser hvordan i laver vingerne? Jeg har lavet mange bamser osv., så jeg er ikke nybegynder, men jeg kan simpelthen ikke se hvorfor mine vinger ikke kommer til at ligne jeres og nu har prøvet jeg i 2 uger og er ved at give op. Håber i kan hjælpe.
30.09.2023 - 19:09DROPS Design answered:
Hei Britt. Vi har ingen video på vingene på denne oppskriften. Hva er det nøyaktig du har problemer med, så skal vi prøve å hjelpe så godt vi kan. mvh DROPS Design
09.10.2023 - 14:18
![]() Elena wrote:
Elena wrote:
Ich habe die Fledermaus mit derselben Maschenanzahl und vergrößerter Länge in Eskimo für meinen Sohn gehäkelt. Ergibt eine gut 30 cm große Kuschelfledermaus, die hier heiß geliebt wird. Vielen Dank für die tolle Anleitung.
29.05.2015 - 11:22
![]() Birgit Christensen wrote:
Birgit Christensen wrote:
Hej jeg kan ikke få omg. 4 til at passe
22.10.2014 - 14:55DROPS Design answered:
Hej Birgit, det skal vi få set på med det samme :)
22.10.2014 - 15:54
|
|
Mr. Fang#dropsmrfang |
|
 |
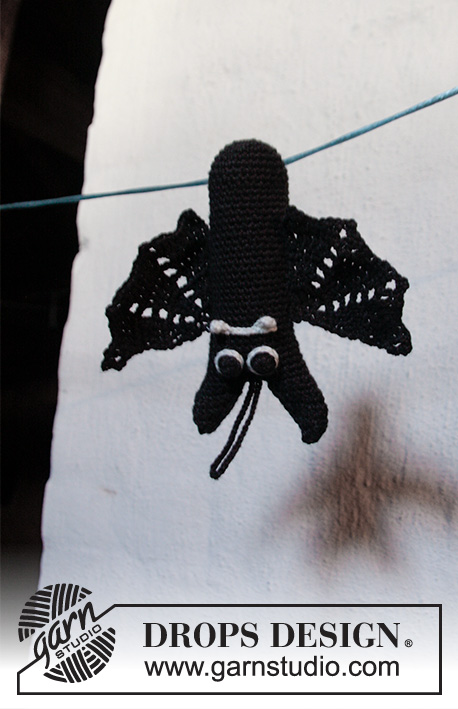 |
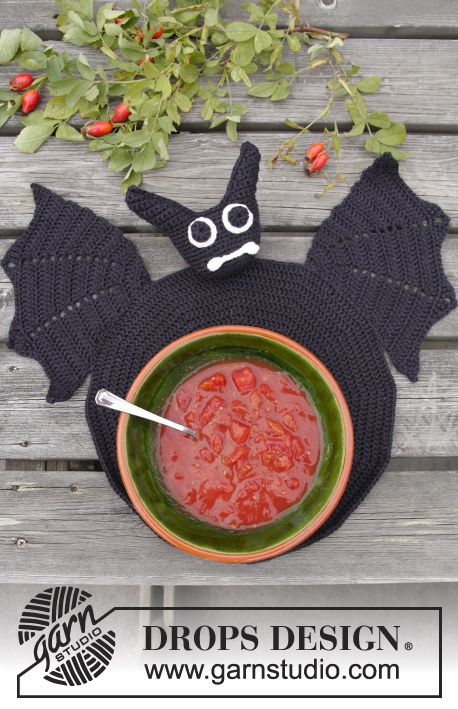
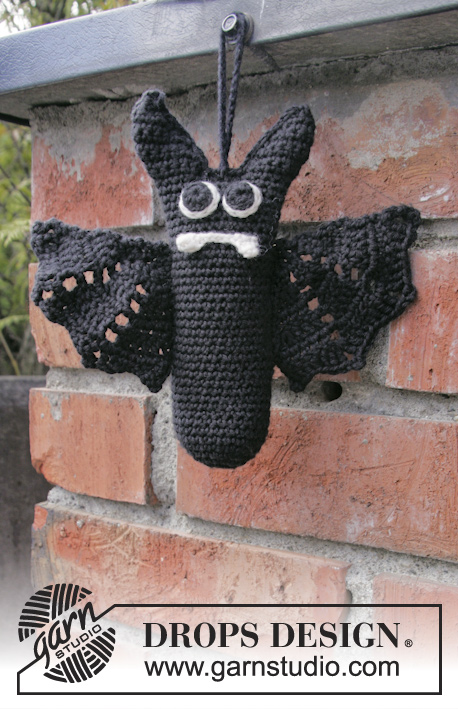
DROPS Halloween: Crochet DROPS bat in "Cotton Merino".
DROPS Extra 0-1044 |
|
|
SAFETY INFO: If the bat will be used as a toy for small children, do not use the paper clips. CROCHET INFO 1: Replace first sc at beg of every sc round with 1 ch. Finish every round with 1 sl st in ch from beg of round. Beg every round with hdc with 2 ch (do not count as 1 hdc). Finish round with 1 sl st in 2nd ch at beg of round. CROCHET INFO 2: Replace first sc at beg of every sc row with 1 ch. Beg every row with dc with 3 ch (do not count as 1st dc). CROCHET SC TOG: Crochet 2 sc tog into 1 sc as follows: Insert hook in first st and pull yarn through, insert hook in next st and pull yarn through, make a YO and pull yarn through all 3 sts on hook. COLOR CHANGE: To get a nice transition between the color changes, work last sl st on round with the new color as follows: Insert hook in last ch from beg of round, get the new yarn, make a YO with the new color and pull it through st on hook. ---------------------------------------------------------- BAT: Crochet in the round from bottom up. Fasten off the strands when working. BODY: Work 3 ch on hook size 2.5 mm/C with black and form a ring with 1 sl st in first ch. ROUND 1: READ CROCHET INFO! Work 8 sc in ch-ring. ROUND 2: Work 2 sc in every sc the entire round = 16 sc. ROUND 3: Work 1 sc in every sc the entire round. ROUND 4: Work alternately 2 and 1 sc in each sc the entire round = 24 sc ROUND 5: Work * 2 sc in next sc, 1 sc in each of the next 5 sc *, repeat from *-* 3 more times = 28 sc.. ROUND 6: Work 1 sc in every sc. Continue to work 1 sc in every sc until piece measures approx. 13 cm / 5''. LEFT EAR: Worked back and forth with black. ROW 1: READ CROCHET INFO 2. Work 1 sc in each of the first 5 sc, 2 sc in next sc, 1 sc in each of the next 5 sc = 12 sc. Turn. ROW 2: Work 1 sc in each of the first 6 sc, 2 sc in next sc, 1 sc in each of the next 5 sc = 13 sc. Turn. ROW 3: Work 2 sc tog - read CROCHET SC TOG - 1 sc in each of the next 4 sc, 2 sc in next sc, 1 sc in each of the next 4 sc, work the next 2 sc tog = 12 sc. Turn. ROW 4: 2 sc tog, 1 sc in each of the next 4 sc, 2 sc in next sc, 1 sc in each of the next 3 sc, work the next 2 sc tog = 11 sc. Turn. ROW 5: 2 sc tog, 1 sc in each of the next 3 sc, 2 sc in next sc, 1 sc in each of the next 3 sc, work the next 2 sc tog = 10 sc. Turn. ROW 6: 2 sc tog, 1 sc in each of the next 2 sc, 2 sc in next sc, 1 sc in each of the next 3 sc, work the next 2 sc tog = 9 sc. Turn. ROW 7: 2 sc tog, 1 sc in each of the next 5 sc, work the next 2 sc tog = 7 sc. Turn. ROW 8: 2 sc tog, 1 sc in each of the next 3 sc, work the next 2 sc tog = 5 sc. Turn. ROW 9: 2 sc tog, 1 sc in next sc, 2 sc tog = 3 sc. Fasten off. RIGHT EAR: Beg by working on last round of body after first row on left ear but skip 3 sc before beg on right ear. Work as left ear. RIGHT WING: Worked back and forth with black. Work ch 6, 1 dc in 4th ch from hook, 1 dc in each of the next 2 ch = 3 dc. Turn. ROW 1: REMEMBER CROCHET INFO 2! 2 dc in first dc, * ch 2, 2 dc in next dc *, repeat from *-* 1 more time = 6 dc and 4 ch. Turn. ROW 2: 1 dc in first dc, 2 dc in next dc, * ch 2, 1 dc in next dc, 2 dc in next dc *, repeat from *-* 1 more time = 9 dc and 4 ch. Turn. ROW 3: 2 dc in first dc, 1 dc in each of the next 2 dc, * ch 2, 2 dc in next dc, 1 dc in each of the next 2 dc *, repeat from *-* 1 more time = 12 dc and 4 ch. Turn. ROW 4: 1 dc in each of the first 3 dc, 2 dc in next dc, * ch 2, 1 dc in each of the next 3 dc, 2 dc in next dc *, repeat from *-* 1 more time = 15 dc and 4 ch. Turn. ROW 5: 2 dc in first dc, 1 dc in each of the next 4 dc, * ch 2, 2 dc in next dc, 1 dc in each of the next 4 dc *, repeat from *-* 1 more time = 18 dc and 4 ch. Turn. Now work an edge row as follows: Work ch 7, 1 sc in 3rd ch from hook, 1 tr in first dc, 1 dc in next dc, 1 hdc in each of the next 2 dc, 1 dc in next dc, 1 tr in next dc, * in next ch work as follows: 1 tr, ch 3, 1 sc in 3rd ch from hook and 1 tr, work 1 tr in next dc, 1 dc in next dc, 1 hdc in each of the next 2 dc, 1 dc in next dc, 1 tr in next dc *, repeat from *-* 1 more time, finish with ch 3, 1 sc in 3rd ch from hook, 1 tr in same dc as last tr was worked in. LEFT WING: Work to and with first row as right wing. ROW 2: Work 2 dc in first dc, 1 dc in next dc, * ch 2, 2 dc in next dc, 1 dc in next dc *, repeat from *-* 1 more time = 9 dc and 4 ch. Turn. ROW 3: 1 dc in each of the first 2 dc, 2 dc in next dc, * ch 2, 1 dc in each of the next 2 dc, 2 dc in next dc *, repeat from *-* 1 more time = 12 dc and 4 ch. Turn. ROW 4: 2 dc in first dc, 1 dc in each of the next 3 dc, * ch 2, 2 dc in next dc, 1 dc in each of the next 3 dc *, repeat from *-* 1 more time = 15 dc and 4 ch. Turn. ROW 5: 1 dc in each of the first 4 dc, 2 dc in next dc, * ch 2, 1 dc in each of the next 4 dc, 2 dc in next dc *, repeat from *-* 1 more time = 18 dc and 4 ch. Turn. Now work an edge row the same way as on right wing. EYES: Work 3 ch on hook size 2.5 mm/C with black and form a ring with 1 sl st in first ch. ROUND 1: REMEMBER CROCHET INFO! Work 8 hdc in ch-ring, switch to white - READ COLOR CHANGE. ROUND 2: Work 1 sl st, 1 sl st in back loop of every sc the entire round. ROUND 3: Work 2 sc in every sl st = 16 sc. Work another eye the same way. MOUTH: Work 6 ch on hook size 2.5 mm/C with white. * Work 1 sc in 4th ch from hook, 1 hdc in next ch, 1 dc in next ch *, 11 ch, repeat from *-* 1 more time. ASSEMBLY: Sew on eyes and mouth. Fill the head and ears with some poly stuffing, then crochet the top of head tog as follows: Work 1 sc in every row/sc through both layers, fasten off. Fasten wings on each side of body. Unfold the 2 paper clips and thread one through the top of each wing to stiffen. Read SAFETY INFO! |
|
Have you finished this pattern?Tag your pictures with #dropspattern #dropsmrfang or submit them to the #dropsfan gallery. Do you need help with this pattern?You'll find 15 tutorial videos, a Comments/Questions area and more by visiting the pattern on garnstudio.com. © 1982-2025 DROPS Design A/S. We reserve all rights. This document, including all its sub-sections, has copyrights. Read more about what you can do with our patterns at the bottom of each pattern on our site. |
|


With over 40 years in knitting and crochet design, DROPS Design offers one of the most extensive collections of free patterns on the internet - translated to 17 languages. As of today we count 314 catalogs and 11822 patterns - 11812 of which are translated into English (US/in).
We work hard to bring you the best knitting and crochet have to offer, inspiration and advice as well as great quality yarns at incredible prices! Would you like to use our patterns for other than personal use? You can read what you are allowed to do in the Copyright text at the bottom of all our patterns. Happy crafting!
Post a comment to pattern DROPS Extra 0-1044
We would love to hear what you have to say about this pattern!
If you want to leave a question, please make sure you select the correct category in the form below, to speed up the answering process. Required fields are marked *.