
Looking for a yarn?


Comments / Questions (12)
![]() Signe Dalthur Holt wrote:
Signe Dalthur Holt wrote:
Hej igen Jeg skrev et spørgsmål til kraven og I har blot svaret med præcis samme ord, som der står i opskriften. I må gå ud fra, at jeg har læst den, når jeg skriver et spørgsmål her. Kraven har en buet form og det er derfor ikke intuitivt, hvor den skal sys sammen. Kan I uddybe det? På samme måde er det ikke en selvfølge, hvilken del af kraven der skal sys til ryggen. Kan I uddybe det?
14.01.2025 - 16:22
![]() Signe wrote:
Signe wrote:
Jeg kan ikke finde ud af, hvordan kraven skal sys sammen og fast til rygstykker. Hvor meget skal sys sammen kant i kant og hvilken del skal sys til rygstykker?
12.01.2025 - 09:07DROPS Design answered:
Hej Signe, den skal sys til halsudskæringen bagpå og de 2 kravedele skal sys sammen midt bagpå :)
14.01.2025 - 14:12
![]() Helen Mala wrote:
Helen Mala wrote:
Srdečné pozdravy, nemohu přijít na to, jak má být háčkováno toto: ... , then work 1 tr in each of the next 3-3-2-5-6-2 ch, ... . Týká se to návodu "BODY". Prosím o vysvětlení, děkuji Vám. Helen
26.02.2023 - 10:42DROPS Design answered:
Dobrý den, Helen, then work 1 tr in each of the next 3-3-2-5-6-2 ch = pak háčkujeme po 1 dlouhém sloupku do každého z následujících 3-3-2-5-6-2 řetízkových ok. Hodně zdaru! Hana
26.02.2023 - 11:43
![]() Sascha wrote:
Sascha wrote:
Hoi, ik lees bij de mouw dat er bij een hoogte van 50cm: haak hv over de eerste 4 stk, dan 1 hv en 3 l in volgend stk. Hoe haak ik 3 l (losse?) in volgend stk?
17.11.2021 - 16:21DROPS Design answered:
Dag Sascha,
Je haakt een vaste in de volgende steek en daarna haak je 3 losssen. (Dus die lossen hoef je niet ergens in te haken.)
09.12.2021 - 13:53
![]() Monica wrote:
Monica wrote:
In the body, the instructions say: * skip 1 ch, 1 dc in each of the next 5 ch * However, the diagram and all other instructions only use a tr rather than dc stitch. Am I correct in assuming that the instructions should be * skip 1 ch, 1 tr in each of the next 5 ch *?
13.02.2021 - 08:24DROPS Design answered:
Dear Monica, thanks for noticing, parttern has been edited now, you should work a row of trebles there (no double crochet at all) (UK-crochet terms). Happy crocheting!
15.02.2021 - 10:44
![]() Alex wrote:
Alex wrote:
Hi, ich verstehe den Aufbau des Kragens nicht. Die 500 Zeichen in der Kommentarspalte reichen leider nicht aus, um meine Herangehensweise/Frage wie der Kragen pro Reihe aufgebaut wird, zu stellen. Könntet ihr mich evtl. per Mail kontaktieren? Danke, Alex
17.01.2021 - 20:05DROPS Design answered:
Liebe Alex, der Kragen wird mit unterschiedlichen Maschen und verkürzten Reihen gehäkelt, damit er Höher gegen Blende als gegen Schulter wird. Folgen Sie die Beschreibung Schritt für Schritt. Sollten Sie individuelle Assistanz brauchen, dann wird Ihnen Ihr DROPS Händler gerne auch telefonisch oder per E-Mail weiterhelfen. Viel Spaß beim häkeln!
18.01.2021 - 11:22
![]() Evelien wrote:
Evelien wrote:
Hoi, Er staat tussen sterretjes dat ik het patron van 1 losse en 5 vasten moet herhalen en dan kom ik uit op 187 stokjes. Moet ik nu vasten of stokjes haken? Haak volgende toer als volgt: 1 stk in 4e l vanaf haak, haak dan 1 stk in elke van volgende 3-3-2-5-6-2 l, * sla 1 l over, 1 v in elke van de volgende 5 l *, herhaal van *-* de rest van toer = 145-155-169-187-203-219 stk Groet Evelien
13.06.2016 - 14:38DROPS Design answered:
Hoi Evelien. De eerste toer waren stk. Hierna haak je volgens het telpatroon - zie onderaan
16.06.2016 - 15:45
![]() Martina wrote:
Martina wrote:
Hallo! Ich möchte mir gerne diese Jacke häkeln, von mir aber nicht sicher bei der Größe. Ich trage Kaufgröße 46, welche Größe soll ich häkeln? XL? Lg Martina
07.02.2016 - 20:45DROPS Design answered:
Schauen Sie am besten in die Maßskizze ganz am Ende der Anleitung, dort finden Sie alle relevanten Maße. Vergleichen Sie die Maße mit einer gut sitzenden Jacke oder messen an sich selbst und wählen Sie dann die entsprechende Größe aus. Viel Spaß beim Häkeln!
09.02.2016 - 14:45
![]() Janina wrote:
Janina wrote:
Hallo ihr Lieben, ich verstehe diesen Teil der Anleitung leider nicht : RUMPFTEIL : ... Die nächste R wie folgt häkeln: 1 Stb in die 4. Lm von der Nadel, dann 1 Stb in jede der nächsten 3-3-2-5-6-2 Lm, * 1 Lm überspringen, 1 feste M in jede der 5 nächsten Lm *, von * - * wdh = 145-155-169-187-203-219 Stb .... wenn ich 1LM überspringen und dann 5 feste Maschen machen soll uns das immer wiederhole. Wie soll ich dann am Ende auf Stäbchen kommen ?
14.09.2015 - 14:00DROPS Design answered:
Liebe Janina, das ist tatsächlich ein Fehler in der Anleitung, der gleich korrigiert wird, es sind Stäbchen gemeint, nicht feste Maschen. Entschuldigung für die Verwirrung und gutes Gelingen!
20.09.2015 - 11:13Paloma wrote:
Qué chaqueta tan maravillosa!!! Tengo algunos problemas al intentar leer el patrón. No tenéis pensado traducirlo al español? Qué pena!
09.04.2014 - 15:59DROPS Design answered:
Hola Paloma! Estamos intentando ponernos al día con las traducciones al español porque se empezó más tarde. Tomo nota y verás que este patrón estará traducido en unos pocos días. Entre las colecciones nuevas hacemos un esfuerzo para que vayan saliendo patrones anteriores. Gracias por seguirnos.
11.04.2014 - 11:38
|
|||||||
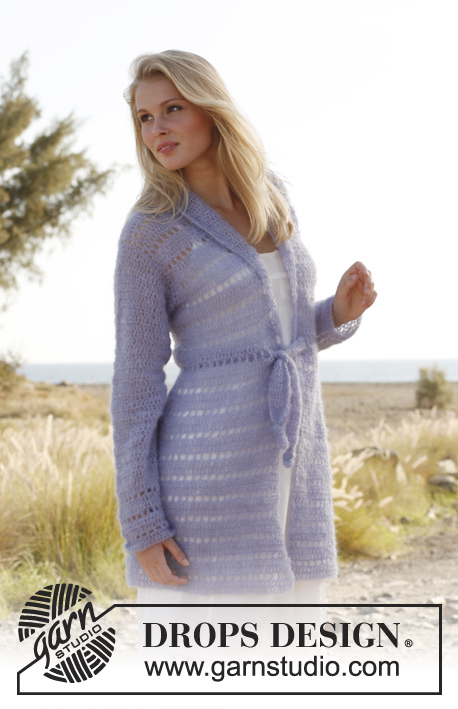
Belted Beauty |
|||||||
 |
 |
||||||
Crochet DROPS jacket with shawl collar and belt in ”Vivaldi”. Size: S - XXXL
DROPS Extra 0-914 |
|||||||
|
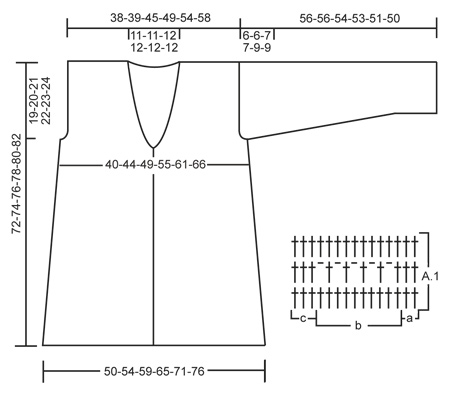
CROCHET INFO: Replace first dc on every row with 3 ch. PATTERN: See diagram A.1. DECREASE TIP: Dec 1 dc by working 2 dc tog as follows: Work 1 dc in first st but wait with last pull through, work 1 dc in next st but on last pull through, pull thread through all 3 loops on hook. ---------------------------------------------------------- BODY: Worked back and forth from mid front. Work 175-187-204-225-244-264 ch (incl 3 ch to turn with) on hook size 5 mm / H/8 with Vivaldi. Work next row as follows: 1 dc in 4th ch from hook, then work 1 dc in each of the next 3-3-2-5-6-2 ch, * skip ch 1, 1 dc in each of the next 5 ch *, repeat from *-* the rest of row = 145-155-169-187-203-219 dc (first 3 ch = 1 dc). READ CROCHET INFO! Insert 2 markers in the piece; 37-40-43-48-52-56 dc in from each side (= 71-75-83-91-99-107 dc between markers on back piece). Continue with diagram A.1 as follows: a over the first 2 dc, b until 3 dc remain, then c. The outermost 3 dc in each side = band. Repeat the 3 rows in diagram until finished measurements. REMEMBER THE CROCHET GAUGE! At the same time when piece measures approx. 15 cm / 6", dec 1 dc on each side of both markers - dec on first or third row in diagram by working 2 dc tog – SEE DECREASE TIP! Repeat dec approx. every 5 cm / 2" 6 more times. After all dec 117-127-141-159-175-191 dc remain on row and piece measures approx. 45 cm / 17¾". READ UNTIL OTHER FRONT PIECE BEFORE CONTINUING! COLLAR: When piece measures 46-47-48-49-50-51 cm / 18"-18½"-19"-19¼"-19¾"-20", beg inc for shawl collar. Inc on next row by working 2 dc in second and next to last dc in each side. Repeat inc on every row 5 more times, then on every other row 2 times. Work the inc sts only in dc, i.e. after inc there are 11 dc on each side of lace pattern on 2nd row in diagram A.1. ARMHOLES: AT THE SAME TIME when piece measures 53-54-55-56-57-58 cm / 21"-21¼"-21⅝"-22"-22½"-22¾", finish back and front piece separately. FIRST FRONT PIECE: Work until 2-3-3-4-5-6 dc remain before marker, turn and work back. When all inc for collar are done, there are 36-38-41-45-48-51 sts on row. Continue pattern as before until piece measures 72-74-76-78-80-82 cm / 28⅜"-29⅛"-30"-30¾"-31½"-32¼" – adjust so that next row beg from mid front. The outermost 19-20-23-26-29-32 sts towards armhole = shoulder, these are no longer worked. Continue with 4 rows with dc over the 17-18-18-19-19-19 sts towards mid front (= collar). Then work next row as follows (from mid front): 1 dc in each of the first 10 dc, * 1 hdc in next dc, 1 sc in next dc and 1 sl st in next dc, turn piece with 1 ch. Skip sl st and work 1 sl st in sc, 1 sc in hdc, 1 hdc in first dc and dc the rest of row *. Turn and work 1 dc in each of the first 6 dc, then repeat on same row from *-* 1 more time. Fasten off. OTHER FRONT PIECE: Work as first front piece but reversed. BACK PIECE: Work pattern as before over the middle 53-55-63-69-75-81 dc (4-6-6-8-10-12 dc in each side = armhole). When piece measures 70-72-74-76-78-80 cm / 27½"-28⅜"-29⅛"-30"-30¾"-31½, work 1 row only over the outermost 19-20-23-26-29-32 dc in each side (the middle 15-15-17-17-17-17 dc = neck). Fasten off. SLEEVE: Worked back and forth and sewn tog afterwards. Ch 40-43-43-45-45-48 (incl 3 ch to turn with) on hook size 5 mm / H/8 with Vivaldi. Turn and work 1 dc in 4th ch from hook. Continue with 1 dc in each of the next 6-3-3-5-5-2 ch, * skip ch 1, 1 dc in each of the next 5 ch *, repeat from *-* the rest of row = 33-35-35-37-37-39 dc – READ CROCHET TIP! Continue with diagram A.1b – finish with 1 dc in last dc. When A.1 has been worked 3 times vertically, continue with only dc until finished measurements. AT THE SAME TIME when piece measures 10 cm / 4", inc 1 dc in each side by working 2 dc in second and next to last dc. Repeat inc every 4th-3rd-3rd-2nd-2nd-2nd row 6-7-8-8-10-10 more times = 47-51-53-55-59-61 dc. When piece measures 50-50-47-46-42-41 cm / 19¾"-19¾"-18½"-18"-16½"-16" (shorter measurements in the larger sizes because of wider shoulders), work next row as follows: Sl sts over the first 4 dc, then 1 sl st + 3 ch up from next dc, continue with dc until 4 sts remain, turn piece. Then work the outermost 2 dc tog in each side on the next 3-3-4-4-5-5 rows. Fasten off, piece measures approx. 56-56-54-53-51-50 cm / 22"-22"-21¼"-21"-20"-19¾". ASSEMBLY: Sew the shoulder seams. Sew collar tog mid back, edge to edge and then sew collar to neck line on back piece. Sew sleeves tog edge to edge and sew sleeves in body. BELT: Ch 12 on hook size 5 mm / H/8 with Vivaldi. Turn and work 1 dc in 4th ch from hook, then work 1 dc in each of the last 8 ch (= 10 dc). Turn and continue with 1 dc in every dc until belt measures approx. 100-110-120-130-140-150 cm / 39½"-43½"-47"-51½"-55"-59", fasten off. Make a small knot at each end of belt and then tie the belt around the waist. |
|||||||
Diagram explanations |
|||||||
|
|||||||
|
|||||||
Have you finished this pattern?Tag your pictures with #dropspattern or submit them to the #dropsfan gallery. Do you need help with this pattern?You'll find 7 tutorial videos, a Comments/Questions area and more by visiting the pattern on garnstudio.com. © 1982-2025 DROPS Design A/S. We reserve all rights. This document, including all its sub-sections, has copyrights. Read more about what you can do with our patterns at the bottom of each pattern on our site. |
|||||||


With over 40 years in knitting and crochet design, DROPS Design offers one of the most extensive collections of free patterns on the internet - translated to 17 languages. As of today we count 314 catalogs and 11822 patterns - 11812 of which are translated into English (US/in).
We work hard to bring you the best knitting and crochet have to offer, inspiration and advice as well as great quality yarns at incredible prices! Would you like to use our patterns for other than personal use? You can read what you are allowed to do in the Copyright text at the bottom of all our patterns. Happy crafting!
Post a comment to pattern DROPS Extra 0-914
We would love to hear what you have to say about this pattern!
If you want to leave a question, please make sure you select the correct category in the form below, to speed up the answering process. Required fields are marked *.