
Popular categories
Looking for a yarn?


Comments / Questions (22)
![]() Tina wrote:
Tina wrote:
Hallo, noch eine Frage zum Zusammennähen: ist es richtig, dass der Zackenrand mit dem glatten Rand zusammengenäht wird?
07.11.2024 - 06:41DROPS Design answered:
Liebe Tina, ja genau, so Rand A von einem Teil mit B von anderem Teil und B von einem Teil mit A von anderem Teil. Viel Spaß beim zusammennähen!
07.11.2024 - 12:45
![]() Ilona wrote:
Ilona wrote:
Hallo, Ich weiss beim besten Willen nicht, wie ich den Poncho zusammen nähen soll. Denn ich habe die zwei Teile gleich gestrickt. Also kommt ja jetzt einmal die linke Seite nach vorne!? Das kann doch nicht sein. Hätte man die Teile nicht gegengleich stricken müssen?
13.09.2021 - 00:08DROPS Design answered:
Liebe Ilona, die beiden Teilen müssen gleich sein die werden nach beide zusammengenäht wie in A.2 gezeigt, dh A (Schulter) von 1. Teil zusammen mit B (Schulter) von 2. Teil - und B von 1. Teil zusammen mit A von 2. Teil. Viel Spaß beim Zusammennähen und Tragen!
13.09.2021 - 09:15
![]() Hammar Lena wrote:
Hammar Lena wrote:
Hej Jag vill köpa garnet, mönstret och stickan. Hur bärjag mig åt? Lyckas inte med detta påver sida.
04.06.2019 - 20:17DROPS Design answered:
Hei Lena. Oppskriften er gratis, så du kan enten printe den ut eller lese denm her på nettsiden. Garn og pinner får du kjøpt i en av mange butikker som selger våre produkter. En liste over alle våre butikker i Sverige , inkludert nettbutikker, her finner du her. God fornøyelse
06.06.2019 - 09:40
![]() Ingeborg Gruber wrote:
Ingeborg Gruber wrote:
Ich habe diesen Poncho gestrickt und kann die Fragen wegen des Zusammennähens verstehen. Es müssen Zacken an Zacken genäht werden. Die glatte Seite ist einfacher. Ich habe viel Freude an ihm und Komplimente erhalten. allerdings habe ich nur 2 Farben gewechselt. Blau- und Grüntöne. Den Halsausschnitt würde ich beim nächsten Mal enger stricken, denn ich habe ihn enger gehäkelt, damit der Poncho besser sitzt. Danke für Ihre tollen Modelle!
15.04.2019 - 09:57
![]() Prete wrote:
Prete wrote:
Bonjour, quand vous écrivez " tricoter les 95-113-113 premières m sur l'aiguille comme avant". Comme avant correspond à quel point ?
08.06.2017 - 16:56DROPS Design answered:
Bonjour Mme Prete, vous les tricotez comme vous le faites depuis le début, c'est-à-dire: 5 m point mousse, et 4,5 fois A.1 (= 90 m). Bon tricot!
08.06.2017 - 17:15
![]() Sonja wrote:
Sonja wrote:
På sid 2 står "maskorna stickas räta på alla varv". I diagram för mönstret står att det ska stickar rm från rätsidan och am från avigsidan. Vad gäller?
10.02.2016 - 16:17DROPS Design answered:
Hej Sonja. När det står "maskorna stickas räta på alla varv" så är det en förklaring på hur du ska sticka rätstickning. Du stickar 5 maskor i rätstickning i varje sida (innan och efter diagramet alltså). Lycka till!
26.02.2016 - 09:05
![]() Kate wrote:
Kate wrote:
Har strikket ferdig fortykket men sidene i v-halsen ble ikke like lang. Er dette riktig?
20.09.2015 - 11:37DROPS Design answered:
Hej Kate, Ja, hvis du overholder strikkefastheden bør de 2 sider blive lige lange. God fornøjelse!
21.09.2015 - 08:42Sheila wrote:
Hola apartir de empezar el grafico A2 se sigue siempre con ese hasta el final? O se intercala entre el A1 y el A2? gracias
25.07.2015 - 16:00DROPS Design answered:
Hola Sheila. El gráfico A2 se sigue hasta finalizar la labor.
26.07.2015 - 18:49
![]() Madeleine wrote:
Madeleine wrote:
Förstår inte mönstret alls. efter 2 varv rätst. och därefter sticka 5 rätm???
15.06.2015 - 13:11DROPS Design answered:
Hej. De två första varven stickas i rätstickning. Sen är det det tredje varvet som börjar med 5 m rätstickning och fortsätter sen med A.1 (som upprepas) och varvet avslutas med 5 m rätstickning. Lycka till!
16.06.2015 - 10:14
![]() Zeipert wrote:
Zeipert wrote:
Ich möchte diese Modell gerne in einen Braun/Natur -Ton oder alternativ in einen Grün-Ton (gedecktes Grün) stricken. Welche Farben muss ich hierzu verwenden um zu diesem Ergebnis zu gelangen. Vielen Dank für ihre Rückantwort.
04.01.2015 - 15:34DROPS Design answered:
Am besten lassen Sie sich von der Fabel-Farbkarte inspirieren. Farben sind letztendlich immer Geschmackssache. Wenn Ihnen der Farbverlauf zu unruhig ist, können Sie auch einfach nur eine Farbverlaufsfarbe verwenden. Beispiele für Ihren Farbwunsch wären: Nr. 542, diese Farbe ist eher dunkel und grün-braun-grau gemischt, Nr. 650 hat einen längeren Farbrapport (wirkt dadurch ruhiger) und ist pastelliger. Nr. 651 wäre ein Braun-Naturton in Long-Print oder 823, oder 912, 547 als Print-Farben.
06.03.2015 - 13:43
|
|||||||||||||
Louise#louiseponcho |
|||||||||||||
|
|
|||||||||||||
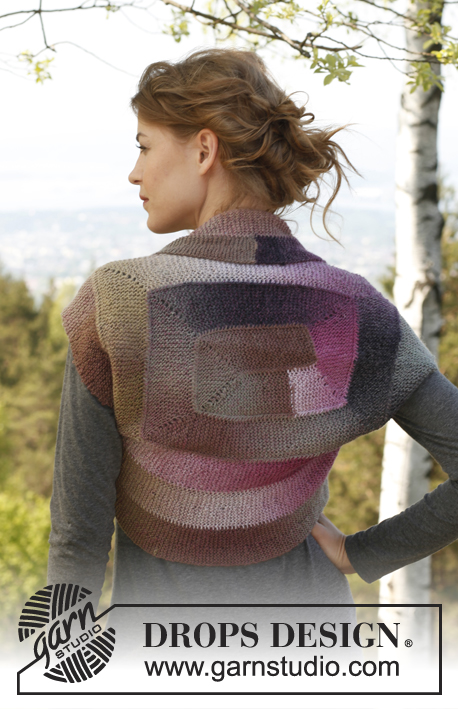
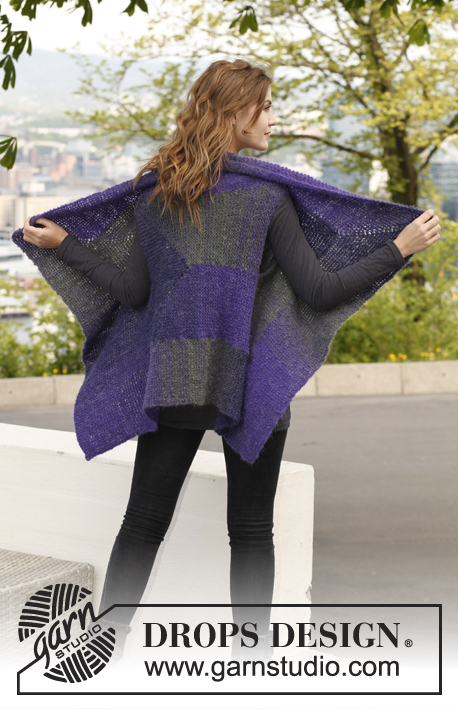
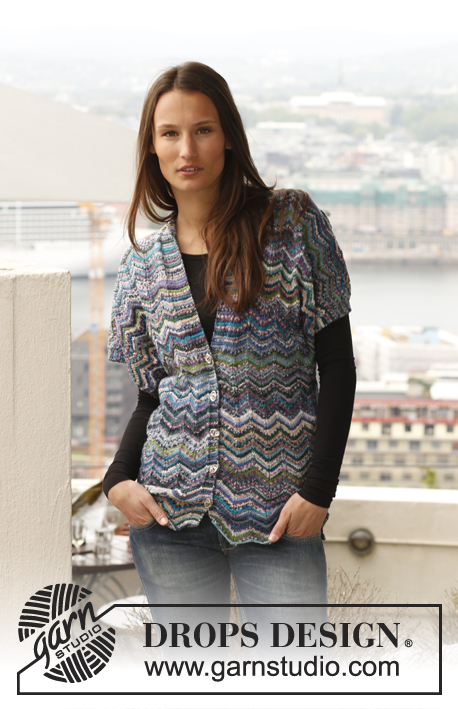
Knitted DROPS poncho with zigzag pattern in ”Fabel”. Size: S - XXXL.
DROPS 141-7 |
|||||||||||||
|
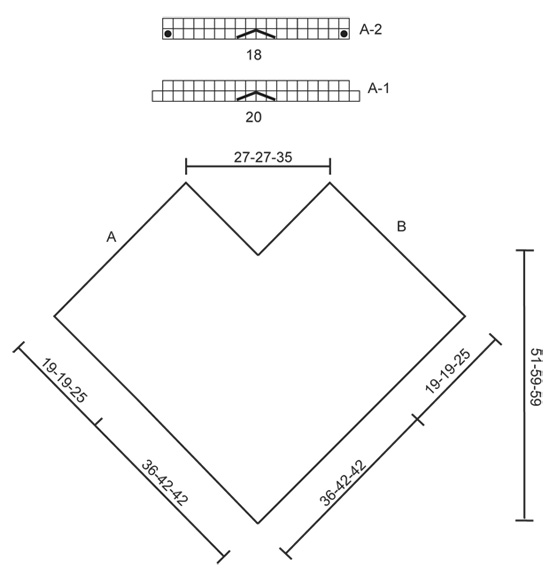
GARTER ST (back and forth on needle): K sts on all rows. STRIPES: Work stripes as follows: 2 rows 522p, turquoise/blue 2 rows 904, lavender 2 rows 911p, fun lilac Repeat stripes until finished measurements. NOTE! Switch color inside 5 sts in garter st in the side – so that the strand can follow upwards without showing in outer edge. Work the first 5 sts with previous color, switch to the new color, work the rest of row. PATTERN: See diagrams A.1 and A.2. Diagrams show pattern from RS. ---------------------------------------------------------- PONCHO: Worked back and forth in 2 parts and sewn tog when finished. Cast on 170-190-210 sts on circular needle size 3.5 mm/ US 4 with 522, turquoise/blue. Work stripes - see explanation above. Work 2 rows in garter st, then work as follows: 5 sts in garter st, repeat diagram A.1 (= 20 sts) until 5 sts remain, work 5 sts in garter st. When A.1 has been worked one time vertically, there are 154-172-190 sts on needle. Continue with A.2 (= 18 sts) with 5 sts in garter st in each side. When piece measures 35-41-41 cm/ 13¾"-16"-16", work 4 rows with garter st over the last 59-59-77 sts on needle (seen from RS) – and work the first 95-113-113 sts on needle as before. On the next row from WS, bind off the first 54-54-72 sts = 100-118-118 sts. Continue with A.2 and 5 sts in garter st each side. When piece measures 54-60-66 cm/21¼"-23½"-26", work 4 rows in garter st over all sts before binding off, piece measures approx. 55-61-67 cm/ 21½"-24"-26½". Knit another part the same way. ASSEMBLY: Place the 2 parts on top of each other WS against WS. Sew the two parts tog on the short sides – see charts. Sew A from part 1 against B from part 2, and B from part 1 against A from part 2. |
|||||||||||||
Diagram explanations |
|||||||||||||
|
|||||||||||||
|
|||||||||||||
Have you finished this pattern?Tag your pictures with #dropspattern #louiseponcho or submit them to the #dropsfan gallery. Do you need help with this pattern?You'll find 8 tutorial videos, a Comments/Questions area and more by visiting the pattern on garnstudio.com. © 1982-2025 DROPS Design A/S. We reserve all rights. This document, including all its sub-sections, has copyrights. Read more about what you can do with our patterns at the bottom of each pattern on our site. |
|||||||||||||


With over 40 years in knitting and crochet design, DROPS Design offers one of the most extensive collections of free patterns on the internet - translated to 17 languages. As of today we count 314 catalogs and 11822 patterns - 11812 of which are translated into English (US/in).
We work hard to bring you the best knitting and crochet have to offer, inspiration and advice as well as great quality yarns at incredible prices! Would you like to use our patterns for other than personal use? You can read what you are allowed to do in the Copyright text at the bottom of all our patterns. Happy crafting!
Post a comment to pattern DROPS 141-7
We would love to hear what you have to say about this pattern!
If you want to leave a question, please make sure you select the correct category in the form below, to speed up the answering process. Required fields are marked *.