DROPS Kid-Silk
DROPS Kid-Silk
75% Mohair, 25% Silk
from 6.75 $ /25g
Get the yarn to make this pattern from 13.50$.

The yarn cost is calculated from the pattern’s smallest size and the yarn’s cheapest product type. Looking for an even better price? You might find it on the DROPS Deals!

DROPS SS24

Morning Dew

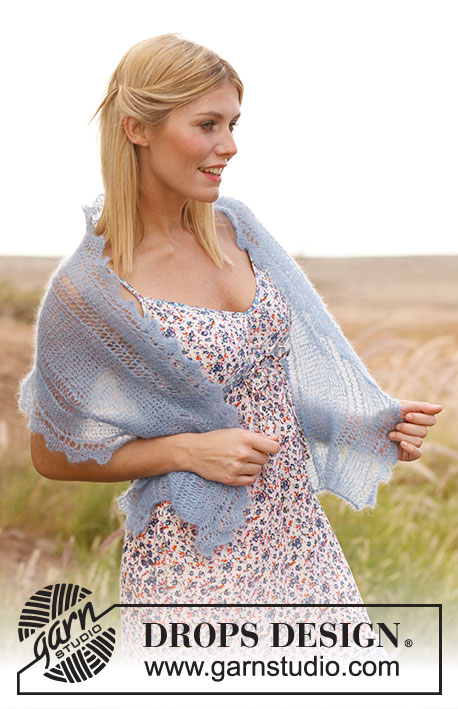
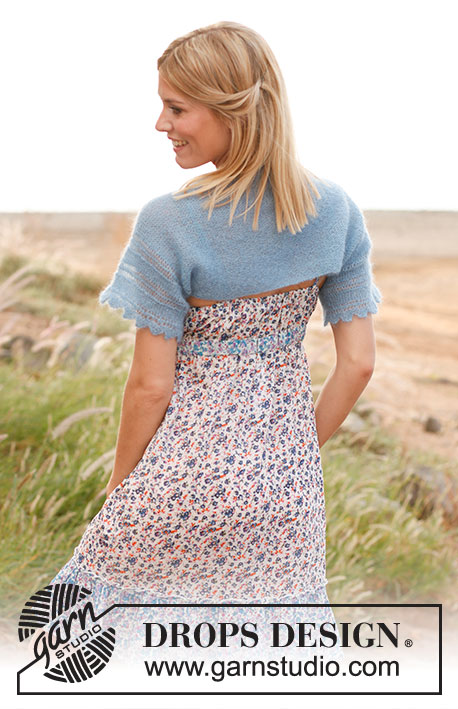
Knitted DROPS small bolero in garter st with lace pattern in ”Kid-Silk”. Size: XS - XXXL.

DROPS 136-29
DROPS design: Pattern no KS-062
Yarn group A
--------------------------------------------------------
Size: XS - S/M - L/XL - XXL/XXXL

Materials: DROPS KID-SILK from Garnstudio
50-50-75-75 g color no 08, gray blue

DROPS STRAIGHT NEEDLES size 3.5 mm / US 4 – or size needed to get 20 sts in garter st with 1 strand = width 10 cm / 4".

-------------------------------------------------------

Alternative Yarn – See how to change yarns here
Yarn Groups A to F – Use the same pattern and change the yarn here
Yarn usage using an alternative yarn – Use our yarn converter here

-------------------------------------------------------

DROPS Kid-Silk
DROPS Kid-Silk
75% Mohair, 25% Silk
from 6.75 $ /25g
Get the yarn to make this pattern from 13.50$.

The yarn cost is calculated from the pattern’s smallest size and the yarn’s cheapest product type. Looking for an even better price? You might find it on the DROPS Deals!

Pattern instructions

NOTE: This pattern is written in American English. All measurements in charts are in cm. For conversion from inches to cm - click here. There are different terms for crocheting in American and British English. If this pattern includes crochet, click for "crochet terms" here. For this pattern in British English, please click here.
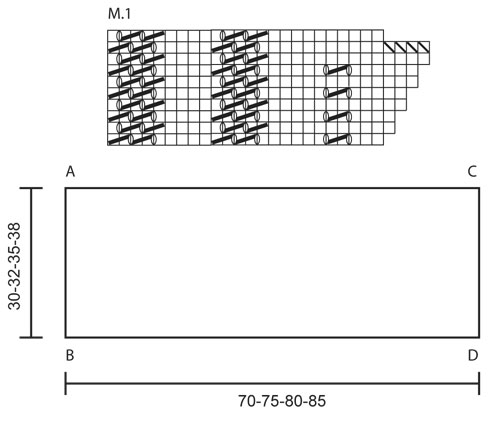
PATTERN:
See diagram M.1. No of sts in diagram M.1 will vary from 24 to 28.
--------------------------------------------------------

BOLERO:
There is no difference between RS and WS, the piece is the same on both sides. Start therefore every row as if it is worked from RS.
Cast on 140-150-160-170 sts on needle size 3.5 mm / US 4 with 2 strands Kid-Silk. Remove one strand and K 1 row over all sts.
Insert a marker after 24 sts in from each side (= 92-102-112-122 sts between markers).
Work next row as follows: First row in diagram M.1 (= 24 sts), then K the rest of row.
Turn and work as follows: First row in diagram M.1 (= 24 sts), K 92-102-112-122 sts (i.e. sts between markers) and work second row in diagram M.1 over the last 25 sts.
Turn and work as follows: Third row in diagram M.1 over the first 25 sts, K the sts between markers and work second row in diagram M.1 over the last 25 sts.
Continue to K the sts between markers on all rows and work diagram M.1 over sts in each side.
REMEMBER THE GAUGE!
When piece measures approx. 30-32-35-38 cm / 11¾"-12½"-13¾"-15" (stop after 1 full repetition of diagram M.1 in each side), K 1 row over all sts.
Then LOOSELY bind off with 2 strands - it is very important that the bind off edge is not too tight.

ASSEMBLY:
Sew tog for sleeves as follows: Place A against B - see chart - and sew cast on edge against bind off edge – start at the outermost edge and sew approx. 10 cm / 4" in towards the middle (sew edge to edge to avoid a chunky seam).
Sew the same way in the other side by placing C against D.

Diagram

All measurements in charts are in cm.

symbols = K all rows (= garter st)
symbols = 1 YO between 2 sts
symbols = K 2 tog on all rows
symbols = bind off this st
diagram
Do you have a question? See a list of frequently asked questions (FAQ)

Knitting tension is what determines the final measurements of your work, and is usually measured per 10 x 10 cm. It is provided like so: number of stitches in width x number of rows in height - eg: 19 stitches x 26 rows = 10 x 10 cm.

The knitting tension is very individual; some people knit/crochet loosely while others work tightly. You adjust the knitting tension with the needle size, which is why the suggested needle size only serve as a guide! You need to adjust this (up or down) to ensure that YOUR knitting tension matches the knitting tension provided in the pattern. If you work with a different knitting tension than provided you will have a different yarn consumption, and your work will have different measurements than what the pattern suggests.

The knitting tension also determines which yarns can replace each other. As long as you achieve the same knitting tension you can replace one yarn with another.

See DROPS lesson: How to measure your tension/gauge

See DROPS video: How to make a gauge tension swatch

The required amount of yarn is provided in grams, eg: 450 g. To calculate how many balls you’ll need you first need to know how many grams are in 1 ball (25g, 50g or 100g). This information is available if you click on the individual yarn quality on our pages. Divide the amount required with the amount of each ball. For example, if each ball is 50g (the most common amount), the calculation will be as follows: 450 / 50 = 9 balls.

The important thing when changing from one yarn to another is that the knitting/crochet tension remains the same. This is so that the measurements of the finished piece will be the same as on the sketch provided. It is easier to achieve the same knitting tension using yarns from the same yarn group. It is also possible to work with multiple strands of a thinner yarn to achieve the knitting tension of a thicker one. Please try our yarn converter. We recommend you to always work a test swatch.

Please NOTE: when changing yarn the garment might have a different look and feel to the garment in the photo, due to individual properties and qualities of each yarn.

See DROPS lesson: Can I use a different yarn than the one mentioned in the pattern?

All our yarns are categorised into yarn groups (from A to F) according to thickness and knitting tension – group A contains the thinnest yarns and group F the thickest. This makes it easier for you to find alternative yarns to our patterns, should you wish to switch yarn. All yarns within the same group have a similar knitting tension and can easily replace each other. However, different yarn qualities have different structures and properties which will give the finished work a unique look and feel.

Click here for an overview of the yarns in each yarn group

At the top of all our patterns you’ll find a link to our yarn converter, which is a helpful tool should you wish to use a different yarn than suggested. By filling in the yarn quality you wish to replace, the amount (in your size) and number of strands, the converter will present good alternative yarns with the same knitting tension. Additionally it will tell you how much you’ll require in the new qualities and whether you’ll need to work with multiple strands. Most skeins are 50g (some are 25g or 100g).

If the pattern is worked with multiple colours, every colour will have to be converted separately. Similarly, if the pattern is worked with several strands of different yarns (for example 1 strand Alpaca and 1 strand Kid-Silk) you will have to find alternatives for each, individually.

Click here to see our yarn converter

Since different yarns have different qualities and textures we have chosen to keep the original yarn in our patterns. However, you can easily find options among our available qualities by using our yarn converter, or simply pick a yarn from the same yarn group.

It is possible that some retailers still have discontinued yarns in stock, or that someone has a few skeins at home that they would like to find patterns for.

The yarn converter will provide both alternative yarn as well as required amount in the new quality.

If you think it's hard to decide what size to make, it can be a good idea to measure a garment you own already and like the size of. Then you can pick the size by comparing those measures with the ones available in the pattern's size chart.

You'll find the size chart at the bottom of the pattern.

See DROPS lesson: How to read size chart

The needle size provided in the pattern serves only as a guide, the important thing is to follow the knitting tension. And since knitting tension is very individual, you will have to adjust the needle size to ensure that YOUR tension is the same as in the pattern – maybe you’ll have to adjust 1, or even 2 needle sizes, up or down to achieve the correct tension. For this, we recommend that you work test swatches.

Should you work with a different knitting tension than the one provided, the measurements of the finished garment might deviate from the measurement sketch.

See DROPS lesson: How to measure your tension/gauge

See DROPS video: How to make a gauge tension swatch

Working a garment top-down provides more flexibility and room for personal adjustment. For example it is easier to try the garment on while working, as well as making adjustments to length of yoke and shoulder caps.

The instructions are carefully explaining every step, in the correct order. Diagrams are adjusted to the knitting direction and are worked as usual.

The diagram depicts all rows/rounds, and every stitch seen from the right side. It is read from bottom to top, from right to left. 1 square = 1 stitch.

When working back and forth, every other row is worked from the right side and every other row is worked from the wrong side. When working from the wrong side, the diagram will have to be worked reversed: from left to right, knit stitches are purled, purl stitches are knit etc.

When working in the round every round is worked from the right side and the diagram are worked from right to left on all rounds.

See DROPS lesson: How to read knitting diagrams

The diagram depicts all rows/rounds, and every stitch seen from the right side. It is worked from bottom to top, from right to left.

When working back and forth every other row is worked from the right side: from right to left and every other row is worked from the wrong side: from left to right.

When working in the round, every row in the diagram are worked from the right side, from right to left.

When working a circular diagram you start in the middle and work your way outwards, counter clockwise, row by row.

The rows usually start with a given number of chain stitches (equivalent to the height of the following stitch), this will either be depicted in the diagram or explained in the pattern.

See DROPS lesson: How to read crochet diagrams

Instructions for working several diagrams after each other on the same row/round, will often be written like so: “work A.1, A.2, A.3 a total of 0-0-2-3-4 times". This means you work A.1 once, then A.2 is worked once, and A.3 is repeated (in width) the number of times provided for your size – in this case like so: S = 0 times, M = 0 times, L=2 times, XL= 3 times and XXL = 4 times.

The diagrams are worked as usual: begin with the first row in A.1, then work the first row in A.2 etc.

See DROPS lesson: How to read knitting diagrams

See DROPS lesson: How to read crochet diagrams

The total width of the garment (from wrist-to-wrist) will be larger in the larger sizes, despite the actual sleeves being shorter. The larger sizes have longer sleeve caps and wider shoulders, so there will be a good fit in all sizes.

The measurement sketch/schematic drawing provides information regarding the full length of the garment. If it’s a jumper or a jacket the length is measured from the highest point on the shoulder (usually closest to the neckline), and straight down to the bottom of the garment. It is NOT measured from the tip of shoulder. Similarly, the length of yoke is measured from the highest point on the shoulder and down to where yoke is split into body and sleeves.

See DROPS lesson: How to read a schematic drawing

Diagrams are often repeated on the round or in height. 1 repeat is the diagram the way it appears in the pattern. If it says to work 5 repeats of A.1 in the round, then you work A.1 a total of 5 times after/next to each other in the round. If it says to work 2 repeats of A.1 vertically/in height you work the entire diagram once, then begin again at the start and work the entire diagram one more time.

Chain stitches are slightly narrower than other stitches and to avoid working the cast-on edge too tight, we simply chain more stitches to begin with. The stitch count will be adjusted on the following row to fit the pattern and measurement sketch.

The rib edge is more elastic and will contract slightly compared to, for example, stocking stitch. By increasing before the rib edge, you avoid a visible difference in width between the rib edge and the rest of the body.

It’s very easy to cast off too tightly, and by making yarn overs while casting off (and simultaneously casting these off) you avoid a too tight cast off edge.

See DROPS video: How to bind off with yarn overs (yo)

To achieve an even increase (or decrease) you can increase on, for example: every 3rd and 4th row alternately, like so: work 2 rows and increase on the 3rd row, work 3 rows and increase on the 4th. Repeat this until the increase is complete.

See DROPS lesson: Increase or decrease 1 st on every 3rd and 4th row alternately

Should you prefer to work in the round instead of back and forth, you may of course adjust the pattern. You’ll need to add steeks mid-front (usually 5 stitches), and follow the instructions. When you would normally turn and work from the wrong side, simply work across the steek and continue in the round. At the end you’ll cut the piece open, pick up stitches to work bands, and cover the cut edges.

See DROPS video: How to knit steeks and cut open

Should you prefer to work back and forth instead of in the round, you may of course adjust the pattern so you work the pieces separately and then assemble them at the end. Divide the stitches for the body in 2, add 1 edge stitch in each side (for sewing) and work the front and back pieces separately.

See DROPS lesson: Can I adapt a pattern for circular needles into straight needles?

Pattern repeats can vary slightly in the different sizes, in order to get the correct proportions. If you’re not working the exact same size as the garment in the photo, yours might deviate slightly. This has been carefully developed and adjusted so that the complete impression of the garment is the same in all sizes.

Make sure to follow instructions and diagrams for your size!

If you have found a pattern you like which is available in women’s size it’s not very difficult to convert it to men’s size. The biggest difference will be the length of sleeves and body. Start working on the women size that you think would fit across the chest. The additional length will be worked right before you cast off for the armhole/sleeve cap. If the pattern is worked top-down you can add the length right after the armhole or before the first decrease on sleeve.

Regarding additional yarn amount, this will depend on how much length you add, but it is better with a skein too many than too few.

All yarns will have excess fibres (from production) that might come off as lint or shedding. Brushed yarns (ie hairier yarns) have more of these loose, excess fibres, causing more shedding.

Shedding also depends on what is worn under or over the garment, and whether this pulls at the yarn fibres. It’s therefore not possible to guarantee that there will be no shedding

Below are some tips on how to get the best result when working with hairier yarns:

1. When the garment is finished (before you wash it) shake it vigorously so the looser hairs come off. NOTE: do NOT use a lint roller, brush or any method that pulls at the yarn.

2. Place the garment in a plastic bag and put it in your freezer - the temperature will cause the fibres to become less attached to each other, and excess fibres will come off easier.

3. Leave in the freezer for a few hours before taking it out and shaking it again.

4. Wash the garment according to the instructions on the yarn label.

Pilling is a natural process that happens to even the most exclusive of fibers. It's a natural sign of wear and tear that is hard to avoid, and that is most visible in high friction areas of your garment like a sweater's arms and cuffs.

You can make your garment look as new by removing the pilling, using a fabric comb or a pill/lint remover.

Still can't find the answer you need? Then scroll down and leave your question so one of our experts can try to help you. This will be done normally within 5 to 10 working days.
In the meantime, you can read the questions and answers that others have left to this pattern or join the DROPS Workshop on Facebook to get help from fellow knitters/crocheters!

You might also like...

Post a comment to pattern DROPS 136-29

We would love to hear what you have to say about this pattern!

If you want to leave a question, please make sure you select the correct category in the form below, to speed up the answering process. Required fields are marked *.

Comments / Questions (18)

country flag Paola wrote:

Dopo il primo ferro si legge di fare così primo f. nel diagramma M.1 (= 24 m.), lavorare 92-102-112-122 m. a dir. (cioè le m. tra i segnapunti) e lavorare il 2° f. del diagramma M.1 sulle ultime 25 m..... Questa ultima parte cioè il 2 ferro del diagramma M1 va lavorato leggendo lo schema da six a dx? Per fare combaciare il bordo a smerlo della manica?

25.05.2020 - 19:11

DROPS Design answered:

Buongiorno Paola. Sì è corretto, lavora il diagramma in modo che lo smerlo sia all'esterno. Buon lavoro!

26.05.2020 - 12:13

country flag Ingeborg Gruber wrote:

Zuerst meinen allerbesten Dank für Ihre vielen schönen Anleitungen. Ich habe 2 Boleros (Akropolis und Mette) mit Ihrer Baby Merino-Wolle gestrickt, da fand ich die Strickrichtung beschrieben. Jedoch in manch anderen Shrug oder Bolero-Anleitungen rätsle ich, ob von der Seite her oder von unten nach oben oder umgekehrt gestrickt werden soll. Ein Pfeil in der Zeichnung wäre hilfreich - DANKE!

18.02.2019 - 18:09

DROPS Design answered:

Liebe Frau Gruber, die Strickrichtung benutzen wir mehr jetzt in den Maßszkizzen. Dieses Modell wird von unten nach oben gestrickt - das Diagram M.1 wird auf beiden Seiten gestrickt (= Ärmelkante). Viel Spaß beim stricken!

19.02.2019 - 09:07

country flag Fillet Maryse wrote:

In patroon 136-29 voorlaatste rij van het telpatroon moet je 4steken afkanten moet je die telkens herhalen of wanneer moet je die afkanten ik snap het niet echt

12.12.2016 - 15:43

DROPS Design answered:

Hoi Fillet. Je herhaalt steeds het telpatroon M.1. Door de omslagen meerder je in de eerste 8 nld zodat je aan het begin van de 9e nld 28 st op de nld hebt. In deze nld kant je dan de eerste 4 st af = en je hebt 24 st weer op de nld. Begin opnieuw met het telpatroon.

13.12.2016 - 12:06

country flag Rosemary wrote:

Is it possible to knit this pattern in garter stitch all over. Will I have enough yarn specified in the pattern for this? Without help I cannot follow the instructions. Thank you

23.01.2016 - 17:18

DROPS Design answered:

Dear Rosemary, altering a pattern can always influence the amount of required yarn - remember you can always get personnal help from your DROPS store - see here for Italy. Happy knitting!

25.01.2016 - 11:37

country flag Rosemary wrote:

Hi. I am also having a similar problem understanding the instructions as Trish Hopkins 25.05.2014 kl. 21:26: I have tried 4 times. Please can you help

23.01.2016 - 17:14

DROPS Design answered:

Dear Rosemary, On first row with pattern work: 1st row in M.1 ( = 24 sts) and work remaining sts on row. On next row, work 1st row in M.1 (= 24 sts) on the first sts on needle, then work 92-122 sts (see size) and work 2nd row in M.1 over the last sts on needle. Turn, work 3rd row in M.1 over the first sts and the 2nd row in M.1 over the last sts and so on. Happy knitting!

25.01.2016 - 14:04

country flag Trish Hopkins wrote:

Can you write out the chart for me, please? Not the symbols, but which rows at beginning/end. For example: seat w row 7, knit 112,follow row 6; turn; k tie 7, knit 112, k row 8; turn. I find your instructions confusing

25.05.2014 - 21:26

DROPS Design answered:

Dear Mrs Hopkins, start reading diagram at the bottom corner on the right side, and start rows reading from the right towards the left, end rows reading pattern from the left towards the right. Happy knitting!

26.05.2014 - 09:59

country flag Charlotte wrote:

Hej på den pind hvor jeg skal starte med at strikke 3 pind i mønster og så retmasker og slutte med anden pind i mønsteret, er det rigtigt og hvad skal jeg så fortsætte med ? 4 pind først så retmasker og slutte med 3 pind??

12.05.2014 - 22:19

DROPS Design answered:

Hej Charlotte. Ja, det er korrekt. Du er hele tiden 1 pind "bagud" i mönstret i den anden side af arbejdet.

13.05.2014 - 16:11

country flag Maria wrote:

Ich bin mit der Aussage "Faden abreissen" etwas unsicher - was soll das bedeuten? Strickt man nun mit einem Faden oder mit zwei doppelt? Was bringt das Anschlagen der Maschen mit 2 Fäden?

21.08.2013 - 21:39

DROPS Design answered:

Liebe Maria, das war auf Deutsch etwas unglücklich formuliert, wir haben das nun überarbeitet: der eine Faden wird abgeschnitten und es wird mit nur 1 Faden weitergstrickt. Lediglich die Anschlag- und Abkettkante wird mit doppeltem Faden gearbeitet, damit sie nicht zu fest wird.

22.08.2013 - 08:11

country flag Samanta wrote:

Ma quando le istruzioni dicono di lavorare il 1 ferro del diagramma m1 significa che devo partire dall'ultimo rigo da destra verso sinistra?

26.07.2012 - 00:02

DROPS Design answered:

Si inizia sempre in basso a destra e si lavora verso sinistra. Buon lavoro!

27.07.2012 - 16:46

country flag Ria wrote:

Ik snap niets van dit patroon en met mij mijn vriendinnen niet. Moet er gemeerderd worden?

12.06.2012 - 21:52

DROPS Design answered:

Bij het breien van M.1 aan de zijkanten komen er automatisch meer steken bij (bekijk de teltekening). Er is in elke 2e nld een extra omslag. In de tweede laatste nld van de teltekening kant u deze extra st weer af.

13.06.2012 - 10:19