
Popular categories
Looking for a yarn?


Comments / Questions (79)
![]() Judith wrote:
Judith wrote:
Bonjour une fois que j'ai tricote 7 cm de côtes pour le col puis 6cm de jersey pour faire un double col Comment dois je coudre les 2 ? Au final si je comprends bien ça va donner un visuel de col en jersey et les cotes seront à l'intérieur du col pour faire jolie ? Merci pour votre aide Judith
22.01.2025 - 12:53DROPS Design answered:
Bonjour Judith, on tricote le col en 2 parties distinctes: on relève d'abord les mailles autour de l'encolure, on tricote 7 cm de côtes et on rabat les mailles. On relève ensuite de nouveau des mailles autour du col = dans les mailles relevées pour les côtes, on tricote 6 rangs jersey et on rabat. Cette bordure roulottée se place ainsi à la jonction de l'encolure, juste avant les côtes et forme un petit "bourrelet"/ une "nervure" en relief à la base du col. Bon tricot!
24.01.2025 - 10:18
![]() Judith wrote:
Judith wrote:
Bonjour, je n'arrive pas à comprendre ce qu'il faut faire pour le col. J'ai relève les mailles au niveau de l'encolure et au tricote en côtes pendant 7 cm. Ensuite je dois relever des mailles sur les cotes pour tricoter en jersey. Ou dois je le faire ? sur les mailles que j'ai rabattues ?
22.01.2025 - 12:43DROPS Design answered:
Bonjour Judith, une fois que le col en côtes est terminé (rabattez les mailles), vous allez relever des mailles dans le 1er rang des côtes du col pour pouvoir tricoter une petite bordure roulottée composée de 6 rangs jersey. Cette bordure se fait en plus, à la jonction du pull et du col et fait une petite "nervure" relief avant les côtes. Bon tricot!
22.01.2025 - 16:20
![]() Ria wrote:
Ria wrote:
Waar is de correctie toegepast. Kan dat niet echt vinden. Alleen op de goede kant zijn de naalden geteld. Tussen de patronen zin. 5 naalden, dat betekend dat er tussen de kabels 10 naalden gebreid worden ? 5 heen en 5 terug. Ik vind kavel patroon zo groot, Het lijkt niet goed. Groetjes Ria
20.01.2025 - 19:55DROPS Design answered:
Dag Ria,
De correcties zijn al doorgevoerd in het online patroon. De telpatronen geven alle naalden in het patroon weer, dus zowel de goede als de verkeerde kant.
20.01.2025 - 20:51
![]() Sarah wrote:
Sarah wrote:
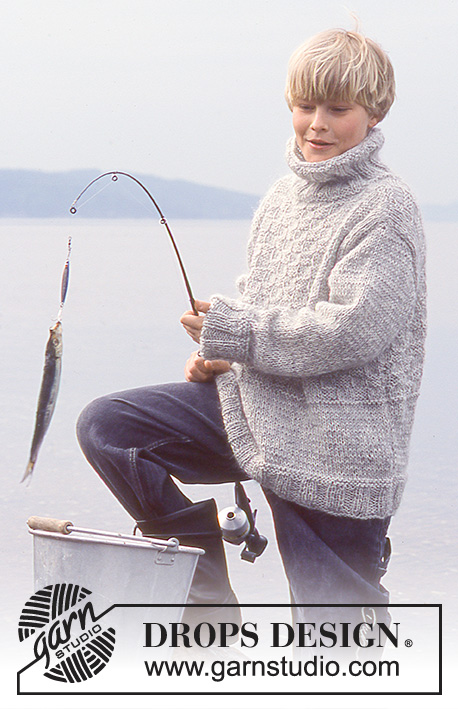
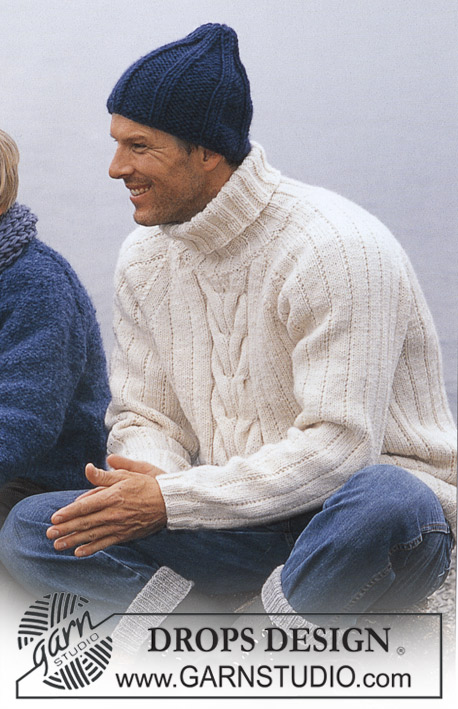
Is this sweater for an adult? The picture is of a man, but the sizes say: 12/14 years - S/M - L - XL - XXL ?
22.11.2024 - 20:39DROPS Design answered:
Dear Sarah, the sweater is for adults, with an extra size to apply for children if you want to: sizes S/M - L - XL - XXL refer to adult sizes. However, you can also apply this pattern for older children, so the smallest size is for 12/14 years (children), while the other sizes are for adults. Happy knitting!
24.11.2024 - 19:40
![]() Sarah wrote:
Sarah wrote:
Is this sweater for an adult? The picture is of a man, but the sizes say: 12/14 years - S/M - L - XL - XXL ?
22.11.2024 - 20:39
![]() Juliet wrote:
Juliet wrote:
I don’t understand how to complete the neck. I have done the first part, picking up sts around neck and rib for 8cm. The next part says pick up sts in first row of rib. Is this on the wrong or right side? It then says join and knit 6 rows, join to what? Thanks for your help
11.11.2024 - 16:28DROPS Design answered:
Dear Juliet, after you have worked the neck edge with rib, you will now work an extra rolled edge, pick up now 1 stitch in each of the stitches on first row of neck edge, from right side and work 6 rounds stocking stitch then cast off. This makes a nice rolling edge at the transition / beginning of neck edge with rib. Happy knitting!
12.11.2024 - 08:53
![]() Anne Mongeon wrote:
Anne Mongeon wrote:
Bonsoir, après avoir tricoter 20 rangs qui me donnent 7 cm de bordure, je tricote 3 rangs envers et un rang endroit, donc mon prochain rang se doit d’être à l’envers, cela veut dire que je commencerais le diagramme sur un rang envers…. Est-ce que j’ai bien compris….. Merci! Anne
17.08.2024 - 04:43DROPS Design answered:
Bonjour Anne, le 1er de ces 3 rangs se fait sur l'envers, ainsi quand ces 3 rangs sont faits, le rang suivant est à tricoter sur l'endroit. Bon tricot!
19.08.2024 - 07:54
![]() Padmaja wrote:
Padmaja wrote:
I have knitted 6cm of color and bind off, where to pick up the stitches for folding the collor
07.06.2024 - 19:20
![]() Padmaja Kadaba wrote:
Padmaja Kadaba wrote:
Thank you for a wonderful pattern. I am almost finished with it. I am stuck at the assembly section. I finished the neck, but unable to follow how to go about the next steps. Do I pick up the next 100 from inside or outside and what does first line mean here?
07.06.2024 - 19:15
![]() Wendy wrote:
Wendy wrote:
Where do I find out how many balls of wool I need to knit this jumper?
13.05.2024 - 00:40DROPS Design answered:
Hi Wendy, Drops Karisma is sold in 50 g balls, so you would need 11 balls for size 12/14 years, 14 for S/M, etc. Happy knitting!
13.05.2024 - 06:34
|
|||||||||||||
Fisherman's Friend |
|||||||||||||
|
|
|||||||||||||
Knitted jumper for men with cables, in DROPS Karisma or DROPS Merino Extra Fine.
DROPS 85-11 |
|||||||||||||
|
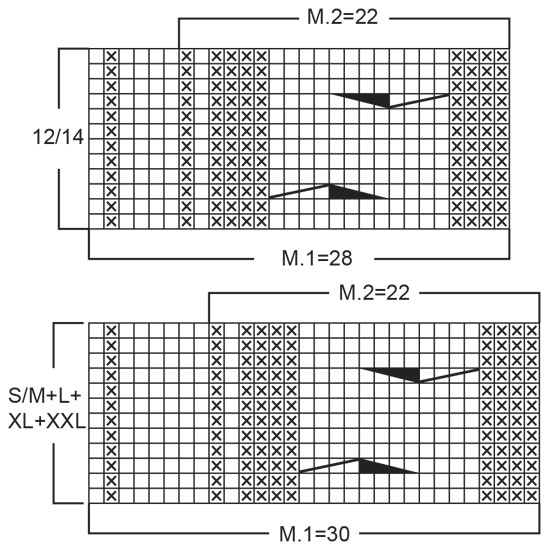
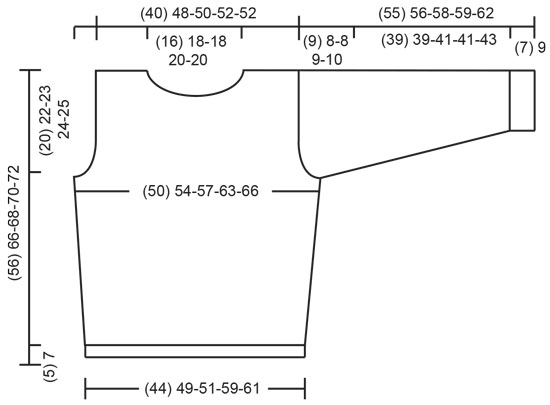
Gauge: 21 sts x 28 rows on larger needles in stockinette st = 10 x 10 cm. Rib: *K 1, P 2*, repeat from *-*. Pattern: The pattern is seen from the right side. The bottom chart is for Size 12/14 years; the top chart is for all other sizes. ________________________________________________________________ Front: Cast on 95-104-110-125-131 sts on smaller needles and knit rib, keeping 1 edge st at each side in garter st. When the rib measures 5-7-7-7-7 cm change to larger needles and P 3 rows, increasing 17-16-16-15-15 sts evenly distributed on the 3rd row = 112-120-126-140-146 sts. Knit the next row as follows (right side row): K 1 (edge st knit in garter st), 1-2-5-12-15 sts stockinette st, P 1, K 1, Pattern 1 over the next 84-90-90-90-90 sts, Pattern 2 (= 22 sts), 1-2-5-12-15 sts stockinette st and K 1 (edge st knit in garter st). Continue the pattern as established. When the piece measures 10 cm inc 1 st at each side every 4-5-5-7-7 cm a total of 6-6-6-5-5 times = 124-132-138-150-156 sts – knit the increased sts in stockinette st. When the piece measures 36-44-45-46-47 cm bind off for armhole at each side every other row: 3 sts 1 time, 2 sts 3-1-1-3-4 times and 1 st 3-3-3-3-4 times = 100-116-122-126-126 sts. Continue with pattern as established. When the piece measures 50-59-61-63-65 cm – adjust to end after the 5th or 11th row in chart – dec 4 sts over each of the 2 center cables as follows: *K 1, K 2 tog*, repeat from *-* a total of 4 times (knit the remaining sts the same as before) = 92-108-114-118-118 sts. Knit 1 row back in pattern, then put the center 18-22-22-26-26 sts on a st holder for the neck. Now bind off at each neck edge every other row: 2 sts 2 times and 1 st 4 times = 29-35-38-38-38 sts remain on each shoulder. When the piece measures 55-65-67-69-71 cm dec 4 sts over the cables on each shoulder in the same way as at neck edge = 25-31-34-34-34 sts remain on each shoulder. Knit 1 row back in pattern and bind off, the piece measures approx. 56-66-68-70-72 cm. Back: Cast on and knit the same as the front. Bind off for armhole as on front. When the piece measures 53-63-65-67-69 cm – adjust to end after the 5th or 11th row in chart – dec 4 sts over each of the 2 center cables in the same way as on front. Knit 1 row back in pattern, then bind off the center 30-34-34-38-38 sts for the neck. Now dec 1 st at each neck edge every other row 2 times = 29-35-38-38-38 sts remain on each shoulder. When the piece measures 55-65-67-69-71 cm dec 4 sts over the cables on each shoulder as on front. Knit 1 row back in pattern and bind off, the piece measures approx. 56-66-68-70-72 cm. Sleeve: Cast on 47-50-53-53-56 sts on smaller needles and knit rib, keeping 1 edge st at each side in garter st. When the piece measures 7-9-9-9-9 cm change to larger needles. K 2 rows (first row = right side) then knit stockinette st to finished measurements. When the piece measures 12-12-12-16-16 cm inc 1 st at each side every 2.5-2-2-1.5-1.5 cm a total of 15-17-18-21-22 times = 77-84-89-95-100 sts. When sleeve measures 46-48-50-50-52 cm bind off for sleeve cap at each side every other row: 4 sts 1 time, 3 sts 1 time, 2 sts 2-3-3-4-4 times and 1 st 5-2-2-3-3 times, then bind off 2 sts at each side until the piece measures 54-55-57-58-61 cm, then bind off 3 sts at each side 1 time. Bind off the remaining sts, the piece measures approx. 55-56-58-59-62 cm. Assembly: Sew shoulder seams. Collar with rolled edge: Pick up and knit approx. 93-117 sts (divisible by 3) around the neck on double-pointed needles; join and knit rib for 6-7-7-8-8 cm and bind off in rib. Now pick up approx. 87-106 new sts in the 1st row of the rib on double-pointed needles; join and knit 6 rows stockinette st (= rolled edge). Bind off – for best roll, make a yo approx. every 8 sts at the same time as binding off. Fold the rib to wrong side and stitch in place. Sew in sleeves. Sew sleeve and side seams using edge sts as a seam allowance. |
|||||||||||||
Diagram explanations |
|||||||||||||
|
|||||||||||||
|
|||||||||||||
|
|||||||||||||
Have you finished this pattern?Tag your pictures with #dropspattern or submit them to the #dropsfan gallery. Do you need help with this pattern?You'll find 17 tutorial videos, a Comments/Questions area and more by visiting the pattern on garnstudio.com. © 1982-2025 DROPS Design A/S. We reserve all rights. This document, including all its sub-sections, has copyrights. Read more about what you can do with our patterns at the bottom of each pattern on our site. |
|||||||||||||


With over 40 years in knitting and crochet design, DROPS Design offers one of the most extensive collections of free patterns on the internet - translated to 17 languages. As of today we count 314 catalogues and 11821 patterns translated into English (UK/cm).
We work hard to bring you the best knitting and crochet have to offer, inspiration and advice as well as great quality yarns at incredible prices! Would you like to use our patterns for other than personal use? You can read what you are allowed to do in the Copyright text at the bottom of all our patterns. Happy crafting!
Post a comment to pattern DROPS 85-11
We would love to hear what you have to say about this pattern!
If you want to leave a question, please make sure you select the correct category in the form below, to speed up the answering process. Required fields are marked *.