
Popular categories
Looking for a yarn?


Comments / Questions (12)
![]() Ewelina wrote:
Ewelina wrote:
Witam, czy przy zwiększaniu oczek na przodzie przy rozmiarze S- 20 oczek robimy drutami 6 dżersejem,a dopiero później robimy ściągacz drutami\r\n4,5. Czy zwiękamy od razu te oczka przy ściagaczu.\r\nPozdrawiam Ewelina
21.05.2025 - 08:04DROPS Design answered:
Witaj Ewelino, dodawanie oczek wykonujesz na etapie ściągacza, na drutach nr 4,5. Na tych samych drutach wykonujesz dalszą część ściągacza. Pozdrawiamy!
21.05.2025 - 10:41
![]() Anna-Lena Löfberg wrote:
Anna-Lena Löfberg wrote:
Hej, "Det minskas 2 maskor på var 11-5-5-5-4-2½ cm totalt 4-7-7-7-8-11 gånger = 42-42-44-46-48-48 maskor." Minskningen i S - var 11 cm måste väl ändå vara fel? Eller har jag missat något? Vänliga hälsningar, Anna-Lena
11.03.2025 - 10:07DROPS Design answered:
Hej Anna-Lena, du minskar när arb mäter 2cm, 13cm, 24cm och 35 cm :)
14.03.2025 - 12:06
![]() Anne-Sophie wrote:
Anne-Sophie wrote:
Bonjour, je ne comprends pas bien comment il faut faire les augmentations des raglan. Pouvez vous me les expliquer autrement ? Que sont les 2 mailles des raglan ? Merci d'avance
09.02.2025 - 20:41DROPS Design answered:
Bonjour Anne-Sophie, les 2 mailles des raglans sont les 2 mailles endroit des côtes qui doivent avoir un fil marqueur entre elles placé au tout début de l'empiècement, vous allez ensuite augmenter pour le raglan en commençant 1 maille avant le fil marqueur ainsi: faites 1 jeté, tricotez 2 mailles endroit (le fil marqueur est entre ces 2 mailles), faites 1 jeté - répétez à chaque fil marqueur pour augmenter 8 mailles par tour. Au tour suivant, tricotez les jetés comme indiqué sous RAGLAN - cf vidéo. Bon tricot!
10.02.2025 - 11:19
![]() Nele Van Passel wrote:
Nele Van Passel wrote:
Hallo, ik denk dat ik een fout gemaakt heb bij de PAS. het lijf is al volledig gebreien en bij het aan doen staat de 4 hoeken van de pas recht. Ik zou graag een foto door willen sturen om het te verduidelijken. Naar waar kan ik dit sturen?
13.12.2024 - 22:01DROPS Design answered:
Dag Nele,
Je meerdert aan beide kanten van elke markeerdraad (= raglanlijn) en dat doe je om de naald, dus de ene naald wel en de andere naald niet. Misschien heb je per ongeluk op iedere naald gemeerderd in plaats van om de naald?
08.01.2025 - 14:20
![]() Christine wrote:
Christine wrote:
Bonjour, sur les photos de présentation du modèle nous ne voyons pas le dos et donc pas les torsades. L’absence de photos des particularités des différents modèles du site ainsi que celle des modèles vus de dos manquent pour la compréhension. Dommage!!! Vos modèles sont très beaux….
01.12.2024 - 15:41
![]() Christine wrote:
Christine wrote:
Je suis arrivée à la division dos/manches. Les deux premières mailles ( qui appartiennent au dos) se situent où par rapport à la maille centrale du raglan?
27.10.2024 - 19:01DROPS Design answered:
Bonjour Christine, en fonction des tailles, la division ne se fait pas exactement au niveau des mailles des raglans mais la maille du raglan + la /les premières et dernières mailles des manches vont être attribuées au devant et au dos. Si votre nombre de mailles est correct, divisez bien les mailles comme indiqué pour votre taille, l'ouvrage sera symétrique. Bon tricot!
28.10.2024 - 09:50
![]() Hanna Lehto wrote:
Hanna Lehto wrote:
Is this knitted with double or single yarn?
16.10.2024 - 16:45DROPS Design answered:
This sweather is knitted with single yarn.
16.10.2024 - 18:11
![]() Susanne wrote:
Susanne wrote:
Jeg vil gjerne bruke oppskriften, men strikke nedenfra opp. Kan jeg det?
15.10.2024 - 16:37DROPS Design answered:
Hej Susanne, ja selvfølgelig, men vi kan ikke hjælpe dig med at ændre den. Det er meget nemt at strikke oppefra og ned og så kan du tilpasse længden. Se vores videoer hvordan man gør :)
16.10.2024 - 12:12
![]() Charlotte wrote:
Charlotte wrote:
Er staat een fout bij 'verdelen voor het lijf en de mouw' er staat Verdeel het werk voor het lijf en de mouwen terwijl u TEGELIJKERTIJD de volgende naald als volgt breit: 2 recht-2-2-3-3-4 (deel van het achterpand). Hierdoor had ik dus te veel steken bij het begin van de naald. Bij het Engelse patroon zag ik de correcte opgave.
13.10.2024 - 11:11
![]() Katja Hinsch wrote:
Katja Hinsch wrote:
Hei. Jeg ønsker strikke denne i drops air. Er det mulig? Vil genseren bli den samme størrelsen i centimeter? Og hvis jeg øsnker strikke den i XXL, så skal jeg i oppr oppsrikft bruke 8 nøster. Hva skal jeg regne inn når jeg har drops air som garn istedenfor?
02.10.2024 - 00:09DROPS Design answered:
Hei Katja, Du trenger samme mengde garn som beskrevet for Drops Brushed Alpaca Silk (de begge hører til samme garngruppa). God fornøyelse!
04.10.2024 - 07:43
|
|
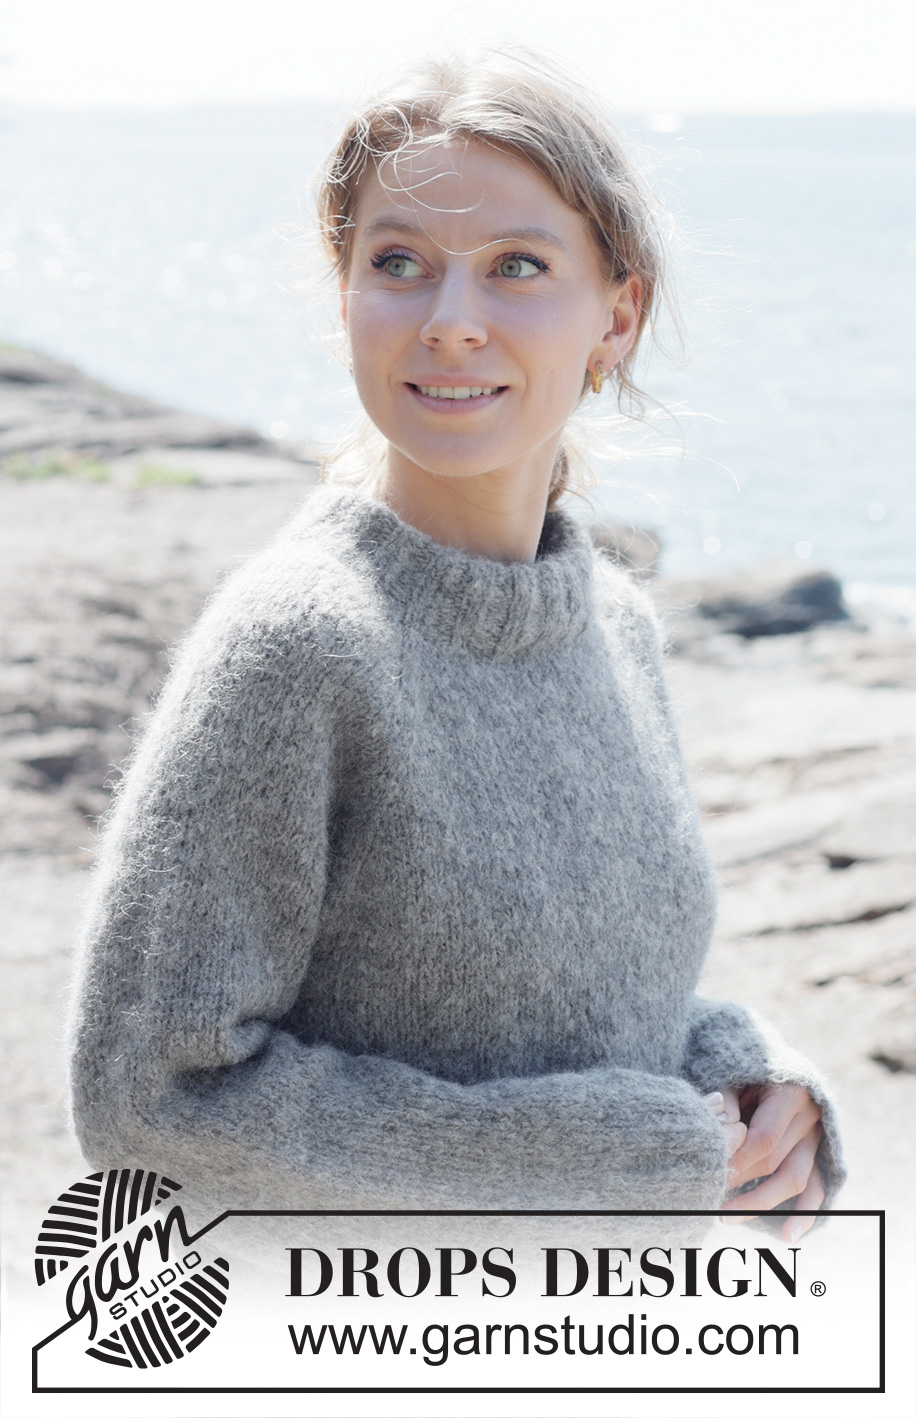
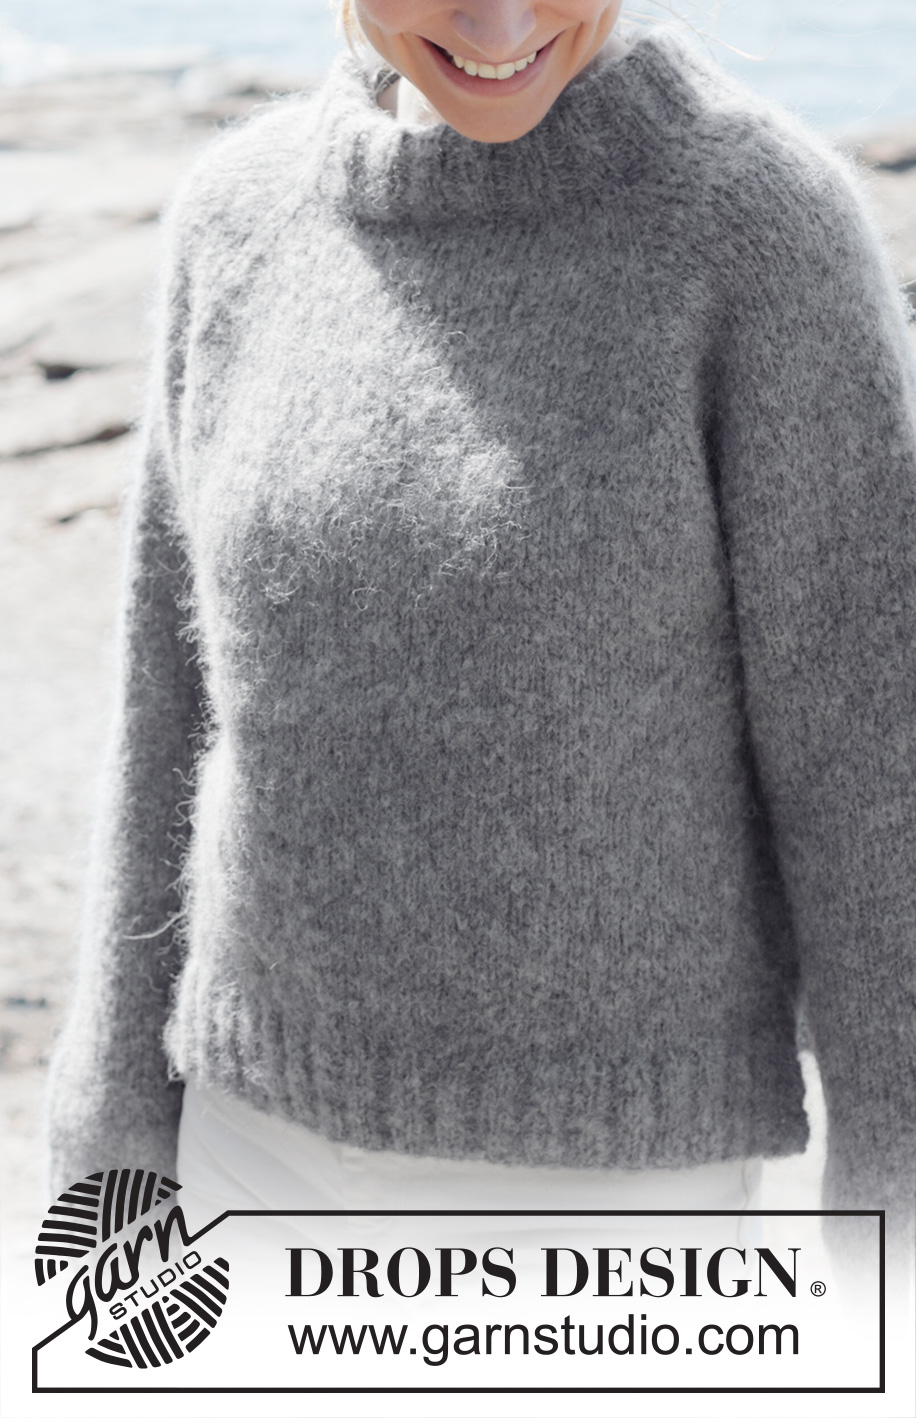
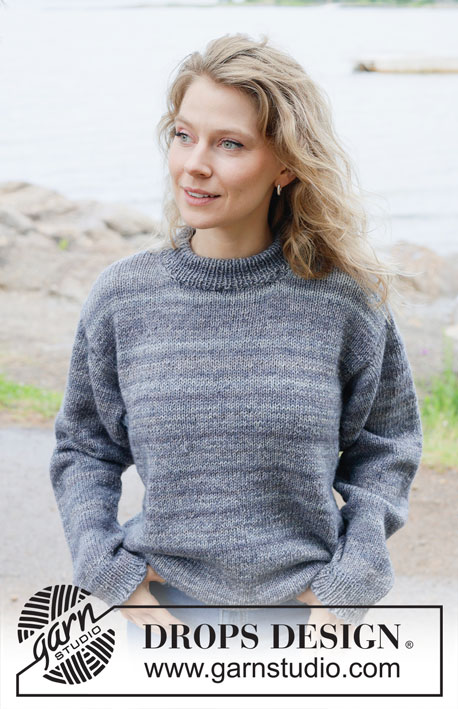
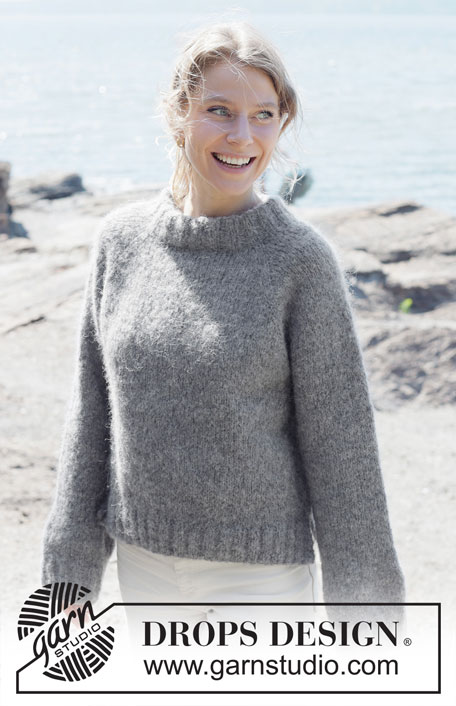
Stone Shore#stoneshoresweater |
|
 |
 |
Knitted jumper in DROPS Melody. The piece is worked top down with raglan, double neck and split in sides. Sizes S - XXXL.
DROPS 252-11 |
|
|
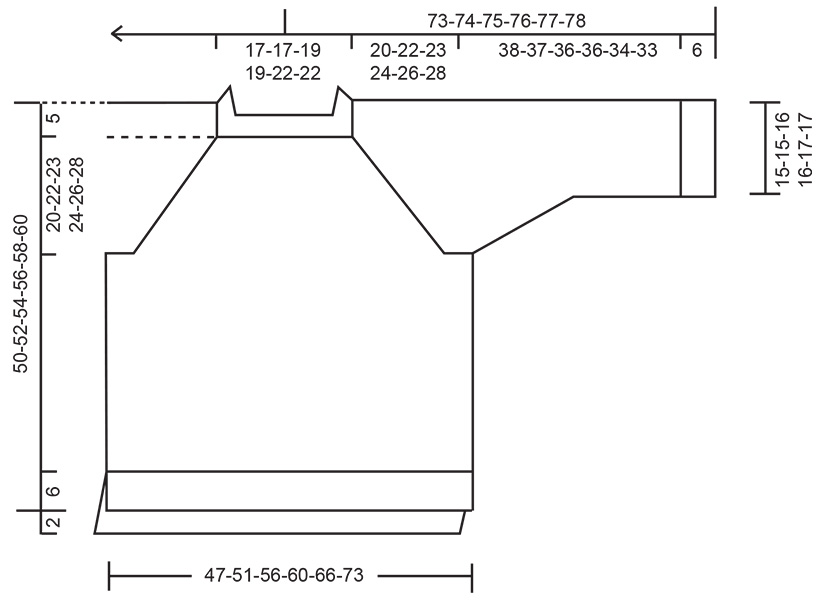
------------------------------------------------------- EXPLANATIONS FOR THE PATTERN: ------------------------------------------------------- RAGLAN: Increase 1 stitch by making 1 yarn over, which is then worked on the next round as follows: BEFORE MARKER-THREAD: Slip the yarn-over off the left needle and replace it twisted (insert the left needle through the back when replacing it). Knit the front loop of the yarn-over to avoid a hole. Then work the new stitch in stocking stitch. AFTER MARKER-THREAD: Knit the yarn-over through the back loop to avoid a hole. Then work the new stitch in stocking stitch. CABLE TIP: Cable 2 stitches without using the cable needle as follows: TOWARDS THE RIGHT: Knit the 2nd stitch on the left needle as usual, keeping the first stitch on the needle, then knit the first stitch. Slip both stitches off left needle. TOWARDS THE LEFT: Knit the 2nd stitch on the left needle through the back loop, keeping the first stitch on the needle, then knit the first stitch. Slip both stitches off the left needle. DECREASE TIP: Decrease 1 stitch on each side of the marker-thread as follows: Work until there are 4 stitches left before the marker-thread, knit 2 together, knit 4 (marker-thread sits in the middle of these 4 stitches), slip 1 stitch knit-wise, knit 1 and pass the slipped stitch over the knitted stitch (2 stitches decreased). ------------------------------------------------------- START THE PIECE HERE: ------------------------------------------------------- JUMPER – SHORT OVERVIEW OF THE PIECE: The pattern uses both long and short needles; start with the length which fits the number of stitches and change when necessary. The neck and yoke are worked in the round with circular needle, from the right back shoulder, top down. When the yoke is finished, it is divided for the body and sleeves. The body is continued in the round, while the sleeves wait. The body is divided for the split in each side and the front and back pieces finished separately, back and forth. The sleeves are worked in the round, top down. The neck is folded double and fastened to the inside to finish. NECK: Cast on 80-80-88-88-96-96 stitches with circular needle size 6 mm and DROPS Melody. Change to circular needle size 4.5 mm (casting on with a larger needle size makes the cast-on edge elastic). Work rib in the round (knit 2, purl 2) for 11 cm. The neck is later folded double to give a neck of approx. 5 cm. The beginning of the round is the back right shoulder. Insert 1 marker after 29-29-31-31-33-33 stitches (approx. mid-front); the piece is measured from this marker. YOKE: Continue in the round with needle size 6 mm. Insert 4 marker-threads in the piece as follows, without working the stitches and insert them between 2 knitted stitches from the rib (the raglan-stitches). Count 1 stitch, insert marker-thread 1 (= beginning of round), count 16 stitches (= sleeve), insert marker-thread 2, count 24-24-28-28-32-32 stitches (= front piece), insert marker-thread 3, count 16 stitches (= sleeve), insert marker-thread 4, with 24-24-28-28-32-32 stitches left after this last marker-thread (= back piece). Work stocking stitch in the round and increase for RAGLAN after/before the 2 raglan-stitches at each marker-thread, in each transition between the body and sleeves – read description above (= 8 stitches increased on each increase-round). Increase for raglan every 2nd round a total of 17-18-19-20-22-23 times = 216-224-240-248-272-280 stitches. Remember to maintain the knitting tension. Continue the stocking stitch without further increases, until the piece measures 20-22-23-24-26-28 cm from the marker mid-front. Now divide for the body and sleeves. DIVIDE FOR BODY AND SLEEVES: AT THE SAME TIME as working the next round, divide for the body and sleeves as follows: Knit 2-2-2-3-3-4 (part of the back piece), place the next 46-48-50-50-54-54 stitches on a thread for the sleeve, cast on 4-8-8-10-10-16 stitches (in side mid-under the sleeve), knit 62-64-70-74-82-86 (front piece), place the next 46-48-50-50-54-54 stitches on a thread for the sleeve, cast on 4-8-8-10-10-16 stitches (in side mid-under the sleeve), knit the last 60-62-68-71-79-82 stitches (back piece). The body and sleeves are finished separately. BODY: = 132-144-156-168-184-204 stitches. Insert 1 marker-thread in the middle of the 4-8-8-10-10-16 cast-on stitches under each sleeve; allow the threads to follow your work onwards – they are used when working the split in each side. Work to the first marker-thread; the round starts here. Continue with stocking stitch in the round until the piece measures 39-41-43-45-47-49 cm from the marker mid-front, working the last round as follows: Start 2 stitches before the beginning of the round, place 2 stitches on cable needle in front of piece, knit 2, place the marker-thread on the needle, knit 2 from the cable needle, work until there are 2 stitches left before the 2nd marker-thread, place 2 stitches on cable needle behind the piece, knit 2, place the marker-thread on the needle, knit 2 from the cable needle, work to end of round. Now divide for the split in each side at each marker-thread, place the back piece stitches on a stitch holder and work the front piece back and forth as described below. FRONT PIECE: = 66-72-78-84-92-102 stitches. On the next row (wrong side) start the rib. AT THE SAME TIME increase 20-22-28-30-30-36 stitches evenly on the row = 86-94-106-114-122-138 stitches as follows: Change to circular needle size 4.5 mm, work rib (purl 2, knit 2 – remember to increase), until there are 2 stitches left, purl 2. Continue this rib, AT THE SAME TIME cable the outermost 2 stitches on each side, on each row from the right side as follows - read CABLE TIP: Cable 2 stitches towards the right, continue the rib until there are 2 stitches left, cable 2 stitches towards the left. When the rib measures 6 cm, cast off with rib. The jumper measures approx. 45-47-49-51-53-55 cm from the marker mid-front and approx. 50-52-54-56-58-60 cm from the top of the shoulder. BACK PIECE: Work in the same way as the front piece until the rib measures 8 cm. The back piece is 2 cm longer than the front piece. SLEEVES: Place the 46-48-50-50-54-54 sleeve-stitches from the thread on one side of the piece on short circular needle size 6 mm and knit up 1 stitch in each of the 4-8-8-10-10-16 stitches cast on under the sleeve = 50-56-58-60-64-70 stitches. Insert a marker-thread in the middle of the 4-8-8-10-10-16 stitches under the sleeve. Start at the marker-thread and work stocking stitch in the round. When the sleeve measures 2 cm, decrease under the sleeve – read DECREASE TIP. Decrease 2 stitches every 11-5-5-5-4-2½ cm a total of 4-7-7-7-8-11 times = 42-42-44-46-48-48 stitches. Continue working until the sleeve measures 38-37-36-36-34-33 cm from the division. Change to double pointed needles size 4.5 mm. Work rib (knit 2, purl 2), AT THE SAME TIME increase 10-10-8-10-8-8 stitches evenly on the first round = 52-52-52-56-56-56 stitches. When the rib measures 6 cm, cast off with rib. The sleeve measures approx. 44-43-42-42-40-39 cm from the division. ASSEMBLY: Fold the neck double to the inside and sew down. To avoid the neck being tight and rolling outwards, it is important that the seam is elastic. |
|
|
|
Have you finished this pattern?Tag your pictures with #dropspattern #stoneshoresweater or submit them to the #dropsfan gallery. Do you need help with this pattern?You'll find 30 tutorial videos, a Comments/Questions area and more by visiting the pattern on garnstudio.com. © 1982-2025 DROPS Design A/S. We reserve all rights. This document, including all its sub-sections, has copyrights. Read more about what you can do with our patterns at the bottom of each pattern on our site. |
|


With over 40 years in knitting and crochet design, DROPS Design offers one of the most extensive collections of free patterns on the internet - translated to 17 languages. As of today we count 314 catalogues and 11822 patterns translated into English (UK/cm).
We work hard to bring you the best knitting and crochet have to offer, inspiration and advice as well as great quality yarns at incredible prices! Would you like to use our patterns for other than personal use? You can read what you are allowed to do in the Copyright text at the bottom of all our patterns. Happy crafting!
Post a comment to pattern DROPS 252-11
We would love to hear what you have to say about this pattern!
If you want to leave a question, please make sure you select the correct category in the form below, to speed up the answering process. Required fields are marked *.