
Popular categories
Looking for a yarn?


|
|||||||||||||||||||||||||
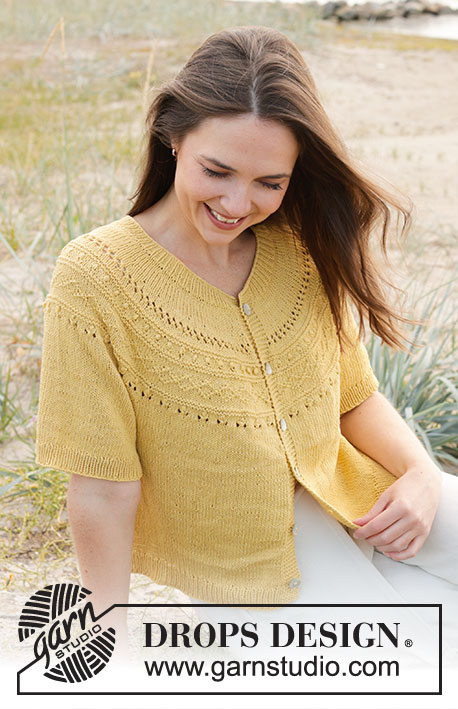
Sun Dream Tee |
|||||||||||||||||||||||||
 |
 |
||||||||||||||||||||||||
Knitted short-sleeve jumper in DROPS Safran. The piece is worked top down, with round yoke and relief-pattern on the yoke. Sizes S - XXXL.
DROPS 240-24 |
|||||||||||||||||||||||||
|
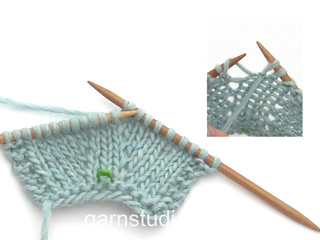
------------------------------------------------------- EXPLANATIONS FOR THE PATTERN: ------------------------------------------------------- PATTERN: See diagram A.1. INCREASE TIP: Increase 1 stitch by making 1 yarn over which is worked twisted on the next round to avoid a hole. DECREASE TIP (for sides of body and sleeves): Decrease 1 stitch on either side of the marker-thread as follows: Work until there are 3 stitches left before the marker-thread, knit 2 together, knit 2 (marker-thread sits between these 2 stitches), slip 1 stitch as if to knit, knit 1 and pass the slipped stitch over the knitted stitch (2 stitches decreased). RAGLAN: Increase by making 1 yarn over after/before each of the marker-stitches (raglan-stitches) in each transition between the body and sleeves (8 stitches increased). The yarn overs are worked as follows on the next round: BEFORE RAGLAN-STITCH: Slip the yarn over as if to knit, place it back onto the left needle the other way round and knit the front loop (leans to the right). No hole. AFTER RAGLAN-STITCH: Knit the back loop (leans to the left). No hole. Then work the new stitches in stocking stitch. ------------------------------------------------------- START THE PIECE HERE: ------------------------------------------------------- JUMPER – SHORT OVERVIEW OF THE PIECE: The neck and yoke are worked in the round with circular needle, top down. The yoke is divided for body and sleeves and the body is continued in the round with circular needle. The sleeves are worked in the round with short circular needle/double pointed needles. NECK: Cast on 120-124-128-134-138-142 stitches with short circular needle size 2.5 mm and DROPS Safran. Knit 1 round, then work rib (knit 1, purl 1) in the round for 3 cm. Knit 1 round and increase 30-32-32-34-36-38 stitches evenly spaced – read INCREASE TIP = 150-156-160-168-174-180 stitches. Insert 1 marker; the yoke is measured from this marker! YOKE: Change to circular needle size 3.5 mm. Work stocking stitch. REMEMBER THE KNITTING TENSION! When the yoke measures 2-3-4-4-5-6 cm from the marker, increase 30-32-36-40-46-48 stitches evenly spaced = 180-188-196-208-220-228 stitches. When the yoke measures 3-4-5-5-6-7 cm from the marker, work A.1 around the yoke. AT THE SAME TIME increase on each round marked with an arrow in A.1: Arrow-1: Increase 28-32-36-36-40-40 stitches evenly spaced = 208-220-232-244-260-268 stitches. Arrow-2: Increase 28-32-32-36-36-40 stitches evenly spaced = 236-252-264-280-296-308 stitches. Arrow-3: Increase 28-30-36-44-46-52 stitches evenly spaced = 264-282-300-324-342-360 stitches. Arrow-4: Increase 24-30-30-36-36-42 stitches evenly spaced = 288-312-330-360-378-402 stitches. Arrow-5: Increase 24-32-30-32-30-34 stitches evenly spaced = 312-344-360-392-408-436 stitches. Finish A.1. The yoke measures approx. 15-16-17-17-18-19 cm from the marker. Now increase for a small raglan. Insert 4 markers without working the stitches as follows: Insert 1 marker in the first stitch, count 64-70-74-80-80-82 stitches (sleeve), insert 1 marker in the next stitch, count 90-100-104-114-122-134 stitches (front piece), insert 1 marker in the next stitch, count 64-70-74-80-80-82 stitches (sleeve), insert 1 marker in the next stitch, there are 90-100-104-114-122-134 stitches left after the last marker (back piece). Work stocking stitch and, on the first round, increase for RAGLAN – read description above (8 stitches increased). Increase for raglan every 4th-4th-2nd-2nd-2nd-2nd round a total of 3-3-5-6-8-8 times = 336-368-400-440-472-500 stitches. Continue working, without further increases, until the yoke measures 19-20-22-23-25-27 cm from the marker. Divide for the body and sleeves as follows: Knit the marker-stitch, place the next 70-76-84-92-96-98 stitches on a thread for the sleeve, cast on 6-6-8-8-10-12 stitches (in side under sleeve), knit 98-108-116-128-140-152 (front piece), place the next 70-76-84-92-96-98 stitches on a thread for the sleeve, cast on 6-6-8-8-10-12 stitches (in side under sleeve), knit the last 97-107-115-127-139-151 stitches (back piece). The body and sleeves are finished separately. The piece is now measured from here! BODY: = 208-228-248-272-300-328 stitches. Insert 1 marker-thread in the middle of the 6-6-8-8-10-12 stitches cast on under each sleeve. Allow the threads to follow your work onwards; they are used when decreasing the sides. Continue with stocking stitch in the round. When the body measures 6 cm from the division, decrease 1 stitch on each side of both marker-threads – read DECREASE TIP (4 stitches decreased). Decrease like this every 6 cm a total of 3 times in each side = 196-216-236-260-288-316 stitches. When the body measures 22-23-23-24-24-24 cm from the division, knit 1 round and increase 44-48-52-56-64-72 stitches evenly spaced = 240-264-288-316-352-388 stitches. Change to circular needle size 2.5 mm and work rib (knit 1, purl 1) for 3 cm. Cast off a little loosely. The jumper measures approx. 48-50-52-54-56-58 cm from the shoulder. SLEEVES: Place the 70-76-84-92-96-98 stitches from the thread on the one side of the piece on short circular needle/double pointed needles size 3.5 mm and knit up 1 stitch in each of the new stitches cast on under the sleeve = 76-82-92-100-106-110 stitches. Insert a marker-thread in the middle of the new stitches under the sleeve. Start at the marker-thread and work stocking stitch in the round. When the sleeve measures 2-2-2-2-1-1 cm from the division, decrease 2 stitches under the sleeve – remember DECREASE TIP. Decrease like this every 8th-4th-2nd-2nd-2nd-2nd round a total of 4-6-9-10-11-11 times = 68-70-74-80-84-88 stitches. Work until the sleeve measures 11-11-9-9-8-8 cm from the division (or to desired length; there is approx. 3 cm left). Knit 1 round and increase 10-12-12-12-14-14 stitches evenly spaced = 78-82-86-92-98-102 stitches. Change to double pointed needles size 2.5 mm. Work rib (knit 1, purl 1) for 3 cm. Cast off a little loosely. The sleeve measures approx.14-14-12-12-11-11 cm. Work the other sleeve in the same way. |
|||||||||||||||||||||||||
Diagram explanations |
|||||||||||||||||||||||||
|
|||||||||||||||||||||||||

|
|||||||||||||||||||||||||

|
|||||||||||||||||||||||||
|
Have you made this or any other of our designs? Tag your pictures in social media with #dropsdesign so we can see them! Do you need help with this pattern?You'll find tutorial videos, a Comments/Questions area and more by visiting the pattern on garnstudio.com. © 1982-2024 DROPS Design A/S. We reserve all rights. This document, including all its sub-sections, has copyrights. Read more about what you can do with our patterns at the bottom of each pattern on our site. |
|||||||||||||||||||||||||


With over 40 years in knitting and crochet design, DROPS Design offers one of the most extensive collections of free patterns on the internet - translated to 17 languages. As of today we count 304 catalogues and 11422 patterns - 11422 of which are translated into English (UK/cm).
We work hard to bring you the best knitting and crochet have to offer, inspiration and advice as well as great quality yarns at incredible prices! Would you like to use our patterns for other than personal use? You can read what you are allowed to do in the Copyright text at the bottom of all our patterns. Happy crafting!
Comments / Questions (24)
I dont have a similar garment. Is there a way to choose size according to bust measurement
01.09.2023 - 18:19DROPS Design answered:
Dear Vaidehi, the measurements of this garment for each size can be found in the measurements schematic, under the pattern instructions. All measurements are in cm. You can see how to read this schematic here: https://www.garnstudio.com/lesson.php?id=24&cid=19. Happy knitting!
03.09.2023 - 19:21How do I decide which size I should make?
01.09.2023 - 10:17DROPS Design answered:
Dear Mrs Vaidehi, measure a similar garment you have and like the shape and compare the measurements to the ones in the chart, that's the best way to find the matching size - read more about sizing here. Happy knitting!
01.09.2023 - 15:24Bij het gaatje breien wordt niet verteld hoe de omslag gebreid moet worden. Brei ik de omslag zoals hij zich voordoet, dan krijg ik een erg groot gat. Brei ik de omslag gedraaid, dan is het gaatje nauwelijks zichtbaar. Ik krijg de gaatjes dus niet zo als op de foto. Wat is nou eigenlijk de bedoeling?
06.08.2023 - 17:33DROPS Design answered:
Dag Saskia,
Je breit deze inderdaad zoals deze zich voordoet, zodat er een gaatje ontstaat. Je breit hem niet gedraaid, anders wordt het niet een gaatje.
08.08.2023 - 20:47This pattern is listed on Ravelry as 240-54 instead of 240-24. Just wanted to let you know because I love you guys! :-) $hearts;
16.07.2023 - 05:21DROPS Design answered:
Thanks Wendy, pattern number has been edited there :)
28.07.2023 - 09:03Per favore vorrei sapere con quali ferri eseguire il campione. Grazie!
07.07.2023 - 15:05DROPS Design answered:
Buonasera Giuseppina, può provare a lavorare il campione con i ferri più grandi. In ogni caso la misura dei ferri è solo indicativa: deve utilizzare i ferri che le permettono di ottenere il campione indicato. Buon lavoro!
07.07.2023 - 19:41Bonjour, comment faire un rehausse pour le dos sur ce modèle ? merci
23.06.2023 - 21:22DROPS Design answered:
Bonjour Mme Roquet, cette vidéo montre comment faire des rangs raccourcis pour former une réhausse pour l'encolure dos; inspirez-vous d'un modèle de tension analogue pour ajouter une réhausse si vous en souhaitez une. Bon tricot!
26.06.2023 - 09:07I am working a size XXL at the point of finishing A1 increases and have 408 stitches as the pattern requires. But the next instructions divide for sleeves and back/front, and the pattern instructions add up to only 404 stitches. I assume there is a mistake, so can you please let me know how I should proceed from here.
03.05.2023 - 03:40DROPS Design answered:
Hi Nancy, After finishing A.1, you have 408 stitches. You then increase for a small raglan by the 4 markers. Increase 2 stitches at each marker (8 stitches increased on the round) x 8, which gives you 472 stitches. Continue working to the correct length of yoke for your size, then divide for the body and sleeves as described, with 96 stitches on each sleeve 140 stitches on the front and back pieces and 10 new stitches cast on under each sleeve. Hope this helps and happy knitting!
03.05.2023 - 06:49Mangler der ikke noget tekst i beskrivelsen af hvordan man strikker en boble?
01.05.2023 - 12:12DROPS Design answered:
Hei Eva. Nei. Forklaringen til boble finner du under diagramteksten og ikonet med en sort stjerne. Du kan også ta en titt på hjelpevideoen "Boble - strik". mvh DROPS Design
02.05.2023 - 13:52Beautiful. I want to try this pattern for summer wear.
29.04.2023 - 10:05Walkin on Sunshine!
22.01.2023 - 23:25