
Popular categories
Looking for a yarn?


|
|||||||||||||||||||||||||
Sherwood Smiles |
|||||||||||||||||||||||||
 |
 |
||||||||||||||||||||||||
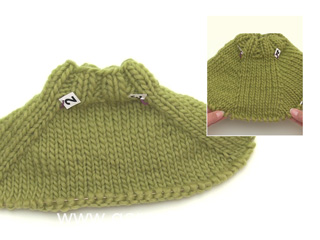
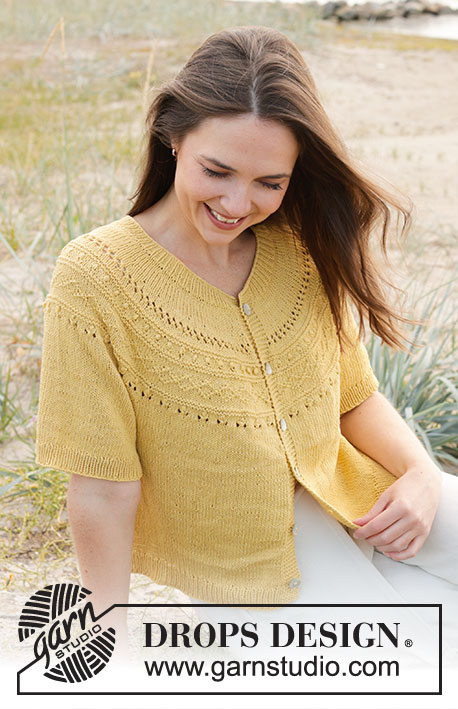
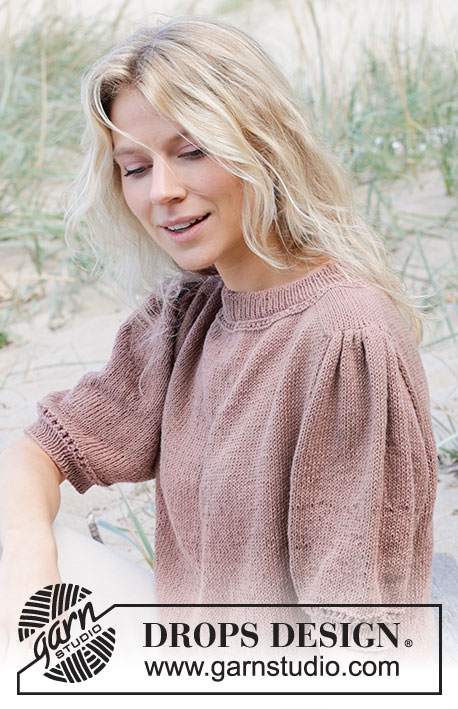
Knitted jumper with short sleeves in DROPS Safran. Piece is knitted top down with double neck edge, saddle shoulder increase, stocking stitch and short puffed sleeves. Size: S - XXXL
DROPS 239-16 |
|||||||||||||||||||||||||
|
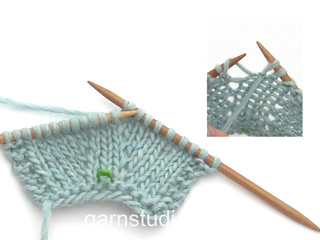
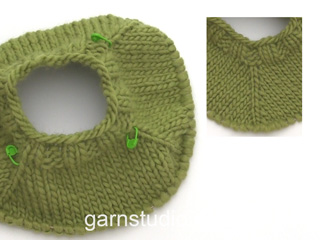
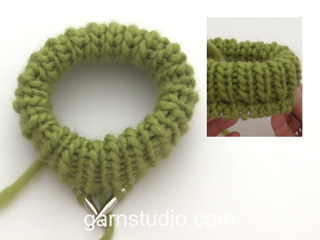
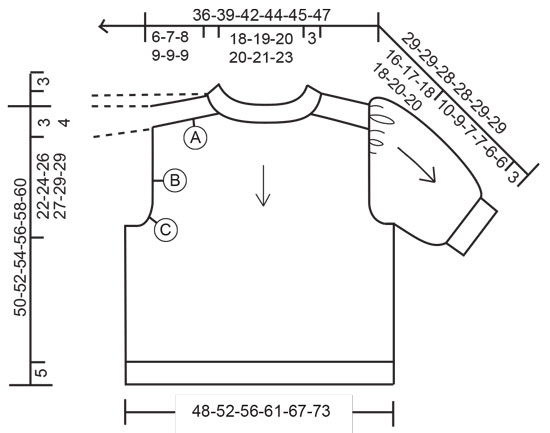
---------------------------------------------------------- EXPLANATION FOR THE PATTERN: ---------------------------------------------------------- PATTERN: See diagram A.1. INCREASE TIP-1 (from right side): INCREASE TOWARDS THE RIGHT BEFORE MARKER: Use left needle to pick up yarn between 2 stitches from round below, pick up yarn from the back and knit stitch in front loop of stitch. INCREASE TOWARDS THE LEFT AFTER MARKER: Use left needle to pick up yarn between 2 stitches from round below, pick up yarn from the front and knit stitch in back loop of stitch. INCREASE TIP-2 (from wrong side): INCREASE TOWARDS THE RIGHT BEFORE MARKER: Use left needle to pick up yarn between 2 stitches from round below, pick up yarn from the front and purl stitch in back loop of stitch. INCREASE TOWARDS THE LEFT AFTER MARKER: Use left needle to pick up yarn between 2 stitches from round below, pick up yarn from the back and purl stitch in front loop of stitch. DECREASE TIP (applies to mid under sleeves): Decrease 1 stitch on each side of marker thread as follows: Work until 3 stitches remain before marker thread and knit 2 together, knit 2 (marker thread is between these 2 stitches), slip 1 stitch knitwise, knit 1, pass slipped stitch over stitch worked (2 stitches decreased). ---------------------------------------------------------- START THE PIECE HERE: ---------------------------------------------------------- JUMPER - SHORT OVERVIEW OF THE PIECE: Work double neck edge in the round on circular needle top down. Then work neck line with short rows, this is worked back and forth on circular needle. Work the rest of the yoke in the round on circular needle. Now divide yoke for body and sleeves. Work the body in the round on circular needle. Work sleeves in the round on double pointed needles/a short circular needle. DOUBLE NECK EDGE: Cast on 116-120-124-134-140-148 stitches with DROPS Safran over a short circular needle size 2.5 and a short circular needle size 3.5 mm held together. Pull out short circular needle 3.5 mm and keep stitches on the short circular needle size 2.5 mm (cast is done like this to get an elastic cast-on edge). Work rib (knit 1/purl 1) for 7 cm. Now fold the rib in towards the wrong side to form a double edge - then work next round in rib as before while at the same time working every approx. 4th stitch together with equivalent approx. every 4th stitch from cast-on edge. You now have a double neck edge. Knit 1 round while increasing 26-26-30-32-34-38 stitches evenly = 142-146-154-166-174-186 stitches. Then work A.1 in the round over all stitches. When A.1 has been worked, insert 1 marker in the middle of round (mid front). Work yoke as explained below – measure yoke from this marker. YOKE WITH SADDLE SHOULDER INCREASE: Switch to circular needle size 3.5 mm. Insert 4 markers in the piece as explained below - this is done without working the stitches, and each marker is inserted between 2 stitches. Use these markers when increasing for saddle shoulder. They should be in a different colour than the marker at the front. 1st marker: Count 28-29-31-32-34-37 stitches (half back piece), insert 1st marker before next stitch. 2nd marker: Count 15-15-15-19-19-19 stitches from 1st marker (shoulder stitches), insert 2nd marker before next stitch. 3rd marker: Count 56-58-62-64-68-74 stitches (front piece), insert 3rd marker before next stitch. 4th marker: Count 15-15-15-19-19-19 stitches (shoulder stitches), insert 4th marker before next stitch. 28-29-31-32-34-37 stitches remain on round after 4th marker (half back piece). Move these 4 markers upwards when working, increase at each of these markers later. Now work a neck line with short rows as explained below to make the garment hight at the back of neck. This is done while at the same time increasing for saddle shoulders. Beginning from right side mid back, and work as follows: ROW 1 (= right side): Work in stocking stitch and increase for saddle shoulders BEFORE 1st marker and AFTER 2nd marker - read INCREASE TIP-1 (2 stitches increased), turn when 2 stitches have been worked past 2nd marker. ROW 2 (= wrong side): Work in stocking stitch and increase for saddle shoulders BEFORE 2nd and 4th marker and AFTER 1st and 3rd marker - read INCREASE TIP-2 (4 stitches increased), turn when 2 stitches have been worked past 3rd marker. ROW 3 (= right side): Work in stocking stitch and increase for saddle shoulders BEFORE 3rd and 1st marker and AFTER 4th and 2nd marker (4 stitches increased), turn when 2 stitches more have been since last turn. ROW 4 (= wrong side): Work in stocking stitch and increase for saddle shoulders BEFORE 2nd and 4th marker and AFTER 1st and 3rd marker (4 stitches increased), turn when 2 stitches more have been worked since last turn. ROW 5 (= right side): Work in stocking stitch and increase for saddle shoulders BEFORE 3rd and 1st marker and AFTER 4th and 2nd marker (4 stitches increased), turn when 2 stitches more have been since last turn. ROW 6 (= wrong side): Work in stocking stitch and increase for saddle shoulders BEFORE 2nd and 4th marker and AFTER 1st and 3rd marker (4 stitches increased), turn when 2 stitches more have been worked since last turn. ROW 7 (= right side): Work in stocking stitch and increase for saddle shoulder BEFORE 3rd marker and AFTER 4th marker (2 stitches increased), work in stocking stitch until mid back. The short rows are now done, and you have increased 6 times in total for saddle shoulders at every marker = 166-170-178-190-198-210 stitches on row. I.e. it has only been increased on front piece and back piece and number of shoulder stitches is the same. Continue working in stocking stitch in the round over all stitches. REMEMBER THE KNITTING TENSION! AT THE SAME TIME continue increase for saddle shoulder the same way as before on EVERY round until increase has been done 20-22-26-28-28-28 times in total including the 6 times in neck line = 222-234-258-278-286-298 stitches. After last increase piece measures approx. 6-7-8-9-9-9 cm from marker at the front by the neck. Work next round as follows: Work as before until 1st marker, cast off the 15-15-15-19-19-19 shoulder stitches, work in stocking stitch until 3rd marker, cast off the 15-15-15-19-19-19 saddle shoulder, work as before the rest of round = 192-204-228-240-248-260 stitches. Keep the markers in the piece - use the markers when increasing for sleeves. Work 48-51-57-60-62-65 stitches in stocking stitch (half back piece), cast on 52-52-52-66-66-66 new stitches on needle for sleeve, work 96-102-114-120-124-130 stitches in stocking stitch (front piece), cast on 52-52-52-66-66-66 new stitches on needle for sleeve, work 48-51-57-60-62-65 stitches in stocking stitch (half back piece) = 296-308-332-372-380-392 stitches. Then increase for sleeves as explained below. SLEEVE INCREASE: Work in stocking stitch in the round. AT THE SAME TIME on next round increase 4 stitches for sleeves as follows: Increase AFTER 1st and 3rd marker and increase BEFORE 2nd and 4th marker – remember INCREASE TIP-1. Increase now only on sleeves and number of stitches on front pieces and back piece is the same. Work the increased stitches in stocking stitch. Increase like this every other round 23-24-25-21-27-25 times in total, then increase on every round 0-0-5-9-0-0 times in total = 388-404-452-492-488-492 stitches. Piece measures approx. 20-22-25-25-26-25 cm from marker by the neck. Then increase for yoke as explained below. YOKE INCREASE: Move the 4 marker so that they are in each side on sleeves (markers are now in a stitches and there are 96-98-110-124-118-114 stitches between stitches with marker). Continue in stocking stitch. AT THE SAME TIME on first round increase 8 stitches for yoke as follows: Increase BEFORE and AFTER each of the 4 markers - remember INCREASE TIP-1. Increase stitches on both on front piece, back piece and sleeves. Increase like this EVERY round 6-6-4-7-11-15 times in total. After last increase there are 436-452-484-548-576-612 stitches on row and piece measures approx. 22-24-26-27-29-29 cm from marker mid front. On next round divide yoke for body and sleeves as follows: Work 54-57-61-67-73-80 stitches (= half back piece), slip the next 110-112-120-140-142-146 stitches on a thread for sleeve, cast on 8-10-12-12-14-16 new stitches on needle (in the side under sleeve), work 108-114-122-134-146-160 stitches (front piece), slip the next 110-112-120-140-142-146 stitches on a thread for sleeve, cast on 8-10-12-12-14-16 new stitches on needle (in the side under sleeve), work the last 54-57-61-67-73-80 stitches (= half back piece). Finish body and sleeves separately. Now measure piece from here! BODY: = 232-248-268-292-320-352 stitches. Work stocking stitch in the round until piece measures 20-20-20-20-20-22 cm from division. Knit 1 round while increasing 63-73-77-83-93-97 stitches evenly = 296-320-344-376-412-450 stitches. Switch to circular needle size 2.5 mm. Work rib (knit 1/purl 1) for 5 cm. Cast off. Jumper measures approx. 50-52-54-56-58-60 cm from shoulder. SLEEVES: Slip the 110-112-120-140-142-146 stitches from thread in one side of piece a short circular needle size 3.5 mm – pick in addition up 1 stitch in each of the 8-10-12-12-14-16 new stitches cast on under sleeve = 118-122-132-152-156-162 stitches. Insert 1 marker thread mid under sleeve – in the middle of the 8-10-12-12-14-16 stitches. Move the marker thread upwards when working - it should be used for decrease. Begin round at the marker thread, and work stocking stitch in the round. AT THE SAME TIME on first round decrease 12-14-16-18-20-22 stitches evenly = 106-108-116-134-136-140 stitches. When piece measures 1 cm from division, decrease 2 stitches mid under sleeve - read DECREASE TIP. Decrease like this every cm 9-8-6-6-5-5 times in total = 88-92-104-122-126-130 stitches. After last decrease knit 1 round while decreasing 10-12-22-36-36-38 stitches evenly = 78-80-82-86-90-92 stitches. Work A.1 in the round over all stitches. When A.1 has been worked, switch to double pointed needles size 2.5 mm. Work rib (knit 1/purl 1) for 3 cm. Cast off. Sleeve measures approx. 13-12-10-10-9-9 cm from division. Work the other sleeve the same way. ASSEMBLY: Baste a strand up and down through cast-on edge at the top on sleeve . Wrinkle the sleeve cap so that it fits in the opening where stitches were cast off on shoulder. Sew sleeve cap to shoulder stitches that were cast off. Repeat in the other side. |
|||||||||||||||||||||||||
Diagram explanations |
|||||||||||||||||||||||||
|
|||||||||||||||||||||||||

|
|||||||||||||||||||||||||
|
|||||||||||||||||||||||||
|
Have you made this or any other of our designs? Tag your pictures in social media with #dropsdesign so we can see them! Do you need help with this pattern?You'll find tutorial videos, a Comments/Questions area and more by visiting the pattern on garnstudio.com. © 1982-2024 DROPS Design A/S. We reserve all rights. This document, including all its sub-sections, has copyrights. Read more about what you can do with our patterns at the bottom of each pattern on our site. |
|||||||||||||||||||||||||


With over 40 years in knitting and crochet design, DROPS Design offers one of the most extensive collections of free patterns on the internet - translated to 17 languages. As of today we count 304 catalogues and 11422 patterns - 11422 of which are translated into English (UK/cm).
We work hard to bring you the best knitting and crochet have to offer, inspiration and advice as well as great quality yarns at incredible prices! Would you like to use our patterns for other than personal use? You can read what you are allowed to do in the Copyright text at the bottom of all our patterns. Happy crafting!
Comments / Questions (21)
Ang bærestykkeøkning. Jeg skjønner ikke helt hvordan jeg skal finne riktig maske å sette merkene i. Skal jeg telle meg ut fra midt bak?
23.01.2024 - 22:16DROPS Design answered:
Hei Vibeke, Du teller fra begynnelsen av omgangen, riktig antall masker og setter merket før neste masken, tell igjen riktig antall masker og setter merket før neste masken, osv. God fornøyelse!
24.01.2024 - 06:39Hej! Stickar denna i strl S och ska snart börja göra resåren i slutet. Funderar över varför jag ska öka med hela 63maskor innan resår? Låter väldigt mycket?! På den ritande bilden ser det ut som det är väldigt rakt från ärmhålan ner till resåren!! Hur ser tröjan ut på? Bilderna visar inte riktigt detta Mvh
17.11.2023 - 15:58DROPS Design answered:
Hei Nettan. Jo, det skal økes før man strikker vrangborden. Dette gjøres for å få en pen overgang mellom fram-og baskstykket. Når man bytter til mindre pinne str. og øker masker masker før vrangbord vil man få samme mål det er under ermhullet og vrangborden (rakt från ärmhålan ner till resåre). Om man ønsker en trangere/smalere vrangbord, man kan la være å øke masker før vrangbord, bare husk å ha et maskeantallet vrangborden går opp i. mvh DROPS Design
20.11.2023 - 09:12Hej! Jag stickar tröjan 239-16 på rundsticka. När jag lagt upp maskor för ärmen har jag svårt för att fortsätta sticka vidare, jag når inte fram med stickorna så jag kan fortsätta. Hur ska jag göra för att fortsätta?
16.09.2023 - 21:43DROPS Design answered:
Hei Margaretha Kan være litt stramt men bruk en settpinne til hjelp. Strikk noen masker med en settpinne før du setter maskene på rundpinnen igjen. Vil bli lettere etter noen omganger. mvh DROPS Design
18.09.2023 - 14:22Thank you so much for your quick answer. This is very helpful. Now I can go on knitting :)
14.09.2023 - 09:44Hello I have again a question concerning the short rows it says in the first row - turn when 2 stitches have been worked past 2nd marker- does the increase stitch count as one and do I knit another additional stitch and then turn? And do I always repeat this the same way till row 7? Thank you once more for your help.
13.09.2023 - 23:57DROPS Design answered:
Hi Katharine, The 2 stitches which are worked after the marker do not include the increase, and the same applies to all the short rows (so work the increase after the marker, then work 2 more stitches before turning). Happy knitting!
14.09.2023 - 06:43Thank you very much for your quick answer. I did make a new gauge with the size 4 needles and had 24 stitches. So I decided to work with the size 4 and 3 needles as I prefer to have the pullover bigger then the size M. I'll see how it goes and hope it works out well. I've noticed that the models are different and I'm learning to look at the measurements more acurately that I then choose the correct size :)
04.09.2023 - 12:39Hello I have a question concerning the swatch. I knitted 10 cm with the needle size 3.5 and had 26 stitches for the whidth, that means 2 stitches more then the mentioned 24 stitches. I would prefere the size M but a little bit bigger (but not the size L). What would you advise me to do? Thank you for your help.
02.09.2023 - 11:26DROPS Design answered:
Dear Katharine, you could try using a 4mm needle, for the swatch. On another hand, with your gauge, if you work the stitches for the M size you will obtain the measurements of the L size. You can use the stitch count for the S size and you will obtain the measurements for the M size. Take into account that often, when starting to work, the gauge may vary from the initial one and will become looser. Happy knitting!
03.09.2023 - 22:57Ciao, È il mio primo progetto grande e volevo capire come seguire lo schema descritto come A. 1. Sto lavorando con i ferri circolari 2.5 e ho appena finito il bordo del collo doppio. Grazie in anticipo per l'aiuto.
30.06.2023 - 07:35Is there a video tutorial on attaching the sleeve to the saddle shoulder? Or could you give me a bit more of a detailed instruction on how to do so? Thank you!
25.05.2023 - 19:00DROPS Design answered:
Dear Melissa, in this video we show (for another pattern) how to work such a saddle shoulder and, from time code 4:43 how to sew the cast on stitches for sleeve onto the cast off stitches. Happy knitting!
26.05.2023 - 10:01Tips: I stedet for å felle av de 15 skuldermaskene, brukte jeg de to neste omgangene til å øke de 15 maskene til 52 masker (str M) og fulgte deretter oppskriften videre. Ble kjempefin puff, jevn og uten å måtte sy i tråd og feste til slutt.
20.04.2023 - 00:20