
Popular categories
Looking for a yarn?


|
|||||||||||||||||||||||||
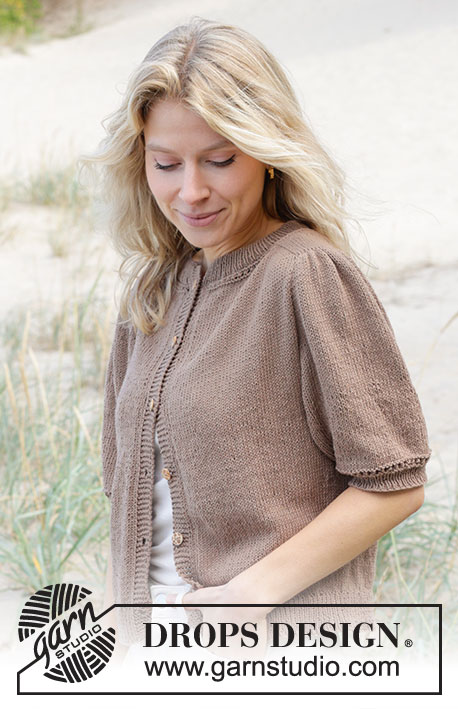
Sherwood Smiles Cardigan |
|||||||||||||||||||||||||
 |
 |
||||||||||||||||||||||||
Knitted jacket with short sleeves in DROPS Safran. Piece is knitted top down with double neck edge, saddle shoulder increase, stocking stitch and short puffed sleeves. Size: S - XXXL
DROPS 239-15 |
|||||||||||||||||||||||||
|
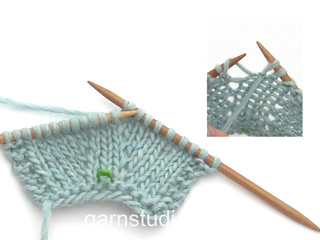
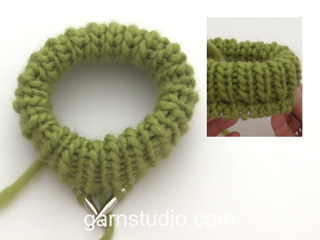
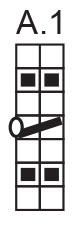
---------------------------------------------------------- EXPLANATION FOR THE PATTERN: ---------------------------------------------------------- PATTERN: See diagram A.1. Diagrams show all rows in pattern seen from the right side. BUTTONHOLES: Decrease for buttonholes on right band. I.e. work from right side until 4 stitches remain on needle, make 1 yarn over, knit 2 together, knit 2. On next row (wrong side) knit the yarn over to make a hole. Decrease first buttonhole on first row in A.1. Then decrease the next 5-5-6-6-6-6 buttonholes, approx. 8½-9-7½-8-8-8½ cm apart. INCREASE TIP-1 (from right side): INCREASE TOWARDS THE RIGHT BEFORE MARKER: Use left needle to pick up yarn between 2 stitches from round below, pick up yarn from the back and knit stitch in front loop of stitch. INCREASE TOWARDS THE LEFT AFTER MARKER: Use left needle to pick up yarn between 2 stitches from round below, pick up yarn from the front and knit stitch in back loop of stitch. INCREASE TIP-2 (from wrong side): INCREASE TOWARDS THE RIGHT BEFORE MARKER: Use left needle to pick up yarn between 2 stitches from round below, pick up yarn from the front and purl stitch in back loop of stitch. INCREASE TOWARDS THE LEFT AFTER MARKER: Use left needle to pick up yarn between 2 stitches from round below, pick up yarn from the back and purl stitch in front loop of stitch. DECREASE TIP (applies to mid under sleeves): Decrease 1 stitch on each side of marker thread as follows: Work until 3 stitches remain before marker thread and knit 2 together, knit 2 (marker thread is between these 2 stitches), slip 1 stitch knitwise, knit 1, pass slipped stitch over stitch worked (2 stitches decreased). ---------------------------------------------------------- START THE PIECE HERE: ---------------------------------------------------------- JACKET - SHORT OVERVIEW OF THE PIECE: Work double neck edge and yoke back and forth on circular needle from mid front, work top down. Now divide yoke for body and sleeves. Work body back and forth on circular needle. Work sleeves in the round on double pointed needles/a short circular needle. DOUBLE NECK EDGE: Cast on 117-121-127-137-141-151 stitches with DROPS Safran over circular needle size 2.5 and circular needle size 3.5 mm held together. Pull out circular needle 3.5 mm and keep stitches on the circular needle size 2.5 mm (cast on is done like this to get an elastic cast-on edge). Work next row as follows from right side: 1 stitch in GARTER STITCH - read explanation above - * knit 1, purl 1 *, work from *-* until 2 stitches remain, knit 1, finish with 1 stitch in garter stitch. Continue rib like this. When piece measures 3 cm, cast on 5 new stitches at the end of the next 2 rows = 127-131-137-147-151-161 stitches. Continue rib as before with 6 stitches in garter stitch in each side until piece measures 6 cm from cast-on edge, adjust so that next row is worked from right side. Now fold rib in towards wrong side, so that the edge is double - then work next row as follows from right side: 6 stitches in garter stitch, work rib as before while at the same time working every 4th stitch together with every 4th stitch from cast-on edge - continue like this until 9-9-7-9-9-7 stitches remain on row, work 3-3-1-3-3-1 stitch in rib and 6 stitches in garter stitch. You now have a double neck edge. Purl 1 row from wrong side while increase 27-27-29-31-35-37 stitches evenly (work the 6 band stitches in each side in garter stitch and do not increase over bands) = 154-158-166-178-186-198 stitches. Work next row as follows from right side: 6 stitches in garter stitch, work A.1 until 7 stitches remain on row, work first stitch in A.1 (on 4th row purl this stitch from wrong side), finish with 6 stitches in garter stitch - remember BUTTONHOLES on band - read explanation above. When A.1 has been worked, insert 1 marker after band on front piece - measure yoke from this marker! Work yoke as explained below. YOKE WITH SADDLE SHOULDER INCREASE: Switch to circular needle size 3.5 mm. Insert 4 markers in the piece as explained below - this is done without working the stitches, and each marker is inserted between 2 stitches. Use these markers when increasing for saddle shoulder. They should be in a different colour than the marker at the front. 1st marker: Count 34-35-37-38-40-43 stitches (front piece), insert 1st marker before next stitch. 2nd marker: Count 15-15-15-19-19-19 stitches from 1st marker (shoulder stitches), insert 2nd marker before next stitch. 3rd marker: Count 56-58-62-64-68-74 stitches (back piece), insert 3rd marker before next stitch. 4th marker: Count 15-15-15-19-19-19 stitches (shoulder stitches), insert 4th marker before next stitch. 34-35-37-38-40-43 stitches remain on row after 4th marker (front piece). Move these 4 markers upwards when working, increase at each of these markers later. Now work a neck line with short rows as explained below to make the garment hight at the back of neck. This is done while at the same time increasing for saddle shoulders. Begin from right side, and work as follows: ROW 1: 6 stitches in garter stitch, work in stocking stitch and increase for saddle shoulders BEFORE 1st and 3rd marker, and AFTER 2nd and 4th marker - read INCREASE TIP-1 (4 stitches increased), turn when 2 stitches have been worked past 4th marker. ROW 2 (= wrong side): Work in stocking stitch and increase for saddle shoulders BEFORE 4th and 2nd marker and AFTER 3rd and 1st marker - read INCREASE TIP-2 (4 stitches increased), turn when 2 stitches have been worked past 1st marker. ROW 3 (= right side): Work in stocking stitch and increase for saddle shoulders BEFORE 1st and 3rd marker and AFTER 2nd and 4th marker (4 stitches increased), turn when 2 stitches more have been worked since last turn. ROW 4 (= wrong side): Work in stocking stitch and increase for saddle shoulders BEFORE 4th and 2nd marker and AFTER 3rd and 1st marker (4 stitches increased), turn when 2 stitches more have been worked since last turn. ROW 5 (= right side): Work in stocking stitch and increase for saddle shoulders BEFORE 1st and 3rd marker and AFTER 2nd and 4th marker (4 stitches increased), turn when 2 stitches more have been worked since last turn. ROW 6 (= wrong side): Work in stocking stitch and increase for saddle shoulders BEFORE 4th and 2nd marker and AFTER 3rd and 1st marker (4 stitches increased), turn when 2 stitches more have been worked since last turn. ROW 7 (= right side): Work in stocking stitch and increase for saddle shoulders BEFORE 1st and 3rd marker and AFTER 2nd and 4th marker (4 stitches increased), work in stocking stitch the entire row with 6 stitches in garter stitch towards mid front. The short rows are now done, and it has been increased a total of 7 times for saddle shoulders = 182-186-194-206-214-226 stitches on row. I.e. it has only been increased on front pieces and back piece and number of shoulder stitches is the same. Then work in stocking stitch back and forth over all stitches with 6 stitches in garter stitch in each side towards mid front. REMEMBER THE KNITTING TENSION! AT THE SAME TIME continue increase for saddle shoulder the same way as before on EVERY row (both from wrong side and right side) until increase has been done 20-22-26-28-28-28 times in total including the 7 times in neck line = 234-246-270-290-298-310 stitches. After last increase piece measures approx. 6-7-8-9-9-9 cm from marker at the front by the neck. Work next row as follows from right side: Work as before until 1st marker, cast off the 15-15-15-19-19-19 shoulder stitches, work in stocking stitch until 3rd marker, cast off the 15-15-15-19-19-19 saddle shoulder, work as before the rest of row = 204-216-240-252-260-272 stitches. Keep the markers in the piece - use the markers when increasing for sleeves. Work next row from wrong side as follows: Work 54-57-63-66-68-71 stitches as before (front piece), cast on 52-52-52-66-66-66 new stitches on needle for sleeve, work 96-102-114-120-124-130 stitches in stocking stitch (back piece), cast on 52-52-52-66-66-66 new stitches on needle for sleeve, work 54-57-63-66-68-71 stitches as before (front piece) = 308-320-344-384-392-404 stitches. Then increase for sleeves as explained below. SLEEVE INCREASE: Work in stocking stitch back and forth with 6 stitches in garter stitch in each side. AT THE SAME TIME on next row from right side increase 4 stitches for sleeves as follows: Increase AFTER 1st and 3rd marker and increase BEFORE 2nd and 4th marker – remember INCREASE TIP-1. Increase now only on sleeves and number of stitches on front pieces and back piece is the same. Work the increased stitches in stocking stitch. Increase like this every other row (every row from right side) 23-24-25-21-27-25 times in total, then increase on every row (both from wrong side and right side) 0-0-5-9-0-0 times in total - remember INCREASE TIP-2 = 400-416-464-504-500-504 stitches. Piece measures approx. 20-22-25-25-26-25 cm from marker by the neck. Then increase for yoke as explained below. YOKE INCREASE: Move the 4 marker so that they are in each side on sleeves (markers are now in a stitches and there are 96-98-110-124-118-114 stitches between stitches with marker). Continue with stocking stitch and 6 stitches in garter stitch in each side towards mid front. AT THE SAME TIME on first row increase 8 stitches for yoke as follows: Increase BEFORE and AFTER each of the 4 markers - remember INCREASE TIP-1 and INCREASE TIP-2. Increase stitches on both on front pieces, back piece and sleeves. Increase like this every row (from both right side and wrong side) 6-6-4-7-11-15 times in total. After last increase there are 448-464-496-560-588-624 stitches on row and piece measures approx. 22-24-26-27-29-29 cm from marker mid front. On next row divide yoke for body and sleeves as follows: Work 60-63-67-73-79-86 stitches as before (front piece), slip the next 110-112-120-140-142-146 stitches on a thread for sleeve, cast on 8-10-12-12-14-16 new stitches on needle (in the side under sleeve), work 108-114-122-134-146-160 stitches in stocking stitch (back piece), slip the next 110-112-120-140-142-146 stitches on a thread for sleeve, cast on 8-10-12-12-14-16 new stitches on needle (in the side under sleeve), and work the last 60-63-67-73-79-86 stitches as before (front piece). Finish body and sleeves separately. Now measure piece from here! BODY: = 244-260-280-304-332-364 stitches. Work in stocking stitch back and forth with 6 stitches in garter stitch in each side towards mid front until piece measures 20-20-20-20-20-22 cm from division. Knit 1 row from right side while increasing 63-73-77- 83-93-97 stitches evenly (do not increase over bands) = 307-333-357-387-425-461 stitches. Switch to circular needle size 2.5 mm. Work next row as follows from wrong side: 6 stitches in garter stitch, * purl 1, knit 1 *, repeat from *-* until 7 stitches remain, purl 1 and 6 stitches in garter stitch. Continue rib like this for 5 cm. Cast off. Jacket measures approx. 50-52-54-56-58-60 cm from shoulder. SLEEVES: Slip the 110-112-120-140-142-146 stitches from thread in one side of piece a short circular needle size 3.5 mm – pick in addition up 1 stitch in each of the 8-10-12-12-14-16 new stitches cast on under sleeve = 118-122-132-152-156-162 stitches. Insert 1 marker thread mid under sleeve – in the middle of the 8-10-12-12-14-16 stitches. Move the marker thread upwards when working - it should be used for decrease. Begin round at the marker thread, and work stocking stitch in the round. AT THE SAME TIME on first round decrease 12-14-16-18-20-22 stitches evenly = 106-108-116-134-136-140 stitches. When piece measures 1 cm from division, decrease 2 stitches mid under sleeve - read DECREASE TIP. Decrease like this every cm 9-8-6-6-5-5 times in total = 88-92-104-122-126-130 stitches. After last decrease knit 1 round while decreasing 10-12-22-36-36-38 stitches evenly = 78-80-82-86-90-92 stitches. Work A.1 in the round over all stitches. When A.1 has been worked, switch to double pointed needles size 2.5 mm. Work rib (knit 1/purl 1) for 3 cm. Cast off. Sleeve measures approx. 13-12-10-10-9-9 cm from division. Work the other sleeve the same way. ASSEMBLY: Baste a strand up and down through cast-on edge at the top on sleeve . Wrinkle the sleeve cap so that it fits in the opening where stitches were cast off on shoulder. Sew sleeve cap to shoulder stitches that were cast off. Repeat in the other side. Sew the buttons on to the left band. |
|||||||||||||||||||||||||
Diagram explanations |
|||||||||||||||||||||||||
|
|||||||||||||||||||||||||
|
|||||||||||||||||||||||||

|
|||||||||||||||||||||||||
|
Have you made this or any other of our designs? Tag your pictures in social media with #dropsdesign so we can see them! Do you need help with this pattern?You'll find tutorial videos, a Comments/Questions area and more by visiting the pattern on garnstudio.com. © 1982-2024 DROPS Design A/S. We reserve all rights. This document, including all its sub-sections, has copyrights. Read more about what you can do with our patterns at the bottom of each pattern on our site. |
|||||||||||||||||||||||||


With over 40 years in knitting and crochet design, DROPS Design offers one of the most extensive collections of free patterns on the internet - translated to 17 languages. As of today we count 304 catalogues and 11422 patterns - 11422 of which are translated into English (UK/cm).
We work hard to bring you the best knitting and crochet have to offer, inspiration and advice as well as great quality yarns at incredible prices! Would you like to use our patterns for other than personal use? You can read what you are allowed to do in the Copyright text at the bottom of all our patterns. Happy crafting!
Comments / Questions (10)
Som det ser ud på skrift skal der IkKe tages ud i en række nedaf på ærmerne. Jeg er ved at skulle sætte mærker ved udtagningsbærestykket. Der er 178m på ærmerne og der skal flyttes markeringer til 124. Derfra skal der så tages ud 8m over ret og vrang. Det vil sige at udtagningsrækken bliver forskubbet. Det giver ingen mening i mit hoved. Hjælp tak
08.04.2024 - 16:42DROPS Design answered:
Hej Inge, vi har lavet 3 videoer som viser udtagninger til sadelskulder, de kan helt sikkert hjælpe dig med forståelsen af teknikken. Se her: Sadelskulder nederst i videoen finder du 2 mere :)
09.04.2024 - 11:35Hello! I'm just about to start on the yoke increase after the sleeve increase, but don't understand where I am meant to move the stitch markers to. How many stitches should there be between markers? Should it no longer be working in the same divisions of front, sleeves and back sections? Also for the assembly, is the basting done with sewing or with a strand of yarn, and is there a video that explains this? Thank you so much :)))
06.04.2024 - 13:04DROPS Design answered:
Dear Hannah-Maria, there seems to be a mistake in the pattern; we shall contact the design department for more information. The markers should be located in each transition between the sleeves and the body. You baste with a strand of yarn; you pass a thread up and down through the stitches and then tighten it, so that the top of the sleeve will wrinkle. Happy knitting!
08.04.2024 - 00:35Hallo, bei der strickmustererklärung heisst es 2 Maschen rechts zusammenstricken (sowohl in Rückreihen als auch in Hinreichen). Wie ist das zu verstehen. Beginnt die Strickmusterzeichnung mit einer Rückreihe ? Liebe grüsse Ingrid Ehret
26.10.2023 - 13:27DROPS Design answered:
Liebe Frau Ehret, das Muster beginnt mit einer Hinreihe und das Loch-Reihe wird eine Rückreihe sein. Viel Spaß beim stricken!
27.10.2023 - 08:13Hej, vilken storlek bär modellen? Med vänliga hälsningar Ylva
18.08.2023 - 08:44DROPS Design answered:
Hej Ylva, det kan vara en S eller M, men du ser koftans mått i måttskissen nederst i mönstret :)
18.08.2023 - 12:10Princess Cordelia Cardigan
18.01.2023 - 16:13Me gusta mucho
18.01.2023 - 09:48Summer evening
18.01.2023 - 03:26Tea Time Cardigan
18.01.2023 - 00:07Afternoon late cardi
17.01.2023 - 22:03Vacances en Bretagne
17.01.2023 - 18:15