
Popular categories
Looking for a yarn?


Comments / Questions (20)
![]() Lorraine Schmaltz wrote:
Lorraine Schmaltz wrote:
I am also struggling with Row 1 of the Body - have tried over and over - not one to give up, I would love to figure out this row. Is there a video?
07.05.2024 - 01:08DROPS Design answered:
Dear Mrs Schmaltz, knit the first 5 stitches, then fold the first arm and pick up 1 stitch in each of the 4 stitches cast on for the arm, then skip the next 4 sts on arm (they will be sewn later), knit the middle 6 sts between arms, pick up 1 stitch in each f the 4 sts of 2nd arm, skip the next 4 sts on 2nd arm and knit the 5 last stitches. There are now 2 small holes under arms, they will be closed afterward with a seam. Happy knitting!
07.05.2024 - 08:02
![]() Mathilda Bergsmo wrote:
Mathilda Bergsmo wrote:
Jag skulle önska att dat fanns mer bilder på hur kaninen ser ut efter varje steg eller att det finns en video på hur man ska göra denna. Jag har lite problem med armarna. När det står ytterst på stickan är det där man har lagt upp 4 st nya maskor eller är det längst ut på arbetet?
17.03.2024 - 14:59
![]() Astaara wrote:
Astaara wrote:
It's ridiculous people are claiming that this is the same as the other pattern. Never mind the fact that a 2D Bunny design has been around for decades and there's only so much variation that can exist, the two patterns are very clearly different
05.03.2024 - 01:44
![]() Charlie Knight wrote:
Charlie Knight wrote:
I love this rabbit, but what alarms me is the reason I love it so much. This rabbit is astonishingly like Cottontail Rabbit designed by Erika Knight in 2016 which I was so fond of. I sincerely hope DROPS isn’t claiming that pattern for their own credit. Shame
04.03.2024 - 13:54
![]() Arabella Harris wrote:
Arabella Harris wrote:
This design bears more than a passing resemblance to the cottontail rabbit pattern by designer Erika Knight. It is deeply concerning to see DROPS misusing a free pattern by an independent designer and disappointing that your in house team would not uphold standards of design originality . I would be grateful for your response. Kind regards, Arabella
04.03.2024 - 11:39
![]() Peter wrote:
Peter wrote:
Thank you so much so providing an answer on those front legs. I'm so happy this piece can be finished!!
03.03.2024 - 20:59
![]() Peter wrote:
Peter wrote:
On the folded leg part- am I supposed to fold over the leg and knit the leg to those extra 4 casted on stitches? Or am I folding the leg to simply move it out of the way and just knit the row straight. Very confused here as to what's going on with the legs. Can anyone add clarity? Because what's written outright in the instructions is not a good explanation, sorry. Otherwise, the rest I understand fine.
01.03.2024 - 22:22DROPS Design answered:
Dear Peter, you should have the row as follow: 5 body stitches, 2nd front leg (4 cast on stitches + 4 stitches from body), 6 body stitches in between, 1st front leg (4 cast on stitches + 4 stitches from body), 5 body stitches. Work over the first 5 stitches, now fold the leg in length (so, instead of 7cm long, the leg should be 3.5cm long) and work over the first 4 stitches through both loops (so the folded leg is firmly joined to the body) skip the next 4 stitches, work over the 6 stitches in between the legs, fold the next leg as the previous one and work again over the first 4 stitches of this leg. Skip the next 4 stitches and work over the last 5 stitches. Happy knitting!
03.03.2024 - 19:34
![]() Adèle wrote:
Adèle wrote:
Bonjour ! Une question bête : peut on facilement laver le doudou en machine ou à la main et /ou faut il enlever le rembourrage avant ? Merci
15.02.2024 - 15:29DROPS Design answered:
Bonjour Adèle, tout dépend du matériel utilisé, aussi bien de la laine choisie (lisez attentivement les consignes d'entretien de ces 2 laines par exemple) aussi bien que du rembourrage choisi. Bon tricot!
16.02.2024 - 07:21
![]() Sandra wrote:
Sandra wrote:
Bonjour, c est peut être une question bête ! Mais après avoir fait la première patte avant , j ai coupé le fil en gardant 25 cm , mais du coup pour continuer sur le corps puis la deuxième patte je n ai plus de fil ! 😅 comment fait on dans ces cas là ! Merci !! 🙏
28.01.2024 - 17:02DROPS Design answered:
Bonjour Sandra, joignez le fil sur l'endroit et tricotez les 10 mailles centrales du corps et continuez comme indiqué pour la 2ème patte. Après la 2ème patte avant, vous coupez le fil, et joignez le fil à nouveau pour tricoter les 5 dernières mailles du corps. Bon tricot!
29.01.2024 - 12:21
![]() Fleur wrote:
Fleur wrote:
Kan ik ergens een uitleg met foto’s en/of video’s vinden? De uitleg van de voorste poten is niet heel duidelijk. Ik brei dus 9 steken naar binnen, richting lijf? En dan 4 steken erbij in het “midden” en dan het werk omdraaien? Klopt het dat er dan een gat zit? Lijkt me niet kloppen. Helemaal in de war met dit stuk. SOS
04.12.2023 - 11:39
|
|||||||
The Bunny Bunch#thebunnybunch |
|||||||
 |
 |
||||||
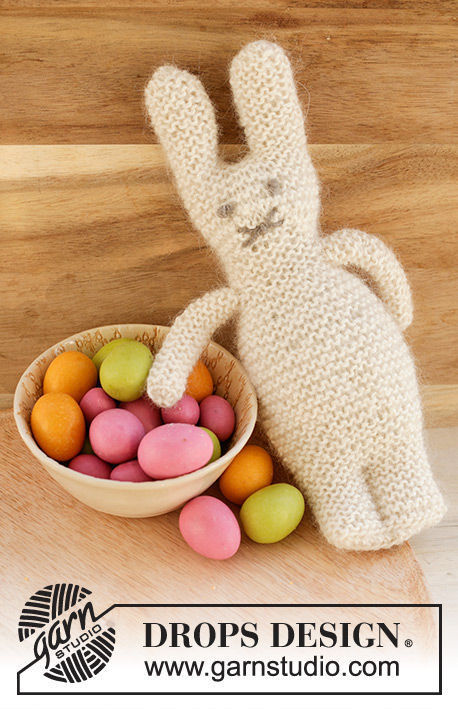
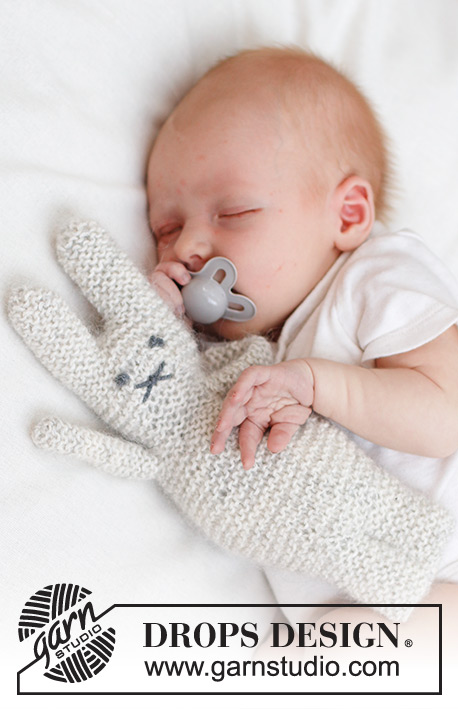
Knitted bunny for babies and children in DROPS Alpaca and DROPS Kid-Silk or 1 strand DROPS Brushed Alpaca Silk. The piece is worked back and forth in garter stitch. Theme: Soft toys.
DROPS Baby 46-18 |
|||||||
|
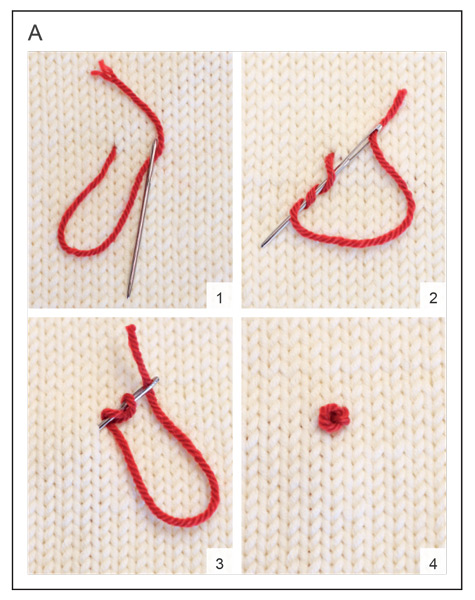
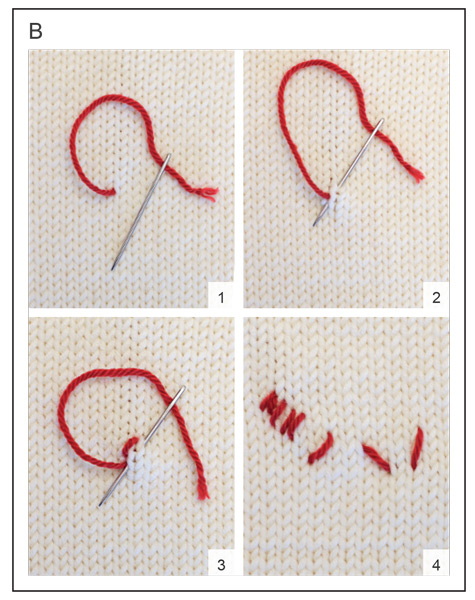
------------------------------------------------------- EXPLANATIONS FOR THE PATTERN: ------------------------------------------------------- RIDGE/GARTER STITCH (worked back and forth): Knit all rows. 1 ridge = knit 2 rows. PATTERN: See diagrams A and B. The diagrams show how to work the embroidered stitches. ------------------------------------------------------- START THE PIECE HERE: ------------------------------------------------------- BUNNY – SHORT OVERVIEW OF THE PIECE: The piece is worked back and forth, top down in GARTER STITCH – read description above. The ears are worked first, then the head and body. FIRST EAR: Cast on 5 stitches with needle size 3.5 mm, 1 strand DROPS Alpaca and 1 strand DROPS Kid-Silk (held together) or 1 strand DROPS Brushed Alpaca Silk: ROW 1: Knit. ROW 2: Knit 1, 1 yarn over, knit 1, 1 yarn over, knit 1, 1 yarn over, knit 1, 1 yarn over, knit 1 = 9 stitches. ROW 3: Knit, knit yarn overs twisted to avoid holes. ROW 4: Knit 1, 1 yarn over, knit 2, 1 yarn over, knit 3, 1 yarn over, knit 2, 1 yarn over, knit 1 = 13 stitches. ROWS 5- 22: Knit, knit yarn overs twisted to avoid holes (the piece measures approx. 5 cm). Cut the strand. Leave the stitches on the needle and work the second ear. SECOND EAR: Cast on and work in the same way as the first ear. Do not cut the strand. Cast on 1 stitch at the end of the last row. REMEMBER THE KNITTING TENSION! HEAD: Turn, knit the stitches from the second ear, cast on 2 stitches, knit the stitches from the first ear, cast on 1 stitch = 30 stitches. Work 4 ridges back and forth over all stitches. NOSE: Increase for the nose as follows: ROW 1: Knit 13, 1 yarn over, knit 4, 1 yarn over, knit 13 = 32 stitches. ROW 2: Knit 13, knit the yarn over twisted (no hole), 1 yarn over, knit 4, 1 yarn over, knit the yarn over twisted (no hole), knit13 = 34 stitches. ROWS 3-5: Knit, yarn overs knitted twisted to avoid holes . Now decrease as follows: ROW 1: Knit 13, knit 2 together, knit 4, knit 2 together, knit 13 = 32 stitches. ROW 2: Knit 12, knit 2 together, knit 4, knit 2 together, knit 12 = 30 stitches. ROW 3: Knit 11, knit 2 together, knit 4, knit 2 together, knit 11 = 28 stitches. ROW 4: Knit 10, knit 2 together, knit 4, knit 2 together, knit 10 = 26 stitches. ROW 5: Knit 9, knit 2 together, knit 4, knit 2 together, knit 9 = 24 stitches. ROWS 6-10: Knit. FRONT LEGS: On the next row: Knit 9 (body), cast on 4 stitches for the first front leg, turn and work garter stitch back and forth over the outermost 8 stitches for 7 cm. Cast off these 8 stitches with knit from the right side, cut the strand, leaving an end of 25 cm (used when assembling). The first front leg is finished. Knit the next 10 stitches (body), cast on 4 stitches for the second front leg, turn and work garter stitch back and forth over the outermost 8 stitches for 7 cm. Cast off these 8 stitches with knit from the right side, cut the strand, leaving an end of 25 cm (used when assembling). The second front leg is finished. Knit the last 5 stitches (body). Turn. BODY: ROW 1 (wrong side): Knit 5 (body), fold the front leg double so you can knit up 1 stitch in each of the 4 cast-on stitches on the front leg, skip the next 4 front-leg stitches, knit 6 (between the legs), fold the second front leg double and knit up 1 stitch in each of the 4 cast-on stitches on the front leg, skip the next 4 front-leg stitches, knit the last 5 stitches (body) = 24 stitches. Now increase for the tummy: ROW 2: Knit and increase 8 stitches evenly on the row – increase with yarn overs which are knitted twisted on the next row to avoid holes = 32 stitches. ROWS 3-7: Knit. ROW 8: Knit and increase 6 stitches evenly on the row – increase with yarn overs which are knitted twisted on the next row to avoid holes = 38 stitches. ROWS 9-14: Knit. ROW 15: Knit and increase 6 stitches evenly on the row – increase with yarn overs which are knitted twisted on the next row to avoid holes = 44 stitches. ROW 16: Knit. Continue with garter stitch until the body measures 7 cm (approx. 15 -16 ridges), and the next row is from the wrong side. Now decrease below the tummy as follows: ROW 1: Knit 3, knit 2 together, knit 5, knit 2 together, knit 5, knit 2 together, knit 5, knit 2 together, knit 5, knit 2 together, knit 5, knit 2 together, knit 4 = 38 stitches. ROWS 2-4: Knit. ROW 5: Knit 3, knit 2 together, knit 4, knit 2 together, knit 4, knit 2 together, knit 4, knit 2 together, knit 4, knit 2 together, knit 4, knit 2 together, knit 3 = 32 stitches. ROWS 6-8: Knit. ROW 9: Knit 3, knit 2 together, knit 6, knit 2 together, knit 6 knit 2 together, knit 6, knit 2 together, knit 6, knit 2 together, knit 6, knit 2 together, knit 3 = 28 stitches. BACK LEGS: The piece is now measured from here! Work garter stitch for 4 cm (approx. 8-9 ridges) and cast off loosely. EMBROIDERING: Use left-over colour grey, brown or black. Work 1 French knot for each eye, above the nose - see diagram A. Work the nose with 2 flat stitches (2 cm long) across each nose section - see diagram B; the flat stitches should cross. Work 1 small flat stitch (½ cm) crossing the middle of the other 2 flat stitches. ASSEMBLY: Sew each ear in the outermost loop of the outermost stitch, filling with wadding as you go. Sew the opening at the top of the head and continue down the back, sewing in the outermost loop of the outermost stitch, filling with wadding as you go. Sew the cast-off edges together at the bottom, sewing from side to side, making sure the seam meets mid-back. Sew a 4 cm seam along the middle to divide the legs, sewing through both layers and the wadding. Sew each front leg, sewing in the outermost loop of the outermost stitch, filling with wadding as you go. Tack a strand through the stitches at the bottom of each front leg, tighten and fasten well. |
|||||||
Diagram explanations |
|||||||
|
|||||||
|
|||||||
|
|||||||
Have you finished this pattern?Tag your pictures with #dropspattern #thebunnybunch or submit them to the #dropsfan gallery. Do you need help with this pattern?You'll find 15 tutorial videos, a Comments/Questions area and more by visiting the pattern on garnstudio.com. © 1982-2025 DROPS Design A/S. We reserve all rights. This document, including all its sub-sections, has copyrights. Read more about what you can do with our patterns at the bottom of each pattern on our site. |
|||||||


With over 40 years in knitting and crochet design, DROPS Design offers one of the most extensive collections of free patterns on the internet - translated to 17 languages. As of today we count 314 catalogues and 11822 patterns translated into English (UK/cm).
We work hard to bring you the best knitting and crochet have to offer, inspiration and advice as well as great quality yarns at incredible prices! Would you like to use our patterns for other than personal use? You can read what you are allowed to do in the Copyright text at the bottom of all our patterns. Happy crafting!
Post a comment to pattern DROPS Baby 46-18
We would love to hear what you have to say about this pattern!
If you want to leave a question, please make sure you select the correct category in the form below, to speed up the answering process. Required fields are marked *.