
Popular categories
Looking for a yarn?


Comments / Questions (20)
![]() Jackie wrote:
Jackie wrote:
Not knitted for a while. Understand the purl row but not with 5 band stitches in Garter Stich?
20.06.2025 - 06:36DROPS Design answered:
Dear Jackie, after stitches are cast on, work the first row from the right side as follows: knit 5, purl until 5 sts remain, knit 5. Turn and work now rib, from RS: knit 5 (garter stitch), then repeat (K1,P1) until 6 sts remain, K1 (last stitch rib) and knit 5 (garter stitch) - from WS work; knit 5 (garter stitch), (P1, K1) until 6 sts remain, purl 1 and knit 5. Happy knitting!
20.06.2025 - 08:15
![]() Inda wrote:
Inda wrote:
So ein schönes Model! Habe den Dreamplancardigan gleich 2 mal gestrickt. Die Anleitung ist sehr detailliert und gut umzusetzen.
23.03.2025 - 08:11
![]() Angela Grobbink wrote:
Angela Grobbink wrote:
Vielen Dank für die leicht verständliche Anleitung auch für nicht versierte Strickerinnen😊\\r\\nLeider hat die Wolle (4 Knäuel für Größe 92) nicht ausgereicht, obwohl meine Maschenprobe genau den angegebenen Maßen entspricht. So musste ich teuer nachkaufen, habe auch die genau gleiche Farbe nicht mehr bekommen.\\r\\nBitte die Anleitung auf 5 Knäuel erhöhen, damit es bei anderen Strickerinnen perfekt klappt. Danke.
16.12.2024 - 15:21
![]() Nicoline wrote:
Nicoline wrote:
Tak for svar på tidligere spørgsmål :) Har lige et mere. Hvordan kan der være at første mærkemaske skal strikkes ret men de andre 3 skal strikkes glatstrik? Mvh. Nicoline
21.11.2024 - 19:50DROPS Design answered:
Hei Nicoline. Alle 4 masker skal strikkes i glattstrikk. Vi skal få oppdatert dette snarest. Takk for at du gjorde oss oppmerksom på dette. mvh DROPS Design
25.11.2024 - 11:22
![]() Nicoline wrote:
Nicoline wrote:
Hej 🙂 Jeg er rimelig nybegynder og har svært ved ar forstå, hvordan strikkemønsteret på bærestykket kan fortsætte med samme antal masker mellem omslag, når der jo hele tiden kommer flere masker til. Er desuden lidt i tvivl om, hvilke omslag der er ærmer og hvilke der er for/bagstykke og dermed, hvordan de skal strikkes. Håber det jeg skriver, giver mening og at I kan hjælpe 😊 Mvh. Nicoline
20.11.2024 - 20:57DROPS Design answered:
Hej Nicoline. Du kommer få fler masker mellan markörerna alltefter att du gör omslag. Det är på var sida av markörerna som du ska göra ökningar/omslag till raglan. Maskorna mellan markör 1 och 2 är ärm och mellan 3 och 4 är den andra ärmen. Hoppas det hjälper! Se gärna våra videor om raglan också. Mvh DROPS Design
21.11.2024 - 13:40
![]() Mirjam wrote:
Mirjam wrote:
Hallo, was heißt denn " in der Höhe stricken" bzw wie macht man das? Das soll beim Passe jede zweite Reihe gemacht werden, richtig? Vielen Dank! Mirjam
07.09.2024 - 21:13DROPS Design answered:
Liebe Mirjam, die Zu- bzw Abnehmen werden soviel Mal gestrickt, wie bescrhrieben,dh in der Höhe und nicht in der Breite. Viel Spaß beim Stricken!
09.09.2024 - 10:13
![]() Eleonora wrote:
Eleonora wrote:
Buongiorno, per la taglia 1-3 mesi non sono sufficienti 150 g come indicato; pur avendo un campione pari pari al modello. Dovrò fare un altro ordine sperando di trovare lo stesso lotto di colore.
30.08.2024 - 16:56
![]() Nicki wrote:
Nicki wrote:
Hi, I haven't knitted in the round before and I am struggling to understand the pattern. It says purl 1 round on the wrong side, but there is no wrong side in the round? What do you mean by band stitches?
27.08.2024 - 22:04DROPS Design answered:
Hi Nicki, This pattern is worked back and forth with circular needles (not in the round). We recommend circular needles due to the number of stitches on each row. The bands are mid-front on each front piece: the right band is where you work the buttonholes, the buttons are sewn onto the left band. Happy knitting!
28.08.2024 - 06:56
![]() Gitte wrote:
Gitte wrote:
Hej, havde forståelsen af at opskriften indeholdt, opskrift på bukserne også ??
22.08.2024 - 17:06DROPS Design answered:
Hej Gitte, dem finder du her: Striped Dreams OG her finder du hele kataloget: DROPS Baby 45
23.08.2024 - 07:39
![]() Janet wrote:
Janet wrote:
What size are the buttons on this pattern please? Can't find the ones suggested - can you give an alternative? Thank you!
15.07.2024 - 18:28DROPS Design answered:
Hi Janet, the button size is 15 mm. You can select buttons you like which have similar size. Happy knitting!
15.07.2024 - 20:51
|
|
Dream Plan Cardigan#dreamplancardigan |
|
 |
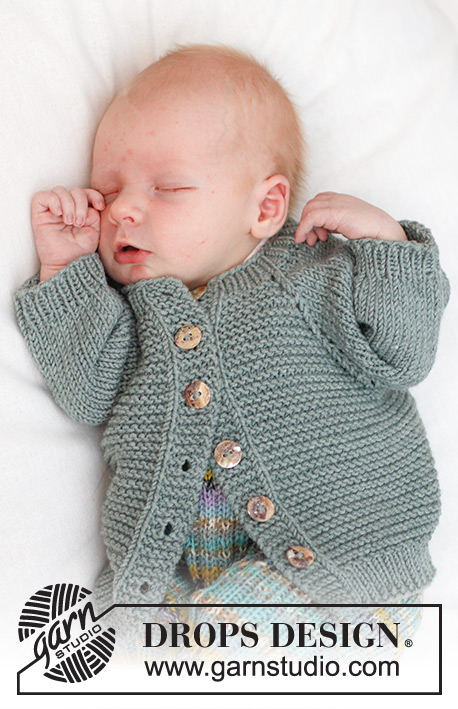 |
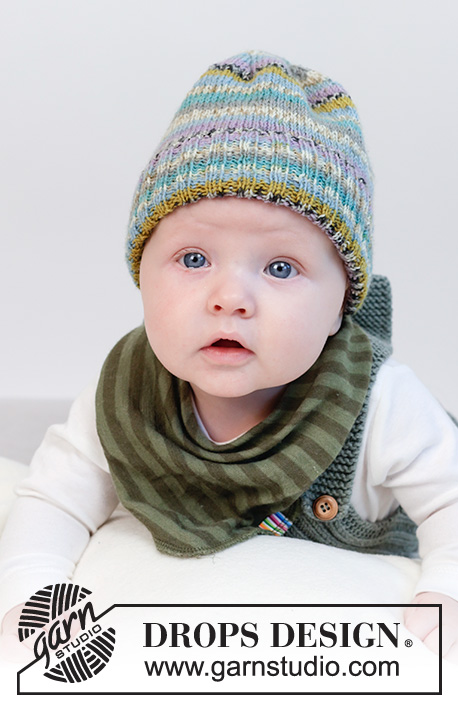
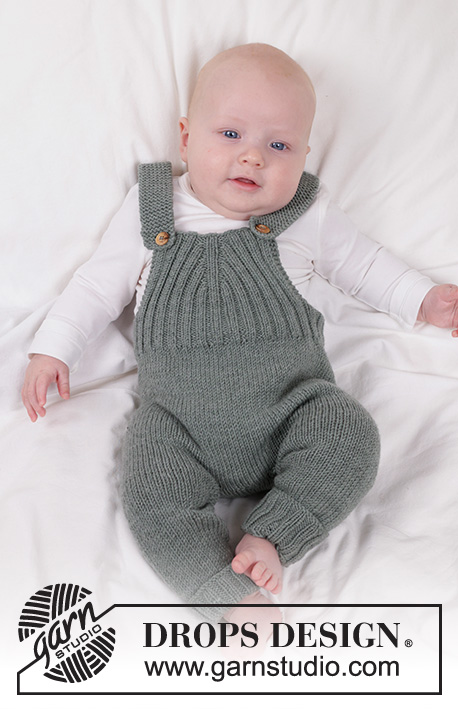
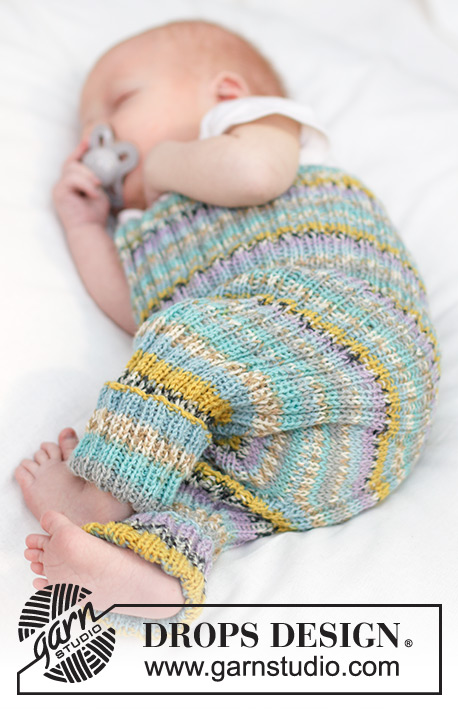
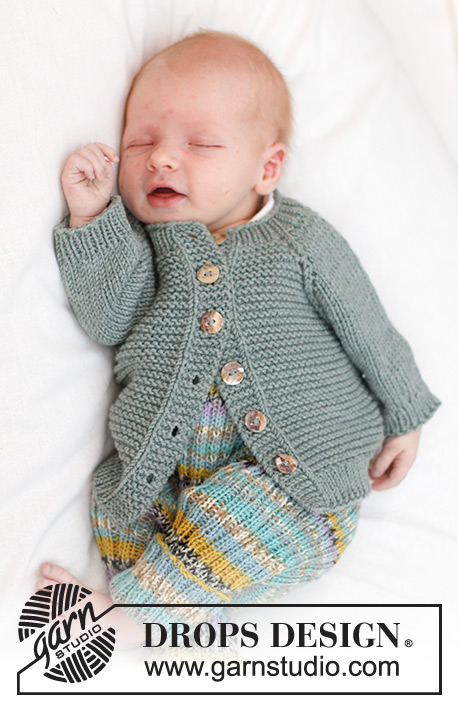
Knitted jacket for baby in DROPS Merino Extra Fine. The piece is worked top down with raglan, garter stitch and stocking stitch. Sizes 0 - 4 years.
DROPS Baby 45-1 |
|
|
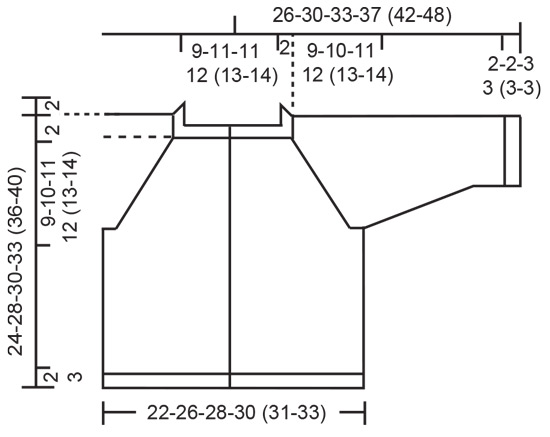
------------------------------------------------------- EXPLANATIONS FOR THE PATTERN: ------------------------------------------------------- RIDGE/GARTER STITCH (worked back and forth): Knit all rows. 1 ridge = knit 2 rows. DECREASE TIP (sleeves): Decrease 1 stitch on either side of the marker-thread as follows: Work until there are 3 stitches left before the marker-thread, knit 2 together, knit 2 (marker-thread sits between these 2 stitches), slip 1 stitch as if to knit, knit 1 and pass the slipped stitch over the knitted stitch. BUTTONHOLES: Work buttonholes on the right band (when the garment is worn). Work from the right side when there are 3 stitches left on the row as follows: Make 1 yarn over, knit 2 together and knit 1. On the next row knit the yarn over to leave a hole. The first buttonhole is worked when the rib on the neck measures approx. 1½-2 cm. Then work the other 4-5-5-5 (5-5) buttonholes with approx. 4-4-4½-5 (5½-6½) cm between each one. ------------------------------------------------------- START THE PIECE HERE: ------------------------------------------------------- JACKET – SHORT OVERVIEW OF THE PIECE. The neck and yoke are worked back and forth with circular needle. The yoke is divided for the body and sleeves and the body continued back and forth. The sleeves are worked in the round with double pointed needles. NECK: Cast on 65-73-73-79 (83-85) stitches with circular needle size 3 mm and DROPS Merino Extra Fine. Purl 1 row from the wrong side with 5 band stitches in GARTER STITCH – read description above, on each side. Work rib, starting from the right side as follows: 5 band stitches in garter stitch, * knit 1, purl 1 *, work from *-* until there are 6 stitches left, knit 1 and 5 band stitches in garter stitch. Remember the BUTTONHOLES – read description above. Work rib for 2 cm and the next row is from the right side. Insert 1 marker-thread after the band at the beginning of the row; the yoke is measured from here! YOKE: Change to circular needle size 4 mm and work from the right side as follows: 5 stitches in garter stitch, 1 stocking stitch (band), 7-9-9-11 (11-11) stitches in garter stitch (front piece), 1 yarn over, 1 stocking stitch and insert a marker in this stitch, 1 yarn over, 9-9-9-9 (11-11) stitches in stocking stitch (sleeve), 1 yarn over, 1 stocking stitch and insert a marker in this stitch, 1 yarn over, 17-21-21-23 (23-25) stitches in garter stitch (back piece), 1 yarn over, 1 stocking stitch and insert a marker in this stitch, 1 yarn over, 9-9-9-9 (11-11) stitches in stocking stitch (sleeve), 1 yarn over, 1 stocking stitch and insert a marker in this stitch, 1 yarn over, 7-9-9-11 (11-11) stitches in garter stitch (front piece), 1 stitch in stocking stitch and 5 stitches in garter stitch (band). There are 4 markers in the piece and you have increased 1 stitch on each side of all marker-stitches for raglan (8 stitches increased). Continue this pattern; work the yarn overs in garter stitch on the front and back pieces and in stocking stitch on the sleeves – the yarn overs are not worked twisted, they should make hole. Increase on both sides of the marker-stitches every 2nd row (each row from the right side) a total of 4-6-6-6 (8-9) times, then every 4th row (every 2nd row from the right side) 7-7-8-9 (9-9) times. You have increased a total of 11-13-14-15 (17-18) times and there are 153-177-185-199 (219-229) stitches on the needle. REMEMBER THE KNITTING TENSION! Continue the pattern until the yoke measures 9-10-11-12 (13-14) cm from the marker-thread on the neck. Divide for the body and sleeves, working as follows: 5 stitches in garter stitch and 1 stocking stitch (band), 19-23-24-27 (29-30) stitches in garter stitch, place the next 31-35-37-39 (45-47) stitches on a thread for the sleeve, without working them, cast on 6-6-8-8 (6-6) stitches under the sleeve, work 41-49-51-55 (59-63) stitches in garter stitch, place the next 31-35-37-39 (45-47) stitches on a thread for the sleeve, without working them, cast on 6-6-8-8 (6-6) stitches under the sleeve, work 19-23-24-27 (29-30) stitches in garter stitch, 1 stocking stitch and 5 stitches in garter stitch (band). BODY: = 103-119-127-137 (141-147) stitches. Continue the pattern back and forth (the cast-on stitches under the sleeve are worked in garter stitch). When the body measures 11-13-14-16 (18-21) cm from the division, increase 8-6-12-10 (16-20) stitches evenly on the next row from the right side (do not increase over the bands) = 111-125-139-147 (157-167) stitches. Change to circular needle size 3 mm. Work rib, starting from the wrong side, as follows: 5 band stitches in garter stitch, * purl 1, knit 1 *, work from *-* until there are 6 stitches left, purl 1 and 5 band stitches in garter stitch. Continue this rib for 2-3-3-3 (3-3) cm. Cast off with knit over knit and purl over purl. The jacket measures approx. 24-28-30-33 (36-40) cm from the shoulder. SLEEVES: Place the 31-35-37-39 (45-47) stitches from the thread on one side of the piece on double pointed needles size 4 mm and knit up 1 stitch in each of the new stitches cast on under the sleeve = 37-41-45-47 (51-53) stitches. Insert a marker thread in the middle of the new stitches under the sleeve = start of the round. Work stocking stitch in the round When the sleeve measures 2 cm decrease 1 stitch on each side of the marker-thread – read DECREASE TIP. Decrease like this every 3-3-2-2½ (3-4) cm a total of 2-3-5-5 (5-5) times = 33-35-35-37 (41-43) stitches. When the sleeve measures 9-11-12-14 (18-22) cm from the division increase 5-5-5-5 (3-5) stitches evenly spaced = 38-40-40-42 (44-48) stitches. Change to double pointed needles size 3 mm and work rib (knit 1, purl 1) for 2-2-3-3 (3-3) cm. Cast off with knit over knit and purl over purl. The sleeve measures approx. 11-13-15-17 (21-25) cm from the division. Work the other sleeve in the same way. ASSEMBLY: Sew the buttons onto the left band. |
|
|
|
Have you finished this pattern?Tag your pictures with #dropspattern #dreamplancardigan or submit them to the #dropsfan gallery. Do you need help with this pattern?You'll find 29 tutorial videos, a Comments/Questions area and more by visiting the pattern on garnstudio.com. © 1982-2025 DROPS Design A/S. We reserve all rights. This document, including all its sub-sections, has copyrights. Read more about what you can do with our patterns at the bottom of each pattern on our site. |
|


With over 40 years in knitting and crochet design, DROPS Design offers one of the most extensive collections of free patterns on the internet - translated to 17 languages. As of today we count 314 catalogues and 11822 patterns translated into English (UK/cm).
We work hard to bring you the best knitting and crochet have to offer, inspiration and advice as well as great quality yarns at incredible prices! Would you like to use our patterns for other than personal use? You can read what you are allowed to do in the Copyright text at the bottom of all our patterns. Happy crafting!
Post a comment to pattern DROPS Baby 45-1
We would love to hear what you have to say about this pattern!
If you want to leave a question, please make sure you select the correct category in the form below, to speed up the answering process. Required fields are marked *.