Comments / Questions (15)
![]() Donatella wrote:
Donatella wrote:
Se volessi lavorare dei ferri accorciati sul dietro, come dovrei calcolarli?
12.04.2025 - 09:22DROPS Design answered:
Buonasera Donatella, può prendere spunto da altri modelli che prevedono l'utilizzo di ferri accorciati oppure rivolgersi al suo rivenditore DROPS di fiducia. Buon lavoro!
12.04.2025 - 17:38
![]() Day wrote:
Day wrote:
Just to comfirm, in wrong side i just purl only for the pattern cable?
25.11.2024 - 11:30DROPS Design answered:
Dear Day, when working diagram A.1 from WS purl the whit squares and knit the "-" squares, for ex. work 2nd row: P1, K2, P2, K5, P4, K5, P2, K2, P1. Happy knitting!
25.11.2024 - 14:46
![]() Day wrote:
Day wrote:
How can i do pattern cable in wrong side?
25.11.2024 - 01:17DROPS Design answered:
Hi Day, Cabling is always worked from the right side (the first row of A.1 is worked from the right side when you start the yoke). Happy knitting!
25.11.2024 - 07:02
![]() Hylari wrote:
Hylari wrote:
Can you clarify if this pattern bas A1 on the back as well? From the limited amount that can be seen on the photo it seems to be only on the front, but the instructions seem to imply it is also on the back. A photo of the back would be helpful. Thank you!
19.10.2024 - 17:00DROPS Design answered:
Dear Morgana, yes, there is a pattern at all 4 of the raglan lines, on the front and also on the back as well. happy Knitting!
20.10.2024 - 10:44
![]() Maya wrote:
Maya wrote:
Thanks for the response. How much ease is shown in the photos accompanying the patter?
08.09.2024 - 22:49DROPS Design answered:
Dear Maya, the model is wearing an M size. The jacket is a tight fit, with around 4cm. Happy knitting!
08.09.2024 - 23:28
![]() Maya wrote:
Maya wrote:
How much ease is this sweater designed to be worn with? I'm trying to decide which size to knit.
08.09.2024 - 21:45DROPS Design answered:
Dear Maya, you can see the measurements of the jacket in cm at the bottom of the pattern, in the size chart. These are the final measurements of the garment so, depending on the type of ease you prefer, you can choose one size or another. You can read more information on this chart here: https://www.garnstudio.com/lesson.php?id=24&cid=19. Happy knitting!
08.09.2024 - 22:44
![]() Beth Rainer wrote:
Beth Rainer wrote:
How do I see the comments in English?
27.08.2024 - 02:44DROPS Design answered:
Hi Beth, If you are on the Norwegian page, just above "Instruksjoner" there is a drop-down menu titled "Norsk". Here you can select English US or English UK as you wish. Happy crafting!
27.08.2024 - 06:26
![]() Guenda wrote:
Guenda wrote:
Buongiorno, dato che questo modello é lavorato dall’alto in basso, anche il diagramma A1 va eseguito dall’alto in basso? Oppure va eseguito lo stesso dal basso come sempre? Grazie per la risposta.
19.02.2024 - 03:03DROPS Design answered:
Buonsera Guenda, i diagrammi si lavorano sempre dal basso verso l'alto. Buon lavoro!
20.02.2024 - 16:14
![]() Kickie Holmer wrote:
Kickie Holmer wrote:
Stickar storlek L på koftan och efter alla raglanökningat står det att jag skall ha 421 mask or, vilket jag har (inkl de 8 första) Sedan står det att raglanökningarna är klara i storlek L. Men sedan när jag ska fortsätta står det att jag ska ha 429 maskor????
22.11.2023 - 16:19DROPS Design answered:
Hej Kickie. Storlek L är 385 maskor och XL är 421 maskor. Vilken storlek är det du stickar? Mvh DROPS Design
24.11.2023 - 07:50
![]() Annemiek Van Rijn wrote:
Annemiek Van Rijn wrote:
Klopt het dat het boord in gerstekorrel wordt gebreid? Omdat je heen en weer breidt en niet rond??
15.11.2023 - 15:08DROPS Design answered:
Dag Annemiek,
Nee, de boord wordt gewoon in boordsteek gebreid, 1 recht/1 averecht. De steken in boordsteek die je aan de goede kant recht breit, brei je aan de verkeerde kant averecht en vice versa.
18.11.2023 - 15:07
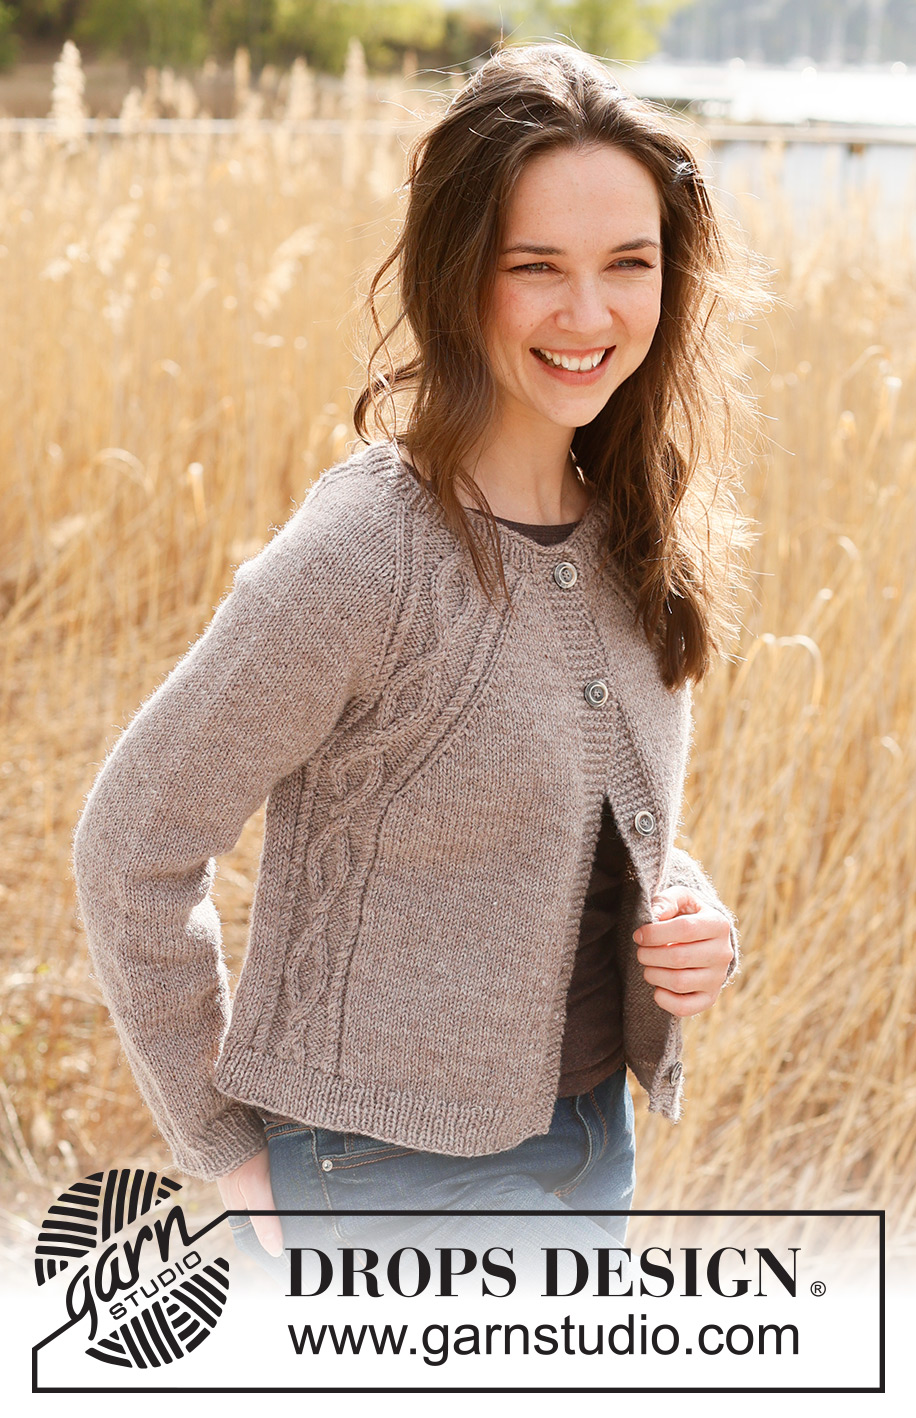
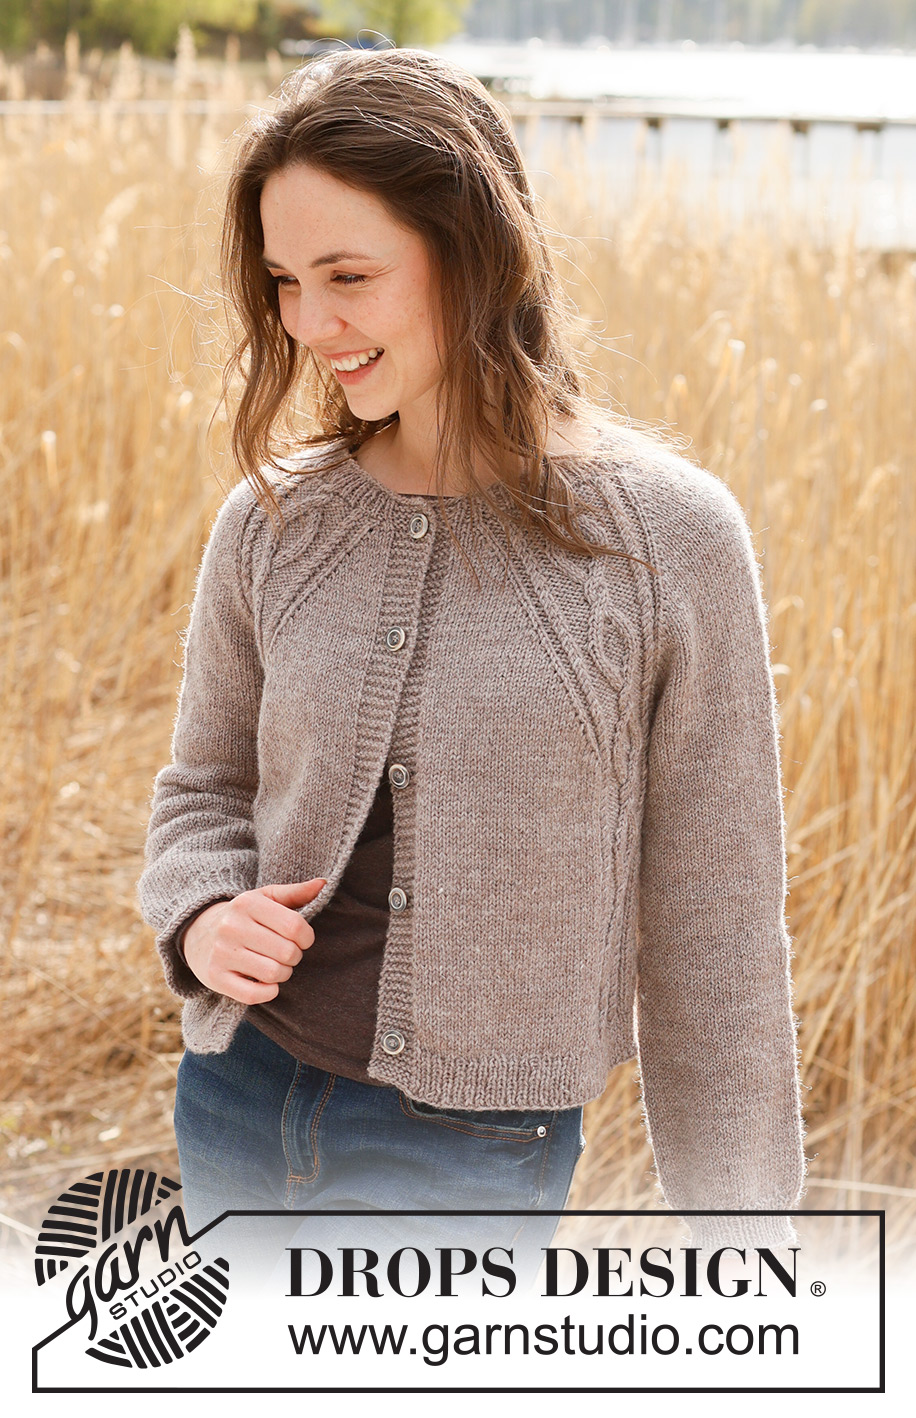
Autumn in the Air Cardigan#autumnintheaircardigan |
|||||||||||||||||||
 |
 |
||||||||||||||||||
Knitted jacket in DROPS Karisma or DROPS Daisy. The piece is worked top down with raglan and cables. Sizes S - XXXL.
DROPS 237-21 |
|||||||||||||||||||
|
------------------------------------------------------- EXPLANATIONS FOR THE PATTERN: ------------------------------------------------------- RIDGE/GARTER STITCH (worked back and forth): Knit all rows. 1 ridge = knit 2 rows. PATTERN: See diagram A.1. The diagram shows all rows in the pattern from the right side. RAGLAN: Increase 1 stitch by making 1 yarn over before/after A.1 (in each transition between the body and sleeves). The yarn overs are then worked as follows from the wrong side: BEFORE A.1: Purl yarn over in the back loop = no hole. AFTER A.1: Slip the yarn over off the left needle and replace it the other way round (insert the left needle in the back when replacing it). Purl yarn over in the front loop = no hole. The new stitches are worked in stocking stitch. DECREASE TIP (for sleeves): Work until there are 3 stitches left before the marker, knit 2 together, knit 2 (marker sits between these 2 stitches), slip 1 stitch as if to knit, knit 1 and pass the slipped stitch over the knitted stitch (2 stitches decreased). BUTTONHOLES: Work buttonholes on the right band (when the garment is worn). Work from the right side when there are 4 stitches left on the row as follows: Make 1 yarn over, knit 2 together and knit 2. On the next row (wrong side), knit the yarn over to leave a hole. The first buttonhole is worked when the rib on the neck is finished. Then work the other 4-4-5-5-5-5 buttonholes with approx. 10-10½-9-9-9½-10 cm between each one. ------------------------------------------------------- START THE PIECE HERE: ------------------------------------------------------- JACKET – SHORT OVERVIEW OF THE PIECE. The neck and yoke are worked back and forth with circular needle, from mid front and top down. The yoke is divided for body and sleeves and the body continued back and forth with circular needle. The sleeves are worked in the round with double pointed needles/short circular needle. NECK: Cast on 113-117-121-125-129-133 stitches with circular needle size 3 mm and DROPS Karisma or Daisy. Purl 1 row from the wrong side. Then work as follows from the right side: 7 stitches in GARTER STITCH – read description above, * knit 1, purl 1 *, work from *-* until there are 8 stitches left, knit 1 and 7 stitches in garter stitch. Continue this rib for 3 cm. Knit 1 row from the right side where you increase 24 stitches evenly spaced (do not increase the bands) = 137-141-145-149-153-157 stitches. Purl 1 row from the wrong side (bands are knitted). Insert 1 marker after the first band; the yoke is measured from this marker! YOKE: Change to circular needle size 4 mm and work the first row from the right side as follows: 7 stitches in garter stitch, 3-4-4-4-5-6 stitches in stocking stitch, increase 1 stitch to RAGLAN – read description above, work A.1, increase 1 stitch to raglan, 7-7-9-11-11-11 stitches in stocking stitch (sleeve), increase 1 stitch to raglan, work A.1, increase 1 stitch to raglan, 7-9-9-9-11-13 stitches in stocking stitch (back piece), increase 1 stitch to raglan, work A.1, increase 1 stitch to raglan, 7-7-9-11-11-11 stitches in stocking stitch (sleeve), increase 1 stitch to raglan, work A.1, increase 1 stitch to raglan, 3-4-4-4-5-6 stitches in stocking stitch and 7 stitches in garter stitch, remember the BUTTONHOLE on the right band – read description above. 8 stitches increased to raglan = 145-149-153-157-161-165 stitches. REMEMBER THE KNITTING TENSION! Continue this pattern and increase to raglan every 2nd row (each row from the right side) a total of 25-27-30-34-35-36 times = 337-357-385-421-433-445 stitches. The increases are now finished in size L. Work the other sizes as below then go to ALL SIZES. SIZES S and M: The increases on the body are finished. Continue working as before and increase on the sleeves 2-1 more times = 345-361 stitches. SIZES XL, XXL and XXXL: The increases on the sleeves are finished. Continue working as before and increase on the front/back pieces 2-5-8 more times = 429-453-477 stitches. ALL SIZES: = 345-361-385-429-453-477 stitches. Continue working without further increases until the yoke measures 22-24-26-27-29-31 cm from the marker. On the next row divide for the body and sleeves as follows: Work 59-62-65-71-76-81 stitches, place the next 61-63-69-79-81-83 stitches on a thread for the sleeve, cast on 6-8-10-10-12-14 stitches (in side under sleeve), work 105-111-117-129-139-149 stitches, place the next 61-63-69-79-81-83 stitches on a thread for the sleeve, cast on 6-8-10-10-12-14 stitches (in side under sleeve), work the last 59-62-65-71-76-81 stitches. The body and sleeves are finished separately. The body is measured from here! BODY: = 235-251-267-291-315-339 stitches. Continue with stocking stitch, A.1 and 7 stitches in garter stitch on each side for a further 20 cm. Knit 1 row from the right side where you increase 24-26-26-30-32-34 stitches evenly spaced (do not increase the bands) = 259-277-293-321-347-373 stitches. Change to circular needle size 3 mm and work as follows from the wrong side: 7 stitches in garter stitch, * purl 1, knit 1 *, work from *-* until there are 8 stitches left, purl 1 and 7 stitches in garter stitch Continue this rib for 4 cm. Cast off a little loosely. The jacket measures approx. 48-50-52-54-56-58 cm from the shoulder down. SLEEVES: Place the 61-63-69-79-81-83 stitches from the thread on the one side of the piece on short circular needle/double pointed needles size 4 mm and knit up 1 stitch in each of the 6-8-10-10-12-14 stitches cast on under the sleeve = 67-71-79-89-93-97 stitches. Insert a marker in the middle of the 6-8-10-10-12-14 stitches under the sleeve. Allow the marker to follow your work onwards; it will be used when decreasing under the sleeve. Start at the marker and work stocking stitch in the round for 4-4-3-3-2-2 cm. Now decrease 2 stitches under the sleeve – read DECREASE TIP. Decrease like this every 3-3-2-1½-1½-1 cm a total of 4-5-8-12-13-14 times = 59-61-63-65-67-69 stitches. Continue working until the sleeve measures 38-37-35-36-34-33 cm from the division. There is 4 cm left; try the jacket on and work to desired length. Knit 1 round where you decrease 5 stitches evenly spaced = 54-56-58-60-62-64 stitches. Change to double pointed needles size 3 mm and work rib (knit 1, purl 1) for 4 cm. Cast off a little loosely. The sleeve measures approx. 42-41-39-40-38-37 cm from the division. Work the other sleeve in the same way. ASSEMBLY: Sew the buttons onto the left band. |
|||||||||||||||||||
Diagram explanations |
|||||||||||||||||||
|
|||||||||||||||||||

|
|||||||||||||||||||

|
|||||||||||||||||||
Have you finished this pattern?Tag your pictures with #dropspattern #autumnintheaircardigan or submit them to the #dropsfan gallery. Do you need help with this pattern?You'll find 35 tutorial videos, a Comments/Questions area and more by visiting the pattern on garnstudio.com. © 1982-2025 DROPS Design A/S. We reserve all rights. This document, including all its sub-sections, has copyrights. Read more about what you can do with our patterns at the bottom of each pattern on our site. |
|||||||||||||||||||


Post a comment to pattern DROPS 237-21
We would love to hear what you have to say about this pattern!
If you want to leave a question, please make sure you select the correct category in the form below, to speed up the answering process. Required fields are marked *.