
Popular categories
Looking for a yarn?


|
|||||||||||||||||||||||||||||||||||||
Miss Summerbee Cardigan |
|||||||||||||||||||||||||||||||||||||
 |
 |
||||||||||||||||||||||||||||||||||||
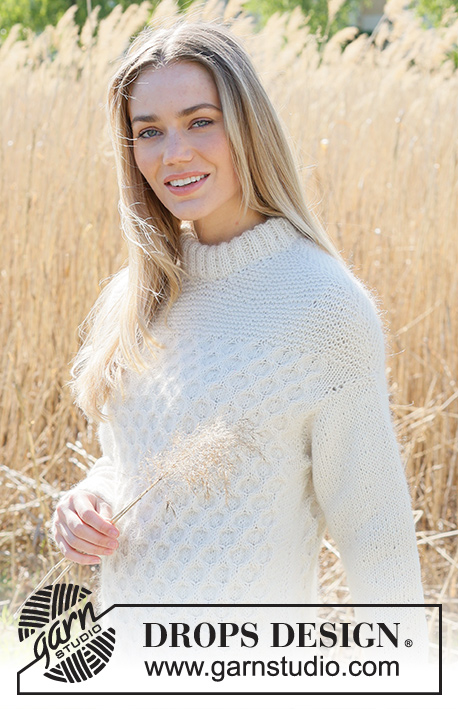
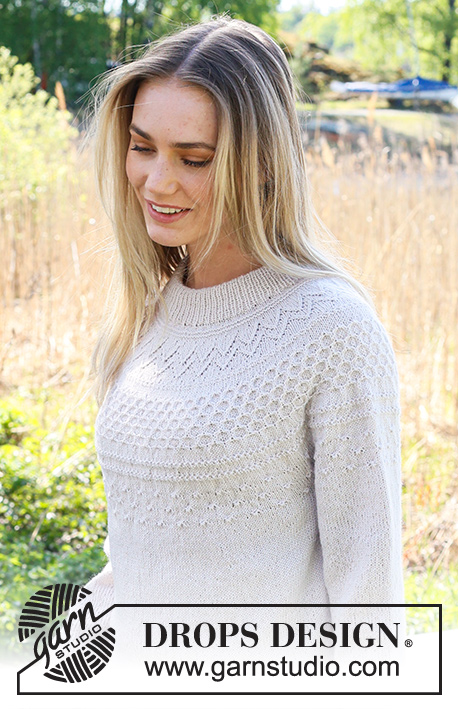
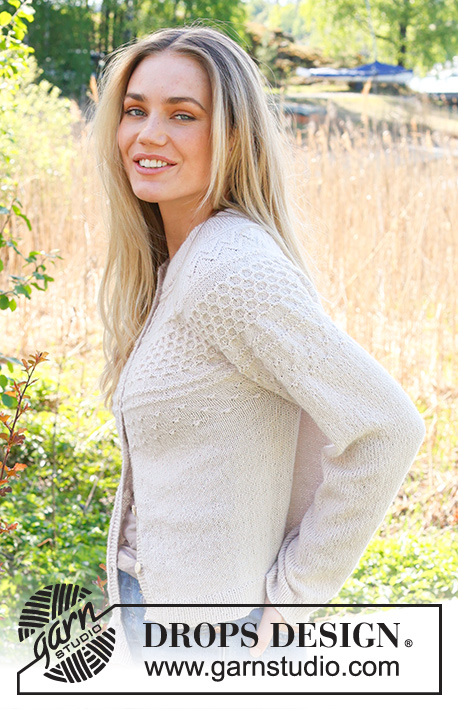
Knitted jacket in DROPS Flora. The piece is worked top down with double neck, round yoke and relief-pattern on the yoke. Sizes S - XXXL.
DROPS 236-11 |
|||||||||||||||||||||||||||||||||||||
|
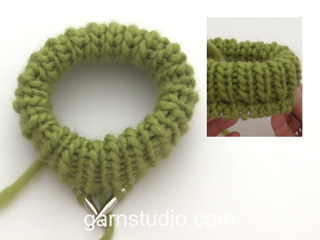
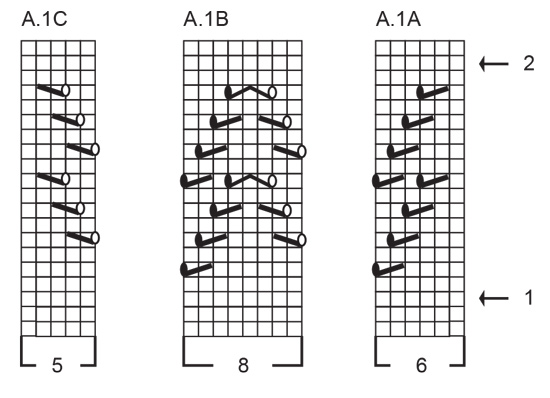
------------------------------------------------------- EXPLANATIONS FOR THE PATTERN: ------------------------------------------------------- RIDGE/GARTER STITCH (worked back and forth): Knit all rows. 1 ridge = knit 2 rows. BUTTONHOLES: Work buttonholes on the right band (when the garment is worn). Work from the right side when there are 5 stitches left on the row as follows: Make 1 yarn over, knit 2 together and knit 3. On the next row (wrong side), knit the yarn over to leave a hole. The first buttonhole is worked when the neck is finished (the piece measures approx. 4 cm = 1½" after the neck has been folded double). Then work the other 5-5-5-6-6-6 buttonholes with approx. 8-8½-9-8-8½-8½ cm = 3⅛"-3¼"-3½"-3⅛"-3¼"-3¼" between each one. ELEVATION (back of neck): To make the back of the neck slightly higher when working the yoke, you can work an elevation as described here. Skip this section if you do not want an elevation. Insert 1 marker in the middle stitch on the row. Start from the right side and knit 14-15-16-16-17-18 stitches past the marker-stitch, turn, tighten strand and purl 29-31-33-33-35-37 stitches back. Turn, tighten strand and knit 43-46-49-49-52-55 stitches, turn, tighten strand and purl 57-61-65-65-69-73 stitches back. Turn, tighten strand and knit 71-76-81-81-86-91 stitches, turn, tighten strand and purl 85-91-97-97-103-109 stitches back. Turn, tighten strand and knit 99-106-113-113-120-127 stitches, turn, tighten strand and purl 113-121-129-129-137-145 stitches back. Turn, tighten the strand and knit to the end of the row. Purl 1 row (the bands are knitted). Then work YOKE as described in the text. PATTERN: See diagrams A.1 to A.3. The diagrams show all rows in the pattern from the right side. INCREASE/DECREASE TIP (evenly spaced): To work out how to increase/decrease evenly, count the total number of stitches on needle (e.g. 121 stitches), and divide by the number of increases/decreases to be made (e.g. 34) = 3.6. In this example, increase by making 1 yarn over after alternately each 3rd and 4th stitch (do not increase the bands). On the next row work the yarn overs twisted to avoid holes. When decreasing, knit together alternately each 2nd and 3rd stitch and each 3rd and 4th stitch. DECREASE TIP (for sleeves): Start 3 stitches before the marker, knit 2 together, knit 2 (marker sits between these 2 stitches), slip 1 stitch as if to knit, knit 1 and pass the slipped stitch over the knitted stitch. ------------------------------------------------------- START THE PIECE HERE: ------------------------------------------------------- JACKET – SHORT OVERVIEW OF THE PIECE. The neck and yoke are worked back and forth with circular needle, from mid front and top down. The yoke is divided for body and sleeves and the body continued back and forth with circular needle. The sleeves are worked in the round with double pointed needles/short circular needle, top down. DOUBLE NECK: Cast on 121-125-129-133-139-143 stitches with DROPS Flora using 2 short circular needles size 2.5 MM = US 1.5 and 3 MM = US 2.5 held together. Remove the needle size 3 MM = US 2.5 (doing this gives you an elastic cast-on edge) and keep stitches on circular needle size 2.5 MM = US 1.5. Work the first row as follows from the right side: 1 stitch in GARTER STITCH – see description above, * knit 1, purl 1*, work from *-* until there are 2 stitches left, knit 1 and 1 stitch in garter stitch. Work this rib back and forth for 4 cm = 1½". Cast on 6 stitches at the end of the next 2 rows = 133-137-141-145-151-155 stitches. Continue the rib as before with 6 stitches in garter stitch on each side (bands) until the rib measures 8 cm = 3⅛" from the cast-on edge – adjust so the next row is worked from the right side. Fold the neck double to the inside and work as follows from the right side: 6 stitches in garter stitch, work rib as before, working every 2nd stitch together with its corresponding stitch on the cast-on edge and until there are 7 stitches left on the row, knit 1 and 6 stitches in garter stitch. Change to circular needle size 3 MM = US 2.5. Work the next row as follows from the wrong side: 6 stitches in garter stitch, purl until there are 6 stitches left and increase 34-38-34-38-40-44 stitches evenly spaced – read INCREASE/DECREASE TIP, 6 stitches in garter stitch = 167-175-175-183-191-199 stitches. Insert 1 marker inside the band at the beginning of the row – this is used to measure the yoke. You can now work an ELEVATION at the back – read description above. If you do not want an elevation go straight to YOKE. YOKE: Work 2-2-6-6-8-10 rows of stockinette stitch with 6 stitches in garter stitch on each side – remember the BUTTONHOLES on the right band – read description above. REMEMBER THE KNITTING GAUGE! Work 2 ridges back and forth over all stitches. Work the next row from the right side as follows: 6 stitches in garter stitch, A.1A, work A.1B until there are 11 stitches left, A.1C, 6 stitches in garter stitch. Continue this pattern, increasing as follows at each arrow: Arrow-1: Increase 40-40-48-56-64-64 stitches evenly spaced = 207-215-223-239-255-263 stitches. Arrow-2: Increase 47-51-61-69-65-75 stitches evenly spaced = 254-266-284-308-320-338 stitches. When A.1 is finished work A.2 as follows from the right side: 6 stitches in garter stitch, A.2A, work A.2B until there are 13 stitches left, A.2C, 6 stitches in garter stitch. Continue this pattern, increasing as follows at each arrow: Arrow-3: Increase 102-108-114-126-126-138 stitches evenly spaced = 356-374-398-434-446-476 stitches (you increase more stitches here as the next pattern tightens the piece slightly). Arrow-4: Decrease 6-6-6-12-12-12 stitches evenly spaced – remember INCREASE/DECREASE TIP = 350-368-392-422-434-464 stitches. Arrow-5: Increase 24-30-30-30-36-42 stitches evenly spaced = 374-398-422-452-470-506 stitches. Arrow-6: Increase 13-21-29-31-37-41 stitches evenly spaced = 387-419-451-483-507-547 stitches. The increases are finished in sizes S, M and L. When A.2 is finished work A.3 as follows from the right side: 6 stitches in garter stitch, A.3A, work A.3B until there are 13 stitches left, A.3C, 6 stitches in garter stitch. Continue this pattern, increasing as follows at the arrow (applies only to sizes XL, XXL and XXXL): Arrow-7: Increase 16-24-24 stitches evenly spaced = 499-531-571 stitches. OVERVIEW OF THE NEXT SECTION: Continue with A.3 as described below. In addition the yoke is divided for the body and sleeves. Read PATTERN and DIVIDING FOR BODY AND SLEEVES before continuing. PATTERN: S and M: When A.3 is finished (a total of 3 rows of knots), continue with stockinette stitch with 6 stitches in garter stitch on each side. NOTE: The yoke is divided for the body and sleeves before A.3 is finished. L: When A.3 is finished, work the first 6 rows in the repeat marked with a star (a total of 4 rows of knots), then continue with stockinette stitch with 6 stitches in garter stitch on each side. NOTE: The yoke is divided for the body and sleeves before A.3 is finished. XL, XXL and XXXL: When A.3 is finished, work the repeat marked with a star until you have a total of 5-6-6 rows of knots, then continue with stockinette stitch with 6 stitches in garter stitch on each side. NOTE: The yoke is divided for the body and sleeves before A.3 is finished. DIVIDING FOR BODY AND SLEEVES: When the yoke measures 21-23-25-27-29-31 cm = 8¼"-9"-9¾"-10⅝"-11⅜"-12¼" from the marker, divide for the body and sleeves as follows: Work 61-67-71-77-84-92 stitches as before (front piece), place the next 77-81-89-101-103-107 stitches on a thread for the sleeve, cast on 8-8-10-10-12-12 stitches (in side under sleeve), work 111-123-131-143-157-173 stitches (back piece), place the next 77-81-89-101-103-107 stitches on a thread for the sleeve, cast on 8-8-10-10-12-12 stitches (in side under sleeve), work the last 61-67-71-77-84-92 stitches (front piece). The body and sleeves are finished separately. The piece is now measured from here! BODY: = 249-273-293-317-349-381 stitches. Finish A.3 as described above – NOTE: After the division, the pattern will not fit under the sleeves; work pattern as far as possible with the remaining stitches under the sleeve in stockinette stitch (the pattern is continued neatly from the yoke on the front and back pieces). When A.3 is finished (a total of 3-3-4-5-6-6 rows of knots), continue with stockinette stitch with 6 stitches in garter stitch on each side until the body measures 24 cm = 9½" from the division. Knit 1 row from the right side and increase 48-54-58-62-68-76 stitches evenly spaced (do not increase the bands) = 297-327-351-379-417-457 stitches. Change to circular needle size 2.5 MM = US 1.5 and work the next row from the wrong side as follows: 6 stitches in garter stitch, * purl 1, knit 1 *, work from *-* until there are 7 stitches left, purl 1 and 6 stitches in garter stitch. Continue this rib for 4 cm = 1½". Bind off a little loosely. The jacket measures approx. 52-54-56-58-60-62 cm = 20½"-21¼"-22"-22¾"-23⅝"-24⅜" from the shoulder down. SLEEVES: Place the 77-81-89-101-103-107 stitches from the thread on the one side of the piece on short circular needle/double pointed needles size 3 MM = US 2.5 and knit up 1 stitch in each of the new stitches cast on under the sleeve = 85-89-99-111-115-119 stitches. Insert a marker in the middle of the new stitches under the sleeve. Finish A.3 in the round as described above. NOTE: After the division, the pattern will not fit under the sleeve; work pattern as far as possible and then the stitches under the sleeve in stockinette stitch. When A.3 is finished continue with stockinette stitch. When the sleeve measures 3 cm = 1⅛" from the division, decrease 2 stitches under the sleeve – read DECREASE TIP. Decrease like this every 4-4-2½-1½-1½-1½ cm = 1½"-1½"-1"-½"-½"-½" a total of 9-9-13-18-19-19 times = 67-71-73-75-77-81 stitches. Continue working until the sleeve measures 39-38-36-35-33-32 cm = 15¼"-15"-14¼"-13¾"-13"-12½" from the division. There is 4 cm = 1½" left to finished length; try the jacket on and work to desired length.. Knit 1 round where you increase 13-13-13-15-15-15 stitches evenly spaced = 80-84-86-90-92-96 stitches. Change to double pointed needles size 2.5 MM = US 1.5 and work rib (knit 1, purl 1) for 4 cm = 1½". Bind off a little loosely. The sleeve measures approx. 43-42-40-39-37-36 cm = 17"-16½"-15¾"-15¼"-14½"-14¼" from the division. Work the other sleeve in the same way. ASSEMBLY: Sew together the openings mid-front by the neck with small stitches. Sew the buttons onto the left band. |
|||||||||||||||||||||||||||||||||||||
Diagram explanations |
|||||||||||||||||||||||||||||||||||||
|
|||||||||||||||||||||||||||||||||||||
|
|||||||||||||||||||||||||||||||||||||

|
|||||||||||||||||||||||||||||||||||||

|
|||||||||||||||||||||||||||||||||||||

|
|||||||||||||||||||||||||||||||||||||
|
Have you made this or any other of our designs? Tag your pictures in social media with #dropsdesign so we can see them! Do you need help with this pattern?You'll find tutorial videos, a Comments/Questions area and more by visiting the pattern on garnstudio.com. © 1982-2024 DROPS Design A/S. We reserve all rights. This document, including all its sub-sections, has copyrights. Read more about what you can do with our patterns at the bottom of each pattern on our site. |
|||||||||||||||||||||||||||||||||||||


With over 40 years in knitting and crochet design, DROPS Design offers one of the most extensive collections of free patterns on the internet - translated to 17 languages. As of today we count 304 catalogs and 11422 patterns - 11417 of which are translated into English (US/in).
We work hard to bring you the best knitting and crochet have to offer, inspiration and advice as well as great quality yarns at incredible prices! Would you like to use our patterns for other than personal use? You can read what you are allowed to do in the Copyright text at the bottom of all our patterns. Happy crafting!
Comments / Questions (25)
Liebes Drops Team, ich finde die Anleitungen super, habe aber immer wieder Probleme die richtige Größe zu finden. Kann man nicht in der Anleitung empfohlene Größe für Brustumfang xx cm schreiben mit der dazu gehörnden Mehrweite oder Angaben zu Brustumfang von-bis? Herzlichen Dank
02.05.2024 - 18:23Wie ermittel ich am besten die Größe? Bei einem Brustumfang von 95 cm . Herzlichen Dank
02.05.2024 - 18:19DROPS Design answered:
Liebe Andrea, messen Sie eine ähnliche Jacke, die Sie gerne tragen, und vergleichen Sie alle Maße mit der Skizze, so finden Sie die beste passende Größe - hier lesen Sie mehr. Viel Spaß beim Stricken!
03.05.2024 - 07:49Hallo, Eine Frage zur Doppelten-Halsblende: es heißt, wenn man 8cm gestrickt hat, soll man das Rippenmuster nach innen umschlagen. Ist somit der gestrickte Anfang, wenn man ihn umschlägt, „vor“ den Stricknadeln oder „dahinter“? Also steche ich beim zusammenstricken erst in die alte Masche und dann in die auf der Nadel liegende oder anders herum. Vielen Dank schonmal und LG
05.04.2024 - 14:18DROPS Design answered:
Liebe Sophie, in diesem Video zeigen wir, wie man eine doppelte Halsblende strickt, im Video handelt es sich um eine Halsblende für einen Pullover, für eine Jacke wird es aber genauso gestrickt, nur in Reihen und nicht in der Runde. Viel Spaß beim Stricken!
05.04.2024 - 15:07Jeg vil gerne strikke denne cardigan, men anvende alpaca og så en følgetråd Kid Silk. Kan jeg det? Jeg er normalt en str M, skal jeg måske ændre i str, hvis jeg strikker i andet garn såsom Alpaca. Alternativt tænker jeg, om jeg kan bruge Flora og så sætte følgetråd Kid Silk i? Jeg vil gerne have Kid Silk i trøjen. Venlig hilsen Lisbeth Nielsen
14.03.2024 - 15:47DROPS Design answered:
Hej Lisbeth, får at få den rigtige størrelse i de 2 ønskede tråde kan du vælge at følge maskeantallet på en af disse cardigans (husk at overholde strikkefastheden som står i den opskrift du følger, for at få rigtig størrelse): Cardigan - rundt bærestykke - oppefra og ned
19.03.2024 - 12:09Danke liebes Drops Team. Da hatte ich ja gleich 2 Fehler gemacht. Also danke.
22.11.2023 - 18:16Danke liebes Drops Team. Da hatte ich gleich 1 Denkfehler und 1 Rechenfehler. Also danke.
22.11.2023 - 13:18Liebes Drops Team. Wo ist mein Fehler ? Ich stricke gr. Xl. Die Zunahme Pfeil 6 ergibt 483 M. Plus Pfeil 7 ergibt 499M. Die Aufteilung in 2 mal Vorderteil je 77 M. plus 2mal Ärmel je 101 M. Plus Rückenteil 143M. sind 489 M. Und weiter nach Abzug der Ärmel 202 M. Ergeben 287 M. Für das Rumpfteil soll ich aber mit 317 M. weiterstricken. Mit freundlichen Grüßen Anke Münstermann
21.11.2023 - 20:04DROPS Design answered:
Liebe Frau Münstermann, bei der Verteilungsreihe wird man 10 Maschen über die stillgelegten Maschen für jede Ärmel anschlagen, so hat man 77+10+143+10+77=317 Maschen. Viel Spaß beim stricken!
22.11.2023 - 08:54I still don't understand the instruction for the stitches on rows 9 and 11. I am following the written instructions rather than the chart and I need to lnow exactly what to do as a1. A3 doesn't make sense to me. Could you please explain further.
09.08.2023 - 15:59DROPS Design answered:
Dear Mrs Palin, Imagine that all these 3 A.3 diagrams are together; you just make knots after every 5 stitches and repeat after every 5 rows. On row 9, start (after the front band stitches) after the first 6 sts and work *a knot over the next 3 sts, knit 5*, ending with knit 7 at the end of the row (inside front band stitches). On row 15 (edit), knit 2, then work *1 knot, knit 5*,, repeat from *-* ending with knit 2 (remember front band sts on each side). Happy knitting!
10.08.2023 - 11:36When working pattern A, rows 1,3,5 7 and 13 are worked over 8 stitches with 25 repeats. When working rows 9 and 11, the pattern is only over 6 stitches with 25 repeats. Therefore, there are more stitches left at the end of the repeats. Please advise as there appears to be an error in either number of stitches used or number of repeats.
09.08.2023 - 00:25DROPS Design answered:
Dear Mrs Palin, when working 9th row, you will work the last 2 sts A.3A together with the first stitch A.3B (you work these 3 sts together 3 times - no decrease, just a small bobble); then work B the same way, ie work the last 2 sts A.3B together with the first stitch next A.3B and then with the first stitch A.3C. Happy knitting!
09.08.2023 - 08:30I really want to try this but I cant understand the ref to A1,A2 and A2- the website refers to diagrams - but there arent any on the page? What am I missing please? Gorgeous pattern, never tried top down so excited to get started - once I understand the pattern- I will neeed new circular needles as I dont have any this size - would you recommend the interchangeable sort with different length cables? Thanks!
02.06.2023 - 18:40DROPS Design answered:
Dear Diane, you can find all of the charts after the pattern written instructions. A.1, A.2 and A.3 are shown separated in 3 parts each (A, B and C). We don't have yet any interchangeable circular needles in DROPS, but you could use them if you have them. Happy knitting!
04.06.2023 - 19:16