
Popular categories
Looking for a yarn?


Comments / Questions (25)
![]() Maiggey wrote:
Maiggey wrote:
Hi, I love your patterns and make a few pieces already. I have question on diagrams starting the skirt. I followed the diagram but I’m getting less stitches and not have any stitches to repeat A.1 again. Can you give me a bit more detail and instructions? Thanks!
13.03.2026 - 04:59DROPS Design answered:
Hi Maiggey, The diagrams are worked bottom up and read from right to left from the right side. A.1 starts with 36 stitches on the first row in the diagram and, depending on the size you are making, this is repeated and fits on the round. I.e., in size S, A.1 is repeated 7 times. 7 x 36 = 252 stitches which is the number of stitches cast on. Regards, Drops Team.
13.03.2026 - 05:46
![]() Anita Albech wrote:
Anita Albech wrote:
Jeg kan ikke få mine masker og mønster til at passe i A1 - når jeg strikker 2. mønster runde får jeg jo får få masker og ender med at mønstret ikke passer ? hvad gør jeg forkert - mon det kan forklares med ord eller kan jeg blive ringet op på 28659075
22.08.2025 - 10:52DROPS Design answered:
Hej Anita. Har du sett att du kun ska gentage de 2 første omgange i A.1 i højden till det mål som uppges i opskriften? Mvh DROPS Design
29.08.2025 - 07:31
![]() Audrey wrote:
Audrey wrote:
Hallo liebes Team von Drops Design. Ich bin bei dem Kleid jetzt bei der Passe angekommen und verstehe nicht ganz wie ich arbeiten muss. Der Rock wurde ja in runden gearbeitet und jetzt heißt es auf einmal hin und Rück Reihe.. muss ich die eine Hälfte der Passe stilllegen, erst den Rückenteil stricken und dann die Seite wechseln zum Vorderteil?
24.07.2024 - 12:11DROPS Design answered:
Liebe Audrey, Sie stricken die Passe tatsächlich hin und zurück, legen aber keine Maschen still - die Passe ist an der einen Seite zunächst offen und wird dann am Ende zusammengenäht. Das Vorderteil und das Rückenteil werden erst später einzeln weitergearbeitet (nach dem Abketten für die Armausschnitte). Viel Spaß beim Weiterstricken!
26.07.2024 - 22:51
![]() Carmen wrote:
Carmen wrote:
En espalda cuando se ve disminuciones, hay una indicación que dice = 64-66-70-72-76-78 veces, creo que quiere decir = que quedan puntos . Gracias.
11.06.2024 - 11:15
![]() Marita Lindqvist wrote:
Marita Lindqvist wrote:
Hej Jag har samma problem som Kari. Får inte maskorna att stämma när jag ska sticka 2 första varven efter att jag har stickat hela A1 en gång.
21.05.2024 - 16:17DROPS Design answered:
Hej Marita, det er de 2 første omgange i A.1 du gentager, du strikker først de 2 sidste omgange når du skal begynde at tage ind :)
23.05.2024 - 11:32
![]() Maria Lund-Hansen wrote:
Maria Lund-Hansen wrote:
I mönstret diagram är det "hål", dvs rutor som är tomma. Vad är det meningen att jag ska göra där? Mvh Maria
10.04.2024 - 12:56DROPS Design answered:
Hej Maria, det er når masken er minskat på varvet innan :)
10.04.2024 - 14:09
![]() Marianna wrote:
Marianna wrote:
Hello, Just a quick comment: in the descriptive paragraph on your website and on Ravelry, the pattern is "worked top-down". Yet, within the pattern it is described as being "worked bottom up". P.S. It is a lovely design, though. 🙂
27.07.2023 - 21:46DROPS Design answered:
Dear Marianna, thanks for noticing, title has now been fixed :) Happy knitting!
28.07.2023 - 09:34
![]() Monica wrote:
Monica wrote:
I mønster A1 runde 3 (der det felles 3 rette sammen) ! Der felles det 6 masker men økes kun 4. når jeg begynner på runde en igjen passer det ikke med maske antall da jeg kun har 34 m på pinnen (i rapprten)og det skal være 36
26.06.2023 - 08:23DROPS Design answered:
Hei Monica. Husk det er bare de 2 første omgangene i A.1 om gjentas i høyden (36 masker) til arbeidet måler 28-29-30-30-31-32 cm, så strikkes de 2 siste omgangene i A.1 (= 34 masker pr gang diagrammet strikkes i bredden). Dette gjelder også når du strikkes de andre diagrammene. mvh DROPS Design
26.06.2023 - 12:03
![]() Karin wrote:
Karin wrote:
Kan man göra klänningen något längre?
21.05.2023 - 21:21DROPS Design answered:
Hei Karin. Det kan du fint gjøre, om du har nok garn. Siden den er strikket nedenifra og opp må du bestemme deg hvilket stykke du vil forlenge og hvor du vil minke masker, slik at du har det riktige maskeantallet når bærestykket skal strikkes. mvh DROPS Design
22.05.2023 - 14:08
![]() Krisztina wrote:
Krisztina wrote:
Hej Jag undrar om det är rätt så att när man stickar kjolen alltså mönster A1 då alla omslag ska stickas vridet att det inte blir hål. Men när jag tittar på bilderna på klänningen ser jag att det är hål. Så hur är det rätt då?
17.06.2022 - 21:12DROPS Design answered:
Hei Krisztina. Kjolen har ikke hullmønster, men et strukturmønster. Kanskje noen vil mene det er små hull, men om du strikker en liten prøvelapp (med et av diagrammene) før du starter på kjolen vil du se hvordan mønstret vil bli. mvh DROPS Design
20.06.2022 - 13:35
|
|||||||||||||||||||
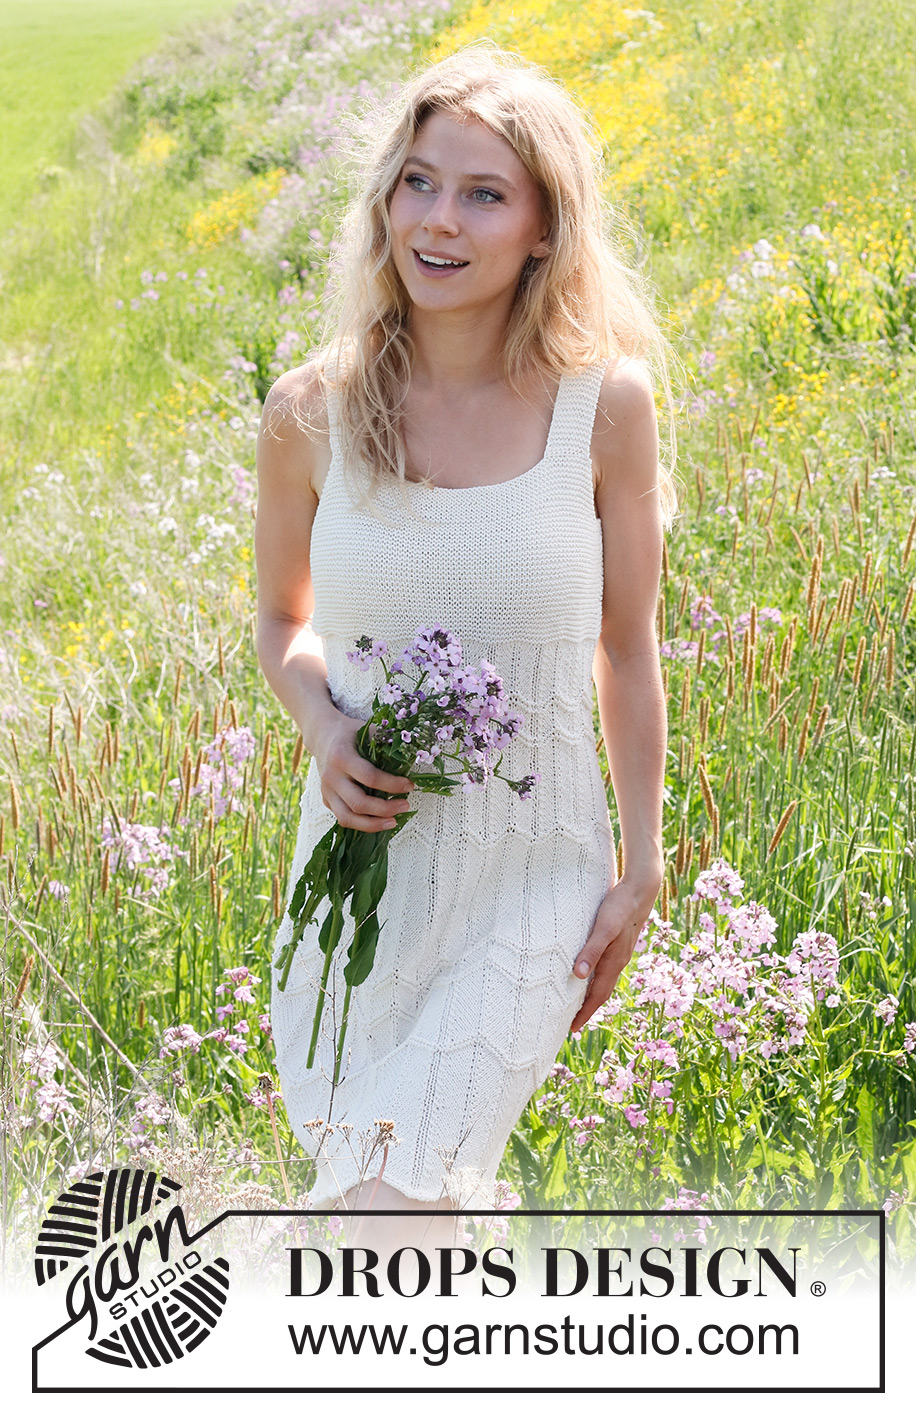
White Peony#whitepeonydress |
|||||||||||||||||||
 |
 |
||||||||||||||||||
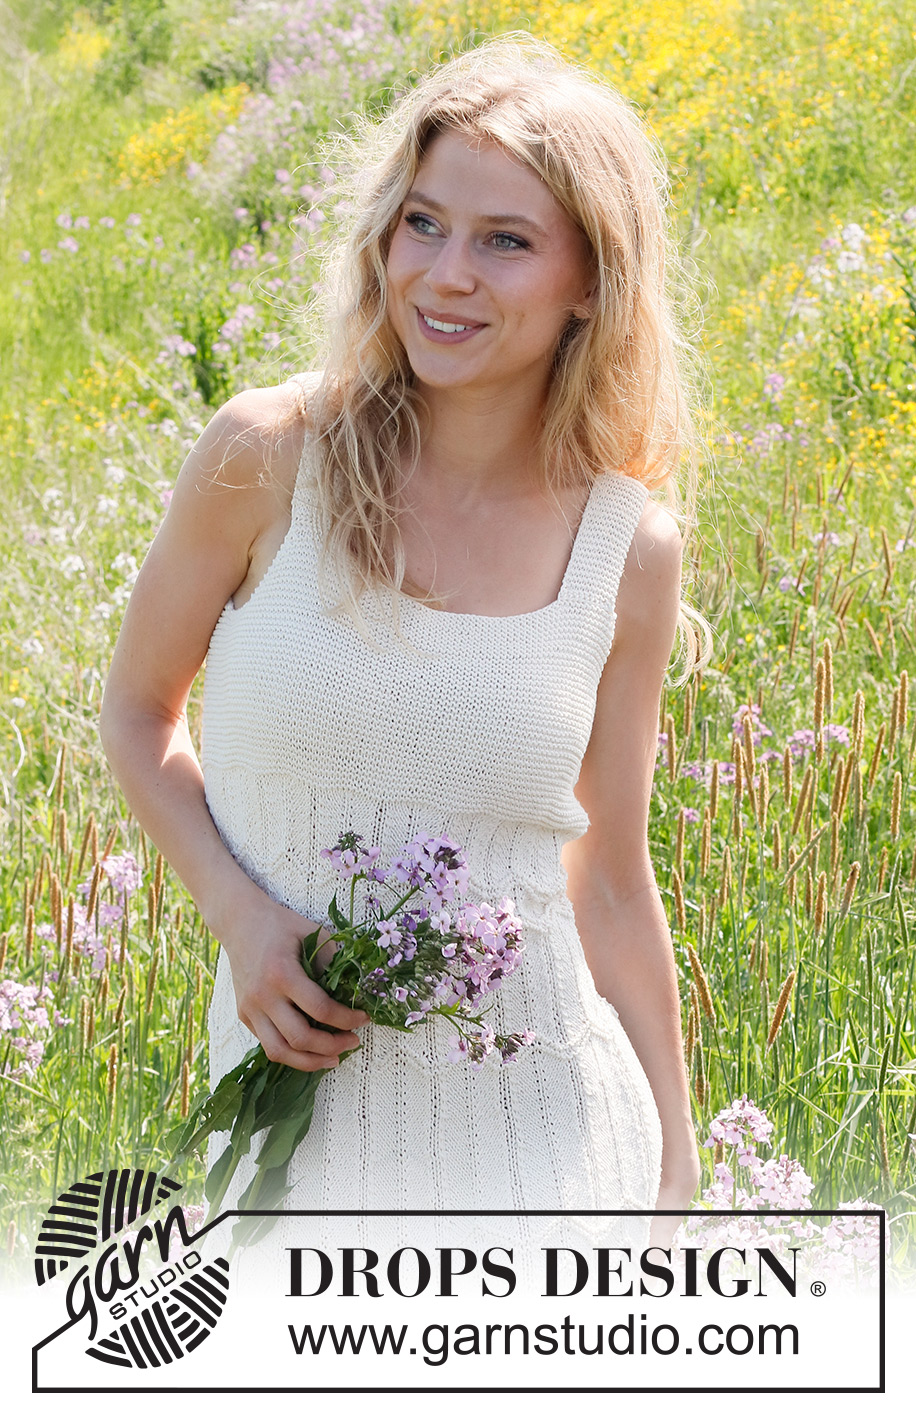
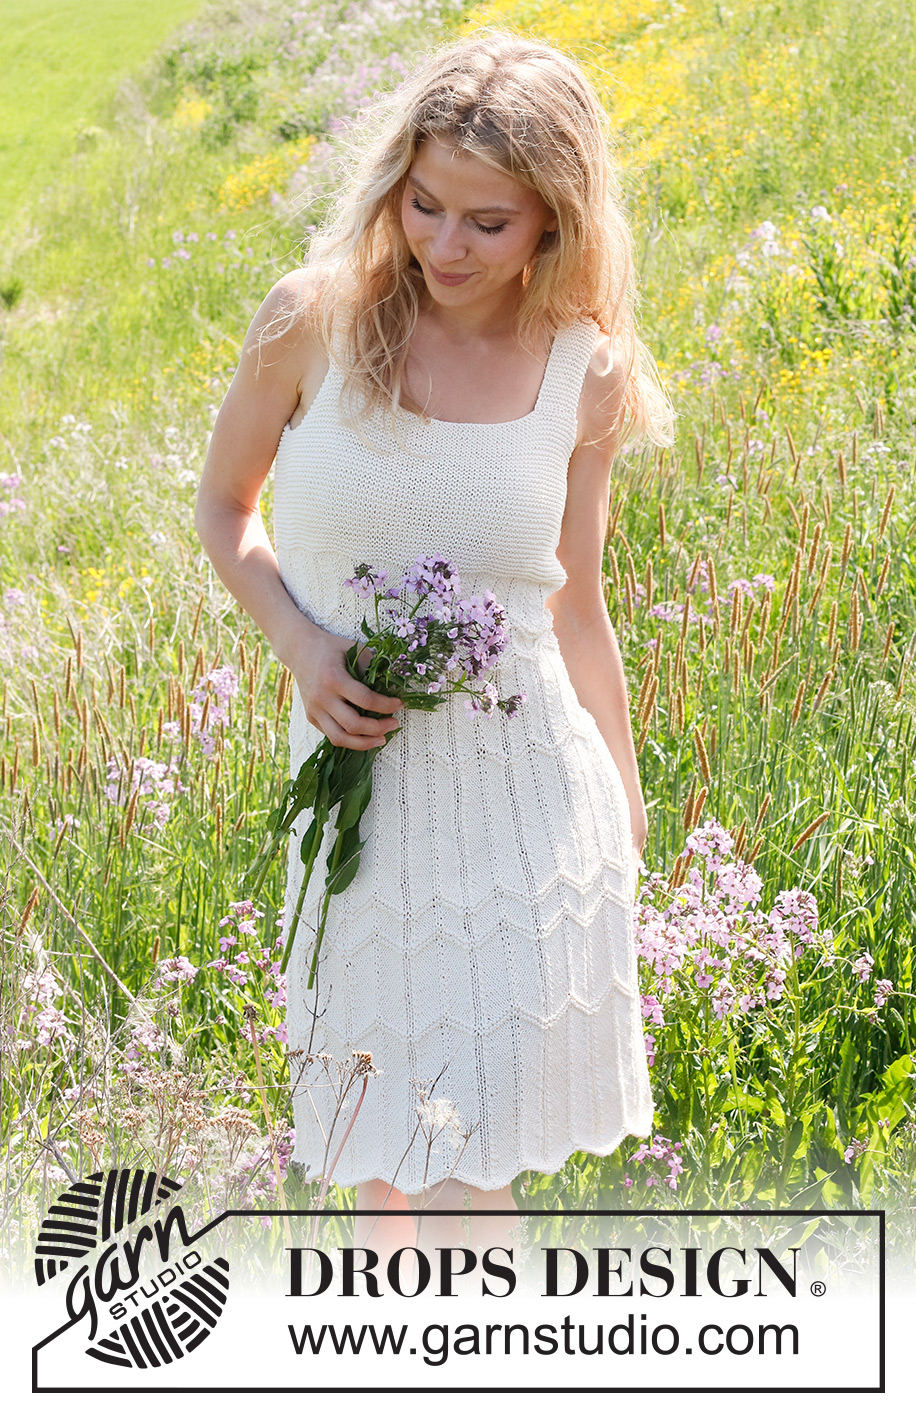
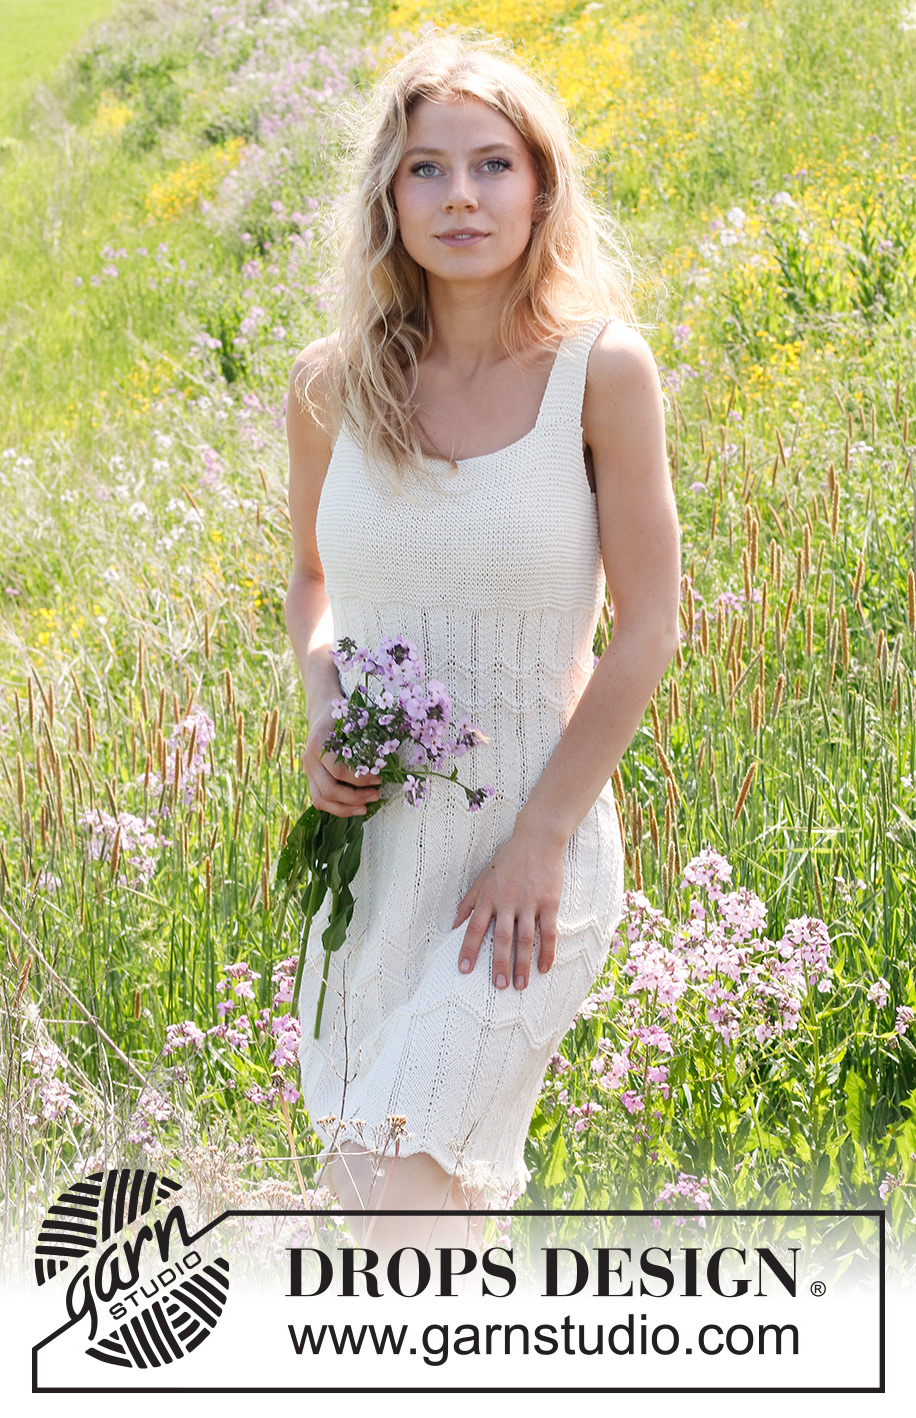
Knitted dress in DROPS Cotton Light. The piece is worked bottom up, with a zig-zag pattern. Sizes S - XXXL.
DROPS 232-12 |
|||||||||||||||||||
|
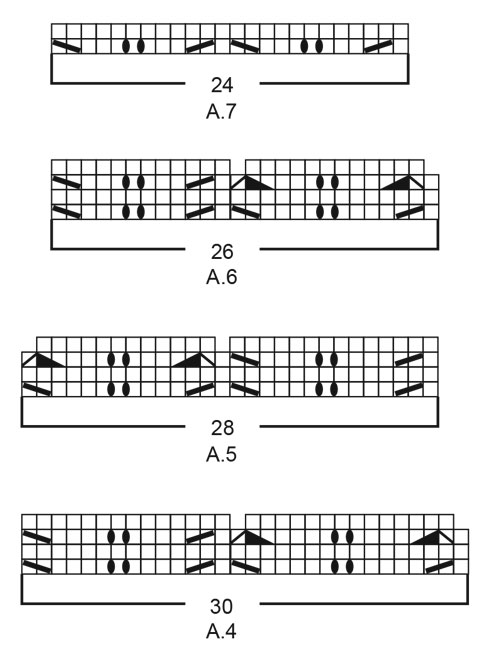
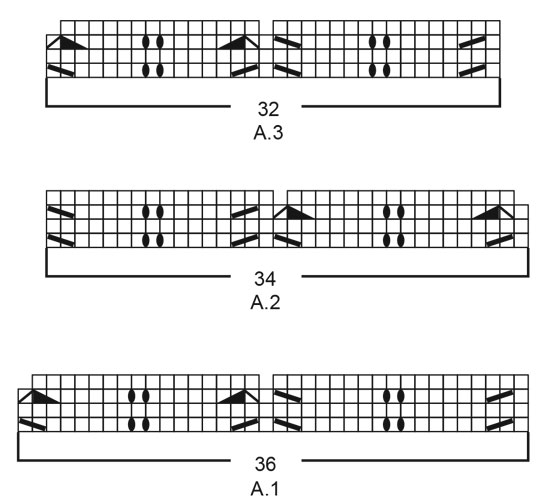
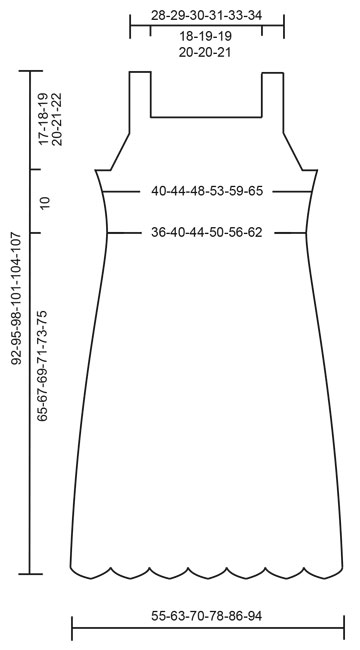
------------------------------------------------------- EXPLANATIONS FOR THE PATTERN: ------------------------------------------------------- RIDGE/GARTER STITCH (worked back and forth): Knit all rows. 1 ridge = knit 2 rows. PATTERN: See diagrams A.1 to A.7 RIDGES AND STRIPES: When the piece measures 16-16-17-17-18-18 cm (measured from the lowest point), work 2 ridges over all stitches, continuing with pattern, as before: i.e., work 1 round as shown in the diagram, on next round purl all stitches instead of knitting them as shown in diagram (purl the yarn overs twisted), work 1 round as shown in the diagram, on next round purl all stitches instead of knitting them as shown in diagram (purl the yarn overs twisted). Repeat these 2 ridges when the piece measures: 26-26-27-28-29-29 cm, 30-30-31-33-34-34 cm, 46-46-48-50-52-52 cm, 56-56-58-61-63-63 cm, 60-60-63-66-68-68 cm. INCREASE TIP: AT THE BEGINNING OF THE ROW: Work 2 stitches in garter stitch, 1 yarn over. ON EACH SIDE OF THE MARKER-THREAD: Work until there are 2 stitches left before the marker-thread, 1 yarn over, 4 stitches in garter stitch (marker-thread sits in the middle of these 4 stitches), 1 yarn over. AT THE END OF THE ROW: Work until there are 2 stitches left, 1 yarn over, 2 stitches in garter stitch. On the next row knit the yarn overs twisted to avoid holes. DECREASE TIP: All decreases are worked from the right side! AT THE BEGINNING OF THE ROW: Work 2 stitches in garter stitch, knit 2 together. AT THE END OF THE ROW: Work until there are 4 stitches left, slip 1 stitch as if to knit, knit 1 and pass the slipped stitch over the knitted stitch, 2 stitches in garter stitch. ------------------------------------------------------- START THE PIECE HERE: ------------------------------------------------------- DRESS – SHORT OVERVIEW OF THE PIECE: The piece is worked in the round, with circular needle, bottom up until the skirt is finished. The yoke is then finished back and forth, starting from the side. The side seam is sewn together and the straps are sewn to the back piece. SKIRT: Cast on 252-288-324-360-396-432 stitches a little loosely, with circular needle size 4 mm and DROPS Cotton Light. Work A.1, 7-8-9-10-11-12 times in the round – NOTE: On round 2 in A.1, the first time you work A.1, all stitches are purled – yarn overs purled twisted to avoid holes. When the first 2 rounds in A.1 are finished, change to circular needle size 3.5 mm. Repeat the first 2 rounds in A.1, as shown in the diagram. REMEMBER THE KNITTING TENSION! When the piece measures 16-16-17-17-18-18 cm (measured from the bottom point), work RIDGES AND STRIPES – read description above. Repeat the stripes as described. AT THE SAME TIME when the piece measures 28-29-30-30-31-32 cm (measured from the bottom point), start to decrease as follows (14-16-18-20-22-24 stitches decreased in the diagram each time you decrease - the zig-zag pattern becomes narrower): Work the last 2 rows in A.1 = 238-272-306-340-374-408 stitches. Then work and repeat the first 2 rows in A.2. When the piece measures 34-35-36-36-37-38 cm, work the last 2 rows in A.2 = 224-256-288-320-352-384 stitches. Then work and repeat the first 2 rows in A.3. When the piece measures 39-40-41-41-42-43 cm, work the last 2 rows in A.3 = 210-240-270-300-330-360 stitches. Then work and repeat the first 2 rows in A.4. When the piece measures 44-45-46-47-48-49 cm, work the last 2 rows in A.4 = 196-224-252-280-308-336 stitches. Then work and repeat the first 2 rows in A.5. When the piece measures 49-50-52-53-54-55 cm, work the last 2 rows in A.5 = 182-208-234-260-286-312 stitches. Then work and repeat the first 2 rows in A.6. When the piece measures 53-54-56-57-59-60 cm, work the last 2 rows in A.6 = 168-192-216-240-264-288 stitches. Work A.7. When the piece measures 65-67-69-71-73-75 cm, knit 1 round where you decrease 4-8-12-12-8-4 stitches evenly spaced = 164-184-204-228-256-284 stitches. Insert 1 marker; the yoke is measured from this marker. YOKE: Change to circular needle size 3 mm. Insert 1 marker-thread after the first 82-92-102-114-128-142 stitches (= side-2). Start at the beginning of the old round and work GARTER STITCH back and forth – read description above. When the piece measures 2 cm, increase 1 stitch at the beginning of the row, 1 stitch on each side of the marker-thread and 1 stitch at the end of the row – read INCREASE TIP (4 stitches increased). Increase like this every 1½-1½-2-2-2-2 cm a total of 5-5-4-4-4-4 times = 184-204-220-244-272-300 stitches. When the yoke measures 10 cm from the marker cast off for the armholes as follows: Cast off 3-4-5-6-7-8 stitches, work 86-94-100-110-122-134 stitches and place these stitches on a thread for the front piece, cast off 6-8-10-12-14-16 stitches and work to the end of the row. Turn, cast off 3-4-5-6-7-8 stitches = 86-94-100-110-122-134 stitches on the back piece. Work to the end of the row. The back and front pieces are finished separately. BACK PIECE: = 86-94-100-110-122-134 stitches. Work garter stitch back and forth on circular needle size 3 mm. AT THE SAME TIME on the first row from the right side decrease 1 stitch on each side for the armholes – read DECREASE TIP. Decrease like this every 4th row a total of 11-10-10-8-6-0 times, then every 2nd row 0-4-5-11-17-28 times = 64-66-70-72-76-78 stitches. Continue working until the yoke measures 22-23-24-25-26-27 cm from the marker. Cast off with knit from the right side. FRONT PIECE: = 86-94-100-110-122-134 stitches. Work garter stitch back and forth on circular needle size 3 mm. AT THE SAME TIME on the first row from the right side decrease for the armholes in the same way as on the back piece = 64-66-70-72-76-78 stitches. Continue working until the yoke measures 19-20-20-21-22-22 cm from the marker. On the next row from the right side work the neck as follows: Work the first 11-11-13-13-15-15 stitches in garter stitch and place these stitches on a thread for the strap, cast off 42-44-44-46-46-48 stitches for the neck, work the last 11-11-13-13-15-15 stitches in garter stitch. STRAP: = 11-11-13-13-15-15 stitches. Continue with garter stitch back and forth on circular needle size 3 mm until the strap measures 13-13-14-14-14-15 cm from the cast-off neck stitches. The strap will be sewn to the back piece; try the dress on and work to the desired length. Cast off. Work the other strap in the same way. ASSEMBLY: Sew the side seam in the outermost loop of the outermost stitch so the seam is flat. Sew the straps to the back piece – to the outside of each side. |
|||||||||||||||||||
Diagram explanations |
|||||||||||||||||||
|
|||||||||||||||||||
 |
|||||||||||||||||||
 |
|||||||||||||||||||
 |
|||||||||||||||||||
Have you finished this pattern?Tag your pictures with #dropspattern #whitepeonydress or submit them to the #dropsfan gallery. Do you need help with this pattern?You'll find 24 tutorial videos, a Comments/Questions area and more by visiting the pattern on garnstudio.com. © 1982-2026 DROPS Design A/S. We reserve all rights. This document, including all its sub-sections, has copyrights. Read more about what you can do with our patterns at the bottom of each pattern on our site. |
|||||||||||||||||||


With over 40 years in knitting and crochet design, DROPS Design offers one of the most extensive collections of free patterns on the internet - translated to 17 languages. As of today we count 325 catalogues and 12298 patterns translated into English (UK/cm).
We work hard to bring you the best knitting and crochet have to offer, inspiration and advice as well as great quality yarns at incredible prices! Would you like to use our patterns for other than personal use? You can read what you are allowed to do in the Copyright text at the bottom of all our patterns. Happy crafting!
Post a comment to pattern DROPS 232-12
We would love to hear what you have to say about this pattern!
If you want to leave a question, please make sure you select the correct category in the form below, to speed up the answering process. Required fields are marked *.