
Popular categories
Looking for a yarn?


Comments / Questions (29)
![]() Claudette wrote:
Claudette wrote:
Bonjour, Pourquoi je ne peux voir la photo et le diagramme de ce modèle de tricot que j’essaye de faire. Merci
03.03.2025 - 19:30DROPS Design answered:
Bonjour Claudette, essayez de nettoyer le cache de votre navigateur, supprimez les cookies, redémarrez le navigateur, et si ça ne fonctionne toujours pas, essayez sur un autre navigateur ou un autre appareil, les images, les photos et les diagrammes devraient tous être visibles. Bon tricot!
04.03.2025 - 09:15
![]() Luzeth Vellinga wrote:
Luzeth Vellinga wrote:
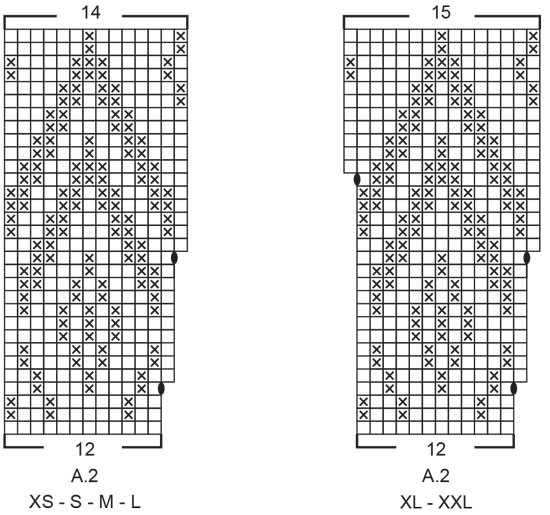
Ik weet niet hoeveel ik in rij 4 van A2 moet meerderen. Ik begin dit deel met 204 steken en na de 2de meerderen rij moet ik 238 steken op de naald hebben. \\r\\nMoet ik dan 2x 17 steken meerderen?
06.02.2025 - 19:57DROPS Design answered:
Dag Luzeth,
Bij pijl 2 van A.2 meerder je 1 steek in elke herhaling in de breedte van A.2, dus je meerdert na elke 4 steken 1 steek.
09.02.2025 - 10:38
![]() Aldona wrote:
Aldona wrote:
Cześć, mam pytanie do tego fragmentu "nabrać 6-8-8-8-10-10 oczek (= bok, pod rękawem)", a właściwie prośbę: czy możecie wskazać, który z filmików instruktażowych pokazuje, jak to zrobić?
24.01.2025 - 10:22
![]() Malgorzata wrote:
Malgorzata wrote:
Po oddzieleniu robotki na tyl przod i rekawy od jakiego markera zaczynamy robotke tego pod rekawem czy jak
16.10.2024 - 07:00DROPS Design answered:
Witaj Małgosiu, po podzieleniu robótki przerabiasz body (przód i tył) zaczynając okrążenie od markera na środku oczek pod jednym z rękawów. Pozdrawiamy!
16.10.2024 - 09:29
![]() Valerie A Randall wrote:
Valerie A Randall wrote:
Good morning. I'm currently making "nordic nights " size L. I'm on chart A2 and the first row of increases. I start with 240 . If I increase every 12 sts x20 this will give me 260, not 280 as pattern. What am I doing wrong? Kind regards Valerie
15.10.2024 - 09:16DROPS Design answered:
Dear Mrs Randall, note that you will increase a total of 2 times in each A.2, so that you will increase a total of 20 times 2 sts = 40 sts - there are then 14 sts in each A.2 x 20 = 280 sts. Happy knitting!
15.10.2024 - 10:36
![]() Valerie Randall wrote:
Valerie Randall wrote:
Is it correct that the neck is cast in contrast colour then changed to main colour after 6cms? Why not use main colour, then contrast for fold line? I'm sure there must be a reason. It just seems strange!
12.10.2024 - 09:12DROPS Design answered:
Dear Valerie, the purpose of working all the inner edge in the contrasting colour is that, if the neck folds slightly outwards, instead of seeing only a line in one colour you have more knitting in that colour, so it won't look like a single line out of place. The folding edge serves as a guide for folding the double neck edge more easily later and a bit of decoration. If you prefer it, you can work everything in the same colour. Happy knitting!
13.10.2024 - 22:55
![]() Madai wrote:
Madai wrote:
Los patrones de uds. son claros , precisos , me encanta que enseñan en distintos tipos de hilados, tienen ayuda para eso en el mismo patrón , nos guían con tallas distintas y es muy fácil seguirlos .Muchas gracias , son lo mejor
04.09.2024 - 02:39
![]() Maritza wrote:
Maritza wrote:
Les felicito por la capacidad de explicar lo más simple posible y en diferentes idiomas, me encantan Muchas Gracias
31.05.2024 - 07:48
![]() Linda wrote:
Linda wrote:
Brei voor het eerst een noorse trui Na A1 en 264 steken ga ik nu beginnen met A2 en lees dat je 66 steken moet meerderen volgens tel patroon( waar en welke toer hoeveel meerderen ) snap het niet Met vriendelijke groet Linda
23.12.2023 - 15:46
![]() Es wrote:
Es wrote:
Kan ik ergens vinden hoe ik verkorte toeren toe kan voegen aan dit patroon?
13.10.2023 - 17:32DROPS Design answered:
Dag Es,
Bedoel je dat je verkorte toeren wilt maken om de hals aan de achterkant hoger te maken? Je zou naar een vergelijkbaar patroon kunnen kijken met dezelfde stekenverhouding, die wel verkorte toeren heeft.
15.10.2023 - 17:00
|
|||||||||||||
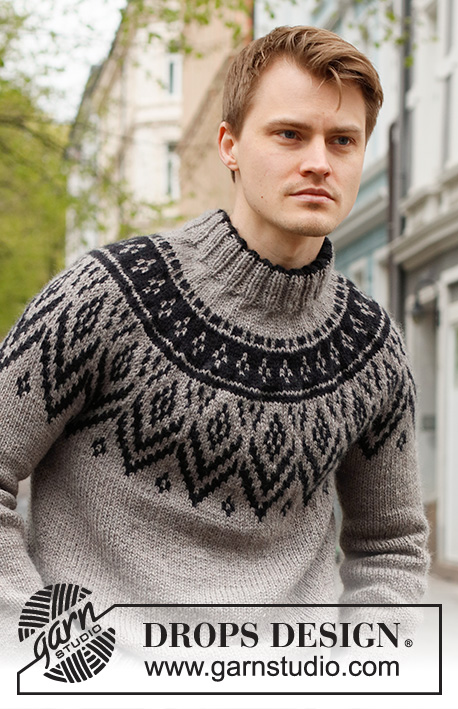
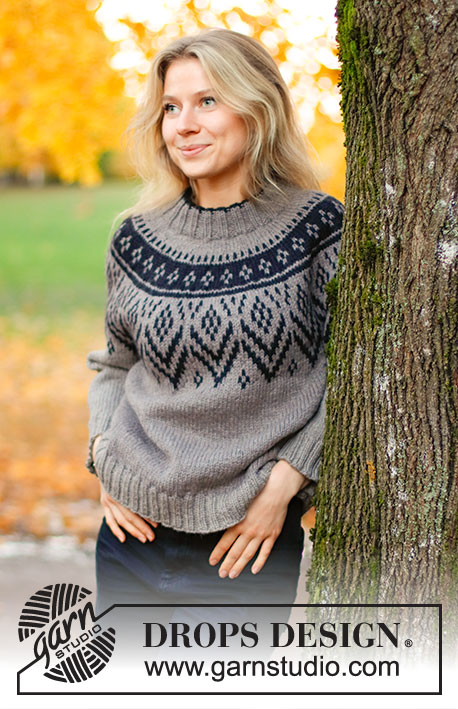
Nordic Nights#nordicnightssweater |
|||||||||||||
 |
 |
||||||||||||
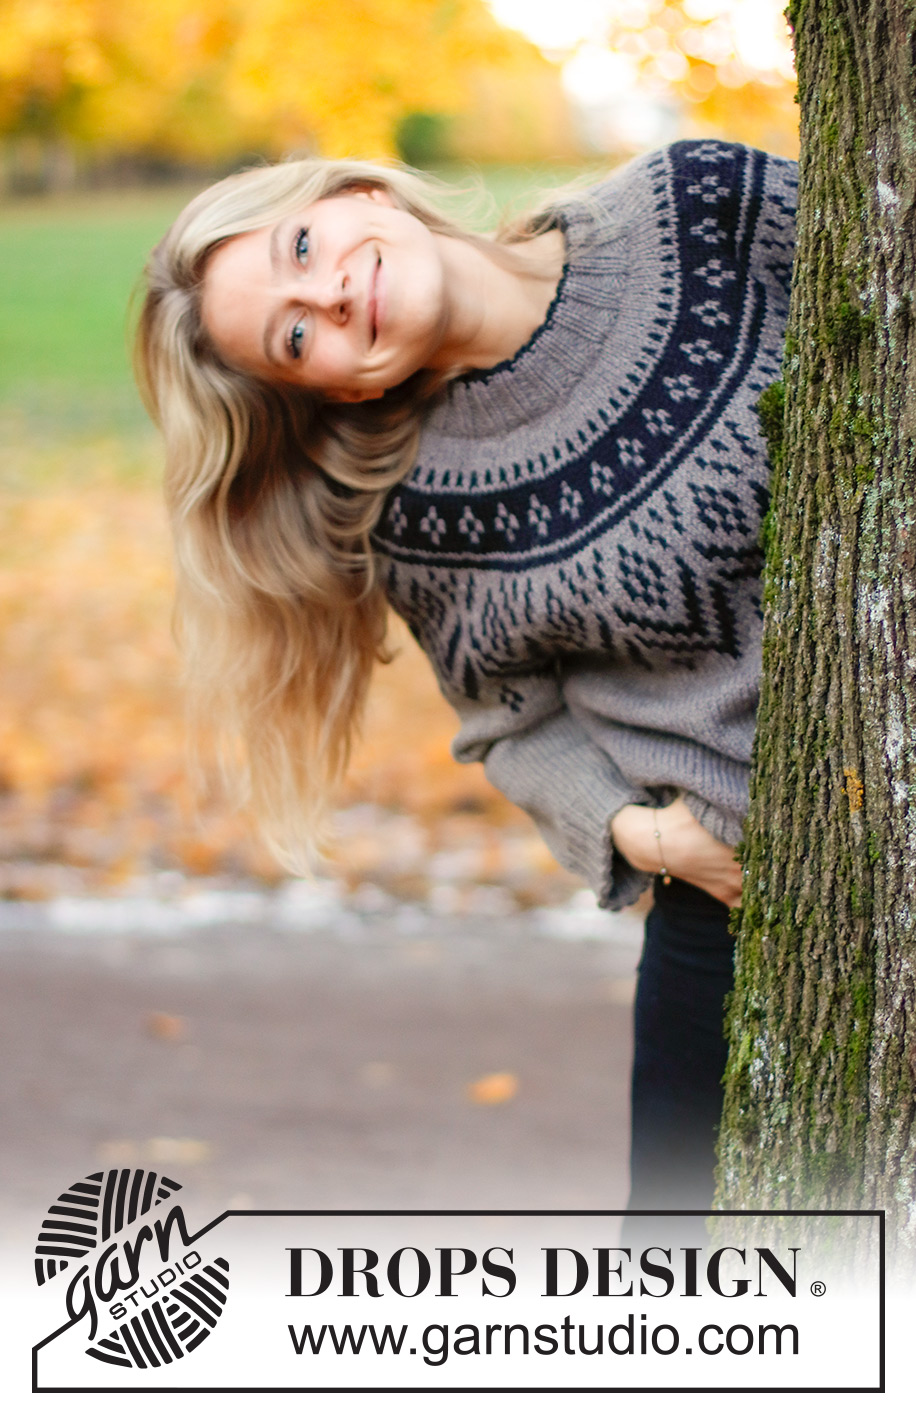
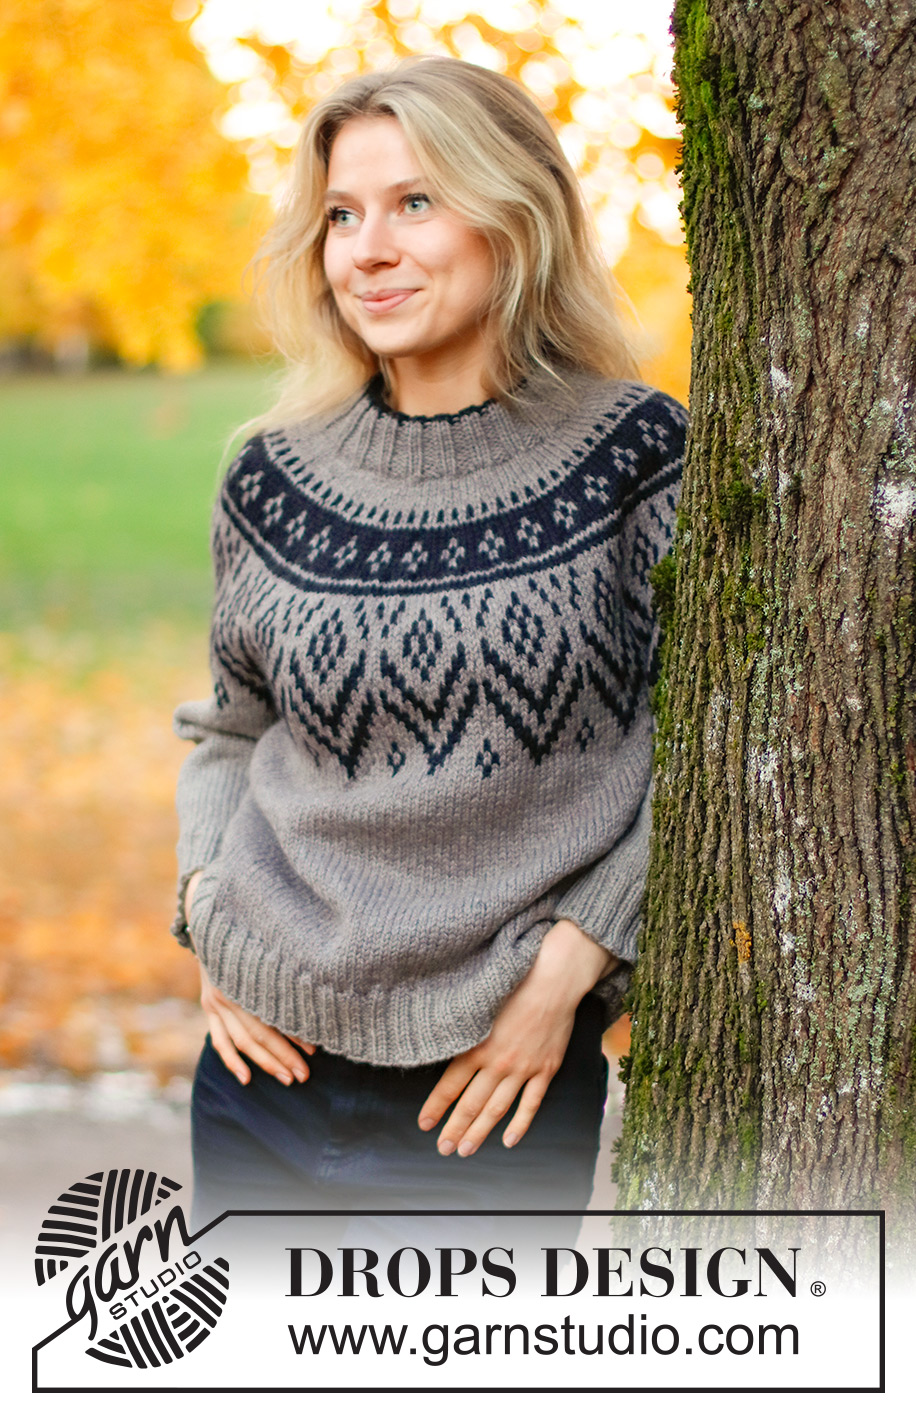
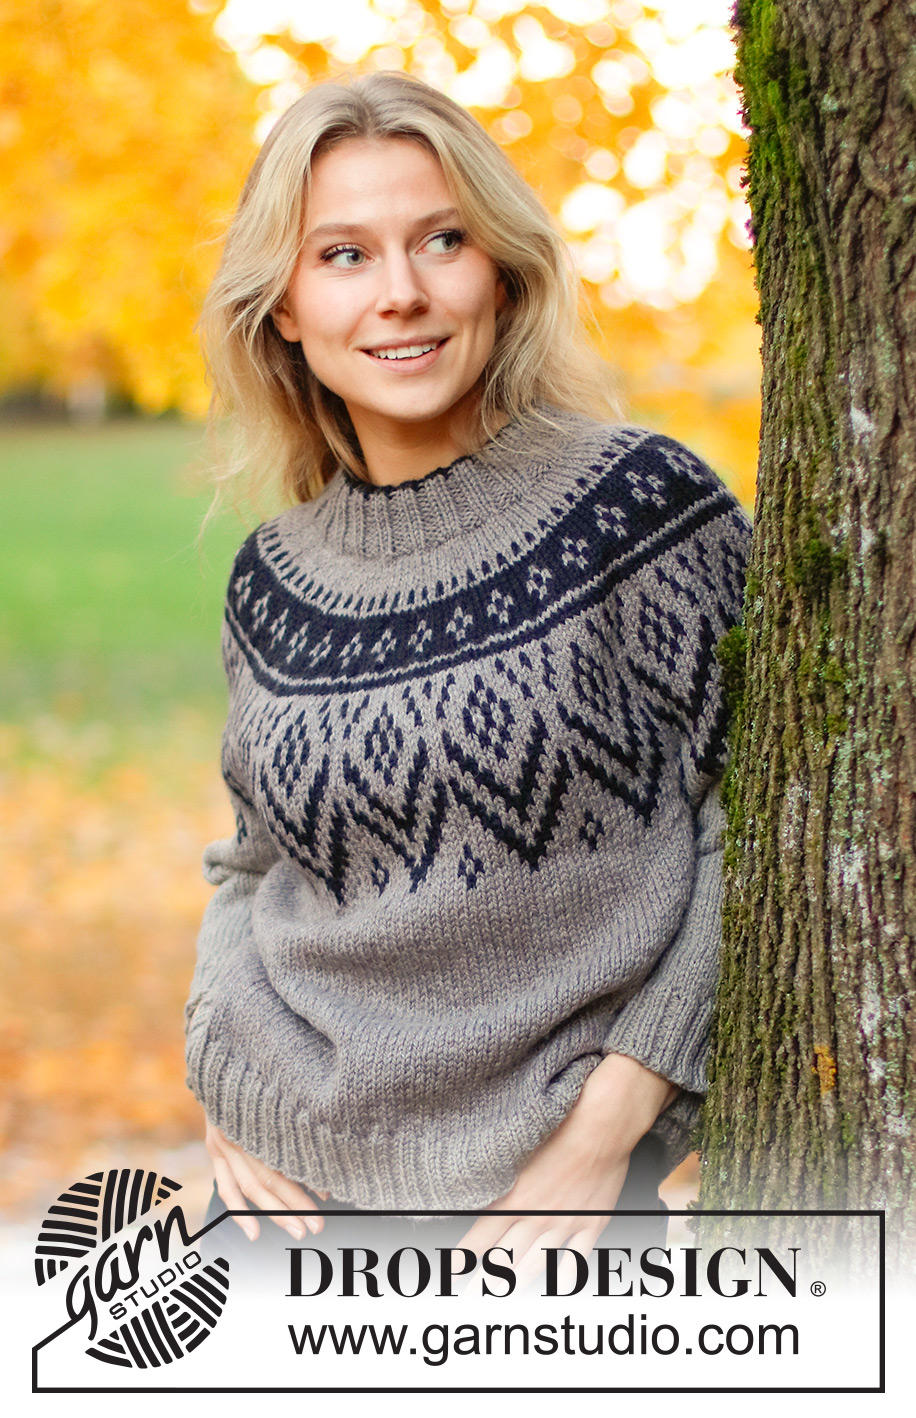
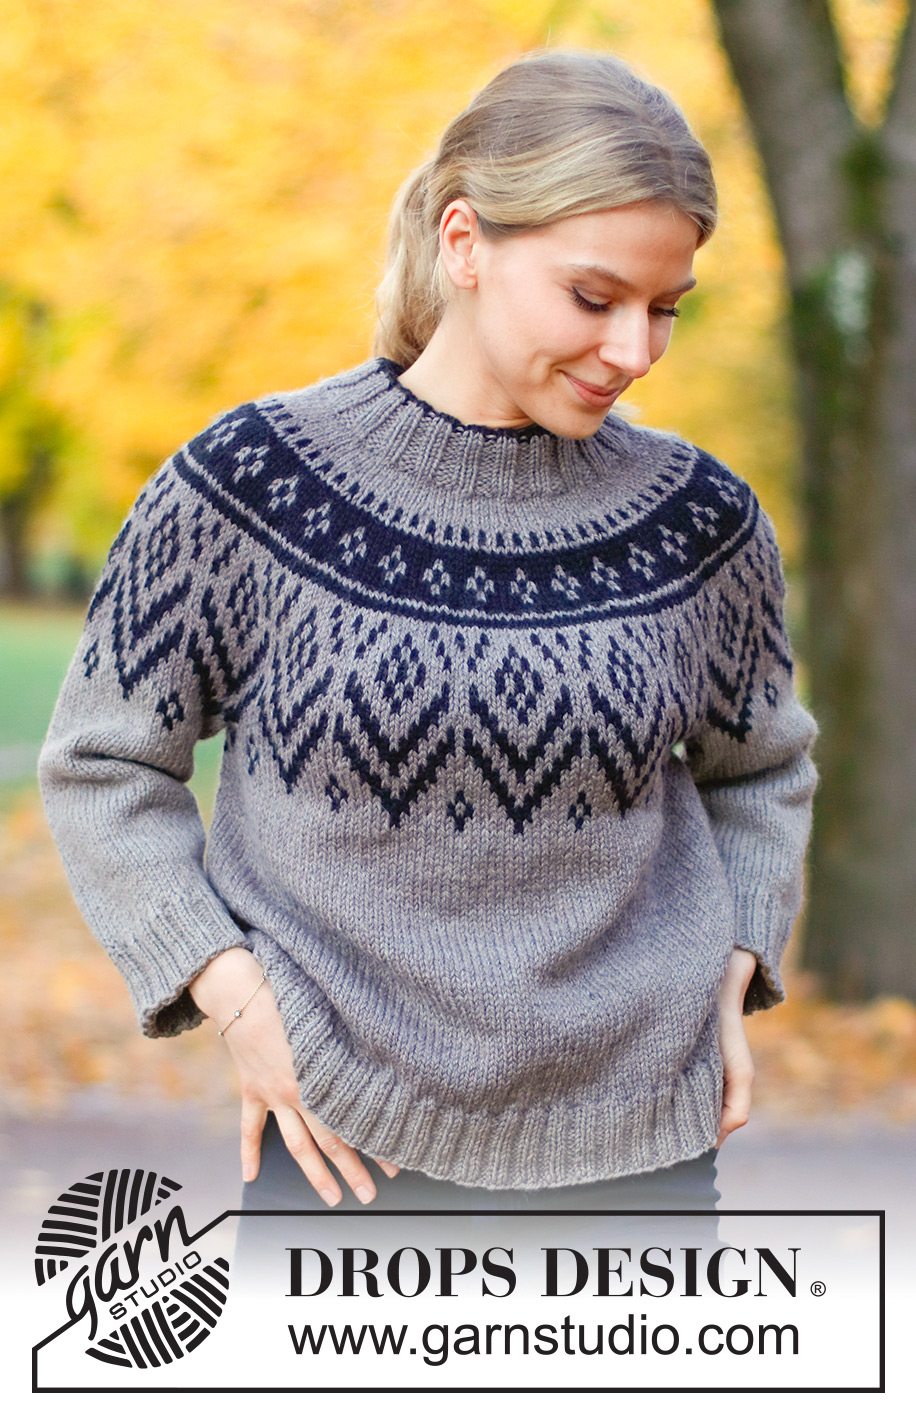
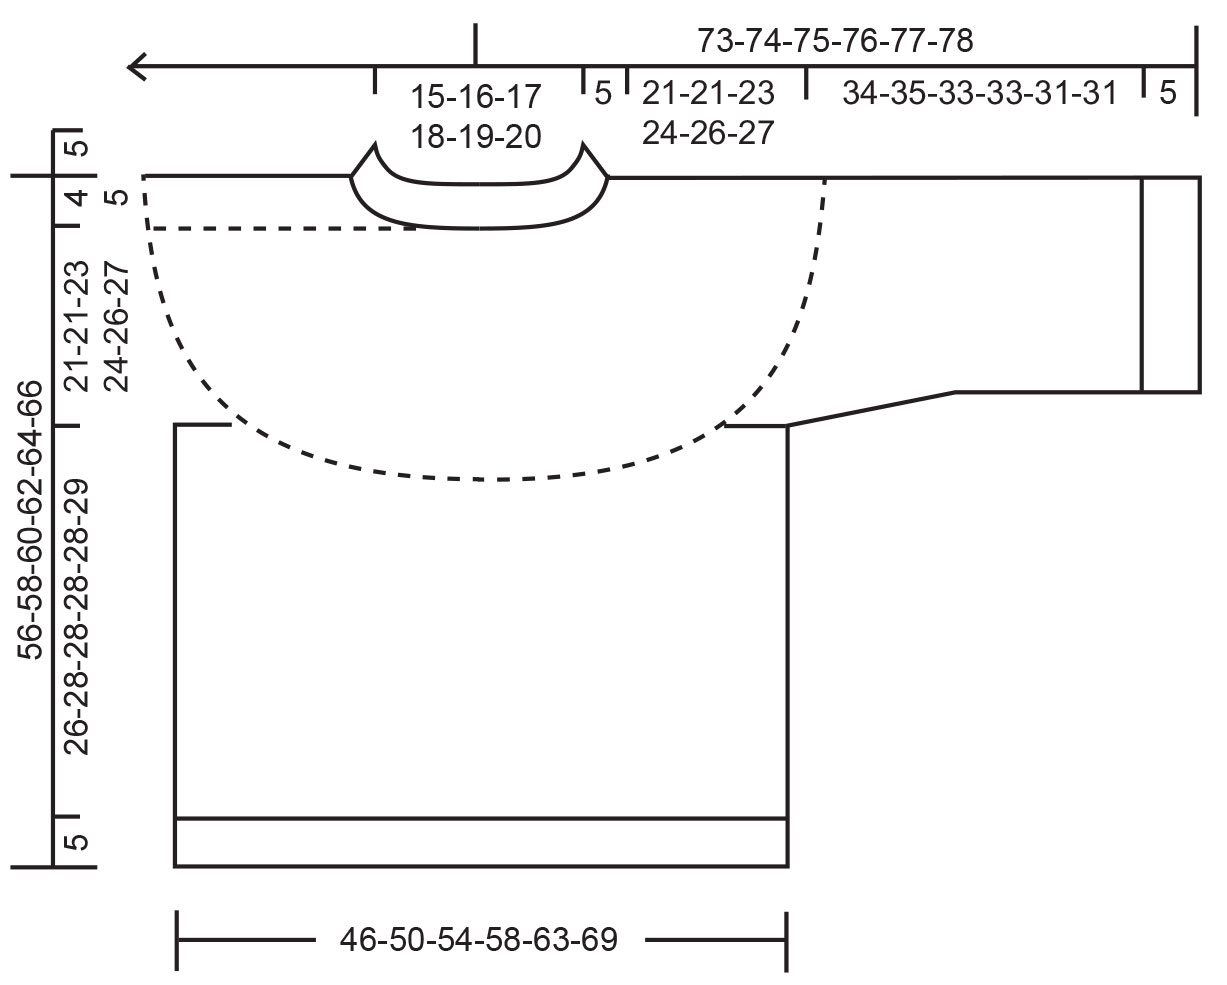
Knitted jumper in DROPS Alaska or DROPS Nepal. Piece is knitted top down with double neck edge, round yoke and Nordic pattern on yoke. Size XS – XXL.
DROPS 226-6 |
|||||||||||||
|
---------------------------------------------------------- EXPLANATION FOR THE PATTERN: ---------------------------------------------------------- PATTERN: See diagrams A.1 and A.2. Choose diagram for your size (applies to A.2). Work the entire pattern in stocking stitch. KNITTING TIP: To avoid the garment losing elasticity when working pattern, it is important not to tighten the strands on back side of piece. Switch to a higher needle number when working pattern if the pattern is somewhat tight. INCREASE TIP (evenly): To calculate how to increase evenly, use the total number of stitches on row (e.g. 76 stitches) and divide stitches by number of increases to be done (e.g. 24) = 3.2. In this example increase by making 1 yarn over after approx. every 3rd stitch. On next round knit yarns over twisted to avoid holes. DECREASE TIP (applies to mid under sleeves): Decrease 1 stitch on each side of marker thread as follows: Work until 4 stitches remain before marker and knit 2 together, knit 4 (marker thread is in the middle of these 4 stitches), slip 1 stitch knitwise, knit 1, pass slipped stitch over stitch worked (= 2 stitches decreased). CAST-OFF TIP: To avoid a tight cast-off edge when casting off, you may use a larger needle. If this still is too tight make 1 yarn over after approx. every 6th stitch while casting off (cast off yarn overs as stitches). ---------------------------------------------------------- START THE PIECE HERE: ---------------------------------------------------------- JUMPER - SHORT OVERVIEW OF THE PIECE: Work double neck edge and yoke in the round on circular needle from transition between left sleeve and back piece, top down. Now divide yoke for body and sleeves. Work body in the round on needle, top down. Work sleeves in the round on double pointed needles/short circular needle, top down. DOUBLE NECK EDGE: Cast on 76-80-84-88-92-96 stitches on a short circular needle size 5.5 mm with colour black in DROPS Alaska or DROPS Nepal. Knit 1 round. Switch to a short circular needle size 4 mm. Work rib in the round = knit 2/purl 2 for 6 cm. Switch to colour light brown in DROPS Alaska or colour camel in DROPS Nepal, and continue rib for 5 cm (= 11 cm rib in total). The neck edge is later folded double and assembled so that the neck edge is approx. 5 cm. When rib is done, knit 1 round while at the same time increasing 24-25-26-27-28-29 stitches evenly - read INCREASE TIP = 100-105-110-115-120-125 stitches. Insert 1 marker at beginning of round. Work yoke as explained below - measure yoke from this marker! YOKE: Switch to circular needle size 5.5 mm. Work stocking stitch in the round with colour light brown in DROPS Alaska or colour camel in DROPS Nepal for 2-3-3-4-4-5 cm from marker at the neck. Read KNITTING TIP and work A.1 in the round. AT THE SAME TIME on every round marked with arrow in A.1 increase stitches evenly as explained below - remember INCREASE TIP: Arrow-1: Increase 24-27-28-33-34-35 stitches evenly = 124-132-138-148-154-160 stitches. Arrow-2: Increase 21-23-27-32-31-35 stitches evenly = 145-155-165-180-185-195 stitches (there is now room for 29-31-33-36-37-39 repetitions of 5 stitches). Arrow-3: Increase 47-49-51-60-55-69 stitches evenly = 192-204-216-240-240-264 stitches. When A.1 has been worked, work A.2 in the round (= 16-17-18-20-20-22 repetitions of 12 stitches). Work A.2. and increase as shown in diagram. After last increase in A.2 there are 224-238-252-280-300-330 stitches on needle. Continue pattern. NOTE! If the knitting tension is correct vertically approx. 5-6-4-4-2-2 cm of A.2 remain when piece later is divided into body and sleeves – finish A.2 on body and work as explained later. Work until yoke measures 21-21-23-24-26-27 cm from marker by the neck. Now divide yoke for body and sleeves as follows: Slip the first 44-47-48-56-60-65 stitches on a stitch holder for sleeve, cast on 6-8-8-8-10-10 new stitches on needle (= in the side under sleeve), continue A.2 over the next 68-72-78-84-90-100 stitches (= back piece), slip the next 44-47-48-56-60-65 stitches on a stitch holder for sleeve, cast on 6-8-8-8-10-10 new stitches on needle (= in the side under sleeve), and continue A.2 as before over the last 68-72-78-84-90-100 stitches (= front piece). Cut the yarn. Finish body and sleeves separately. NOW MEASURE PIECE FROM HERE! BODY: = 148-160-172-184-200-220 stitches. Insert 1 marker in the middle of the 6-8-8-8-10-10 new stitches cast on under sleeve in each side. Begin round at the marker, and continue A.2 in the round - NOTE: Work as far as possible towards each side under sleeves - the pattern will not fit in the sides under sleeves. When A.2 has been worked, work stocking stitch in the round with colour light brown in DROPS Alaska or colour camel in DROPS Nepal until piece measures 26-28-28-28-28-29 cm from division. Approx. 5 cm remain until finished measurements, try the jumper on and work to desired length To avoid the rib from contracting increase stitches as explained below: Knit 1 round while increasing 40-44-48-52-56-60 stitches evenly - remember INCREASE TIP = 188-204-220-236-256-280 stitches. Switch to circular needle size 4 mm. Work rib in the round = knit 2/purl 2 for 5 cm. Cast off with knit over knit and purl over purl - read CAST-OFF TIP. Jumper measures approx. 56-58-60-62-64-66 cm from shoulder and down. SLEEVE: Slip the 44-47-48-56-60-65 stitches from stitch holder in one side of piece on double pointed needles or a short circular needle size 5.5 mm and pick in addition up 1 stitch in each of the 6-8-8-8-10-10 new stitches cast on under sleeve, with colour light brown in DROPS Alaska or colour camel in DROPS Nepal = 50-55-56-64-70-75 stitches. Insert a marker thread mid under sleeve, i.e. in the 6-8-8-8-10-10 new stitches under sleeve. Begin round at the marker thread and continue A.2 in the round - the pattern will not fit mid under sleeve. When A.2 has been worked, work stocking stitch in the round with colour light brown in DROPS Alaska or colour camel in DROPS Nepal. AT THE SAME TIME when sleeve measures 3-3-3-2-2-2 cm from division, decrease 2 stitches mid under sleeve - read DECREASE TIP. Decrease like this 4-4-4-3-2½-2 cm 3-3-3-5-6-7 times in total = 44-49-50-54-58-61 stitches. Work until sleeve measures 34-35-33-33-31-31 cm from division (shorter measurements in the larger sizes because of wider neck and longer yoke). Approx. 5 cm remain until finished measurements, try the jumper on and work to desired length Knit 1 round while increasing 12-15-14-18-18-19 stitches evenly = 56-64-64-72-76-80 stitches. Switch to double pointed needles size 4 mm. Work rib in the round = knit 2/purl 2 for 5 cm. Cast off with knit over knit and purl over purl - remember CAST-OFF TIP. Sleeve measures approx. 41-41-39-39-37-37 cm from division. Work the other sleeve the same way. ASSEMBLY: Fold rib at the top of neck down on inside of garment. Fasten rib to get a double folding edge. To avoid a tight neck edge that sticks out it is important to keep the seam elastic. |
|||||||||||||
Diagram explanations |
|||||||||||||
|
|||||||||||||
|
|||||||||||||

|
|||||||||||||
|
|||||||||||||
Have you finished this pattern?Tag your pictures with #dropspattern #nordicnightssweater or submit them to the #dropsfan gallery. Do you need help with this pattern?You'll find 29 tutorial videos, a Comments/Questions area and more by visiting the pattern on garnstudio.com. © 1982-2025 DROPS Design A/S. We reserve all rights. This document, including all its sub-sections, has copyrights. Read more about what you can do with our patterns at the bottom of each pattern on our site. |
|||||||||||||


With over 40 years in knitting and crochet design, DROPS Design offers one of the most extensive collections of free patterns on the internet - translated to 17 languages. As of today we count 314 catalogues and 11822 patterns translated into English (UK/cm).
We work hard to bring you the best knitting and crochet have to offer, inspiration and advice as well as great quality yarns at incredible prices! Would you like to use our patterns for other than personal use? You can read what you are allowed to do in the Copyright text at the bottom of all our patterns. Happy crafting!
Post a comment to pattern DROPS 226-6
We would love to hear what you have to say about this pattern!
If you want to leave a question, please make sure you select the correct category in the form below, to speed up the answering process. Required fields are marked *.