
Popular categories
Looking for a yarn?


Comments / Questions (11)
![]() Tamara wrote:
Tamara wrote:
Die Anleitung ergibt nicht das Stirnband das als Bild gezeigt wird. Sieht trotzdem nett aus
23.04.2026 - 13:40
![]() Ina wrote:
Ina wrote:
Er det mulig å få et bilde av hvordan det ser ut fra front som viser relieff og stavene? Uansett hvordan jeg gjør det blir det enten færre eller flere masker. Ganske sikker på at jeg bruker feil hull på noe
12.12.2024 - 00:07DROPS Design answered:
Hei Ina. LItt usikker på hva du mener fra front da bilde nr 3 viser pannebåndet midt foran. Har du tatt en titt på hjelpevideoen, Hvordan hekle relieff mønster ? Du finner hjelpevideo til høyre / eller under bildene. mvh DROPS Design
16.12.2024 - 08:22
![]() Maud wrote:
Maud wrote:
Bonjour Ça y est tout est clair, il n'y a plus qu'à !!! Merci pour votre patience Cordialement MB
19.11.2024 - 09:00
![]() Maud wrote:
Maud wrote:
Bonjour merci pour votre réponse mais décidément je ne comprends toujours pas : sur l'envers crochetez une maille serrée dans chaque maille serrée mais il n'y a pas de mailles serrées dans le rang 1... pouvez-vous me préciser encore comment se construisent les rangs pairs / sur l'envers ?
18.11.2024 - 16:34DROPS Design answered:
Bonjour Maud, le 1er rang du diagramme = celui avec l'étoile noire est décrit dans les explications, et, conformément au symbole,; c'est un rang de brides crocheté sur l'envers de l'ouvrage, puis le rang suivant est un rang sur l'endroit en brides et double-brides, vous crochèterez la double-bride en relief autour de la bride du 1er rang, au rang suivant (sur l'envers), vous crochetez en mailles serrées = 1 maile serrée dans chaque maille et vous répétez ces 2 rangs. Bon crochet!
19.11.2024 - 07:42
![]() Maud wrote:
Maud wrote:
Bonsoir. N'y a-t-il pas une contradiction entre les explications écrites et le schéma :sur le schéma, les rangs envers sont composés de mailles serrées alors que dans le texte, le rang commence par des mailles serrées suivies de brides. J'ai fait l'essai mais du coup l'ouvrage n'est pas droit... n rang de mailles serrées, ensuite comment faire les brides en relief ?Pouvez-vous aussi me confirmer qu'en relief ce sont des DB et non des simples brides ?
16.11.2024 - 20:58DROPS Design answered:
Bonjour Maud, le 1er rang = sur l'endroit se crochète bien en suivant A.1 de droite à gauche = cf flèche en commençant par 1 bride (3 ml), puis (1 bride, 1 double bride en relief autour de la maille du rang précédent, 1 bride) répétez de (à) et terminez par 1 bride, sur l'envers, crochetez 1 maille serrée dans chaque maille serrée. Bon crochet!
18.11.2024 - 09:17
![]() Cille Cecilie Iuell wrote:
Cille Cecilie Iuell wrote:
På oppskrift DROPS 225-30 , under` Diagramforklaring`, mangler hele punktet A1.... ??
27.09.2024 - 12:19DROPS Design answered:
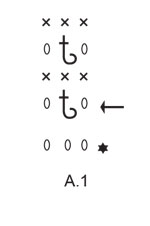
Hei Cille. A.1 er selve diagrammet (1.RAD = pil +1stav + 1 relieff-dobbelstav + 1 stav. 2. RAD= fastmasker. 3.RAD= 1stav + 1 relieff-dobbelstav + 1 stav. 4.RAD = fastmasker). mvh DROPS Design
07.10.2024 - 11:47
![]() Karin wrote:
Karin wrote:
De vraag is hier al eens gesteld maar ik lees geen antwoord. Bij het afwerken moet toch de verkeerde kant naar buiten worden gevouwen?
25.04.2024 - 21:50DROPS Design answered:
Dag Karin,
Je vouwt het werk in de lente waarbij de goede kanten naar buiten liggen en dus de verkeerde kanten naar binnen.
28.04.2024 - 10:21
![]() Laurie wrote:
Laurie wrote:
Je pense qu'il y a une erreur pour le montage, il faut plier le bandeau endroit contre endroit et non envers contre envers sinon la couture sera visible sur l'endroit.
14.01.2024 - 07:05
![]() Mieke wrote:
Mieke wrote:
Geachte mevrouw Bij het afwerken staat van het hoofdband goede kant naar buiten om aan elkaar te naaien en dan omkeren maar dan komt de verkeerde kant naar buiten kant dus eigen lijk moet het anders om zijn . Met vriendelijke groeten mieke Maar als je die omdraait dan komt
15.12.2022 - 14:39
![]() Elena wrote:
Elena wrote:
Ciao, scusate, è la prima volta che lavoro seguendo un diagramma e non mi è chiaro come funzioni. La riga 1 è composta dalla ripetizione delle maglie indicate nel diagramma A.1? Cioè 1 m.a., 1 m.a. in rilievo, 1 m.a., 3 m.b., 1 m.a., 1 m.a. in rilievo, 1 m.a.... così? Quando scrivere "maglia alta nella maglia sotto" si intende nell'occhiello della maglia del giro prima o un'altra cosa? Grazie
03.11.2022 - 17:42DROPS Design answered:
Buonasera Elena, deve lavorare A.1 su 18 maglie con indicato, quindi ripetere la sequenza di 3 maglie per 6 volte. La 1° riga di A.1 si lavora in questo modo: 1 m.a. nella maglia sotto, 1 maglia alta doppia in rilievo, 1 m.a nella maglia sotto. Buon lavoro!
03.11.2022 - 18:17
|
||||||||||||||||
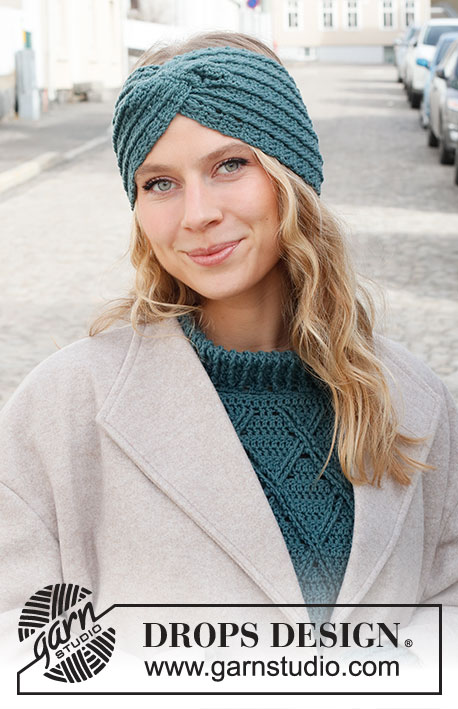
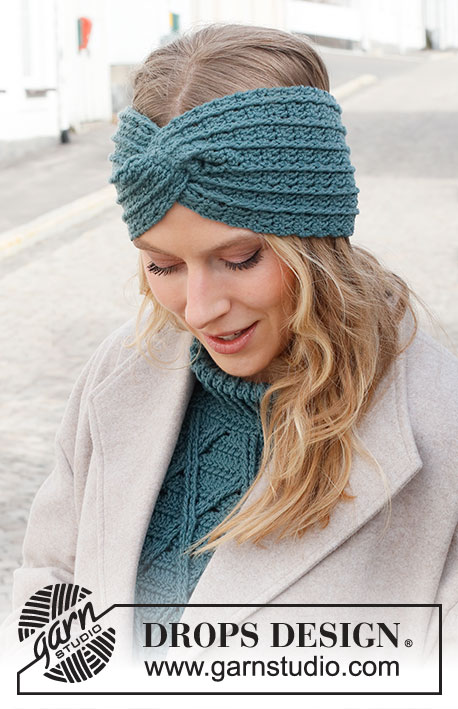
Twist of Teal#twistoftealheadband |
||||||||||||||||
 |
 |
|||||||||||||||
Crocheted head band in DROPS Merino Extra Fine. Piece is crocheted with relief stitches and cable.
DROPS 225-30 |
||||||||||||||||
|
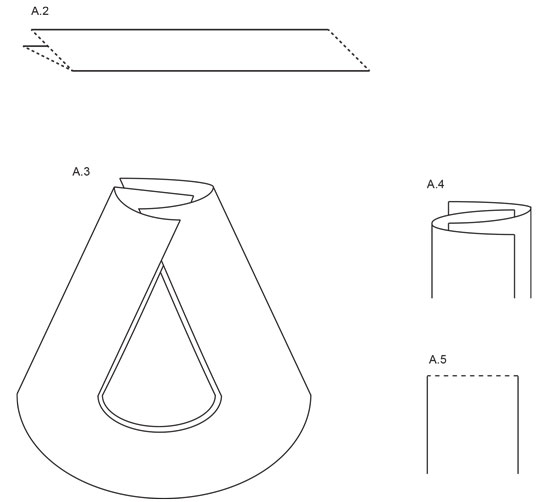
---------------------------------------------------------- EXPLANATION FOR THE PATTERN: ---------------------------------------------------------- CROCHET TIP FOR CHAIN STITCH: If you work at the end of crochet hook the chain stitch will often be too tight. 1 chain stitch should be just as long as 1 double crochet/treble crochet is wide. CROCHET INFORMATION: At the beginning of every row with treble crochets work 3 chain stitches. These 3 chain stitches replace first treble crochet on row. At the beginning of every row with double crochets work 1 chain stitch. The chain stitch does not replace first double crochet but is worked in addition to the other stitch on row. PATTERN: See diagrams A.1 to A.5 (A.2 to A.5 shows assembly). ---------------------------------------------------------- START THE PIECE HERE: ---------------------------------------------------------- HEAD BAND – SHORT OVERVIEW OF THE PIECE: Worked back and forth from mid front. Sew end together to form a cable mid front on head band. HEAD BAND: Work 23 chain stitches – read CROCHET TIP FOR CHAIN STITCH, on hook size 4.5 mm with DROPS Merino Extra Fine. Turn and work 1 treble crochet in 4th chain stitch from hook, work 1 treble crochet in each of the remaining 19 chain stitches = 20 treble crochets + 3 chain stitches to turn with (= 1 treble crochet) - read CROCHET INFO. Work pattern as follows: ROW 1 (= right side): Work 3 chain stitches (= 1 treble crochet), begin on row with arrow in A.1 and work A.1 over the first 18 stitches, work 1 treble crochet in each of the last 2 stitches. ROW 2 (= wrong side): Work 1 chain stitch, work 1 double crochet in each of the next 2 treble crochets, work A.1 over the next 18 stitches, 1 double crochet in last stitch. Continue back and forth like this. REMEMBER THE CROCHET TENSION! When piece measures approx. 50-52-54 cm - adjust to finish after a row with treble crochets, the head band is finished. Cut and fasten the yarn. ASSEMBLY: The piece is now a flat rectangle, fold it along the long side so that it is double with right side out - see diagram A.2. Now place the long sides of head band in towards each other in layers without twisting the piece - see diagram A.3. The ends of the head band should now be alternately inside and outside of each other, and ends should be edge to edge - see diagram A.4. Now sew through all layers as follows: Sew along the dotted line in diagram A.5 (i.e. over the ends of piece), and sew with close whip stitches with 1 stitch in every stitch - it is important to sew through all layers to get an invisible seam when the piece is turned. Cut and fasten the yarn. Turn the piece so that the seam is on the inside of head band. |
||||||||||||||||
Diagram explanations |
||||||||||||||||
|
||||||||||||||||
 |
||||||||||||||||
 |
||||||||||||||||
Have you finished this pattern?Tag your pictures with #dropspattern #twistoftealheadband or submit them to the #dropsfan gallery. Do you need help with this pattern?You'll find 9 tutorial videos, a Comments/Questions area and more by visiting the pattern on garnstudio.com. © 1982-2026 DROPS Design A/S. We reserve all rights. This document, including all its sub-sections, has copyrights. Read more about what you can do with our patterns at the bottom of each pattern on our site. |
||||||||||||||||


With over 40 years in knitting and crochet design, DROPS Design offers one of the most extensive collections of free patterns on the internet - translated to 17 languages. As of today we count 325 catalogues and 12298 patterns translated into English (UK/cm).
We work hard to bring you the best knitting and crochet have to offer, inspiration and advice as well as great quality yarns at incredible prices! Would you like to use our patterns for other than personal use? You can read what you are allowed to do in the Copyright text at the bottom of all our patterns. Happy crafting!
Post a comment to pattern DROPS 225-30
We would love to hear what you have to say about this pattern!
If you want to leave a question, please make sure you select the correct category in the form below, to speed up the answering process. Required fields are marked *.