
Popular categories
Looking for a yarn?


Comments / Questions (218)
![]() Simone wrote:
Simone wrote:
Ik begin nu voor de 3e keer met de boord (tijdje weggelegd) maar snap t echt niet. 8 steken 2r 2a, dan 1 steek recht, n markeerder tussen de steken in, nog 1 steek recht en dan? 1 av 2 recht over de volg. 33 st dan krijg je toch geen boord met 2 r 2 av ? Daarna 1 av 1 r....help!
06.03.2021 - 19:22DROPS Design answered:
Dag Simone,
Over de eerste 8 steken brei je boordsteek (2 recht, 2 averecht) tussen de volgende 2 steken recht plaats je een markeerdraad, daarna brei je inderdaad een variant op de boordsteek in de vorm van 1 averecht, 2 recht. Dit deel zit boven de mouw en kun je ook zien als je de laatste afbeelding bekijkt. (Later wordt er weer gemeerderd naar 2 recht, 2 averecht.)
09.03.2021 - 11:23
![]() Drelon Andree wrote:
Drelon Andree wrote:
Bonjour vos modeles sont tres beaux est il possible de les voir expliques avec des aiguilles droites merci pour votre reponse
04.03.2021 - 10:27DROPS Design answered:
Bonjour Mme Drelon et merci, cette leçon vous donne quelques informations sur les aiguilles circulaires, n'hésitez pas à essayer, nombreuses sont celles qui les ont finalement adoptées après avoir essayé. Bon tricot!
04.03.2021 - 11:39
![]() Anja Machowetz wrote:
Anja Machowetz wrote:
Bei den Raglanzunahmen schreibt ihr, dass insgesamt 8 per Runde zugenommen werden sollen. Aber gleichzeitig sagt ihr 2 Maschen vor und 2 Maschen ach der Raglanlinie. Das macht dann aber 16 M per Runde. Was ist denn nun die korrekte Anzahl oder verstehe ich etwas falsch?
28.02.2021 - 11:51DROPS Design answered:
Liebe Frau Machowetz, es wird nur beim Vorder und Rückenteil zugenommen, dh nich bei den Ärmeln, so nehmen Sie zuerst nur 8 Maschen (= jeweils 4 Maschen beim Vorder- bzw Rückenteil. Viel Spaß beim stricken!
01.03.2021 - 09:27
![]() Birgitta Laget-thelin wrote:
Birgitta Laget-thelin wrote:
Skulle så gärna vilja sticka denna jumper med raglanärm på vanliga stickor, alltså ej rundsticka, kan någon hjälpa mig? Modell w 806
11.02.2021 - 17:29DROPS Design answered:
Hei Birgitta. Vi har dessverre ikke mulighet til å skrive om denne oppskriften til å strikke med parpinner. mvh DROPS design
15.02.2021 - 15:03
![]() Loredana Daviddi wrote:
Loredana Daviddi wrote:
Buonasera, aumentare ogni 2 giri cosa significa? Lavoro 1 ferro con aumenti e 1 ferro senza ... grazie Lore
04.02.2021 - 17:55DROPS Design answered:
Buonasera Loredana, sì esatto, lavora 1 giro con aumenti e 1 giro senza. Buon lavoro!
04.02.2021 - 19:11
![]() Sonja wrote:
Sonja wrote:
Anleitung wird zum Kauf angeboten im Internet bei etsy , mit Ihren original Fotos
26.01.2021 - 06:13
![]() Cecilie Nissen Jøhnk wrote:
Cecilie Nissen Jøhnk wrote:
Hej, jeg er ved at være færdig, og læser nu i jeres vaske-instruktioner, at det er vigtigt at vaske Drops bomuldsgarn ved *høj* nok temperatur, ellers løber farverne. 1) Hvordan kan det være? Havde håbet at vaske ved 30 grader som resten af mit tøj 2) Gælder det også for recycled denim, som jeg strikker i? Tak og venlig hilsen Cecilie
20.01.2021 - 10:21DROPS Design answered:
Hei Cecilie. Vi anbefaler at man vasker all garn etter vaskeanvisningen, det er den anbefalingen vi har fått fra vår leverandør. Ved å vaske på 30`C blir ikke plagget sentrifugert fort nok, slik at det kan bli liggenede (får bare en lett sentrifugering) ganske vått i maskinen over litt tid, derav kan fargen farge av. Dette gjelder jo spesielt når man har et plagg med flere farger. mvh DROPS design
27.01.2021 - 13:55
![]() Cecilie Nissen Jøhnk wrote:
Cecilie Nissen Jøhnk wrote:
Hej, jeg er ved at være færdig, og læser nu i jeres vaske-instruktioner, at det er vigtigt at vaske Drops bomuldsgarn ved *høj* nok temperatur, ellers løber farverne. 1) Hvordan kan det være? Havde håbet at vaske ved 30 grader som resten af mit tøj 2) Gælder det også for recycled denim, som jeg strikker i? Tak og venlig hilsen Cecilie
20.01.2021 - 00:01DROPS Design answered:
Hej Cecilie, vore anbefalinger gælder generelt for bomuld. Hvis du ikke vil følge dem, kan du lave en strikkeprøve og vaske først. God fornøjelse!
20.01.2021 - 07:35
![]() Mirta wrote:
Mirta wrote:
Posso avere le istruzioni per lavorare con ferri normali ? Grazie
04.01.2021 - 16:13DROPS Design answered:
Buonasera Mirta, questo modello è stato progettato per la lavorazione in tondo; per lavorarlo in piano dovrebbe spostare l'inizio del lavoro su un lato e aggiungere una maglia di vivagno a ogni lato per la cucitura. Buon lavoro!
04.01.2021 - 18:22
![]() Ann E Urick wrote:
Ann E Urick wrote:
INCREASE TIP-2: Increase 1 stitch by making 1 yarn over. On next round purl yarn over twisted to avoid holes. Purl the new stitches. What do you mean by "purl yarn over twisted" to avoid holes?
29.12.2020 - 20:36DROPS Design answered:
Hi Ann, This means you purl in the back loop of the yarn-over so the yarn-over twists and doesn't leave a hole. Happy knitting!
30.12.2020 - 08:07
|
|
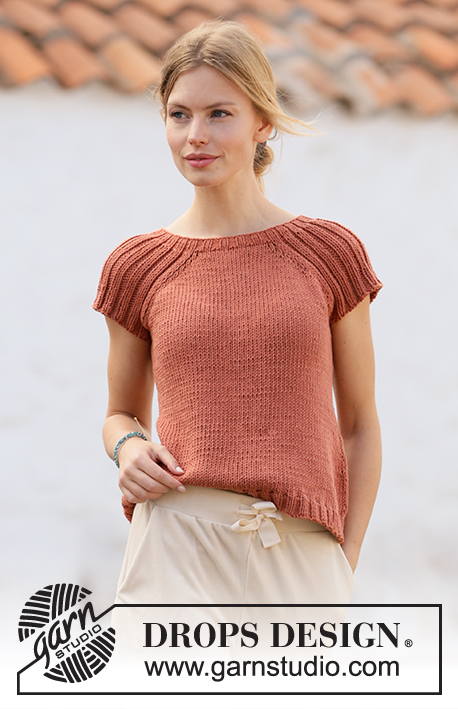
Canyon Clay#canyonclaytop |
|
 |
 |
Knitted top with raglan in DROPS Paris. Piece is knitted top down with rib. Size: S - XXXL
DROPS 212-15 |
|
|
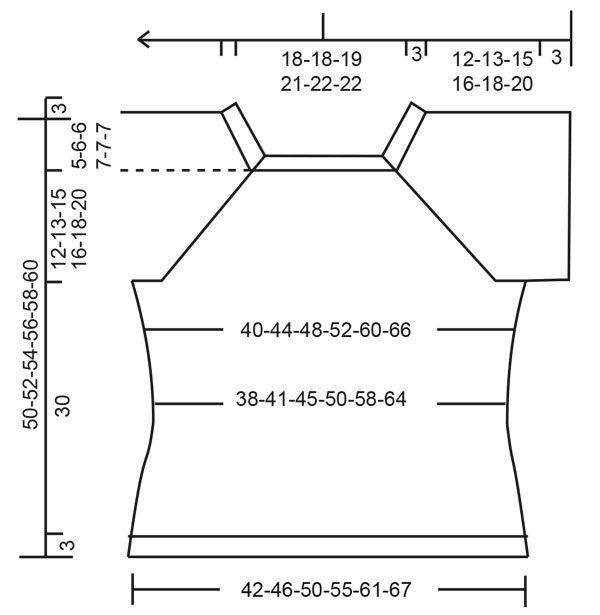
---------------------------------------------------------- EXPLANATION FOR THE PATTERN: ---------------------------------------------------------- INCREASE TIP-1 (evenly): To calculate how to increase evenly, count the stitches to be increased (e.g. 9 stitches) and divide by stitches of increases to be done (e.g. 2) = 4.5. In this example increase by making 1 yarn over after alternately every 4th and 5th stitch. On next row work yarn overs twisted to avoid holes. INCREASE TIP-2: Increase 1 stitch by making 1 yarn over. On next round purl yarn over twisted to avoid holes. Purl the new stitches. INCREASE TIP-3 (applies to sides of body): Work until 2 stitches remain before marker thread, 1 yarn over, knit 4 (marker thread is in the middle of these stitches), 1 yarn over. On next round knit yarn overs twisted to avoid holes. Then work the new stitches in stocking stitch. DECREASE TIP: Decrease 1 stitch on each side of marker thread as follows: Work until 3 stitches remain before marker thread and knit 2 together, knit 2 (marker thread is between these stitches), slip 1 stitch knitwise, knit 1, pass slipped stitch over stitch worked. RAGLAN: In the beginning increase 2 stitches towards each raglan on front and back piece (= 8 stitches increased on round), and thereafter increase 1 stitch towards each raglan on front and back piece (= 4 stitches increased on round). Increase 2 stitches before marker thread as follows: Work until 2 stitches remain before marker thread: 1 yarn over, knit 1, 1 yarn over, knit 1, marker thread is here. Increase 2 stitches after marker thread as follows: Knit 1, 1 yarn over, knit 1, 1 yarn over. Increase 1 stitch before marker thread as follows: Work until 1 stitch remains before marker thread: 1 yarn over, knit 1, marker thread is here. Increase 1 stitch after marker thread as follows: Knit 1, 1 yarn over. On next round knit yarn overs twisted to avoid holes. Then work the new stitches in stocking stitch. CAST-OFF TIP: To avoid a tight cast-off edge you may use a larger needle. If this also is too tight, make 1 yarn over after approx. every 4th stitch and cast off these as regular stitches. ---------------------------------------------------------- START THE PIECE HERE: ---------------------------------------------------------- TOP - SHORT OVERVIEW OF THE PIECE: Work neck edge and yoke in the round on circular needle from mid back, top down. Now divide yoke for body and sleeves. Work body in the round on circular needle. Work sleeves in the round on double pointed needles/short circular needle, top down. NECK EDGE: Cast on 112-118-126-138-144-144 stitches on circular needle size 3.5 mm with Paris. Knit 1 round. Work next round as follows: (Knit 2/purl 2) over the first 8-8-12-12-12-12 stitches, knit 1, insert a marker thread here (= in transition between back piece and right sleeve), knit 1, (purl 1/knit 2) over the next 33-36-36-42-45-45 stitches, purl 1, knit 1, insert a marker thread here (= in transition between right sleeve and front piece), knit 1, (purl 2/knit 2) over the next 16-16-20-20-20-20 stitches, purl 2, knit 1, insert a marker thread here (= in transition between front piece and left sleeve), knit 1, (purl 1/knit 2) over the next 33-36-36-42-45-45 stitches, purl 1, knit 1, insert a marker thread here (= in transition between left sleeve and back piece), knit 1, (purl 2/knit 2) over the next 8-8-8-8-8-8 stitches, purl 2. Continue in the round like this until rib measures 3 cm. When rib is done, work next round as follows: Knit until first marker thread and increase at the same time 2-3-3-3-3-4 stitches evenly – read INCREASE TIP-1, knit over knit and purl over purl until next marker thread and increase at the same time 1 stitch in every purl section – read INCREASE TIP-2, knit until next marker thread and increase at the same time 4-6-5-5-6-8 stitches evenly, knit over knit and purl over purl until next marker thread and increase at the same time 1 stitch in every purl section, knit the last 11-11-11-11-11-11 stitches and increase at the same time 2-3-2-2-3-4 stitches evenly = 144-156-162-178-188-192 stitches. Work 1 row with knit over knit and purl over purl (work the yarn overs twisted to avoid holes). Switch to circular needle size 5 mm. Insert 1 marker at the beginning of round (= approx. mid back), measure yoke from this marker! YOKE: Knit over knit and purl over purl. On first round start increase for RAGLAN – read explanation above. Only increase on front piece and back piece towards each raglan. Increase 2 stitches every other round 9-9-8-10-12-13 times in total, then increase 1 stitch every other round 2-4-6-6-8-8 times = 224-244-250-282-316-328 stitches. REMEMBER THE KNITTING TENSION! Continue with knit over knit and purl over purl until piece measures 12-13-15-16-18-20 cm from marker. The yoke is finished. Then work in the outermost stitch in each side of front piece and back piece in on sleeves. Work next round as follows: Work the first 30-33-37-41-47-50 stitches, slip the next 50-54-54-62-66-66 stitches on a stitch holder for sleeve and cast on 6-6-10-10-10-14 stitches on needle (= in the side under sleeve), work the next 62-68-71-79-92-98 stitches (= front piece), slip the next 50-54-54-62-66-66 stitches on a stitch holder for sleeve and cast on 6-6-10-10-10-14 stitches on needle (= in the side under sleeve), work the remaining 32-35-34-38-45-48 stitches on needle. Then finish body and sleeves separately. NOW MEASURE PIECE FROM HERE! BODY: = 136-148-162-178-204-224 stitches. Insert 1 marker thread in the in each side, in middle of the new stitches cast-on under the sleeves (= 3-3-5-5-5-7 new stitches on each side of marker thread). Move the marker threads upwards when working; they should be used for increase later in the sides. Work in stocking stitch in the round. When piece measures 4 cm from division, decrease 1 stitch on each side of marker threads - read DECREASE TIP. Decrease like this approx. every 8-7-6-5-4-3 cm 2 times in total = 128-140-154-170-196-216 stitches. When piece measures 20-18-16-14-12-10 cm from division, increase 1 stitch on each side of marker threads - read INCREASE TIP-3. Increase like this approx. every 3-4-4-5-6-6 cm 4-4-4-4-3-3 times in total = 144-156-170-186-208-228 stitches. When piece measures 30 cm from division (3 cm remain until finished measurements - work to desired length), knit 1 round while increasing 28-28-34-38-40-44 stitches = 172-184-204-224-248-272 stitches. Switch to circular needle size 3.5 mm. Work rib (knit 2/purl 2) in the round for 3 cm. Cast off with knit over knit and purl over purl - read CAST-OFF TIP. Top measures total 50-52-54-56-58-60 cm in total from shoulder and down. SLEEVE: Slip the 50-54-54-62-66-66 stitches from stitch holder in one side back on double pointed needles/circular needle size 5 mm, and pick up 1 stitch in each of the 6-6-10-10-10-14 stitches cast on under the sleeve = 56-60-64-72-76-80 stitches. Work rib (knit 2/purl 2) in the round. When sleeve measures 3 cm from division, cast off with knit over knit and purl over purl - remember CAST-OFF TIP. Work the other sleeve the same way. |
|
 |
|
Have you finished this pattern?Tag your pictures with #dropspattern #canyonclaytop or submit them to the #dropsfan gallery. Do you need help with this pattern?You'll find 25 tutorial videos, a Comments/Questions area and more by visiting the pattern on garnstudio.com. © 1982-2026 DROPS Design A/S. We reserve all rights. This document, including all its sub-sections, has copyrights. Read more about what you can do with our patterns at the bottom of each pattern on our site. |
|


With over 40 years in knitting and crochet design, DROPS Design offers one of the most extensive collections of free patterns on the internet - translated to 17 languages. As of today we count 325 catalogues and 12298 patterns translated into English (UK/cm). 12298
We work hard to bring you the best knitting and crochet have to offer, inspiration and advice as well as great quality yarns at incredible prices! Would you like to use our patterns for other than personal use? You can read what you are allowed to do in the Copyright text at the bottom of all our patterns. Happy crafting!
Post a comment to pattern DROPS 212-15
We would love to hear what you have to say about this pattern!
If you want to leave a question, please make sure you select the correct category in the form below, to speed up the answering process. Required fields are marked *.