-------------------------------------------------------
Alternative Yarn – See how to change yarns here
Yarn Groups A to F – Use the same pattern and change the yarn here
Yarn usage using an alternative yarn – Use our yarn converter here
-------------------------------------------------------
= navy | |
= beige | |
= grey blue | |
= brown | |
= petrol green | |
= granite green | |
= adult | |
= child |
Each of our patterns has specific tutorial videos to help you.
These step-by-step tutorials might also help you:
Why is the knitting/crochet tension so important?
Knitting tension is what determines the final measurements of your work, and is usually measured per 10 x 10 cm. It is provided like so: number of stitches in width x number of rows in height - eg: 19 stitches x 26 rows = 10 x 10 cm.
The knitting tension is very individual; some people knit/crochet loosely while others work tightly. You adjust the knitting tension with the needle size, which is why the suggested needle size is only meant as a guide! You need to adjust this (up or down) to ensure that YOUR knitting tension matches the knitting tension provided in the pattern. If you work with a different knitting tension than provided you will have a different yarn consumption, and your work will have different measurements than what the pattern suggests.
The knitting tension also determines which yarns can replace each other. As long as you achieve the same knitting tension you can replace one yarn with another.
See DROPS lesson: How to measure your tension/gauge
See DROPS video: How to make a gauge tension swatch
How do I know how many balls of yarn I need?
The required amount of yarn is provided in grams, eg: 450 g. To calculate how many balls you’ll need you first need to know how many grams are in 1 ball (25g, 50g or 100g). This information is available if you click on the individual yarn quality on our pages. Divide the amount required with the amount of each ball. For example, if each ball is 50g (the most common amount), the calculation will be as follows: 450 / 50 = 9 balls.
Can I use a different yarn than what the pattern suggests?
The important thing when changing from one yarn to another is that the knitting/crochet tension remains the same. This is so that the measurements of the finished piece will be the same as on the sketch provided. It is easier to achieve the same knitting tension using yarns from the same yarn group. It is also possible to work with multiple strands of a thinner yarn to achieve the knitting tension of a thicker one. Please try our yarn converter. We recommend you to always work a test swatch.
Please NOTE: when changing yarn the garment might have a different look and feel to the garment in the photo, due to individual properties and qualities of each yarn.
See DROPS lesson: Can I use a different yarn than the one mentioned in the pattern?
What are the yarn groups?
All our yarns are categorised into yarn groups (from A to F) according to thickness and knitting tension – group A contains the thinnest yarns and group F the thickest. This makes it easier for you to find alternative yarns to our patterns, should you wish to switch yarn. All yarns within the same group have a similar knitting tension and can easily replace each other. However, different yarn qualities have different structures and properties which will give the finished work a unique look and feel.
How do I use the yarn calculator?
At the top of all our patterns you’ll find a link to our yarn calculator, which is a helpful tool should you wish to use a different yarn than suggested. By filling in the yarn quality you wish to replace, the amount (in your size) and number of strands, the calculator will present good alternative yarns with the same knitting tension. Additionally it will tell you how much you’ll require in the new qualities and whether you’ll need to work with multiple strands. Most skeins are 50g (some are 25g or 100g).
If the pattern is worked with multiple colours, every colour will have to be calculated separately. Similarly, if the pattern is worked with several strands of different yarns (for example 1 strand Alpaca and 1 strand Kid-Silk) you will have to find alternatives for each, individually.
Why do you show discontinued yarns in the patterns?
Since different yarns have different qualities and textures we have chosen to keep the original yarn in our patterns. However, you can easily find options among our available qualities by using our yarn calculator, or simply pick a yarn from the same yarn group.
It is possible that some retailers still have discontinued yarns in stock, or that someone has a few skeins at home that they would like to find patterns for.
The yarn calculator will provide both alternative yarn as well as required amount in the new quality.
What size should I knit?
If you think it's hard to decide what size to make, it can be a good idea to measure a garment you own already and like the size of. Then you can pick the size by comparing those measures with the ones available in the pattern's size chart.
You'll find the size chart at the bottom of the pattern.
See DROPS lesson: How to read size chart
Why do I get the wrong knitting tension with the suggested needle size?
The needle size provided in the pattern serves only as a guide, the important thing is to follow the knitting tension. And since knitting tension is very individual, you will have to adjust the needle size to ensure that YOUR tension is the same as in the pattern – maybe you’ll have to adjust 1, or even 2 needle sizes, up or down to achieve the correct tension. For this, we recommend that you work test swatches.
Should you work with a different knitting tension than the one provided, the measurements of the finished garment might deviate from the measurement sketch.
See DROPS lesson: How to measure your tension/gauge
See DROPS video: How to make a tension/gauge swatch
Why is the pattern worked top-down?
Working a garment top-down provides more flexibility and room for personal adjustment. For example it is easier to try the garment on while working, as well as making adjustments to length of yoke and shoulder caps.
The instructions are carefully explaining every step, in the correct order. Diagrams are adjusted to the knitting direction and are worked as usual.
How do I work according to a knitting diagram?
The diagram depicts all rows/rounds, and every stitch seen from the right side. It is read from bottom to top, from right to left. 1 square = 1 stitch.
When working back and forth, every other row is worked from the right side and every other row is worked from the wrong side. When working from the wrong side, the diagram will have to be worked reversed: from left to right, knit stitches are purled, purl stitches are knit etc.
When working in the round every round is worked from the right side and the diagram are worked from right to left on all rounds.
See DROPS lesson: How to read knitting diagrams
How do I work according to a crochet diagram?
The diagram depicts all rows/rounds, and every stitch seen from the right side. It is worked from bottom to top, from right to left.
When working back and forth every other row is worked from the right side: from right to left and every other row is worked from the wrong side: from left to right.
When working in the round, every row in the diagram are worked from the right side, from right to left.
When working a circular diagram you start in the middle and work your way outwards, counter clockwise, row by row.
The rows usually start with a given number of chain stitches (equivalent to the height of the following stitch), this will either be depicted in the diagram or explained in the pattern.
See DROPS lesson: How to read crochet diagrams
How do I work several diagrams simultaneously on the same row/round?
Instructions for working several diagrams after each other on the same row/round, will often be written like so: “work A.1, A.2, A.3 a total of 0-0-2-3-4 times". This means you work A.1 once, then A.2 is worked once, and A.3 is repeated (in width) the number of times provided for your size – in this case like so: S = 0 times, M = 0 times, L=2 times, XL= 3 times and XXL = 4 times.
The diagrams are worked as usual: begin with the first row in A.1, then work the first row in A.2 etc.
See DROPS lesson: How to read knitting diagrams
See DROPS lesson: How to read crochet diagrams
Why are the sleeves shorter in larger sizes?
The total width of the garment (from wrist-to-wrist) will be larger in the larger sizes, despite the actual sleeves being shorter. The larger sizes have longer sleeve caps and wider shoulders, so there will be a good fit in all sizes.
Where on the garment is the length measured?
The measurement sketch/schematic drawing provides information regarding the full length of the garment. If it’s a jumper or a jacket the length is measured from the highest point on the shoulder closest to the neckline, and straight down to the bottom of the garment. It is NOT measured from the tip of shoulder. Similarly, the length of yoke is measured from the highest point on the shoulder and down to where yoke is split into body and sleeves.
On a jacket measures are never taken along bands, unless specifically stated. Always measure inside band stitches when measuring the length.
See DROPS lesson: How to read a schematic drawing
What is a repeat?
Diagrams are often repeated on the round or in height. 1 repeat is the diagram the way it appears in the pattern. If it says to work 5 repeats of A.1 in the round, then you work A.1 a total of 5 times after/next to each other in the round. If it says to work 2 repeats of A.1 vertically/in height you work the entire diagram once, then begin again at the start and work the entire diagram one more time.
Why does the piece start with more chain stitches than it’s worked with?
Chain stitches are slightly narrower than other stitches and to avoid working the cast-on edge too tight, we simply chain more stitches to begin with. The stitch count will be adjusted on the following row to fit the pattern and measurement sketch.
Why increase before the rib edge when the piece is worked top-down?
The rib edge is more elastic and will contract slightly compared to, for example, stocking stitch. By increasing before the rib edge, you avoid a visible difference in width between the rib edge and the rest of the body.
Why increase in the cast-off edge?
It’s very easy to cast off too tightly, and by making yarn overs while casting off (and simultaneously casting these off) you avoid a too tight cast off edge.
See DROPS video: How to bind off with yarn overs (yo)
How do I increase/decrease on every 3rd and 4th row/round alternately?
To achieve an even increase (or decrease) you can increase on, for example: every 3rd and 4th row alternately, like so: work 2 rows and increase on the 3rd row, work 3 rows and increase on the 4th. Repeat this until the increase is complete.
See DROPS lesson: Increase or decrease 1 st on every 3rd and 4th row alternately
How can I work a jacket in the round instead of back and forth?
Should you prefer to work in the round instead of back and forth, you may of course adjust the pattern. You’ll need to add steeks mid-front (usually 5 stitches), and follow the instructions. When you would normally turn and work from the wrong side, simply work across the steek and continue in the round. At the end you’ll cut the piece open, pick up stitches to work bands, and cover the cut edges.
See DROPS video: How to knit steeks and cut open
Can I work a jumper back and forth instead of in the round?
Should you prefer to work back and forth instead of in the round, you may of course adjust the pattern so you work the pieces separately and then assemble them at the end. Divide the stitches for the body in 2, add 1 edge stitch in each side (for sewing) and work the front and back pieces separately.
See DROPS lesson: Can I adapt a pattern for circular needles into straight needles?
Why is the pattern slightly different than what I see in the photo?
Pattern repeats can vary slightly in the different sizes, in order to get the correct proportions. If you’re not working the exact same size as the garment in the photo, yours might deviate slightly. This has been carefully developed and adjusted so that the complete impression of the garment is the same in all sizes.
Make sure to follow instructions and diagrams for your size!
How do I make a women’s size garment into a men’s size one?
If you have found a pattern you like which is available in women’s size it’s not very difficult to convert it to men’s size. The biggest difference will be the length of sleeves and body. Start working on the women size that you think would fit across the chest. The additional length will be worked right before you cast off for the armhole/sleeve cap. If the pattern is worked top-down you can add the length right after the armhole or before the first decrease on sleeve.
Regarding additional yarn amount, this will depend on how much length you add, but it is better with a skein too many than too few.
How do I prevent a hairy garment from shedding?
All yarns will have excess fibres (from production) that might come off as lint or shedding. Brushed yarns (ie hairier yarns) have more of these loose, excess fibres, causing more shedding.
Shedding also depends on what is worn under or over the garment, and whether this pulls at the yarn fibres. It’s therefore not possible to guarantee that there will be no shedding
Below are some tips on how to get the best result when working with hairier yarns:
1. When the garment is finished (before you wash it) shake it vigorously so the looser hairs come off. NOTE: do NOT use a lint roller, brush or any method that pulls at the yarn.
2. Place the garment in a plastic bag and put it in your freezer - the temperature will cause the fibres to become less attached to each other, and excess fibres will come off easier.
3. Leave in the freezer for a few hours before taking it out and shaking it again.
4. Wash the garment according to the instructions on the yarn label.
Why does my garment pill?
Pilling is a natural process that happens to even the most exclusive of fibers. It's a natural sign of wear and tear that is hard to avoid, and that is most visible in high friction areas of your garment like a sweater's arms and cuffs.
You can make your garment look as new by removing the pilling, using a fabric comb or a pill/lint remover.
Treehouse Fun |
|||||||||||||||||||||||||
|
|
||||||||||||||||||||||||
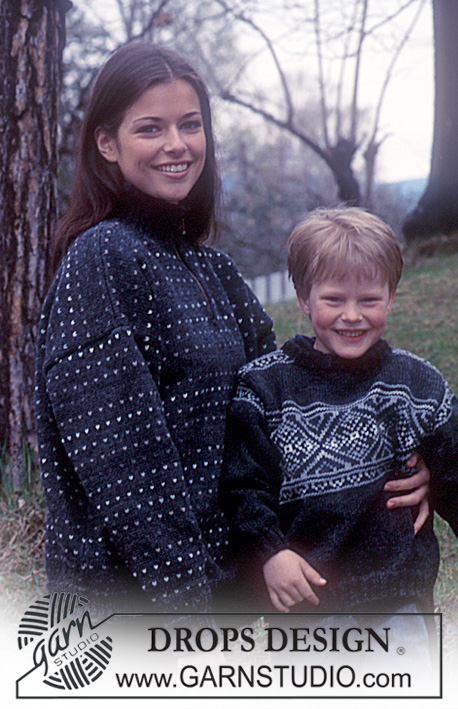
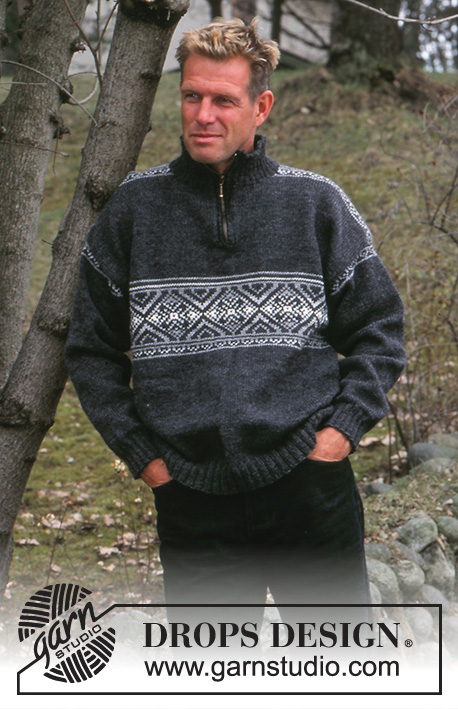
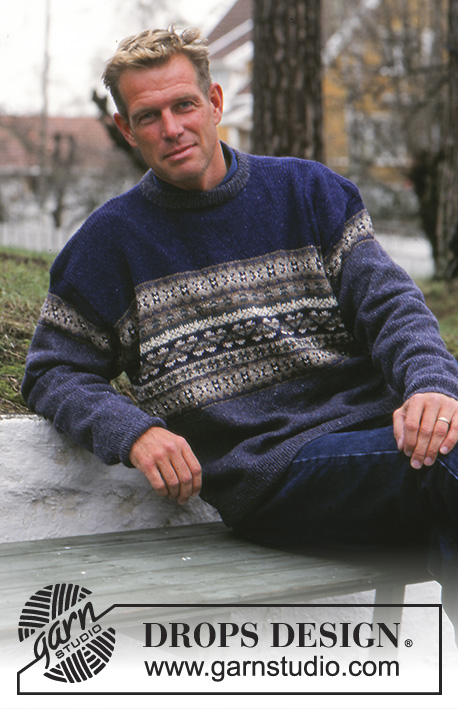
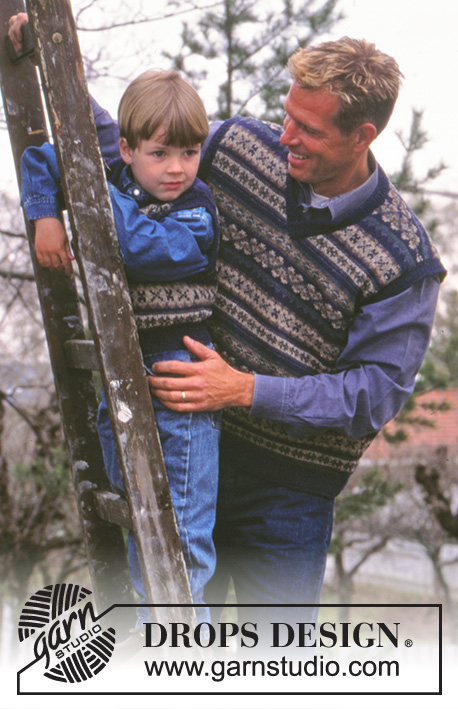
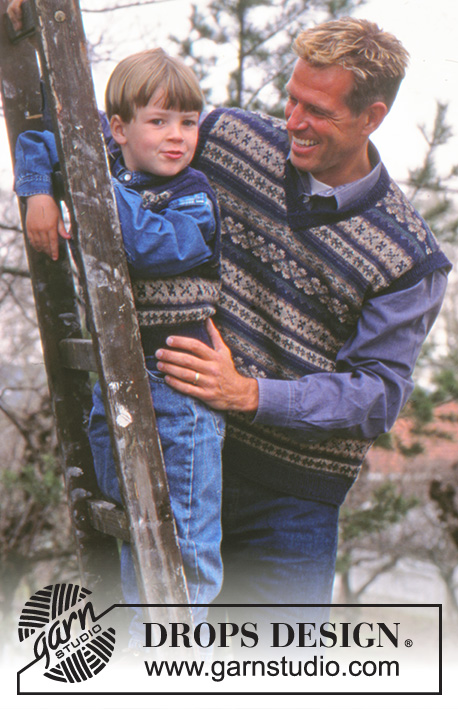
Knitted vest / slipover for men and kids in DROPS Silke-Tweed with Nordic pattern. Men's size S/M - XXL. Kid's size 2 years - 13/14 years.
DROPS 59-5 |
|||||||||||||||||||||||||
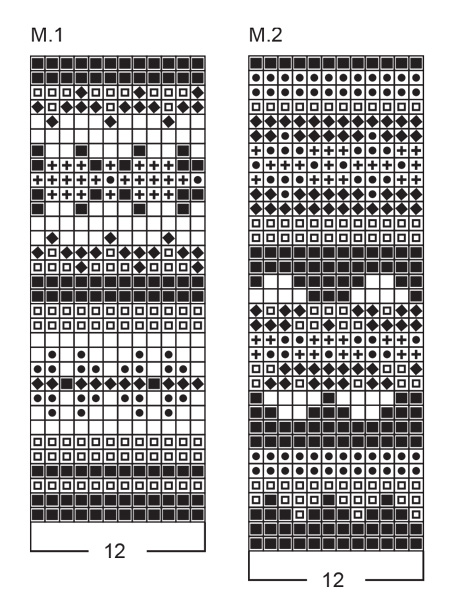
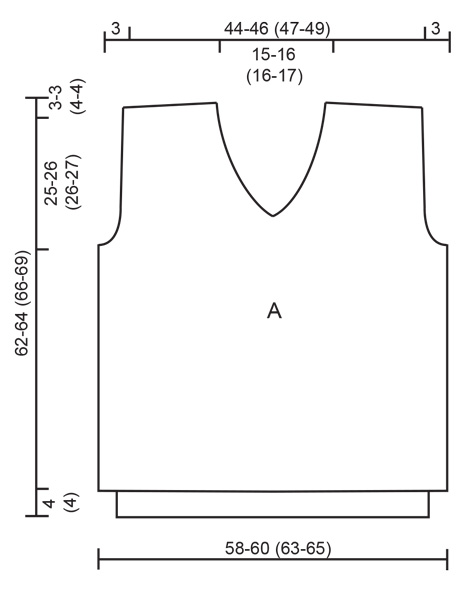
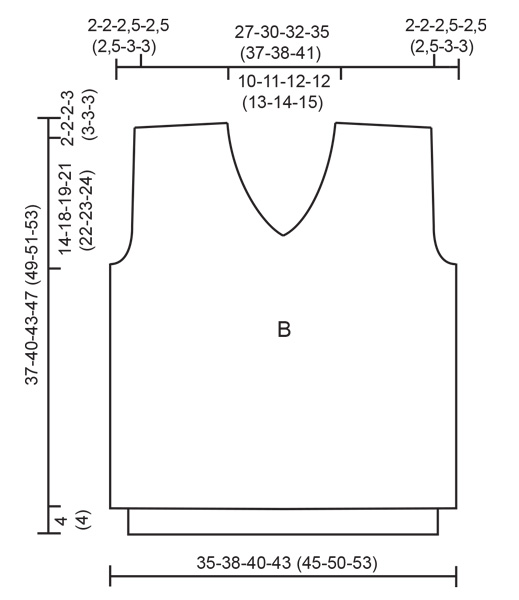
------------------------------------------------------- START THE PIECE MEN: ------------------------------------------------------- EXPLANATION FOR THE PATTERN MEN: PATTERN: See diagrams M.1 and M.2. The diagrams show all rows in the pattern seen from the right side. RIB: * knit 1 / purl 1 *. Repeat from *-*. GARTER STITCH (back and forth): Knit all rows. 1 ridge = 2 rows knit. GARTER STITCH (worked in the round): 1 ridge = 2 rounds. * knit 1 round and purl 1 round *, repeat from *-*. ------------------------------------------------------- Body: Cast on 276-288 (300-312) sts on smaller circular needles with marine and knit 2 rows garter st, then 4 cm rib, then 2 rows garter st. Change to larger circular needles and knit M.1 (center the pattern across the front and back). When M.1 has been worked 1 time vertically, continue with M.2. Repeat M.1 and M.2 onwards. When piece measures 34-35 (36-38) cm knit the next row as follows: bind off 3 sts for armhole, 132-138 (144-150) sts for the front, bind off 6 sts for armhole, 132-138 (144-150) sts for the back, bind off 3 sts for armhole. Knit the rest of each part separately. Front: = 132-138 (144-150) sts. Bind off for armholes every other row: 3 sts 2 times, 2 sts 2-2 (3-3) times, 1 st 3-4 (4-4) times = 106-110 (112-118) sts. When the work measures 46-46 (48-49) cm divide at the center for V-neck. Knit the rest of the left and right sides separately. Dec 1 st at each neck edge every other row 15-15 (15-14) times, then every 4th row 3-4 (4-6) times. At the same time, when the work measures 59-61 (62-65) cm , bind off for the shoulder every other row: 8-8 (7-7) sts 0-1 (1-3) times, 7-7 (6-6) sts 5-4 (5-3) times. The work measures approx. 62-64 (66-69) cm . Back: = 132-138 (144-150) sts. Bind off for armholes as on the front = 106-110 (112-118) sts. When the work measures 59-61 (62-65) cm , bind off for the shoulder as on the front. At the same time, when the work measures 60-62 (64-67) cm , bind off the center 30-32 (32-34) sts for the neck. Bind off at each neck edge every other row: 2 sts 1 time, 1 st 1 time. All sts should be bound off and the work measures approx. 62-64 (66-69) cm. Assembly: Sew shoulder seams. Pick up approx. 130-140 sts (divisible by 2 sts) around the neck on smaller circular needles with marine and knit 2 rows garter st back and forth on the needles from the center front V. Then knit rib for 3 cm , finish with 2 rows garter st, bind off. Lay the left part of the neck edge over the right and sew. Pick up approx. 114-130 sts (divisible by 2 sts) around the armhole on smaller double pointed needles with marine; join and knit 2 rows garter st, 3 cm rib, finish with 2 rows garter st, bind off. ------------------------------------------------------- START THE PIECE KIDS: ------------------------------------------------------- EXPLANATION FOR THE PATTERN KIDS: PATTERN: See diagrams M.1 and M.2. The diagrams show all rows in the pattern seen from the right side. RIB: * knit 1 / purl 1 *. Repeat from *-*. GARTER STITCH (back and forth): Knit all rows. 1 ridge = 2 rows knit. GARTER STITCH (worked in the round): 1 ridge = 2 rounds. * knit 1 round and purl 1 round *, repeat from *-*. ------------------------------------------------------- Body: Cast on 168-180-192-204 (216-240-252) sts on smaller circular needles with marine; join and place a marker at the join. Knit 2 rows garter st, then 3 cm rib, 2 rows garter st. Change to larger circular needles and knit M.1 (center the pattern across the front and back). When M.1 has been worked 1 time vertically, continue with M.2. Repeat pattern like this onwards. When piece measures 20-21-22-23 (24-25-26) cm , knit the next row as follows: bind off 3 sts for armhole, 78-84-90-96 (102-114-120) sts for the front, bind off 6 sts for armhole, 78-84-90-96 (102-114-120) sts for the back, bind off 3 sts for armhole. Knit the rest of each part separately. Front: = 78-84-90-96 (102-114-120) sts. Cast off for armholes each side on every other row: 2 sts 2-2-2-2 (2-4-4) times, 1 st 3-2-3-2 (3-3-3) times = 64-72-76-84 (88-92-98) sts. When the work measures 27-29-31-34 (35-36-37) cm , divide at the center for V-neck. Knit the rest of the right and left side of the front separately. Dec 1 st at each neck edge every other row 11-11-12-11 (13-13-14) time, then every 4th row 1-2-2-3 (3-4-4) times. At the same time, when the work measures approx. 31-33-35-38 (40-41-42) cm (adjust so pattern looks complete), finish the pattern and knit the rest with stockinette st and marine. At the same time, when the work measures 35-38-41-44 (46-48-50) cm , bind off for the shoulder every other row: 7-8-8-6 (6-6-7) sts 2-2-3-3 (3-4-1) times, 6-7-0-5 (5-5-6) sts 1-1-0-2 (2-1-4) times. All sts should be bound off and the work measures approx. 37-40-43-47 (49-51-53) cm. Back: = 78-84-90-96 (102-114-120) sts. Bind off for armholes as on the front = 64-72-76-84 (88-92-98) sts. Finish the pattern as on the front. When the work measures 35-38-41-44 (46-48-50) cm , bind off the center 20-22-24-24 (28-30-32) sts for the neck and begin binding off for the shoulder as on the front. Bind off 2 sts on each neck edge on the second row of bind-offs. The work measures approx. 37-40-43-47 (49-51-53) cm. Assembly: Sew shoulder seam. Pick up approx. 100-130 sts (divisible by 2 sts) around the neck on smaller circular needles with marine and knit 2 rows garter st back and forth on the needles from the center front. Then knit rib for 2-2-2.5-2.5 (2.5-3-3) cm , finish with 2 rows garter st, bind off. Lay the left part of the neck edge over the right and sew. Pick up approx. 80-100-108-116 (120-126-132) sts (divisible by 2 sts) around the armhole on smaller double pointed needles with marine and knit 2 rows garter st, 2-2-2.5-2.5 (2.5-3-3) cm rib, finish with 2 rows garter st, bind off. |
|||||||||||||||||||||||||
Diagram explanations |
|||||||||||||||||||||||||
|
|||||||||||||||||||||||||
Have you made this or any other of our designs? Tag your pictures in social media with #dropsdesign so we can see them! Do you need help with this pattern?You'll find tutorial videos, a Comments/Questions area and more by visiting the pattern on garnstudio.com. © 1982-2024 DROPS Design A/S. We reserve all rights. This document, including all its sub-sections, has copyrights. Read more about what you can do with our patterns at the bottom of each pattern on our site. |
With over 40 years in knitting and crochet design, DROPS Design offers one of the most extensive collections of free patterns on the internet - translated to 17 languages. As of today we count 309 catalogues and 11518 patterns translated into English (UK/cm). 11518
We work hard to bring you the best knitting and crochet have to offer, inspiration and advice as well as great quality yarns at incredible prices! Would you like to use our patterns for other than personal use? You can read what you are allowed to do in the Copyright text at the bottom of all our patterns. Happy crafting!
Comments / Questions (13)
Amy wrote:
Hi, when working on the front after casting off armholes, the pattern then says, “when the work measures 46 cm (adult M/L),” Does that mean I should repeat RS and WS rows (110 st) until my work reaches 46cm? Does the same apply to after decreasing 1 st at neck edges, “when the work measures 61cm?” I hope my question is understandable, I’m new to knitting. Thank you in advance!
19.04.2024 - 17:56DROPS Design answered:
Dear Amy, yes, you should continue the pattern, but, after dividing the piece at the armholes, you knit back and forth. Do not forget, that the diagrams show the pattern as you would see it from the right side. Happy Knitting!
19.04.2024 - 23:19Elisabeth wrote:
Hej! Garnet Silke tweed har utgått. Vad kan jag ersätta det med för garn?
02.12.2020 - 18:13DROPS Design answered:
Hej Elisabet. Du kan ersätta DROPS Silke tweed med ett annat garn i garngrupp A, tex DROPS Alpaca. Tänk bara på att du ska få samma stickfasthet som uppges i mönstret och att beräkna riktig garnåtgång. Mvh DROPS Design
03.12.2020 - 12:05Varpu Rahkonen wrote:
Ruutupiirros näkyy englannin kielisenä!
13.10.2019 - 10:07Varpu Rahkonen wrote:
Miksi ruutupiirros ei näy?
13.10.2019 - 10:04DROPS Design answered:
Nyt piirros aukeaa!
18.12.2019 - 17:08Oliver Gliese wrote:
Man kan ikke se diagrammerne :( Kan dette fixes?
26.03.2019 - 10:41Graeme wrote:
Instructions for finishing back don’t make sense! Fir adult 3rd size it says ‘when work measures 64cm bind off the centre ......’ then later it says ‘at same time when the work measures 62cm, bind off for the shoulder’. I assume this measurement is correct as that is when I bound off in front so am wondering what the correct measurement should be to cast off for the centre neck. Help! Thanks.
06.10.2018 - 09:00DROPS Design answered:
Dear Mrs Graeme, you are right, both sentences have been swapped, you should first bind off for the shoulder as on back piece, and at the same time bind off for neck as explained. Pattern will be fixed, thank you. Happy knitting!
08.10.2018 - 10:27Hilde Taylor wrote:
Hi, I have just got past the point of doing the bind offs for the armholes leaving 138 st front and 138 st back and so I have just started working back and forth instead of working in the round. It says "decrease every other row" but I am confused as I have just decreased 3 stitches on both the RS and 3 at the WS, leaving me with 132. Do I now skip decreasing for the next 2 rows back and forth or carry on decreasing? Thanks I need this finished if I can by Saturday! Hilde.
18.04.2016 - 18:40DROPS Design answered:
Dear Mrs Taylor, in 2nd size, you bind off for armholes 3 sts 2 times, then 2 sts 3 times and 1 st 4 times, 110 sts remain - bind off these sts at the beg of every row on each side. Then When piece measures 46 cm divide work for V-neck and continue each side separately dec 1 st every other row (= every row from RS) 15 times. Happy knitting!
19.04.2016 - 08:56Inge-Lise Dahl wrote:
Jeg vil gerne strikke denne vest i alpaka garn kan I give mig nr på de farver jeg skal bruge så farverne bliver de samme som i opskriften
16.02.2015 - 13:01DROPS Design answered:
Hej Inge-Lise. Du kan kontakte din butik med hjaelp til at finde de rette farver. De hjaelper dig gerne med at finde de rette kombinationer. God fornöjelse.
16.02.2015 - 15:39Lilli Larsen wrote:
Hej,jeg kunne tænke mig at strikke denne vest 59-5 small/medium, men uden mønster i garn Fabel Long Print. Skal jeg også bruge 400 gr i denne garn type og vil maske antal på opskriften passe til garnet? På forhånd tak for hjælpen. Hilsen Lilli
30.01.2014 - 17:08DROPS Design answered:
Hej Lilli, denne oppskrift passer veldigt fint till Fabel. Silke-Tweed hade 200 m per 50 gram vilket er nextan exakt samme. Vi tror du har nok med 300 gram = 6 nystan.
06.02.2014 - 20:18Birgit wrote:
Nu kan jag tyda tecknen. Hjärtligt tack och God Jul!
20.12.2013 - 17:57