
Popular categories
Looking for a yarn?


|
|||||||||||||
Sideway Vines#sidewayvinesset |
|||||||||||||
 |
 |
||||||||||||
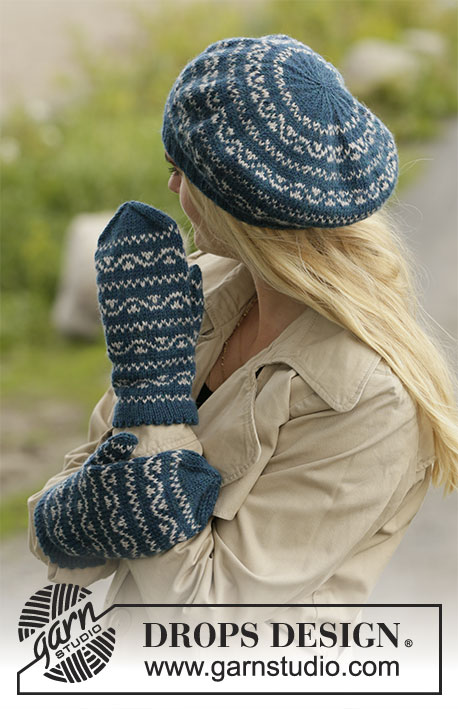
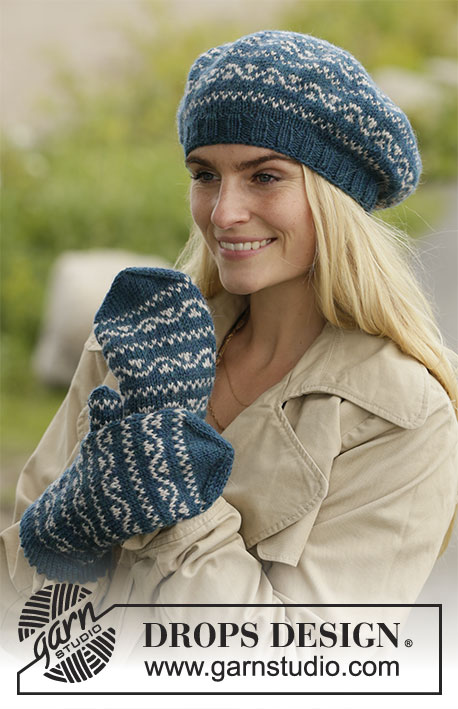
Knitted beret and mittens with Nordic pattern in DROPS Karisma.
DROPS 204-15 |
|||||||||||||
|
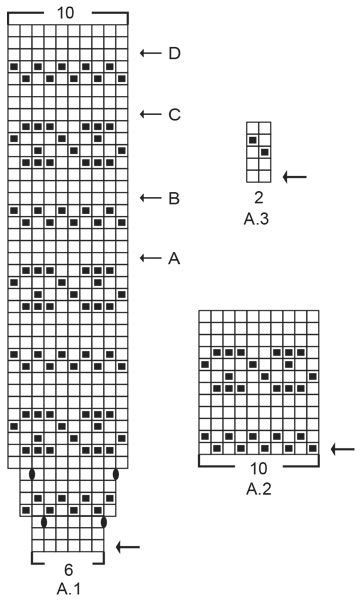
------------------------------------------------------- EXPLANATIONS FOR THE PATTERN: ------------------------------------------------------- PATTERN: Beret: See diagram A.1. Mittens: See diagrams A.2 and A.3. The whole pattern is worked in stocking stitch. DECREASE TIP (evenly spaced): To work out how to decrease evenly, count the total number of stitches on needle (e.g. 112 stitches) and divide by number of decreases to be made (e.g. 4) = 28. In this example decrease by knitting each 27th and 28th stitch together. KNITTING TIP-1: To avoid the knitting tension becoming tighter when working pattern, it is important that the strands at the back are not tight. You can use a larger size needle when working pattern if this is a problem. KNITTING TIP-2 (for mittens): If you would like the mittens to have a larger circumference you can use a size, or a half-size, larger needles. A half-size larger will give approx. 1 cm more in circumference and a full size will give approx. 2 cm more in circumference. KNITTING TIP-3 (for mittens): The length before you start the thumb can be adjusted by working more or fewer rounds before marking the thumb opening. DECREASE TIP-1 (for top of mitten): Decrease 1 stitch on each side of the marker as follows: Start 3 stitches before the marker, knit 2 together, knit 2 (the marker sits between these 2 stitches), slip 1 stitch as if to knit, knit 1 and pass the slipped stitch over the knitted stitch (= 2 stitches decreased at the marker and a total of 4 stitches decreased on the round). DECREASE TIP-2 (for thumb): Decrease 1 stitch on each side of the marker as follows: Start 2 stitches before the marker, knit 2 together, marker, slip 1 stitch as if to knit, knit 1 and pass the slipped stitch over the knitted stitch (= 2 stitches decreased at the marker and a total of 4 stitches decreased on the round). ------------------------------------------------------- START THE PIECE HERE: ------------------------------------------------------- BERET – SHORT OVERVIEW OF THE PIECE: The piece is worked in the round with short circular needle, bottom up. Change to double pointed needles when necessary. BERET: Cast on 104-112 stitches with short circular needle size 3 mm and petrol. Knit 1 round then work rib in the round (= knit 2 / purl 2) for 3-4 cm. Change to short circular needle size 3.5 mm and knit 1 round with petrol where you decrease 2-4 stitches evenly spaced – read DECREASE TIP = 102-108 stitches. Read KNITTING TIP-1 and work A.1 in the round (= 17-18 repeats of 6 stitches). Increase as shown in the diagram = 170-180 stitches on the needle. REMEMBER THE KNITTING TENSION! AT THE SAME TIME on the rounds marked with arrows in A.1, decrease stitches evenly spaced as described below: Arrow-A: Decrease 20-20 stitches evenly spaced = 150-160 stitches. Arrow-B: Decrease 20-20 stitches evenly spaced = 130-140 stitches. Arrow-C: Decrease 30-30 stitches evenly spaced = 100-110 stitches. Arrow-D: Decrease 30-30 stitches evenly spaced = 70-80 stitches. When A.1 has been worked in height continue with petrol AT THE SAME TIME as you decrease as follows: * Knit 1 round then knit 1 round where you decrease 18-20 stitches evenly spaced *, work from *-* a total of 3 times (each time you decrease you work 1 stitch less before knitting 2 together) = 16-20 stitches left. Knit 1 round then knit 1 round where all stitches are knitted together 2 and 2 = 8-10 stitches left. Cut the strand, pull it through the remaining stitches, tighten and fasten well. The beret measures approx. 21-22 cm from mid top and down to the cast-on edge. ------------------------------------------------------- MITTENS – SHORT OVERVIEW OF THE PIECE: The piece is worked in the round with double pointed needles, bottom up. The circumference is the same in both sizes, but the length is different. The circumference can be adjusted – read KNITTING TIP-2! LEFT MITTEN: Cast on 50-50 stitches with double pointed needles size 3 mm and petrol. Work 8 rounds of stocking stitch for the lining. The next round is worked as follows: * Knit 2 together, make 1 yarn over *, work from *-* to end of round (= folding-edge). Insert 1 marker thread on the round; the piece is now measured from here. Work 8 rounds of stocking stitch with petrol. Read KNITTING TIP-1 and then work A.2 in the round (= 5-5 repeats of 10 stitches). REMEMBER THE KNITTING TENSION! When the piece measures approx. 11-12 cm from the marker thread (adjust so the next round is one-coloured), work a marking of the thumb-opening as follows – read KNITTING TIP-3: Work 15 stitches stocking stitch with petrol, 8 stitches stocking stitch for the thumb-opening using a contrasting colour, then the remaining 27 stitches stitches in stocking stitch with petrol. Then continue the pattern as before over all the stitches. When the piece measures approx. 21-23 cm from the marker thread, start to decrease at the top of the mitten (there is approx. 3 cm left to finished length; you can try the mitten on and continue to desired length). Insert 1 marker at the beginning of the round and 1 marker after 25-25 stitches. On the next round decrease 1 stitch on each side of both markers - read DECREASE TIP-1. Decrease like this every round a total of 11 times in both sizes = 6-6 stitches left. Cut the strand, pull it through the remaining stitches, tighten and fasten well. The mitten measures approx. 24-26 cm from the top down to the marker thread on the folding-edge. THUMB, LEFT MITTEN: Pull out the strand worked over the 8 stitches for the thumb-opening and place the stitches on double pointed needles size 3 mm. In addition, knit up 1 stitch in one side of the thumb and 2 stitches on the other side of the thumb (with petrol) = 18 thumb stitches on the needles. Remember KNITTING TIP-1 and work A.3 in the round. When the thumb measures approx. 5-5½ cm, start to decrease at the top of the thumb (there is approx. 1 cm left to finished length; you can try the mitten on and work the thumb to desired length). Insert 1 marker on each side of the thumb so there are 9 stitches on each side of both markers. On the next round decrease 1 stitch on each side of both markers - read DECREASE TIP-2. Decrease like this every round a total of 3 times = 6 stitches left. Cut the strand, pull it through the remaining stitches, tighten and fasten well. The thumb measures approx. 6-6½ cm from the top down. RIGHT MITTEN: Cast on 50-50 stitches with double pointed needles size 3 mm and petrol. Work 8 rounds stocking stitch for the lining. The next round is worked as follows: * Knit 2 together, make 1 yarn over *, work from *-* to end of round (= folding-edge). Insert 1 marker thread on the round; the piece is now measured from here. Work 8 rounds stocking stitch with petrol. Then work A.2 in the round (= 5-5 repeats of 10 stitches). When the piece measures approx. 11-12 cm from the marker thread (adjust to match the left mitten) work a marking of the thumb-opening as follows: Work 27 stitches in stocking stitch with petrol, 8 stitches stocking stitch for the thumb-opening with a contrasting colour then the remaining 15 stitches in stocking stitch with petrol. Then continue the pattern as before over all stitches. When the piece measures approx. 21-23 cm from the marker thread, start to decrease at the top of the mitten (adjust the length to match the left mitten). Insert 1 marker at the beginning of the round and 1 marker after 25-25 stitches. On the next round decrease 1 stitch on each side of both markers - read DECREASE TIP-1. Decrease like this every round a total of 11 times in both sizes = 6-6 stitches left. Cut the strand, pull it through the remaining stitches, tighten and fasten well. The mitten measures approx. 24-26 cm from the top down to the marker thread on the folding-edge. THUMB, RIGHT MITTEN: Work the thumb in the same way as the thumb on the left mitten. ASSEMBLY: Fold the lining in towards the wrong side and fasten with small neat stitches. |
|||||||||||||
Diagram explanations |
|||||||||||||
|
|||||||||||||
 |
|||||||||||||
Have you finished this pattern?Tag your pictures with #dropspattern #sidewayvinesset or submit them to the #dropsfan gallery. Do you need help with this pattern?You'll find 16 tutorial videos, a Comments/Questions area and more by visiting the pattern on garnstudio.com. © 1982-2026 DROPS Design A/S. We reserve all rights. This document, including all its sub-sections, has copyrights. Read more about what you can do with our patterns at the bottom of each pattern on our site. |
|||||||||||||


With over 40 years in knitting and crochet design, DROPS Design offers one of the most extensive collections of free patterns on the internet - translated to 17 languages. As of today we count 324 catalogues and 12245 patterns translated into English (UK/cm). 12245
We work hard to bring you the best knitting and crochet have to offer, inspiration and advice as well as great quality yarns at incredible prices! Would you like to use our patterns for other than personal use? You can read what you are allowed to do in the Copyright text at the bottom of all our patterns. Happy crafting!
Post a comment to pattern DROPS 204-15
We would love to hear what you have to say about this pattern!
If you want to leave a question, please make sure you select the correct category in the form below, to speed up the answering process. Required fields are marked *.