
Popular categories
Looking for a yarn?


Comments / Questions (45)
![]() Medine wrote:
Medine wrote:
Jeg er næsten færdig med huen i xl men den bliver alt for lille min er kun blevet 47 og ikke 57 som der står i opskrifter hvad har jeg gjort forkert
20.02.2020 - 21:42DROPS Design answered:
Hej Medine, så skal du prøve at hækle på en større hæklenål. Lav en lille prøve med fastmasker, du skal få 17 fastmasker på 10 cm. Således måler du strikke-/hæklefastheden!
21.02.2020 - 08:09
![]() Rikke wrote:
Rikke wrote:
Hvad skal man efter omgang 13, hvis man gerne vil lave en str L/XL? Kan kun se opskriften op til str M/L.
21.01.2020 - 20:05DROPS Design answered:
Hei Rikke. Her er det nok en tastefeil. Det skal være L/XL (og ikke M/L) over 12. og 13. omgang. Dette skal vi få ordnet, takk for at du gjorde oss oppmerksom på dette. mvh DROPS design
27.01.2020 - 14:12
![]() Charlotte wrote:
Charlotte wrote:
Hvordan hækler man efter række 14. Skal man tage en maske ud for hver omgang
28.12.2019 - 20:34
![]() Ginette Ratelle wrote:
Ginette Ratelle wrote:
Pourrais-je avoir ce patron en français svp merci. Il y a plusieurs patron que j'aime de vous mais je ne peux jamais les faire pcqu"il sont en anglais . Merci
27.06.2019 - 05:05DROPS Design answered:
Bonjour Mme Ratelle, tous les modèles DROPS sont disponibles en français, cliquez sur le menu déroulant sous la photo et sélectionnez "français". Bon crochet!
27.06.2019 - 08:50
![]() Johanna wrote:
Johanna wrote:
Jag har virkat på och inser att mina 73 maskor aldrig kommer att bli tillräckligt stor för en vuxen-mössa. Just nu är omkretsen ca. 40cm (!) Har virkat med en nål som är 5mm, vad tror ni jag behöver gå upp till? 7mm? 8mm? Mätte även på 10 cm och det blev 20 maskor.
25.09.2018 - 21:43DROPS Design answered:
Hej, du kan pröva virka en provlapp med nål nr 6 eller 7 och se om virkfastheten då stämmer. Det är alltid viktigt att göra en provlapp innan man påbörjar själva arbetet, i längden sparar detta tid och möda.
26.09.2018 - 14:18
![]() Stefanie wrote:
Stefanie wrote:
Er også helt nybegynder, så skal også lige være sikker på, at jeg forstå opskriften korrekt (huen). Når der står, at jeg skal erstatte hver første fm med en lm, vil det så sige, at jeg skal have en fm mindre end det, der står ved hver omgang? Altså 5 fm i første omgang? Eller har jeg helt galt fat i det? :) På forhånd mange tak for hjælpen - glæder mig til at komme igang med den fine opskrift :)
10.09.2018 - 19:38DROPS Design answered:
Hei Stefanie. Ja det stemmer, på 1 omgang hekler du 1 luftmaske og 5 fastmasker om ringen. God fornøyelse.
11.09.2018 - 08:07
![]() Anette wrote:
Anette wrote:
Skal den sidste maske i hver række bruges som kædemaske rundt om den første luftmaske, eller skal der en ekstra til?
26.08.2018 - 17:04DROPS Design answered:
Hej Anette, du kæder overgangen med fm samme med kædemasken, og hækler 1 lm for at komme et hak op. Du skal have det antal fm som står ud for hver omgang. God fornøjelse!
27.08.2018 - 16:05
![]() Line wrote:
Line wrote:
Jeg er nybegynder og allerede forvirret ved huen! Under hækleinfo står der at første fm i hver omgang erstattes med en lm. Så i 4.omgang, hvor der står at jeg skal lave 1 fm i hver af de 2 første fm, skal jeg bare lave 1 fm,da den første allerede er erstattet af 1 lm? Syntes det er kringlet beskrevet, så er i tvivl om jeg gør det rigtigt. Som nybegynder kunne det være rart med en lidt mere udpenslet opskrift.
22.02.2018 - 08:55DROPS Design answered:
Hei Line, ja det stemmer! 4.omgang starter med 1 luftmaske som erstatter første fastmaske, hopp da over den første fastmasken på forrige omgang og hekle 1 fastmaske i neste maske. God hekling:)
26.02.2018 - 13:14
![]() Ida-Maria Skavhaug wrote:
Ida-Maria Skavhaug wrote:
Heklenaal NR 6 staar det i starten (12fmx14 rad paa 10cmx10cm) -- men i oppskrift paa lue saa staar det jo NR 5. Hvor mange fm per rad da? Jeg strever litt for aa faa rett fasthet her...
14.10.2017 - 00:53DROPS Design answered:
Hei Ida-Maria, Det står hekle nål nr 5 på lua (nr 6 på halsen) og da får du 14 fm x 17 rader på 10 x 10 cm. Husk at pinnestørrelsen er bare veiledende! God fornøyelse!
15.10.2017 - 13:36
![]() Sanne wrote:
Sanne wrote:
12 og 13 omg, skal de også hækles i bagerste led? Flot hue.
12.09.2017 - 07:13DROPS Design answered:
Hei Sanne. Ja, og det fortsettes med å hekle 1 fm i bakre ledd av hver fm til arb måler 18-19 cm. God Fornøyelse!
12.09.2017 - 07:18
|
|
Queen of the Chill#queenofthechillset |
|
|
|
|
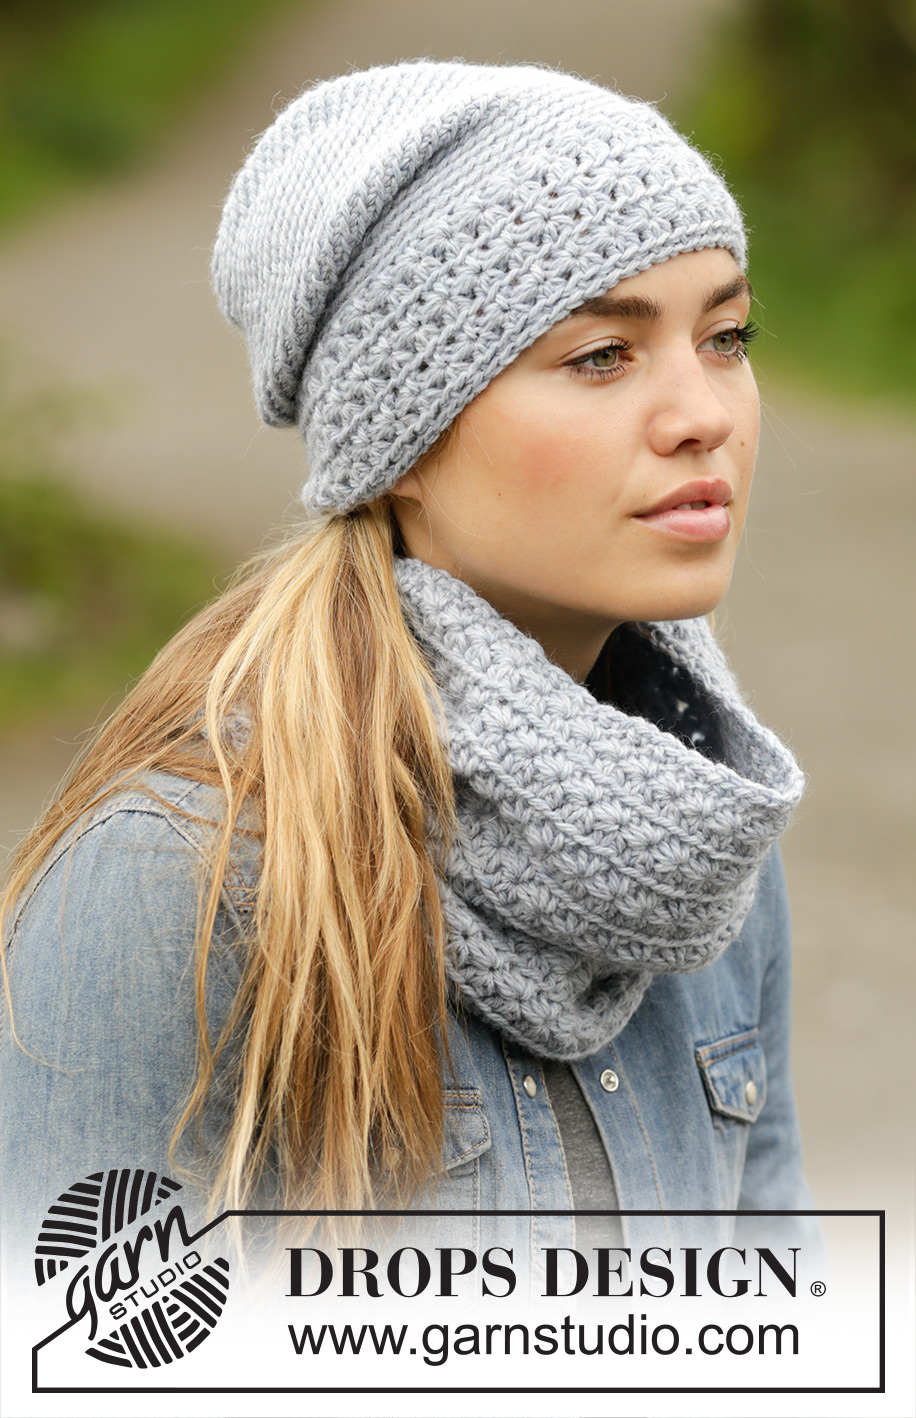
Crochet DROPS hat and neck warmer with star pattern in ”Nepal”.
DROPS 171-45 |
|
|
HAT: CROCHET INFO: Replace first dc at beg of every dc round with 1 ch. Finish every round with 1 sl st in first ch on round. INCREASE TIP: Inc 1 st by working 2 dc in same st. STAR PATTERN (in the round): ROUND 1: 3 ch, pick up 5 sts, beg in 2nd ch from hook, when picking up st in dc pick up in back loop (= 6 loops on hook), make a YO and pull through all 6 loops, work 1 ch to make a hole over the 6 sts, * pick up 1 st in the hole, pick up 1 st in the side on the last of the 6 sts, pick up 1 st in same ch as the last of the 6 sts was picked up in, 1 st in back loop in each of the 2 next ch (= 6 loops on hook), make a YO and pull through all 6 loops, 1 ch *, repeat from *-*, finish with 1 sl st in 3rd ch at beg of round. ROUND 2: 2 ch, work 2 htr in each "star hole", finish round with 1 sl st in 2nd ch at beg of round = 34-36 stars. ROUND 3: 3 ch, pick up 1 st in 2nd and 3rd ch from hook, 1 st in back loop of the first 3 htr on row (= 6 loops on hook), make a YO and pull through all 6 loops, 1 ch, * pick up 1 st in the hole, 1 st in the side on the last of the 6 sts, 1 st in back loop of same htr as the last of the 6 sts was picked up in, 1 st in back loop of each of the next 2 htr (= 6 loops on hook), make a YO and pull through all 6 loops, 1 ch *, repeat from *-*, finish with 1 sl st in 3rd ch at beg of round. Repeat 2nd and 3rd round 2 times in total, work 2nd round 1 more time (= 6 rounds in total vertically = 3 stars vertically). ---------------------------------------------------------- HAT: The piece is worked top down in the round. Crochet 4 ch on hook size 5 mm with Nepal and form a ring with 1 sl st in first ch. ROUND 1: Work 6 dc in ch-ring – READ CROCHET INFO! Now work all dc in back loop of dc from previous round. ROUND 2: Work 2 dc in every dc = 12 dc. ROUND 3: * 1 dc in first dc, 2 dc in next dc *, repeat from *-* the entire round = 18 dc. ROUND 4: * 1 dc in each of the first 2 dc, 2 dc in next dc *, repeat from *-* the entire round = 24 dc. REMEMBER THE CROCHET TENSION! ROUND 5: * 1 dc in each of the first 3 dc, 2 dc in next dc *, repeat from *-* the entire round = 30 dc. ROUND 6: * 1 dc in each of the first 4 dc, 2 dc in next dc *, repeat from *-* the entire round = 36 dc. ROUND 7: * 1 dc in each of the first 5 dc, 2 dc in next dc *, repeat from *-* the entire round = 42 dc. ROUND 8: * 1 dc in each of the first 6 dc, 2 dc in next dc *, repeat from *-* the entire round = 48 dc. ROUND 9: * 1 dc in each of the first 7 dc, 2 dc in next dc *, repeat from *-* the entire round = 54 dc. ROUND 10: * 1 dc in each of the first 8 dc, 2 dc in next dc *, repeat from *-* the entire round = 60 dc. ROUND 11: * 1 dc in each of the first 9 dc, 2 dc in next dc *, repeat from *-* the entire round = 66 dc. SIZE S/M: ROUND 12: Work 1 round with 1 dc in every dc and inc 3 dc evenly - READ INCREASE TIP = 69 dc. SIZE L/XL: ROUND 12: * 1 dc in each of the first 10 dc, 2 dc in next dc *, repeat from *-* the entire round = 72 dc. ROUND 13: Work 1 round with 1 dc in every dc and inc 1 dc - READ INCREASE TIP = 73 dc. BOTH SIZES: Piece measures approx. 7-8 cm. Continue to work 1 dc in back loop of every dc until piece measures 18-19 cm. Then work STAR PATTERN – see explanation above. Make sure to not make the star pattern to tight! When star pattern has been worked, work 1 edge in the round as follows: Work 1 dc in back loop of first htr, * 1 ch, skip 1 htr, 1 dc in next htr *, repeat from *-* the entire round. Fasten off. ---------------------------------------------------------- NECK WARMER: STAR PATTERN: ROUND 1: 3 ch, pick up 5 sts, beg in 2nd ch from hook, when picking up st in dc pick up in back loop (= 6 loops on hook), make a YO and pull through all 6 loops, work 1 ch to make a hole over the 6 sts, * pick up 1 st in the hole, pick up 1 st in the side on the last of the 6 sts, pick up 1 st in same ch as the last of the 6 sts was picked up in, 1 st in back loop in each of the 2 next ch (= 6 loops on hook), make a YO and pull through all 6 loops, 1 ch *, repeat from *-*, finish with 1 sl st in 3rd ch at beg of round. ROUND 2: 2 ch, work 2 htr in each "star hole", finish round with 1 sl st in 2nd ch at beg of round = 36-39 stars. ROUND 3: 3 ch, pick up 1 st in 2nd and 3rd ch from hook, 1 st in back loop of the first 3 htr on row (= 6 loops on hook), make a YO and pull through all 6 loops, 1 ch, * pick up 1 st in the hole, 1 st in the side on the last of the 6 sts, 1 st in back loop of same htr as the last of the 6 sts was picked up in, 1 st in back loop of each of the next 2 htr (= 6 loops on hook), make a YO and pull through all 6 loops, 1 ch *, repeat from *-*, finish with 1 sl st in 3rd ch at beg of round. Repeat round 2 and 3. ---------------------------------------------------------- NECK WARMER: Crochet 73-79 LOOSE ch on hook size 6 mm with Nepal and form a ring with 1 sl st in first ch. Work STAR PATTERN - see explanation above. REMEMBER THE CROCHET TENSION! Neck warmer should measure approx. 61-66 cm in circumference, make sure to avoid a tight neck warmer. When piece measures 24-26 cm, adjust so that last round is 2nd round, work 1 edge around the neck warmer as follows: Work 1 ch (= first dc), * 1 ch, skip 1 htr, 1 dc in next htr *, repeat from *-* around the entire neck warmer, finish with 1 sl st in first ch. Fasten off. Work the same edge in opposite side of piece, i.e. in ch-row from RS. Fasten off. |
|
Have you finished this pattern?Tag your pictures with #dropspattern #queenofthechillset or submit them to the #dropsfan gallery. Do you need help with this pattern?You'll find 8 tutorial videos, a Comments/Questions area and more by visiting the pattern on garnstudio.com. © 1982-2026 DROPS Design A/S. We reserve all rights. This document, including all its sub-sections, has copyrights. Read more about what you can do with our patterns at the bottom of each pattern on our site. |


With over 40 years in knitting and crochet design, DROPS Design offers one of the most extensive collections of free patterns on the internet - translated to 17 languages. As of today we count 324 catalogues and 12267 patterns translated into English (UK/cm). 12267
We work hard to bring you the best knitting and crochet have to offer, inspiration and advice as well as great quality yarns at incredible prices! Would you like to use our patterns for other than personal use? You can read what you are allowed to do in the Copyright text at the bottom of all our patterns. Happy crafting!
Post a comment to pattern DROPS 171-45
We would love to hear what you have to say about this pattern!
If you want to leave a question, please make sure you select the correct category in the form below, to speed up the answering process. Required fields are marked *.