
Popular categories
Looking for a yarn?


Comments / Questions (100)
![]() Anna wrote:
Anna wrote:
Quando inizio a lavorare il secondo giro di A5-A7 mi dice di aumentare per una xl 24 m.a. da distribuire uniformemente poi di lavorare A7 per 46 volte e poi di rifare i 24 aumenti vorrei essere segato che significa e come vanno distribuiti gli aumenti e qusati ne sono effettivamente in questo secondo giro
06.11.2017 - 01:12DROPS Design answered:
Buongiorno Anna. Quando inizia i diagrammi A.5 – A.7 lei ha 265 maglie alte. Alla 2a riga deve aumentare 2 m.alte all’altezza di ogni segnapunti, come indicato nel paragrafo : SUGGERIMENTO PER GLI AUMENTI-2. I segnapunti sono 8, quindi aumenta 16 maglie alte. Inoltre deve aumentare 8 m.a in modo uniforme su tutta la riga. Per questi 8 aumenti può aumentare come segue: sottrae dalle 265 maglie le maglie dei bordi davanti: 265 – 12 = 253 e divide per il numero degli aumenti da fare: 253 : 8 = 31,6. Quindi aumenta una maglia ogni 31 e ogni 32 maglie in modo alternato. In tutto deve aumentare 24 maglie alte sulla riga. Buon lavoro!
06.11.2017 - 12:40
![]() CARMEN wrote:
CARMEN wrote:
Que significa:7 p.a.(17-17-18-vcs en el ancho), la abrebiatura vcs significa veces ,o tiene otro significado, y que quiere decir en el 4ºp.de cad.desde el ganchillo(=2p.a.)-LEER INFORMACIÓN PARA REALIZAR EL TRABAJO,el2p.a no lo entiendo.les doy las gracias de antemano por su tiempo y su ayuda que pasen una buena mañana.
24.08.2017 - 11:55DROPS Design answered:
Hola Tamara. p.a.= punto alto, vcs = veces, trabajar 1 punto alto en el 4º punto de cadeneta contando desde la aguja del ganchillo = 2 puntos altos trabajados ( los tres puntos de cadeneta desde el ganchillo forman 1 punto alto al inicio de la fila)
29.08.2017 - 17:55
![]() Benedetta wrote:
Benedetta wrote:
Buonasera, scusatemi ma cosa significa " girare l'anello di cat (cioè continuare a lav nella stessa direzione),poi continuare a lav la nocciolina",riferito al grafico A3 A.2. Grazie
07.05.2017 - 20:47DROPS Design answered:
Buonasera Benedetta. Il seguente video può esserle di aiuto. Trova la descrizione del passaggio da lei indicato al minuto 2. Buon lavoro!
07.05.2017 - 22:23
![]() Pat Hoalcraft wrote:
Pat Hoalcraft wrote:
I am interested in making the Sweet Mint Cardigan, Drops 169/32. I have looked several places but can't find the finished measurements in inches for the sizes so I know which one to make. Have I overlooked it? Thanks for your help.
28.04.2017 - 17:15DROPS Design answered:
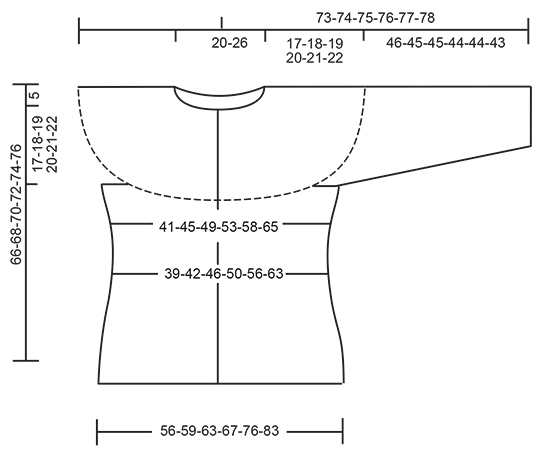
Dear Mrs Hoalcraft, you will find a chart with measurements at the bottom of the page, all measurements are done flat from side to side in cm. Read more about sizes and convert here. Happy crocheting!
02.05.2017 - 08:54Natalie wrote:
Hello. The first part says: work and incr. at the same time increase in addition 9 (for the XL) on the entire row. Does that mean in addition to all those other increases mentioned? Then it says work 38 dc,insert marker work 4 dc and increase 4 dc evenly. Where exactly do I have to start increasing? After the 38 dcs or within them? Will the increase make my count 38+4 or are those 4 dc increases already included in the 38 stitches?
28.03.2017 - 19:24DROPS Design answered:
Dear Natalie, you will have to inc in the last row of A.2 and A.3, ie inc a total of 9 dc evenly on row and then insert the marker as explained. When you have to crochet 38, 44, 60 dc, it includes the inc you have to work evenly. Read more about how to inc evenly here. Happy crocheting!
29.03.2017 - 09:22Zahra wrote:
Aha !!! I have 4 rows with dc : first row is last row in A.5 with inc. .. second row is dc only.. third row is dc with inc .. fourth row is dc only .. that what I read in the pattern.. Thank you very much for helping me .
16.02.2017 - 14:30DROPS Design answered:
Dear Zahra, there are 6 rows in A.5 - A.8, start from row with an arrow (= row 1) to the row at the very top of diagrams = 6 rows all together. Happy crocheting!
16.02.2017 - 14:42Zahra wrote:
I'm work the size M .
16.02.2017 - 06:32Zahra wrote:
What can I do? I'm sure that everything is correct.
16.02.2017 - 05:45DROPS Design answered:
Dear Zahra, please check answer to your previous question. Happy crocheting!
16.02.2017 - 09:43Zahra wrote:
Thank you very much for answering me .. when i work the row with dc and 8 ch for sleeve .. it doesn't RS on my work ! It is WS !! Why ??
15.02.2017 - 15:50DROPS Design answered:
Dear Zahra, 1st row in A.5 - A.8 is worked from RS, and last row in A.5-A.8 is worked from WS. You have then 2 more rows (= 1 from RS, 1 from WS), so that next row (dividing for sleeves) will be from RS. Happy crocheting!
16.02.2017 - 09:22Zahra wrote:
Thank you for the answer but where i do the increase?
03.02.2017 - 13:59DROPS Design answered:
Dear Zahra, you have to inc evenly on row, read here how to increase evenly. Happy crocheting!
03.02.2017 - 14:58
|
||||||||||||||||||||||||||||||||||
Sweet Mint Cardigan#sweetmintcardigan |
||||||||||||||||||||||||||||||||||
|
|
||||||||||||||||||||||||||||||||||
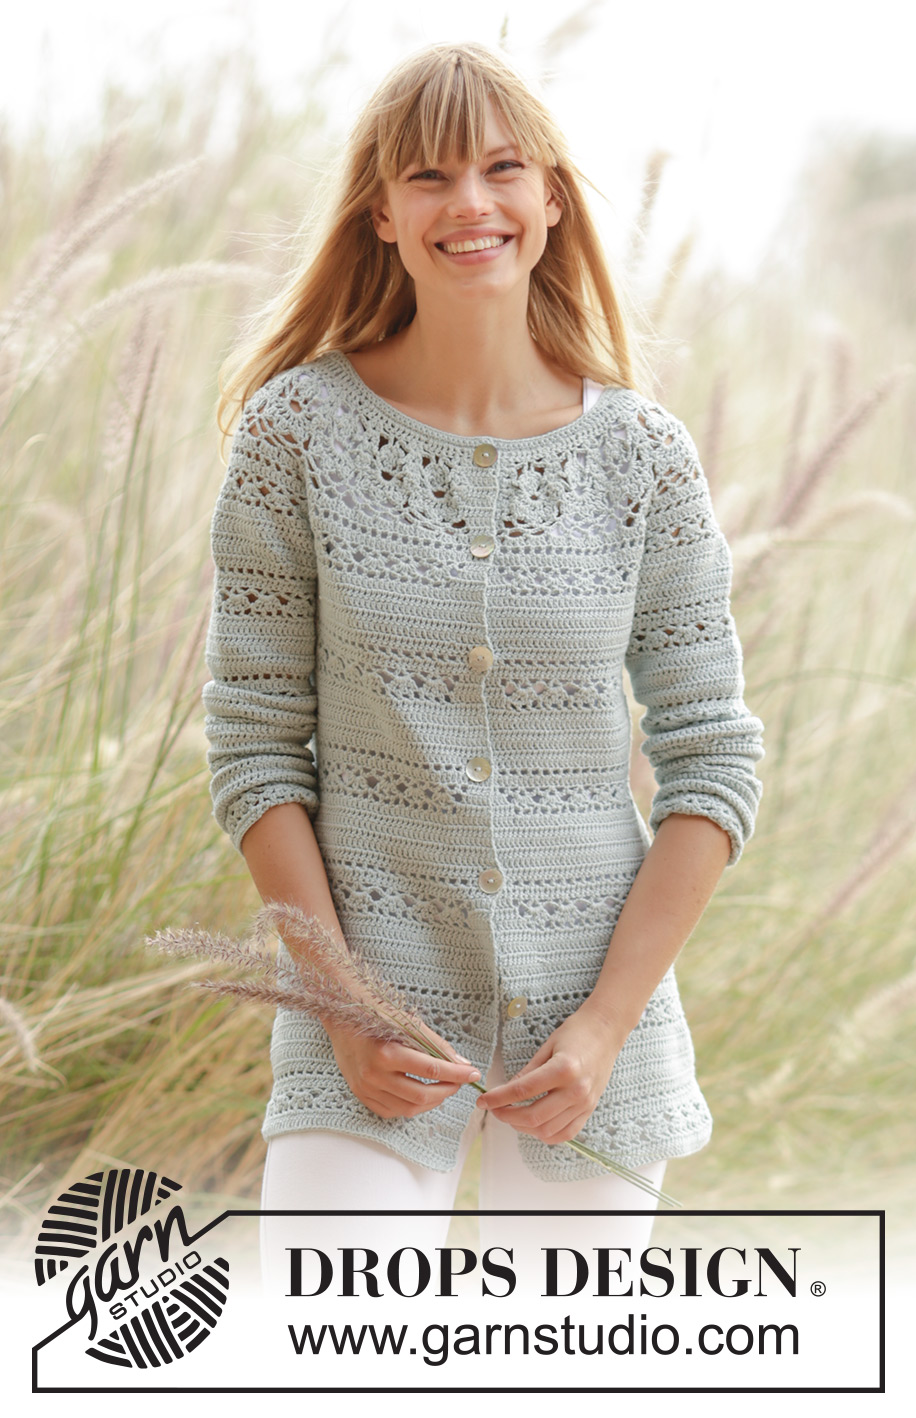
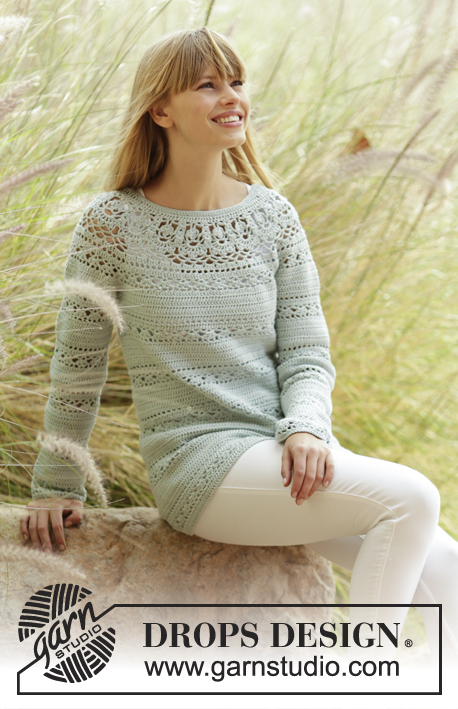
Crochet DROPS jacket with lace pattern and round yoke in ”Safran”. The piece is worked top down. Size: S - XXXL.
DROPS 169-32 |
||||||||||||||||||||||||||||||||||
|
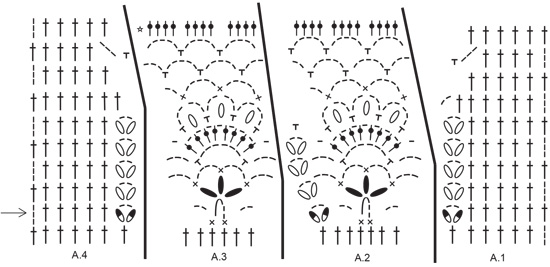
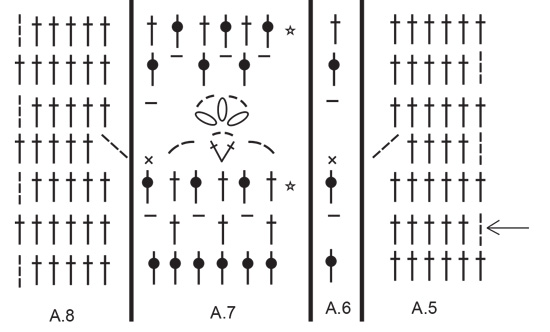
PATTERN: See diagrams A.1 to A.8. CROCHET INFO: On every tr row replace first tr with 3 ch. On every dc row replace first dc with 1 ch. Replace first tr at on every tr round with 3 ch, finish the round with 1 sl st in 3rd ch from beg of round. Replace first dc at on every dc round with 1 ch, finish the round with 1 sl st in first ch from beg of round. INCREASE TIP-1: Inc 1 tr by working 2 tr in same st. INCREASE TIP-2: Work until 2 tr/ch remain before marker, work 2 tr in/around next tr/ch (= 1 tr inc), work 1 tr in/around each of the next 2 tr/ch, markers is in the middle of these tr/ch, work 2 tr in/around next tr/ch (= 1 tr inc). Repeat inc at every marker. PATTERN-1 (applies to body): Work 1 tr in every tr until 6-8-10-10-10-10 rows have been worked, * work from RS: Work A.5 over the first 6 tr, A.6 over next tr, repeat A.7 until 6 tr remain, A.8 over the last 6 tr. When A.5 to A.8 have been worked 1 time vertically, work 6-8-10-10-10-10 rows with 1 tr in every tr *, repeat pattern from *-* until finished measurements. PATTERN-2 (applies to sleeve): * Work A.7 over all tr. When A.7 has been worked 1 time vertically, continue as follows: Work 6-8-10-10-10-10 rounds with 1 tr in every tr *, repeat from *-* until finished measurements. DECREASE TIP: Dec 1 tr by working the next 2 tr tog as follows: Work 1 tr but wait with last pull through (= 2 loops on hook), then work next tr but on last pull through, pull yarn through all 3 loops on hook. BUTTONHOLES: Make buttonholes on right band. 1 buttonhole = replace fourth tr from edge with 1 ch. On next row work band st as before (work 1 tr around ch). Work for buttonholes when piece measures: SIZE S: 2, 11, 20, 29, 38 and 47 cm. SIZE M: 2, 11, 20, 29, 38 and 47 cm. SIZE L: 2, 10, 18, 26, 34, 42 and 50 cm SIZE XL: 2, 10, 18, 26, 34, 42 and 50 cm SIZE XXL: 2, 11, 20, 29, 38, 47 and 55 cm SIZE XXXL: 2, 11, 20, 29, 38, 47 and 55 cm ---------------------------------------------------------- YOKE: Worked back and forth, top down. Work 163-163-172-172-180-180 ch on hook size 3.5 mm with Safran. Work next row as follows: Work 1 tr in 4th ch from hook (= 2 tr) - READ CROCHET INFO, 1 tr in each of the next 5-5-0-0-1-1 ch, * skip 1 ch, 1 tr in each of the next 6 ch *, repeat from *-* the entire row = 139-139-146-146-153-153 tr. Then work next row from WS as follows: Work A.4 over the first 7 tr (= right band), A.3 over the next 6 tr, repeat A.2 until 7 tr remain (= 17-17-18-18-19-19 times in width), finish with A.1 over the last 7 tr (= left band). Continue like this, i.e. work as follows from RS: A.1, A.2 17-17-18-18-19-19 times in total, A.3 and A.4. REMEMBER THE CROCHET TENSION! Remember BUTTONHOLES - see explanation above. On last row in A.1-A.4 (= from WS) insert 8 markers and inc as follows: NOTE: Continue as shown in diagrams A.1-A.4. Work and inc like as follows AT THE SAME TIME inc in addition 0-3-3-9-3-3 tr evenly on the entire row – READ INCREASE TIP-1: Work 36-36-38-38-40-40 tr, insert 1 marker in piece, work 4 tr and inc 2-4-4-4-4-4 tr evenly (= right front piece), insert 1 marker, work 42-42-44-44-46-46 tr, insert 1 marker, work 4 tr and inc 2-4-4-4-4-4 tr evenly, insert 1 marker (= sleeve), work 56-56-60-60-64-64 tr, insert 1 marker, work 4 tr and inc 2-4-4-4-4-4 tr evenly, insert 1 marker (= back piece), work 42-42-44-44-46-46 tr, insert 1 marker, work 4 tr and inc 1-4-4-4-4-4 tr evenly, insert 1 marker (= sleeve), work 36-36-38-38-40-40 tr (= left front piece) = 235-247-259-265-271-271 tr on row. Move the markers upwards when working. Piece measures approx. 9 cm. Work 0-0-0-0-2-2 row with 1 tr in every tr and inc 0-0-0-0-12-15 tr evenly on every row (= 0-0-0-0-24-30 tr in total) = 235-247-259-265-295-301 tr. Work A.5 to A.7 as follows (first row is from RS): Work A.5 over the first 6 tr (= left band), A.6 over next tr, repeat A.7 until 6 tr remain (= 37-39-41-42-47-48 times in width), finish with A.8 over the last 6 tr (= right band). On 2nd row (i.e. tr row) inc at every marker – READ INCREASE TIP-2 and inc 2-8-8-8-8-8 tr evenly on row (= 2 tr in at every marker and 2-8-8-8-8-8 tr inc evenly = 18-24-24-24-24-24 tr inc in total on row) = 253-271-283-289-319-325 tr. Now repeat A.7 40-43-45-46-51-52 times in width. Repeat inc (i.e. 2 tr inc at every marker and 2-8-8-8-8-8 tr inc evenly = 18-24-24-24-24-24 tr inc in total on row). On last row in A.5 to A.8 = 271-295-307-313-343-349 tr. * Work 1 row with 1 tr in every tr. Work 1 row with tr and inc 18-18-16-17-24-26 tr evenly *, repeat from *-* 1-1-2-3-2-3 times in total = 289-313-339-364-391-427 tr. Work 0-1-1-0-1-0 rows with 1 tr in every tr. Piece measures approx. 17-18-19-20-21-22 cm. On next row (= from RS), work as follows: Work 1 tr in each of the first 46-50-54-58-64-70 tr (= left front piece), work 8 ch, skip 60-64-69-73-75-79 tr from previous row (= sleeve), 1 tr in each of the next 77-85-93-102-113-129 tr (= back piece), 8 ch, skip 60-64-69-73-75-79 tr from previous round (= sleeve), 1 tr in each of the last 46-50-54-58-64-70 tr (= right front piece) = 185-201-217-234-257-285 tr/ch on row. Insert 1 marker in piece, NOW MEASURE PIECE FROM HERE. Work 1 row from WS with 1 tr in every tr/ch. Then work PATTERN-1 from RS - see explanation above and dec 4-2-0-5-4-2 tr evenly in first row of tr - READ DECREASE TIP = 181-199-217-229-253-283 tr. When piece measures 12 cm, adjust so that next row is a row with tr, dec 6-12-12-6-6-6 tr evenly = 175-187-205-223-247-277 tr. Continue with pattern as before. When piece measures 19-20-21-22-23-24 cm – adjust so that next row is a row with tr, inc 12 tr evenly. Repeat inc every 3 cm 5-5-5-5-6-6 more times = 247-259-277-295-331-361 tr. Work pattern as before until piece measures 44-45-46-47-48-49 cm from marker. Fasten off. SLEEVE: Sleeve is worked in the round, top down. Beg by working mid under sleeve as follows: Work 1 dc in 5th ch of the 8 ch work in armhole on body, 3 ch (= 1 tr), work 1 tr in each of the next 3 ch, work 1 tr in every tr over sleeve, work 1 tr in each of the remaining 4 ch under sleeve = 68-72-77-81-83-87 tr. Insert 1 marker thread mid under sleeve. Insert 1 marker in piece, NOW MEASURE PIECE FROM HERE. Leave marker in piece, move marker thread when working. SIZE S-M: Work 1 tr in every tr and dec 2-0 tr evenly = 66-72 tr. SIZE L-XL-XXL-XXXL: Work 1 tr in every tr and inc 1-3-1-3 tr evenly = 78-84-84-90 tr. ALL SIZES: READ ALL OF THE FOLLOWING SECTION BEFORE CONTINUING! WORK PATTERN AND DEC AT THE SAME TIME: PATTERN: Work 1 tr in every tr until 5-7-9-9-9-9 round with tr have been worked in total. Work PATTERN-2 - see explanation above. DECREASE: When piece measures 4 cm, adjust so that next round is 1 round with tr, dec 6 tr evenly, repeat dec every 15-10-8-8-8-6 cm 2-3-4-4-4-5 more times = 48-48-48-54-54-54 tr. Fasten off when sleeve measures 46-45-45-44-44-43 cm. Work the other sleeve the same way. NECK EDGE: Worked back and forth from mid front. Beg from RS. Work in ch where the tr were worked (i.e. do not work over the ch skipped = 139-139-146-146-153-153 tr). Work 1 dc in each of the first 22-22-24-24-26-26 tr, * 1 htr in each of the next 3 ch, 1 tr in each of the next 3 ch, 1 dtr in each of the next 19 ch, 1 tr in each of the next 3 ch, 1 htr in each of the next 3 ch *, 1 dc in each of the next 33-33-36-36-39-39 ch, repeat from *-* 1 time, 1 dc in each of the last 22-22-24-24-26-26 ch. Work next row as follows: Work 1 dc in each of the first 26-26-28-28-30-30 sts, ** 1 htr in each of the next 3 sts, 1 tr in each of the next 3 sts, * work the next 2 dtr tog *, repeat from *-* 5 more times, 1 tr in each of the next 3 sts, 1 htr in each of the next 3 sts **, 1 dc in each of the next 39-39-42-42-45-45 sts, repeat from **-** 1 more time, finish with 1 dc in each of the last 26-26-28-28-30-30 sts = 127-127-134-134-141-141 sts. Work 1 row with 1 dc in every st. Fasten off. ASSEMBLY: Sew the buttons on to the left front band. |
||||||||||||||||||||||||||||||||||
Diagram explanations |
||||||||||||||||||||||||||||||||||
|
||||||||||||||||||||||||||||||||||
 |
||||||||||||||||||||||||||||||||||
 |
||||||||||||||||||||||||||||||||||
 |
||||||||||||||||||||||||||||||||||
Have you finished this pattern?Tag your pictures with #dropspattern #sweetmintcardigan or submit them to the #dropsfan gallery. Do you need help with this pattern?You'll find 15 tutorial videos, a Comments/Questions area and more by visiting the pattern on garnstudio.com. © 1982-2026 DROPS Design A/S. We reserve all rights. This document, including all its sub-sections, has copyrights. Read more about what you can do with our patterns at the bottom of each pattern on our site. |
||||||||||||||||||||||||||||||||||


With over 40 years in knitting and crochet design, DROPS Design offers one of the most extensive collections of free patterns on the internet - translated to 17 languages. As of today we count 324 catalogues and 12267 patterns translated into English (UK/cm). 12267
We work hard to bring you the best knitting and crochet have to offer, inspiration and advice as well as great quality yarns at incredible prices! Would you like to use our patterns for other than personal use? You can read what you are allowed to do in the Copyright text at the bottom of all our patterns. Happy crafting!
Post a comment to pattern DROPS 169-32
We would love to hear what you have to say about this pattern!
If you want to leave a question, please make sure you select the correct category in the form below, to speed up the answering process. Required fields are marked *.