
Popular categories
Looking for a yarn?


Comments / Questions (31)
![]() Gräf Andrea wrote:
Gräf Andrea wrote:
Das sieht ja super aus. Freue mich schon wenn es endlich die Anleitung gibt und ich los legen kann.
17.01.2016 - 09:27
![]() Janne Yde wrote:
Janne Yde wrote:
Luftig og sommerlig med fint mønster
14.01.2016 - 22:20
![]() Dagmar wrote:
Dagmar wrote:
Genau mein Geschmack
12.01.2016 - 17:56
![]() Dagmar wrote:
Dagmar wrote:
Sehr ein wunderschönes Teil...Ein Muster have für diesen Sommer
12.01.2016 - 17:48
![]() Estela wrote:
Estela wrote:
Todos los estilos son muy lindos
06.01.2016 - 07:55
![]() Esther wrote:
Esther wrote:
Sencillamente espectacular. Estoy deseando tejerlo!!!
23.12.2015 - 19:08
![]() Wilma Van Oostenbrugge wrote:
Wilma Van Oostenbrugge wrote:
Prachtig motief
14.12.2015 - 10:58
![]() Carina Lindgren Selgeryd wrote:
Carina Lindgren Selgeryd wrote:
Vilket vackert linne med en Alinjeformad stil!
13.12.2015 - 13:16
![]() Anja wrote:
Anja wrote:
Ich liebe Strickware mit viel Muster. Sieht an diesem Shirt toll aus.
12.12.2015 - 23:18
![]() Helen Sjödin wrote:
Helen Sjödin wrote:
Fin!
12.12.2015 - 10:53
|
|||||||||||||||||||
Erica Singlet#ericasinglet |
|||||||||||||||||||
|
|
|||||||||||||||||||
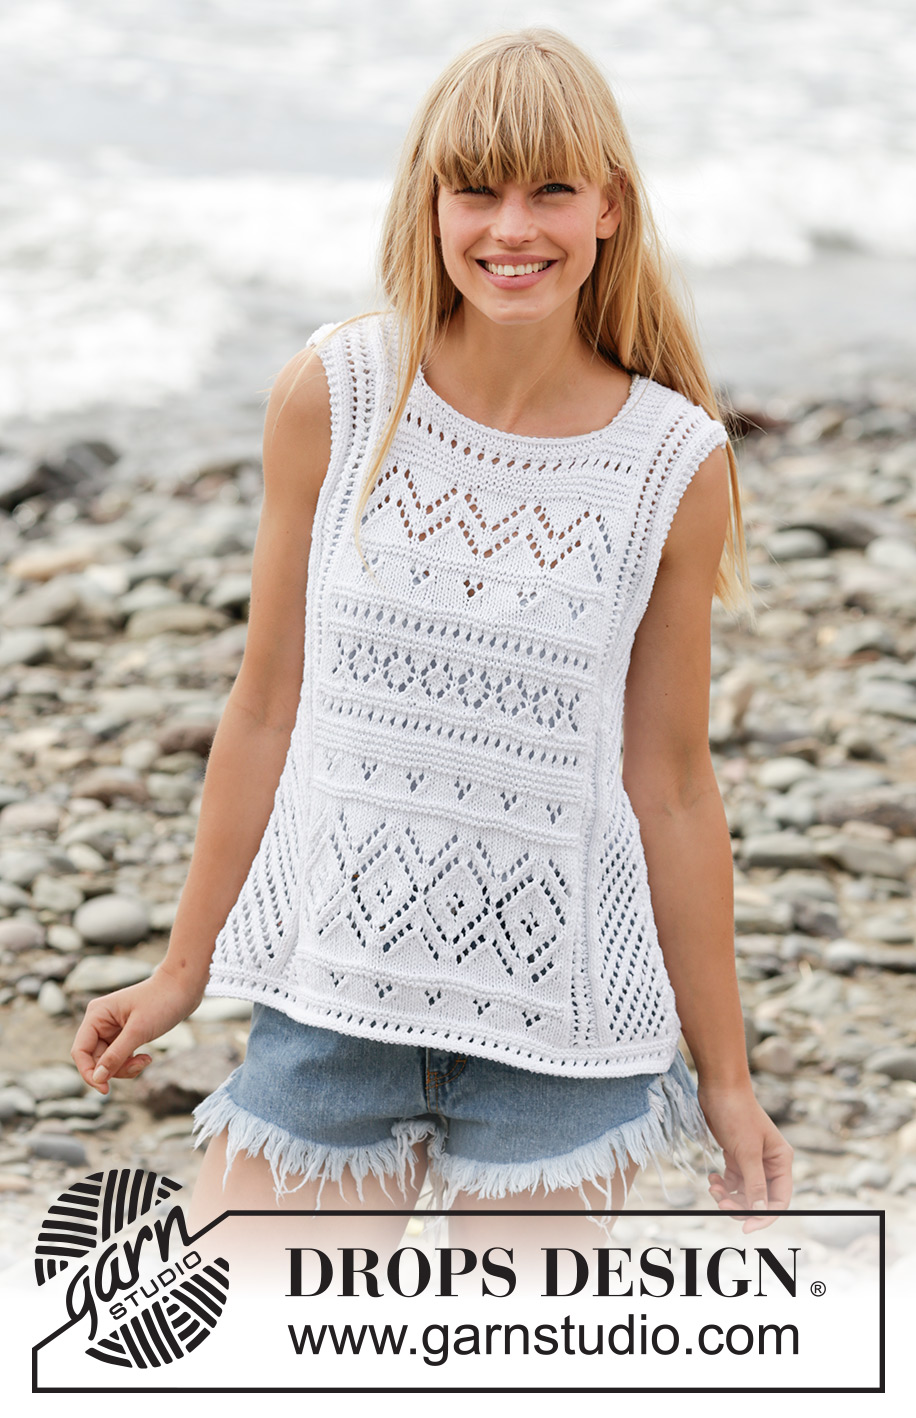
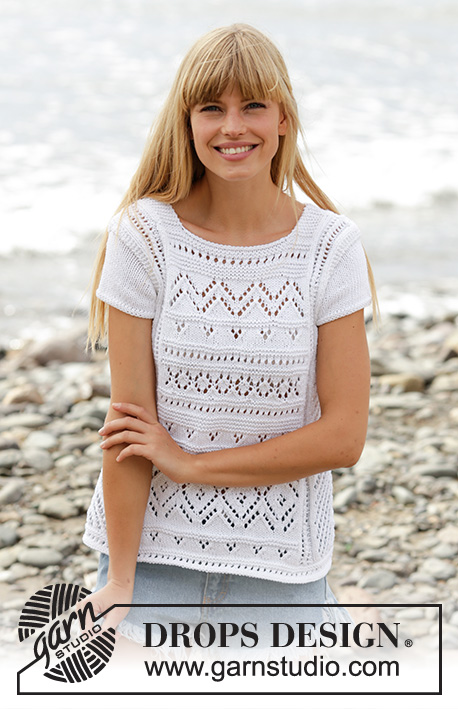
Knitted DROPS top with lace pattern and A-shape in ”Cotton Light”. Size: S - XXXL.
DROPS 169-20 |
|||||||||||||||||||
|
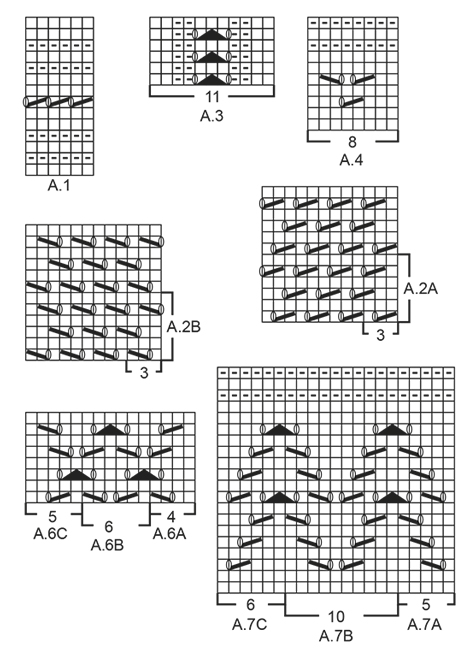
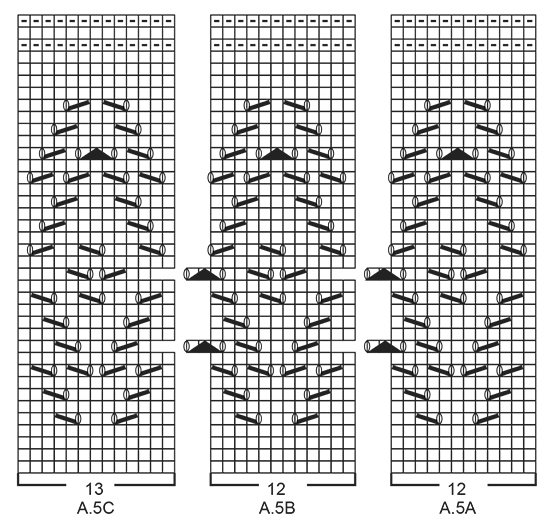
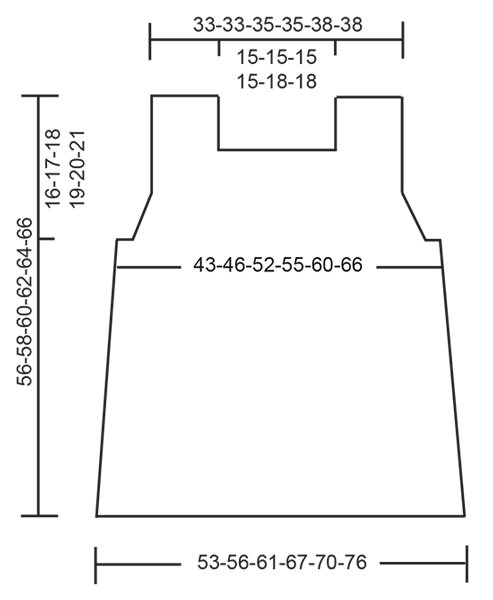
GARTER ST (back and forth): K all rows. 1 ridge = 2 rows K. PATTERN: See diagrams A.1 to A.7. The diagrams show all rows in pattern seen from RS. DECREASE TIP-1 (applies to sides of body): Dec inside 2 edge sts in garter st. All dec are done from RS! Dec as follows after 2 edge sts: K 2 tog. Dec as follows before 2 edge st: Beg 2 sts before edge st, slip 1 st as if to K, K 1, psso. DECREASE TIP-2 (applies to armholes): Dec inside 2 edge sts in garter st. All dec are done from RS! Dec as follows after 2 edge sts: Slip 1 st as if to K, K 1, psso. Dec as follows before 2 edge st: Beg 2 sts before edge sts and K 2 tog. ---------------------------------------------------------- TOP: Worked back and forth on needle in 2 parts. BACK PIECE: Cast on 111-117-129-141-147-159 sts on needle size 4 mm with Cotton Light. Work first row as follows from RS: 2 edge sts in GARTER ST - see explanation above, work pattern according to diagram A.1 until 3 sts remain on row, work 1st st in A.1 and finish with 2 edge sts in garter st - NOTE: On 7th row in A.1 K last st before edge sts. When A.1 has been worked, work next row as follows from RS: 2 edge sts in garter st, work pattern according to diagram A.2A over the next 18-21-27-33-36-42 sts (= 6-7-9-11-12-14 repetitions of 3 sts), work A.3 (=11 sts), insert 1 marker (= marker A), work pattern according to diagram A.4 over the next 48 sts (= 6 repetitions of 8 sts), work 1st st in A.4, insert 1 marker (= marker B – there are now 49 sts between markers), work A.3 (= 11 sts), work pattern according to diagram A.2B over the next 18-21-27-33-36-42 sts and finish with 2 edge sts in garter st. Continue pattern like this. NOTE: Continue A.2 and A.3 upwards outside of marker A and B up to armhole. Between marker A and B work a lace edge, no of sts between markers will vary upwards. READ ALL OF THE FOLLOWING SECTION BEFORE CONTINUING! PATTERN (applies to sts between marker A and B): When A.4 has been worked 1 time vertically, work pattern according to diagram A.5 as follows (continue sts before marker A and after marker B as before): Work A.5A (= 12 sts), repeat A.5B over the next 24 sts (= 2 repetitions of 12 sts) and finish with A.5C (= 13 sts). When A.5 has been worked 1 time vertically, work pattern according to A.4 again the same way as last time. Then work A.1 while AT THE SAME TIME on last row from RS dec 4 sts evenly in size S + M + L + XL and inc 2 sts evenly in size XXL + XXXL (between marker A and B) = 45-45-45-45-51-51 sts between markers. On next row from RS work A.6 as follows: Work A.6A (= 4 sts), repeat A.6B over the next 36-36-36-36-42-42 sts (= 6-6-6-6-7-7 repetitions of 6 sts) and finish with A.6C (= 5 sts). After A.6 work A.1 again AT THE SAME TIME on last row from RS dec 4-4-4-4-2-2 sts evenly = 41-41-41-41-49-49 sts between markers. After A.1 work A.4 again AT THE SAME TIME on last row from RS inc 2 sts in size XXL + XXXL = 41-41-41-41-51-51 sts between markers. Then work A.7 as follows: Work A.7A (= 5 sts), repeat A.7B over the next 30-30-30-30-40-40 sts (= 3-3-3-3-4-4 repetitions of 10 sts) and finish with A.7C (= 6 sts). On last row from RS in A.7 dec 2 sts evenly in size XXL + XXXL (do not dec in the other sizes) = 41-41-41-41-49-49 sts. After A.7 repeat A.4 and A.1 alternately up to neck dec. DECREASE IN THE SIDES: AT THE SAME TIME when piece measures 6 cm, dec 1 st in each side - READ DECREASE TIP-1! Repeat dec every 6-6-6-4-4-4 cm a total of 6-6-6-9-9-9 times - NOTE: Work sts that do not fit the pattern out towards the side in stocking st when dec. After dec in the sides, 12-15-21-24-27-33 sts remain in A.2 in each side. ARMHOLE: When piece measures 39-40-41-42-43-44 cm, work 2 ridges over the outermost 14-17-23-26-29-35 sts in each side (i.e. over all sts on outside of A.3 in each side - work the other sts as before). Then cast off the outermost 4-6-6-8-10-14 sts at beg of the next 2 rows for armholes. Continue pattern between marker A and B as explained above, continue A.3 on outside of marker A and B as before and work in garter st over the outermost 10-11-17-18-19-21 sts in each side. AT THE SAME TIME dec for armholes in each side every other row (i.e. every row from RS) as follows - READ DECREASE TIP-2: Dec 1 st 7-8-12-13-16-18 times in total. NECK: When piece measures approx. 50-50-54-54-54-54 cm - adjust after one whole repetition of A.1 or A.4 - cast off the middle 31-31-31-31-37-37 sts for neck and finish each shoulder separately. Continue A.3 as before with 5-5-5-5-6-6 edge sts in garter st towards the neck and 3-3-5-5-3-3 edge st in garter st towards the armhole. Continue until piece measures 56-58-60-62-64-66 cm and cast off. Repeat on the other shoulder. FRONT PIECE: Cast on and work as back piece. ASSEMBLY: Sew the shoulder seams. Sew side seams - sew edge to edge with 1 stitch in every st to get a flat seam. |
|||||||||||||||||||
Diagram explanations |
|||||||||||||||||||
|
|||||||||||||||||||
 |
|||||||||||||||||||
 |
|||||||||||||||||||
 |
|||||||||||||||||||
Have you finished this pattern?Tag your pictures with #dropspattern #ericasinglet or submit them to the #dropsfan gallery. Do you need help with this pattern?You'll find 18 tutorial videos, a Comments/Questions area and more by visiting the pattern on garnstudio.com. © 1982-2026 DROPS Design A/S. We reserve all rights. This document, including all its sub-sections, has copyrights. Read more about what you can do with our patterns at the bottom of each pattern on our site. |
|||||||||||||||||||


With over 40 years in knitting and crochet design, DROPS Design offers one of the most extensive collections of free patterns on the internet - translated to 17 languages. As of today we count 324 catalogues and 12267 patterns translated into English (UK/cm). 12267
We work hard to bring you the best knitting and crochet have to offer, inspiration and advice as well as great quality yarns at incredible prices! Would you like to use our patterns for other than personal use? You can read what you are allowed to do in the Copyright text at the bottom of all our patterns. Happy crafting!
Post a comment to pattern DROPS 169-20
We would love to hear what you have to say about this pattern!
If you want to leave a question, please make sure you select the correct category in the form below, to speed up the answering process. Required fields are marked *.