
Popular categories
Looking for a yarn?


Comments / Questions (31)
![]() Esther wrote:
Esther wrote:
Hallo, in het patroon lees ik, brei tussen markeerders A en B kanten randen. Wordt daar mee bedoelt kantsteken??
17.06.2017 - 09:00DROPS Design answered:
Hoi Esther, Excuses, er stond een typefout. Er moet staan: kantrand. Ik heb het aangepast. Veel haakplezier!
17.06.2017 - 20:26
![]() Brita Skyborg-Møller wrote:
Brita Skyborg-Møller wrote:
Kan den strikkes på rundp?
19.04.2017 - 09:13DROPS Design answered:
Hej Brita, Ja det kan den godt, men vi kan desværre ikke hjælpe dig med at skrive opskriften om, så hvis du kan det selv så er det helt fint :) God fornøjelse!
26.04.2017 - 16:24
![]() Chad Parmalee wrote:
Chad Parmalee wrote:
In pattern blocks 6 and 7, how do the repeats work when the sk2p is partially in the stitches outside the repeat? (ex. A6A, B, C 3rd and 7th rows; A7A, B, C 9th and 15th rows)
10.09.2016 - 16:52DROPS Design answered:
Dear Mrs Parmalee, On these row, work the last st from diagram A (= A.6A/A.7A) tog with the first 2 sts in next repeat of diagram B, then work the last st in diag. B tog with first st of next diagram B and at the end of row, tog with the first st of diagram C. Happy knitting!
12.09.2016 - 08:54
![]() Nancy Goldberg wrote:
Nancy Goldberg wrote:
How do we know how much ease there is in the pattern? Does this answer hold for all patterns or is each one different? Not sure what size to choose especially if in between sizes given Thank you
18.06.2016 - 05:19DROPS Design answered:
Dear Mrs Goldberg, you will find at the bottom of the pattern a measurement chart with all measurements in cm, taken flat from side to side. Compare these to a similar garment you have and like the shape to find out the matching size - read more here<. Happy knitting!
20.06.2016 - 08:39
![]() Annette wrote:
Annette wrote:
Jeg synes ikke rigtig maskeantallet passer. Jeg har købt det rigtige garn og slået 147 masker op til en str. xxl. I følge diagrammet skulle det passe med 70 cm i forstykket - det passer ikke, forstykket er 87 cm. bredt i en xxl - det er et helt villatelt - blot til orientering.
28.03.2016 - 21:45DROPS Design answered:
Hej, Hvis du har 21 m på 10 cm så bliver arbejdet også 70 cm i bredden. 147/2,1 = 70 cm. God fornøjelse!
31.03.2016 - 09:56
![]() Gunda Poll wrote:
Gunda Poll wrote:
Einfach fantastisch, diese Kollektion, wo soll ich nur anfangen, eins schöner als das andere, herrlich, danke, tausendmal danke!!!
10.02.2016 - 09:17
![]() DieAnne wrote:
DieAnne wrote:
Wenn ich am Vorder- und Rückteil jeweils an beiden Rändern eine der Randmaschen abziehe, könnte ich das Top dann bis zum Armausschnitt in Runden stricken? (Ich bin faul und habe gern möglichst wenige Nähte.)
01.02.2016 - 10:31DROPS Design answered:
Theoretisch ist das möglich, aber vielleicht kommen Sie dann mit dem Muster und den Seitenabnahmen durcheinander, das Muster ist ja nicht ganz einfach. Vielleicht geben Sie sich besser einen Ruck und nehmen die Nähte in Kauf, es sind ja auch nicht viele. :-)
07.02.2016 - 13:26
![]() Mandy Cabot wrote:
Mandy Cabot wrote:
Echoing the first comment, where are the diagrams for this pattern? Please advise, as I have already purchased the yarn.
29.01.2016 - 19:49DROPS Design answered:
Dear Mrs Cabot, diagrams and chart measurements are now visible. Happy knitting!
01.02.2016 - 09:11
![]() Irene Johnston wrote:
Irene Johnston wrote:
The charts aren't included with the pattern. Am I looking in the wrong place?
28.01.2016 - 17:29DROPS Design answered:
Dear Mrs Johnston, diagrams and measurement chart are now visible. Happy knitting!
01.02.2016 - 09:11
![]() Bonny wrote:
Bonny wrote:
Ich kann es kaum erwarten,diese Anleitung zu stricken.Ist wirklich wunderschön luftig und doch wirkt es ganz fein und ich werde es mit Seide stricken.
19.01.2016 - 11:04
|
|||||||||||||||||||
Erica Singlet#ericasinglet |
|||||||||||||||||||
|
|
|||||||||||||||||||
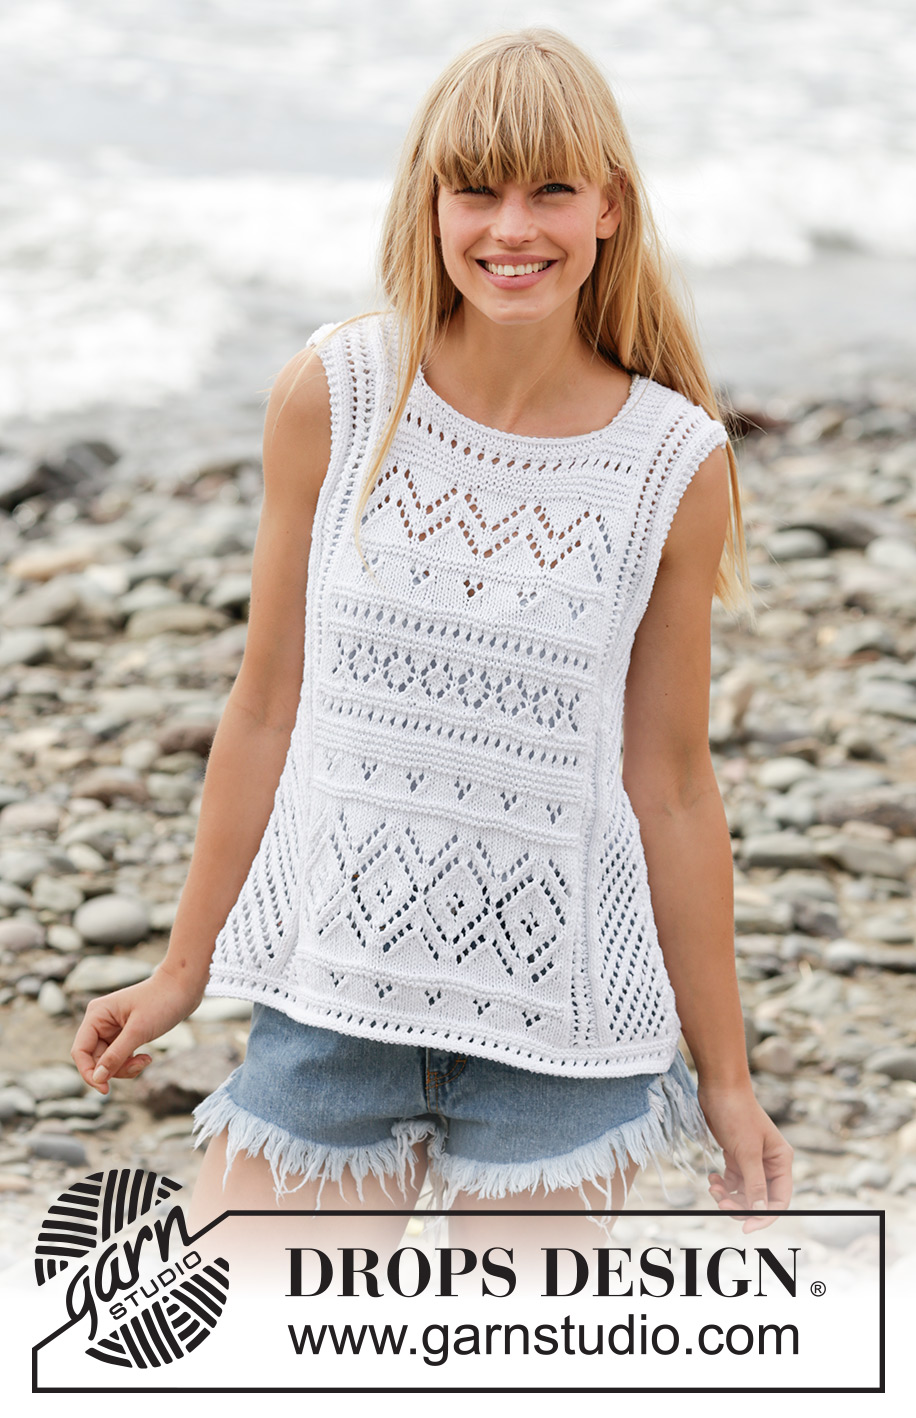
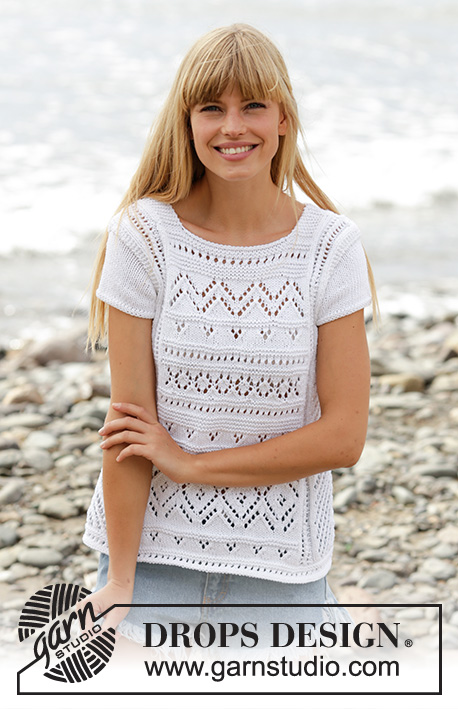
Knitted DROPS top with lace pattern and A-shape in ”Cotton Light”. Size: S - XXXL.
DROPS 169-20 |
|||||||||||||||||||
|
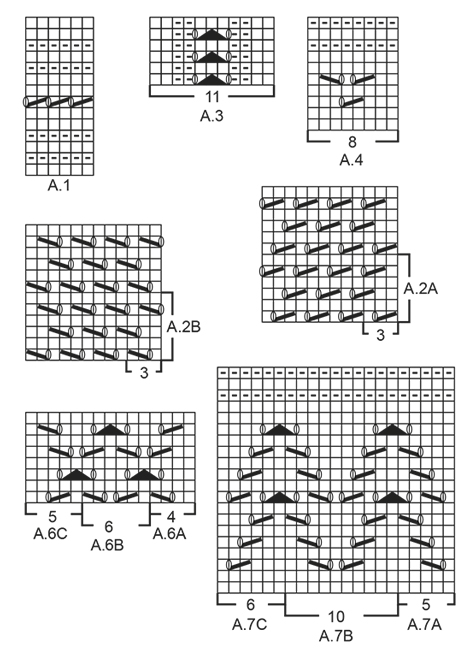
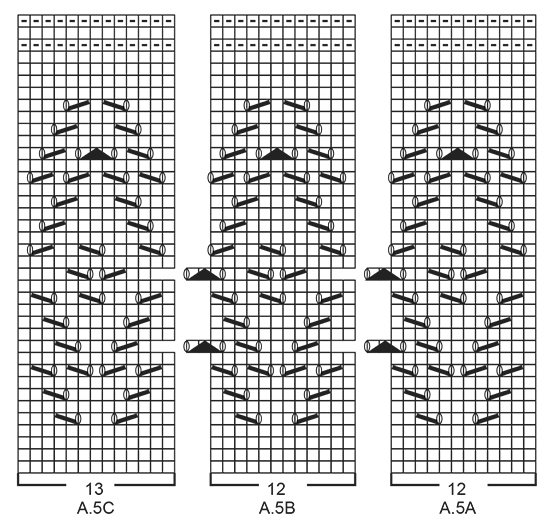
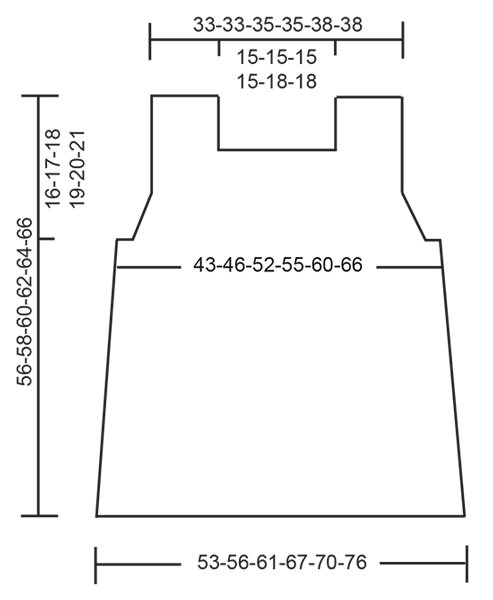
GARTER ST (back and forth): K all rows. 1 ridge = 2 rows K. PATTERN: See diagrams A.1 to A.7. The diagrams show all rows in pattern seen from RS. DECREASE TIP-1 (applies to sides of body): Dec inside 2 edge sts in garter st. All dec are done from RS! Dec as follows after 2 edge sts: K 2 tog. Dec as follows before 2 edge st: Beg 2 sts before edge st, slip 1 st as if to K, K 1, psso. DECREASE TIP-2 (applies to armholes): Dec inside 2 edge sts in garter st. All dec are done from RS! Dec as follows after 2 edge sts: Slip 1 st as if to K, K 1, psso. Dec as follows before 2 edge st: Beg 2 sts before edge sts and K 2 tog. ---------------------------------------------------------- TOP: Worked back and forth on needle in 2 parts. BACK PIECE: Cast on 111-117-129-141-147-159 sts on needle size 4 mm with Cotton Light. Work first row as follows from RS: 2 edge sts in GARTER ST - see explanation above, work pattern according to diagram A.1 until 3 sts remain on row, work 1st st in A.1 and finish with 2 edge sts in garter st - NOTE: On 7th row in A.1 K last st before edge sts. When A.1 has been worked, work next row as follows from RS: 2 edge sts in garter st, work pattern according to diagram A.2A over the next 18-21-27-33-36-42 sts (= 6-7-9-11-12-14 repetitions of 3 sts), work A.3 (=11 sts), insert 1 marker (= marker A), work pattern according to diagram A.4 over the next 48 sts (= 6 repetitions of 8 sts), work 1st st in A.4, insert 1 marker (= marker B – there are now 49 sts between markers), work A.3 (= 11 sts), work pattern according to diagram A.2B over the next 18-21-27-33-36-42 sts and finish with 2 edge sts in garter st. Continue pattern like this. NOTE: Continue A.2 and A.3 upwards outside of marker A and B up to armhole. Between marker A and B work a lace edge, no of sts between markers will vary upwards. READ ALL OF THE FOLLOWING SECTION BEFORE CONTINUING! PATTERN (applies to sts between marker A and B): When A.4 has been worked 1 time vertically, work pattern according to diagram A.5 as follows (continue sts before marker A and after marker B as before): Work A.5A (= 12 sts), repeat A.5B over the next 24 sts (= 2 repetitions of 12 sts) and finish with A.5C (= 13 sts). When A.5 has been worked 1 time vertically, work pattern according to A.4 again the same way as last time. Then work A.1 while AT THE SAME TIME on last row from RS dec 4 sts evenly in size S + M + L + XL and inc 2 sts evenly in size XXL + XXXL (between marker A and B) = 45-45-45-45-51-51 sts between markers. On next row from RS work A.6 as follows: Work A.6A (= 4 sts), repeat A.6B over the next 36-36-36-36-42-42 sts (= 6-6-6-6-7-7 repetitions of 6 sts) and finish with A.6C (= 5 sts). After A.6 work A.1 again AT THE SAME TIME on last row from RS dec 4-4-4-4-2-2 sts evenly = 41-41-41-41-49-49 sts between markers. After A.1 work A.4 again AT THE SAME TIME on last row from RS inc 2 sts in size XXL + XXXL = 41-41-41-41-51-51 sts between markers. Then work A.7 as follows: Work A.7A (= 5 sts), repeat A.7B over the next 30-30-30-30-40-40 sts (= 3-3-3-3-4-4 repetitions of 10 sts) and finish with A.7C (= 6 sts). On last row from RS in A.7 dec 2 sts evenly in size XXL + XXXL (do not dec in the other sizes) = 41-41-41-41-49-49 sts. After A.7 repeat A.4 and A.1 alternately up to neck dec. DECREASE IN THE SIDES: AT THE SAME TIME when piece measures 6 cm, dec 1 st in each side - READ DECREASE TIP-1! Repeat dec every 6-6-6-4-4-4 cm a total of 6-6-6-9-9-9 times - NOTE: Work sts that do not fit the pattern out towards the side in stocking st when dec. After dec in the sides, 12-15-21-24-27-33 sts remain in A.2 in each side. ARMHOLE: When piece measures 39-40-41-42-43-44 cm, work 2 ridges over the outermost 14-17-23-26-29-35 sts in each side (i.e. over all sts on outside of A.3 in each side - work the other sts as before). Then cast off the outermost 4-6-6-8-10-14 sts at beg of the next 2 rows for armholes. Continue pattern between marker A and B as explained above, continue A.3 on outside of marker A and B as before and work in garter st over the outermost 10-11-17-18-19-21 sts in each side. AT THE SAME TIME dec for armholes in each side every other row (i.e. every row from RS) as follows - READ DECREASE TIP-2: Dec 1 st 7-8-12-13-16-18 times in total. NECK: When piece measures approx. 50-50-54-54-54-54 cm - adjust after one whole repetition of A.1 or A.4 - cast off the middle 31-31-31-31-37-37 sts for neck and finish each shoulder separately. Continue A.3 as before with 5-5-5-5-6-6 edge sts in garter st towards the neck and 3-3-5-5-3-3 edge st in garter st towards the armhole. Continue until piece measures 56-58-60-62-64-66 cm and cast off. Repeat on the other shoulder. FRONT PIECE: Cast on and work as back piece. ASSEMBLY: Sew the shoulder seams. Sew side seams - sew edge to edge with 1 stitch in every st to get a flat seam. |
|||||||||||||||||||
Diagram explanations |
|||||||||||||||||||
|
|||||||||||||||||||
 |
|||||||||||||||||||
 |
|||||||||||||||||||
 |
|||||||||||||||||||
Have you finished this pattern?Tag your pictures with #dropspattern #ericasinglet or submit them to the #dropsfan gallery. Do you need help with this pattern?You'll find 18 tutorial videos, a Comments/Questions area and more by visiting the pattern on garnstudio.com. © 1982-2026 DROPS Design A/S. We reserve all rights. This document, including all its sub-sections, has copyrights. Read more about what you can do with our patterns at the bottom of each pattern on our site. |
|||||||||||||||||||


With over 40 years in knitting and crochet design, DROPS Design offers one of the most extensive collections of free patterns on the internet - translated to 17 languages. As of today we count 324 catalogues and 12267 patterns translated into English (UK/cm). 12267
We work hard to bring you the best knitting and crochet have to offer, inspiration and advice as well as great quality yarns at incredible prices! Would you like to use our patterns for other than personal use? You can read what you are allowed to do in the Copyright text at the bottom of all our patterns. Happy crafting!
Post a comment to pattern DROPS 169-20
We would love to hear what you have to say about this pattern!
If you want to leave a question, please make sure you select the correct category in the form below, to speed up the answering process. Required fields are marked *.