
Popular categories
Looking for a yarn?


Comments / Questions (50)
![]() Ruta wrote:
Ruta wrote:
Hi, when i have to switch needle size from 2.5mm to 3mm do i however work the band with 2.5mm or do i work the band from there on with 3mm needle?
10.05.2019 - 09:55DROPS Design answered:
Dear Ruta, continue working the front band stitches with the needle size 3 mm, as other stitches on row. Happy knitting!
10.05.2019 - 11:14
![]() Lenia wrote:
Lenia wrote:
Could you please explain A.1A each step.
03.09.2018 - 19:35DROPS Design answered:
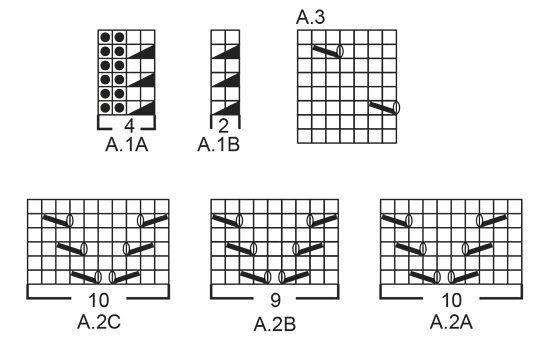
Hi Lenia, A.1 is repeated on the row. Each A.1 consists of 4 stitches and is read from bottom right to left and upwards. So row 1 repeats: 'place 1 stitch on cable needle at back of piece, knit 1, knit 1 from cable needle, purl 2'. Repeat these 4 stitches to end of row. Then row 2 is knit 2, purl 2 and row 3 is the same as row 1 etc. I hope this helps and happy knitting!
04.09.2018 - 08:04
![]() Lenia wrote:
Lenia wrote:
Please explain what this means: (includes 7 band sts each side towards mid front)
11.08.2018 - 18:17DROPS Design answered:
Dear Lena, in this pattern you have 7 sts on each side for bands, and they're counted in the number of stitches that you have to cast on. Happy knitting!
12.08.2018 - 17:14
![]() Liselotte Lundqvist wrote:
Liselotte Lundqvist wrote:
Når jeg ser på billedet så syntes jeg der ligner at ribben er ca 8-10 cm ..inden der strikkes vidre med mønster..er det forkert set
30.04.2018 - 20:37
![]() Alice wrote:
Alice wrote:
Kan dit patroon ook met rechte naalden gebreit worden?
12.04.2018 - 09:53DROPS Design answered:
Hallo Alice, Ja dat kan. Kijk wel even goed hoe je uitkomt met het kantpatroon in de zijnaden. Via deze link vind je meer informatie over hoe je een patroon aanpast om met rechte naalden te breien. Succes!
21.04.2018 - 13:46
![]() Jeanneke wrote:
Jeanneke wrote:
Bij de beschrijving van het rechtervoorpand staat vermeld dat je moet afkanten voor het armsgat, aan het begin van elke nld aan de zijkant als op het achterpand?? Er staat niet vermeld hoeveel steken en in welke pen af te kanten, dit staat wél beschreven bij het achterpand. Zijn jullie vergeten de afhechtingen te benoemen? Kan ik de afhechtingen voor het armsgat zoals beschreven bij het achterpand aanhouden?
05.01.2018 - 23:12DROPS Design answered:
Hoi Jeanneke, Het afkanten op de voorpanden doe je op precies dezelfde manier als op de achterpanden, zodat je dezelfde ronding erin hebt. Dus kant af net zoals op het achterpand.
08.01.2018 - 09:58
![]() Geeta wrote:
Geeta wrote:
What will be the bust measurement in inches/cms for S M L etc sizes? thank you.
16.06.2016 - 06:12DROPS Design answered:
Dear Geeta, you will find a measurement chart at the bottom of the pattern with all measurements for each size in cm - taken flat from side to side. Convert into inch and read more about sizing here. Happy knitting!
16.06.2016 - 08:49
![]() Johane wrote:
Johane wrote:
Je suis incapable d imprimer le diagramme merci de m aider johane
26.03.2016 - 00:25DROPS Design answered:
Bonjour Johanne, un test nous a permis d'imprimer les diagrammes en page 6/8 des explications. Bon tricot!
29.03.2016 - 08:42
![]() Loredana wrote:
Loredana wrote:
Quindi il motivo risulta più alto sul dietro.... Grazie ancora Loredana
26.02.2016 - 10:21DROPS Design answered:
Buongiorno Loredana. Sì esatto: sul dietro ripete il motivo 5 volte in verticale; sul davanti 4 volte in verticale. Buon lavoro!
26.02.2016 - 11:53
![]() Loredana wrote:
Loredana wrote:
Buongiorno, Le spiegazioni per il dietro sono: 2 m rasata, A2C × 8 volte (80 m), A2B x 1 volta (9 maglie), 2 m rasata (totale = 93 m). Quindi le ripetizioni sono 9...o sbaglio? Comunque, scalando di volta in volta un motivo da entrambi i lati, le ripetizioni totali in verticale sarebbero 5! Grazie Loredana
26.02.2016 - 07:55DROPS Design answered:
Buongiorno Loredana. Chiediamo scusa. E' corretto come dice lei. Le ripetizioni sul dietro sono 9 e le ripetizioni in verticale sono 5. Grazie e buon lavoro!
26.02.2016 - 09:28
|
|||||||||||||||||||
Spring Fling#springflingbolero |
|||||||||||||||||||
 |
 |
||||||||||||||||||
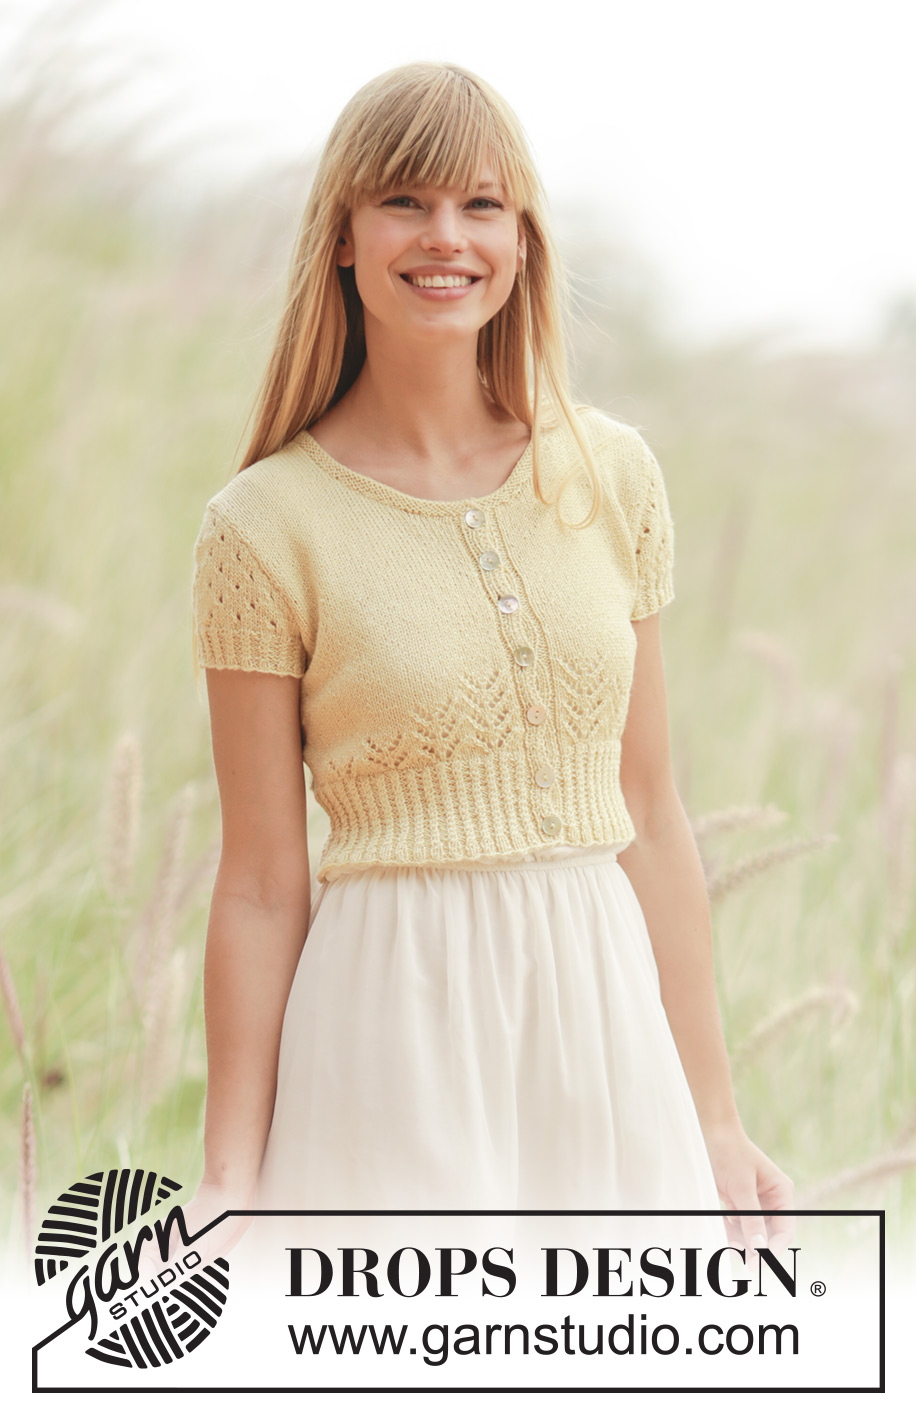
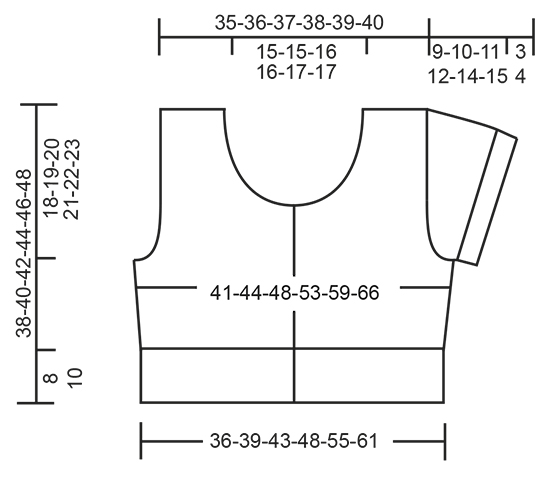
Knitted DROPS bolero with lace pattern and small cables in ”Alpaca”. Size: S - XXXL.
DROPS 169-11 |
|||||||||||||||||||
|
GARTER ST (back and forth): K all rows. 1 ridge = 2 rows K. PATTERN: See diagrams A.1 to A.3. The diagrams show all rows in pattern seen from RS. INCREASE TIP: All inc are done from RS as follows: Work until 2 sts remain before marker, make 1 YO, K 4 (marker is in the middle of these 4 sts), make 1 YO. On next row (= WS) P YOs twisted to avoid holes. DECREASE TIP: To calculate how often dec should be done, use the total no of sts on row (e.g. 232 sts), minus bands (e.g. 14 sts) and divide the remaining sts by no of dec to be done (e.g. 47) = 4.6. I.e. in this example work alternately every third and fourth st and every fourth and fifth st tog (do not dec over bands). BUTTONHOLES: Dec for buttonholes on right band. 1 button hole = K third and fourth st from mid front twisted tog and make 1 YO, on next row work YO in rib. Dec for buttonholes when piece measures: SIZE S: 2, 7, 11, 15, 19, 23 and 27 cm SIZE M: 2, 7, 12, 17, 21, 25 and 29 cm SIZE L: 2, 7, 12, 17, 21, 25 and 29 cm SIZE XL: 2, 7, 12, 17, 22, 27 and 31 cm SIZE XXL: 2, 7, 12, 17, 22, 27 and 31 cm SIZE XXXL: 2, 8, 13, 18, 23, 28 and 33 cm ---------------------------------------------------------- BODY: Worked back and forth on circular needle from mid front. Cast on 232-256-280-312-356-392 sts (incl 7 band sts each side towards mid front) on circular needle size 2.5 mm with Alpaca. P 1 row from WS. Work next row as follows from RS: 2 edge sts in garter st, K 1, P 1, K 1, P 2 (= 7 band sts), * K 2, P 2 * repeat from *-* until 9 sts remain on needle, finish with K 2 and 7 band sts as follows: P 2, K 1, P 1, K 1, 2 edge sts in garter st. Continue rib like this for 2 cm – remember BUTTONHOLES on right band – see explanation above. Work next row as follows from RS: 7 band sts as before, work pattern according to diagram A.1A until 9 sts remain, work A.1B (= 2 sts) and finish with 7 band sts as before. Continue the pattern like this until piece measures 8-8-8-10-10-10 cm. Now K 1 row from RS while dec 47-55-59-67-79-83 sts evenly - READ DECREASE TIP = 185-201-221-245-277-309 sts. Switch to circular needle size 3 mm and P 1 row (continue bands as before). Insert 1 marker 50-54-59-65-73-81 sts in from each side (= 85-93-103-115-131-147 sts between markers on back piece). Work next row as follows from RS: 7 band sts as before, work pattern according to diagram A.2A over the next 40-40-50-50-60-70 sts (= 4-4-5-5-6-7 repetitions of 10 sts), work 3-7-2-8-6-4 sts in stocking st, marker, work 8-2-7-3-1-9 sts in stocking st, work pattern according to diagram A.2C over the next 60-80-80-100-120-120 sts (= 6-8-8-10-12-12 repetitions of 10 sts), work A.2B 1 time (= 9 sts), 8-2-7-3-1-9 sts in stocking st, marker, 3-7-2-8-6-4 sts in stocking st, pattern according to diagram A.2C over the next 40-40-50-50-60-70 sts and finish with 7 band sts as before. READ ALL OF THE FOLLOWING SECTION BEFORE CONTINUING AND REMEMBER THE KNITTING TENSION! PATTERN: Continue with pattern and in stocking st until 1 repetition has been worked vertically. Now work pattern the same way but over 1 repetition less towards the markers in the side, i.e. work A.2A 3-3-4-4-5-6 times in total, work 13-17-12-18-16-14 sts in stocking st, marker, 18-12-17-13-11-19 sts in stocking st, A.2C 4-6-6-8-10-10 times in total, A.2B 1 time, 18-12-17-13-11-19 sts in stocking st, marker, 13-17-12-18-16-14 sts in stocking st, A.2C 3-3-4-4-5-6 times in total. Continue the pattern like this by working over 1 repetition les towards the markers in the sides until 1 repetition has been worked over last repetition mid front and mid back. Then work in stocking st over all sts until finished measurements. SIDE INC: AT THE SAME TIME when piece measures 10-10-10-12-12-12 cm, inc 1 st on each side of markers in the sides (= 4 sts inc). Repeat inc every 1½-1½-2-2-2½-2½ cm 6-6-6-6-5-5 times in total = 209-225-245-269-297-329 sts. ARMHOLE: When piece measures 20-21-22-23-24-25 cm, work next row as follows: Work 53-57-61-67-73-81 sts as before (= front piece), cast off 6-6-8-8-10-10 sts for armhole, work 91-99-107-119-131-147 sts as before (= back piece), cast off 6-6-8-8-10-10 sts for armhole, work the remaining 53-57-61-67-73-81 sts as before (= front piece). Finish fronts and back piece separately. BACK PIECE: = 91-99-107-119-131-147 sts. Continue with stocking st back and forth and cast off for armholes at beg of every row in each side as follows: Cast off 3 sts 0-0-0-1-1-2 times, 2 sts 1-2-3-4-5-6 times and 1 st 1-2-3-3-6-7 times = 85-87-89-91-93-97 sts remain on needle. When piece measures 36-38-40-42-44-46 cm, cast off the middle 33-33-35-35-37-37 sts for neck and finish each shoulder separately. Continue to cast off 1 st at beg of the next 2 rows from neck = 24-25-25-26-26-28 sts remain on the shoulder. Continue to work until piece measures 38-40-42-44-46-48 cm and loosely cast off. RIGHT FRONT PIECE: = 53-57-61-67-73-81 sts. Continue in stocking st back and forth on circular needle with 7 band sts towards mid front as before and cast off for armhole at beg of every row from the side as on back piece. AT THE SAME TIME when piece measures 28-30-30-32-32-34 cm, slip the first 12-12-13-13-14-14 sts at beg of row from mid front on 1 stitch holder for neck (work them before slipping them on stitch holder to avoid cutting the yarn). Continue to cast off for neck at the beg of every row from mid front as follows: Cast off 3 sts 1 time, 2 sts 4 times, and 1 st 3 times. After all cast off for armhole and dec for neck, 24-25-25-26-26-28 sts remain on shoulder. Continue to work until piece measures 38-40-42-44-46-48 cm and loosely cast off. LEFT FRONT PIECE: Work as right front piece but reversed - NOTE: Do not dec for buttonholes on left front piece. SLEEVE: Worked in the round on double pointed needles, switch to circular needle when sleeve cap beg. Cast on 76-80-88-92-100-108 sts on double pointed needles size 2.5 mm with Alpaca. K 1 round. Then work rib = K 2/P 2. When piece measures 1 cm, work pattern in the round according to diagram A.1A. When piece measures 3-3-3-4-4-4 cm, work next round as follows: Cast off the first 3-3-4-4-5-5 sts, K 70-74-80-84-90-98 and cast off the last 3-3-4-4-5-5 sts. Switch to circular needle size 3 mm and work pattern back and forth on circular needle according to diagram A.3. AT THE SAME TIME cast off for sleeve cap at beg of every row in each side as follows: Cast off 2 sts 3-4-4-4-4-5 times and 1 st 6-7-9-9-12-12 times. Then cast off 2 sts at beg of every row in each side until piece measures 11-12-13-15-17-18 cm. Cast off 3 sts at beg of the next 2 rows before loosely casting off remaining sts, sleeve measures approx. 12-13-14-16-18-19 cm. Knit another sleeve. ASSEMBLY: Sew the shoulder seams. Sew in sleeves. NECK EDGE: Pick up from RS on circular needle size 2.5 mm approx. 118 to 138 sts around the neck (incl sts on stitch holders at the front). K 5 rows and then loosely cast off with K from RS. Sew the buttons on to left front piece. |
|||||||||||||||||||
Diagram explanations |
|||||||||||||||||||
|
|||||||||||||||||||
 |
|||||||||||||||||||
 |
|||||||||||||||||||
Have you finished this pattern?Tag your pictures with #dropspattern #springflingbolero or submit them to the #dropsfan gallery. Do you need help with this pattern?You'll find 27 tutorial videos, a Comments/Questions area and more by visiting the pattern on garnstudio.com. © 1982-2026 DROPS Design A/S. We reserve all rights. This document, including all its sub-sections, has copyrights. Read more about what you can do with our patterns at the bottom of each pattern on our site. |
|||||||||||||||||||


With over 40 years in knitting and crochet design, DROPS Design offers one of the most extensive collections of free patterns on the internet - translated to 17 languages. As of today we count 324 catalogues and 12267 patterns translated into English (UK/cm). 12267
We work hard to bring you the best knitting and crochet have to offer, inspiration and advice as well as great quality yarns at incredible prices! Would you like to use our patterns for other than personal use? You can read what you are allowed to do in the Copyright text at the bottom of all our patterns. Happy crafting!
Post a comment to pattern DROPS 169-11
We would love to hear what you have to say about this pattern!
If you want to leave a question, please make sure you select the correct category in the form below, to speed up the answering process. Required fields are marked *.