
Popular categories
Looking for a yarn?


Comments / Questions (24)
![]() Lise wrote:
Lise wrote:
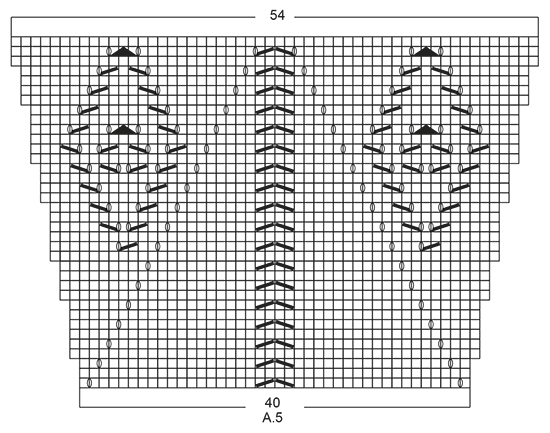
Je suis dans le modèle 170-12 ,dans la séquence A5 et cela fait trois fois que je détricote le troisième rang. Je comprends qu’il ne faut pas faire les augmentations,mais dans A4, A6 et A7 il y a des mailles glissé et des mailles tricoter ensemble. Donc ma question est les augmentations ont les fait plus mais les diminutions elles oui?
07.06.2018 - 12:00DROPS Design answered:
Bonjour Lise, tricotez les diagrammes comme indiqué: 3 m point mousse, A.4 (= 3 m), *A.5 (= 40 m), A.6 (= 5 m) *, répétez de *-* encore 4 fois, terminez par A.5, A.7 (= 3 m) et 3 m point mousse. Les augmentations vont se faire dans A.4, A.6 et A.7 mais sont reportées au rang suivant sur les diagrammes A.5. Veillez à toujours bien tricoter A.4 et A.7 sur les mêmes 3 mailles et A.6 sur les mêmes 5 mailles (= pour que les jours soient bien alignés). Bon tricot!
07.06.2018 - 13:26
![]() Lorraine wrote:
Lorraine wrote:
Autre question 170-12 je suis à la section A.5 première section il me faut 48 mailles et j'en ai que 45 comment j'intègre le A.4 car il me faut 45 mailles pour le A.5A.6 et j'aurai le même problème à la fin pour A.7 merci
19.08.2017 - 04:14DROPS Design answered:
Bonjour Lorraine. Avant de commencer le diagramme A.5, vous avez 277 m. Vous tricotez le rang suivant ainsi: 3 m point mousse, A.4 1 fois (=3 m), vous répétez A.5 (=40m) + A.6 (=5 m) 5 fois en total, puis A.5 (40 m), A.7 (3m) et enfin 3 m point mousse. En total : 3+3+(40+5)*5+40+3+3= 277 m. Bon tricot.
20.08.2017 - 17:14
![]() Lorraine wrote:
Lorraine wrote:
Je fais le modèle 170-12 présentement et je voulais savoir si je comprends bien je suis à la séquence A.5 je pense que l'on exécute A.4 A.5A.6 A.5A.6 A.5A.6 A.5A.6 A.5A.6 A.5 A.7 alors ma question que si je calcule le nombre de mailles je n'arrive pas au même nombre qu'indiqué à la fin ceci doit me donner 361 et j'ai 301 je voudrais savoir ce qui me manque merci.
19.08.2017 - 02:06DROPS Design answered:
Bonjour Lorraine. Après avoir tricoté le diagramme A.5 1 fois en verticale, vous avez 54 m dans le diagramme A.5. Vous avez pourtant: 3 m point mousse, A.4 (=3 m), A.5 (= 54 m) + A.6 (=5 m) 5 fois en total, A.5 (54 m), A.7 (3m) et enfin 3 m point mousse. En total : 3+3+(54+ 5)*5+54+3+3= 361 m. Bon tricot.
20.08.2017 - 17:21
![]() Bonita wrote:
Bonita wrote:
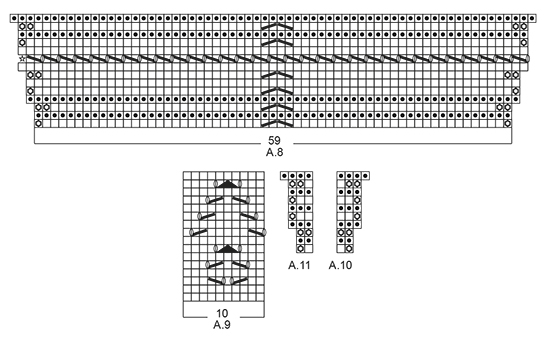
I am having trouble starting A10 and A11
11.06.2017 - 00:45DROPS Design answered:
Hi Bonita, A.10 and A.11 are only 2 stitches in width on the first row, knit from right side and purl from wrong side (in A.10 you start with knit from the right side and in A.11 you start with purl from wrong side. To start A.10, work 3 stitches in garter stitch, then A.10, then garter stitch until 2 stitches are left before the marker, decrease as before, garter stitch until 2 stitches before marker, the A.11 (2 stitches) followed by A.10 as you have started on your repeat and so on....Continue like this upwards according to A.10 and A.11. I hope this helps, Kind regards, Deirdre
12.06.2017 - 12:58Eleni Sideri wrote:
Where we use A5 in this pattern?
23.11.2016 - 10:16DROPS Design answered:
Hi Eleni, the English version should be corrected. Please see the US language version. When the piece measures approx. 38 cm, you will start A.5. Happy knitting!
24.11.2016 - 18:48
![]() Kathy Griffin wrote:
Kathy Griffin wrote:
Thank you for your answers to my questions. They were most helpful. My misunderstanding was to do with the explanation at the beginning of the pattern which states: INCREASE TIP: Inc 1 St by making 1 YO, on next row work YO twisted to avoid holes. I assumed that I should follow this, even when following the charts. I guess that it simply applied to the start of the chart as you increased from 6 St to 18 St.
04.10.2016 - 18:55Kathy Griffin wrote:
When working 2 stitches in one stitch, do you knit and then purl the same stitch? Thanks, Kathy from Canada
03.10.2016 - 19:43DROPS Design answered:
Dear Mrs Griffin, if you click on the video tab, on the top under the pattern title, next to the materials, you can find all the video related to this pattern. In particular, you can work 2 sts in 1 st knitting the same st in the front and in the back loop. Happy knitting!
04.10.2016 - 08:37Vicki wrote:
There is an error late in this pattern when starting the section with A.9. It says " Inc made in A.4/A.6/A.7 are drawn as extra sts in **A.5** so that the patterns align.". There is no A.5 is this section. Can you please confirm that directions should read : inc made in A.4/A.6/A.7 are drawn in as extra sts on each side of the 60 stitch blocks of A.9 as stocking stitch. Thanks.
19.09.2016 - 17:27DROPS Design answered:
Dear Vicki, you are correct, the extra sts not included in A.4/A.6 and A.7 should be worked in stocking st. Happy knitting!
06.10.2016 - 13:06
![]() Gardien wrote:
Gardien wrote:
Bonjour Comme Christine, je suis bloquée dans la même section. Si je comprends bien, je ne m'occupe pas des augmentations faites dans A4,A6 et A7. Elles sont tricotées en jersey le rang suivant. Merci de m'eclairer. Ça fait 3 fois que je detricote le 3ème rang de A9
15.06.2016 - 18:28DROPS Design answered:
Bonjour Mme Gardien, les augmentations faites dans A.4/A.6 et dans A.6/A.7 (= de chaque côté d'un motif de A.5) sont dans le diagramme A.5, vous pouvez placer un marqueur entre chaque diagramme pour bien vous repérer et ainsi continuer les diagrammes comme indiqués. Bon tricot!
16.06.2016 - 08:42
![]() Christine wrote:
Christine wrote:
Bonjour, ce modèle de châle est magnifique, j'ai quasiment fini de le tricoter, le résultat est splendide mais je ne comprends pas l'explications de l'avant dernière section, celle qui utilise les diagrammes A4, A9, A6 et A7. Pouvez-vous me donner leur succession de manière claire ? Je vous remercie d'avance pour votre réponse et vos superbes modèles :-)
16.02.2016 - 11:20DROPS Design answered:
Bonjour Christine et merci. Tricotez les diagrammes dans l'ordre indiqué, en alignant bien tous les diagrammes les uns au-dessus des autres au fur et à mesure, c'est-à-dire que les augmentations faites dans A.4/A.6 et A.7 vont s'intercaler entre les diagrammes (tricotez les en jersey). Placez un marqueur entre chaque diagramme pour bien repérer ces augm. et bien aligner les motifs les uns au-dessus des autres sans les décaler. Bon tricot!
16.02.2016 - 12:58
|
|||||||||||||||||||||||||
Spring Splendor#springsplendorscarf |
|||||||||||||||||||||||||
|
|
|||||||||||||||||||||||||
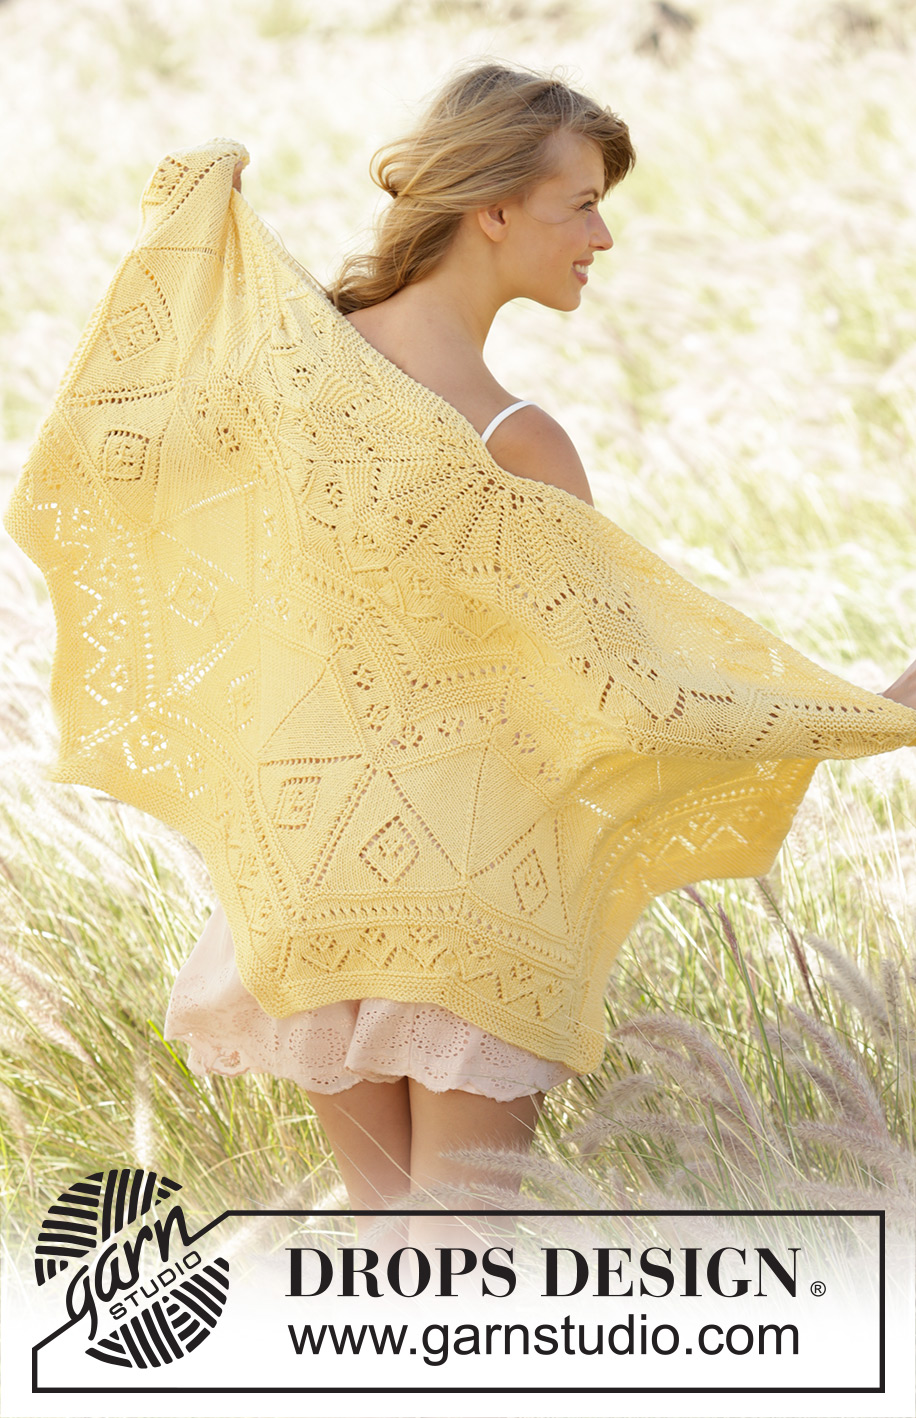
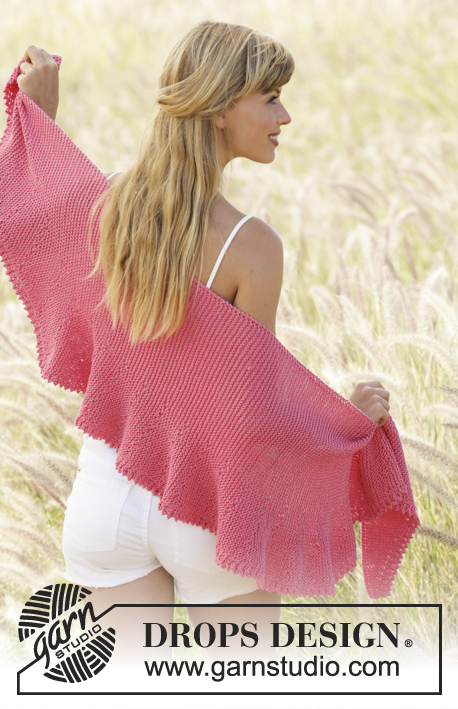
Knitted DROPS shawl in garter st with lace pattern and zig zag pattern in ”Cotton Merino”
DROPS 170-12 |
|||||||||||||||||||||||||
|
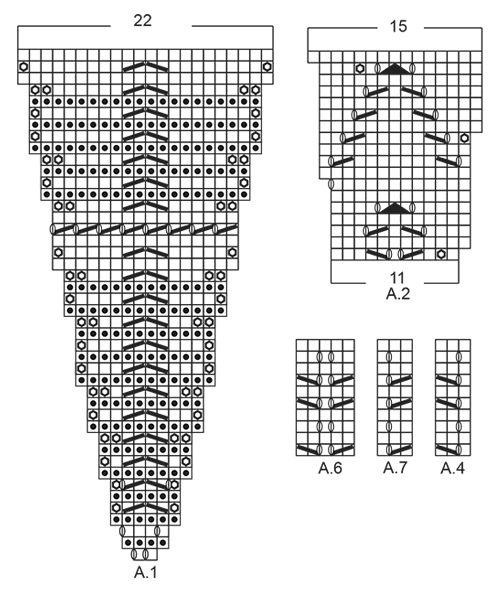
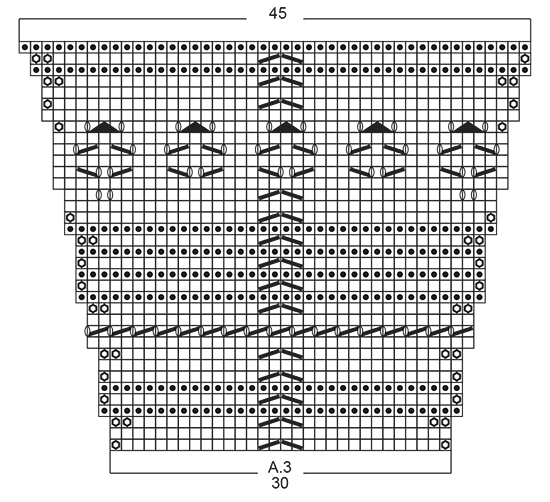
PATTERN: See diagrams A.1 to A.11. The diagrams show all rows in pattern seen from RS. GARTER ST (back and forth): K all rows. 1 ridge = 2 rows K. INCREASE TIP: Inc 1 st by making 1 YO, on next row work YO twisted to avoid holes. ---------------------------------------------------------- SHAWL: Worked back and forth, top down. Cast on 6 sts on circular needle size 4.5 mm with Cotton Merino. Work 3 ridges in GARTER ST - see explanation above, and inc 4 sts evenly on every row from RS - READ INCREASE TIP = 18 sts. Work next row as follows from RS: Work 3 sts in GARTER ST – see explanation above, insert 1 marker, * A.1 (= 2 sts), insert 1 marker *, repeat from *-* 5 more times, finish with 3 sts in garter st = 7 markers in piece. Move the markers upwards when working. Continue with A.1 and 3 sts in garter st in each side of piece. REMEMBER THE KNITTING TENSION When A.1 has been worked 1 time vertically, there are 138 sts on needle. Work next row as follows from RS: 3 sts in garter st, A.2 (= 11 sts) until 3 sts remain (= 12 times in width), finish with 3 sts in garter st. When A.2 has been worked 1 time vertically, there are 186 sts on needle. Work next row as follows from RS: 3 sts in garter st, A.3 (= 30 sts) until 3 sts remain (= 6 times in width), finish with 3 sts in garter st. On last row from RS in A.3 inc 1 st with a YO after the 3 sts in garter st at the beg of row. When A.3 has been worked 1 time vertically, there are 277 sts on needle. Piece measures approx. 38 cm on the longest (measured along the middle). Work next row as follows from RS: 3 sts in garter st, work A.4 (= 3 sts), * A.5 (= 40 sts), A.6 (= 5 sts) *, repeat from *-* 4 more times, work A.5, A.7 (= 3 sts), finish with 3 sts in garter st. Inc in A.4/A.6/A.7 is drawn in A.5 so that the pattern fits. Repeat A.4/A.6/A.7 vertically until A.5 has been worked 1 time vertically. When A.5 has been worked 1 time vertically, there are 361 sts on needle. Piece measures approx. 53 cm on the longest (measured along the middle). Work as follows from RS: 3 sts in garter st, 1 st in garter st (this st is worked in garter st when working in garter st in A.8 and in stocking st when working in stocking st in A.8), repeat A.8 (= 59 sts) until 3 sts remain (= 6 times in width), finish with 3 sts in garter st. NOTE: Eyelet row in A.8 does not fit in diagram but fits in total on row, first st after 3 sts in garter st should be work in stocking st from RS. On last row from RS insert 1 marker thread in the middle of every repetition of A.8, i.e. between: Slip 1 st as if to K, K 1, psso, insert 1 marker and K 2 tog. Move the marker threads upwards when working. When A.8 has been worked 1 time vertically, there are 397 sts on needle. Piece measures approx. 58 cm on the longest (measured along the middle). Work as follows on next row from RS: 3 sts in garter st, A.4 over the next 3 sts, * repeat A.9 (= 10 sts) 6 times in total in width, A.6 over the next 5 sts *, repeat from *-* 4 more times, repeat A.9 (= 10 sts) 6 times in total, A.7 over the next 3 sts, finish with 3 sts in garter st. Inc made in A.4/A.6/A.7 are worked in stocking st. Repeat A.4/A.6/A.7 vertically (make sure that A.4/A.6/A.7 are come above itself) until A.9 has been worked 1 time vertically. When A.9 has been worked 1 time vertically, there are 433 sts on needle. Piece measures approx. 65 cm on the longest (measured along the middle). Then work piece in garter st as follows from RS: Work 3 sts in garter st, * A.10 (= 2 sts), work in garter st until 2 sts remain before marker thread, dec as before (i.e. slip 1 st as if to K, K 1, psso, K the next 2 tog), work in garter st until 2 sts remain before marker, work A.11 over the next 2 sts *, repeat from *-* until 3 sts remain, finish with 3 sts in garter st. Continue like this until piece measures 70 cm on the longest part. Loosely cast off. |
|||||||||||||||||||||||||
Diagram explanations |
|||||||||||||||||||||||||
|
|||||||||||||||||||||||||
 |
|||||||||||||||||||||||||
 |
|||||||||||||||||||||||||
 |
|||||||||||||||||||||||||
 |
|||||||||||||||||||||||||
Have you finished this pattern?Tag your pictures with #dropspattern #springsplendorscarf or submit them to the #dropsfan gallery. Do you need help with this pattern?You'll find 18 tutorial videos, a Comments/Questions area and more by visiting the pattern on garnstudio.com. © 1982-2026 DROPS Design A/S. We reserve all rights. This document, including all its sub-sections, has copyrights. Read more about what you can do with our patterns at the bottom of each pattern on our site. |
|||||||||||||||||||||||||


With over 40 years in knitting and crochet design, DROPS Design offers one of the most extensive collections of free patterns on the internet - translated to 17 languages. As of today we count 324 catalogues and 12267 patterns translated into English (UK/cm). 12267
We work hard to bring you the best knitting and crochet have to offer, inspiration and advice as well as great quality yarns at incredible prices! Would you like to use our patterns for other than personal use? You can read what you are allowed to do in the Copyright text at the bottom of all our patterns. Happy crafting!
Post a comment to pattern DROPS 170-12
We would love to hear what you have to say about this pattern!
If you want to leave a question, please make sure you select the correct category in the form below, to speed up the answering process. Required fields are marked *.