
Popular categories
Looking for a yarn?


Comments / Questions (48)
![]() Amy Weisenburger wrote:
Amy Weisenburger wrote:
How many texture rows will there be in the yoke?
28.10.2019 - 22:45DROPS Design answered:
Hello Amy! It depends on the size. Please look at the number for your size. Happy crocheting!
30.10.2019 - 14:12
![]() Charlotte Bundgaard wrote:
Charlotte Bundgaard wrote:
Skal man tælle de 3 luftmasker i begyndelsen af omgangen med, når man skal kontrollere at man har 146 stangmasker, når man er færdig med udtagning til raglan?
26.02.2019 - 17:35DROPS Design answered:
Hei Charlotte. Første stav på omgangen erstattes av 3 luftmasker, så disse telles som 1 stav - se hekleinfo på toppen av oppskriften. God fornøyelse
07.03.2019 - 13:43
![]() Mette B wrote:
Mette B wrote:
Så jeg skal ikke tælle den første række med udtagninger med? Altså den med de 90 st?
07.12.2018 - 15:43DROPS Design answered:
Hei igjen Mette. Den første økingen der du øker til 90 staver er ikke medregnet i beskrivelsen av øking til raglan. Denne kommer i tillegg. Du øker altså først til 90 staver som beskrevet, og videre følger du økingen til raglan og øker slik totalt 6 ganger. Du har da 186 staver på omgangen. God fornøyelse.
10.12.2018 - 10:12
![]() Mette B wrote:
Mette B wrote:
Hej. Jeg er ved at lave kjolen i str. 92, og når jeg laver 6 rækker med udtagninger (bærestykket), så ender jeg kun på 170 st og ikke 186 som man skal. Jeg har talt og talt, og kigget opskriften igennem flere gang og kan umiddelbart ikke finde fejlen, jeg har derfor lavet en ekstra række med udt. så det passer med antal masker i opskriften. Kan I mon regne ud, hvad der er galt?
06.12.2018 - 16:31DROPS Design answered:
Hei Mette. Før du begynner med øking til raglan har du altså 90 staver på raden (78 staver + 3 staver økt ved hvert merke). Deretter øker du 16 staver på hver omgang fra retten, dette gjør du totalt 6 ganger = 96 masker økt. Det betyr at du har 90 (staver fra før) + 96 (staver økt til raglan) = 186 staver totalt på omgangen. God fornøyelse
07.12.2018 - 11:03
![]() Charlotte wrote:
Charlotte wrote:
Hej. Jeg skal til at hækle denne, men jeg er forvirret over, hvordan de 4 mærketråde skal sættes i. Hvad betyder det, når der står "start midt bagpå"? Hvordan gøres dette og hvad er for og bag på en række luftmasker?
15.10.2018 - 11:10DROPS Design answered:
Hej, du starter kjolen øverst ved halsen, tænker dig ind i hvordan den vil se ud på og starter med at hækle ved slidsen midt bagpå. Du tæller altså fra første maske (som skal blive bagpå) når du sætter mærketrådene. God fornøjelse!
29.10.2018 - 15:47
![]() Pia-Lotta wrote:
Pia-Lotta wrote:
Nej snälla ta du och räkna igenom det som står i mönstret för för ålder 6/9 mån. Första ökningsvarvet så står det att man skall öka 2+2r och så blir det 86 men 86-74=12 inte 16. Så du menar att man skall öka 6 gånger och inte 5 som det står? Det är före strukturvarven som problemet uppstår.6/9 månader får 170 maskor... 74+16+5*16=170 För hur man skall öka bara 12 maskor under det där första ökningsvarvet fattar jag inte. Kan du förklara det?
19.06.2018 - 11:33DROPS Design answered:
Hej igen, jo du har 74 fm. Du virkar 1 st i 70 av dessa fm - och i de 4 fm med mærktråd virkar du 2st+2lm+2st = 16st nu har du totalt 86 st. :)
20.06.2018 - 09:55
![]() Pia-Lotta wrote:
Pia-Lotta wrote:
Hej håller på med storlek 6/9mån och får inte ihop antalet stolpar... Har gjort mönstervarvet med ökningar 5 gånger- 74+5*16= 154 och inte 166... inte ens om man tar med luftmaskorna så stämmer det. Med 8 luftmaskor så blir det 162 och lägger man till ett varv till så blir det 170stolpar... Suck Jag får verkligen inte ihop det Pia
10.06.2018 - 17:16DROPS Design answered:
Hej, det ökas 16 maskor totalt 5 gånger (80 ökade maskor). Då du påbörjar strukturmönstret har du 86 maskor, med de ökade maskorna ska det då bli 166 maskor.
11.06.2018 - 17:54Cloudy wrote:
I've almost finished but I found the Adjusting the Neckline very confusing, working back from mid front on both sides has left a ridge that makes it visible when doing the neck edge in the offwhite. It looks very messy and if I do this again I will leave out the adjustment i don't think the neck edge needs it. Otherwise it's a lovely pattern and the Drops Baby Alpaca is a stunning and beautifully soft yarn to work with I love this yarn 😊
28.04.2018 - 14:21DROPS Design answered:
Dear Cloudy, You might want to try to do the last stitch before turning thighter to aboid the hole. However, leaving out the adjustment at the neck will result in a slight more open, wider neck line. If that does not bother you, you can leave it out, of course. Happy Crafting!
06.05.2018 - 09:25Cloudy wrote:
Ok I think I worked it out thank you. Have others found this pattern difficult to understand?
23.04.2018 - 14:28Cloudy wrote:
Thank you so much for the prompt reply! After I have done the dc row then on the next row which is a tr row, what do I crochet at the raglan line as I will have two lines of 2 chains?
23.04.2018 - 13:13DROPS Design answered:
Dear Cloudy, on next tr row, increasing crocheting 2 tr, 2 ch, 2 tr around both 2-ch-spaces. Happy crocheting!
23.04.2018 - 13:54
|
|||||||||||||
Beth#bethdress |
|||||||||||||
|
|
|||||||||||||
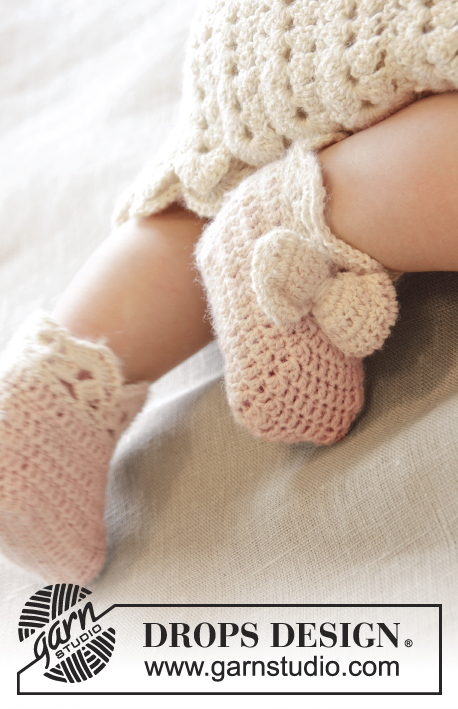
Crochet baby dress with raglan, short sleeves and fan edges, worked top down in DROPS BabyAlpaca Silk. Size 0-4 years
DROPS Baby 25-16 |
|||||||||||||
|
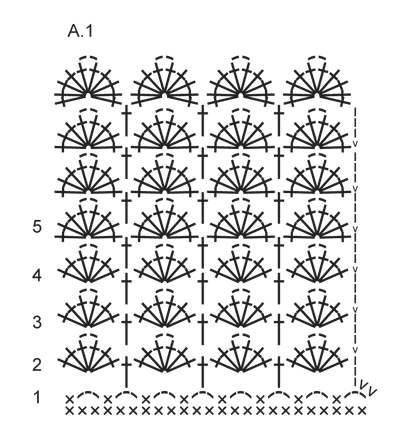
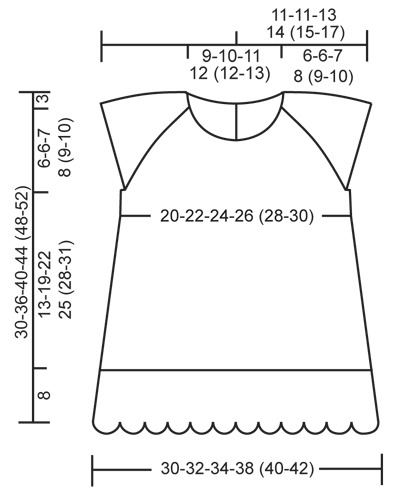
CROCHET INFO: Replace first dc at beg of every dc round/row with 1 ch. Finish round with 1 sl st in ch from beg of round. Finish row with 1 dc in 3rd ch from beg of previous row. Replace first tr at beg of every tr round/row with 3 ch. Finish round with 1 sl st in 3rd ch from beg of round. Finish row with 1 tr in ch from beg of previous row. TEXTURE ROWS: * 1 row/round dc, 1 row/round tr *, repeat from *-* (1 row/round dc + 1 row/round tr = 1 texture row). INCREASE TIP: Inc 1 dc/tr by working 2 dc/tr in same st. PATTERN: See diagram A.1. ---------------------------------------------------------- DRESS: The piece is worked top down. Work back and forth from mid back to after vent mid back, then work piece in the round. YOKE: Work 67-71-75-79 (79-83) ch (incl 1 ch to turn with) on hook size 3.5 mm with powder. Work 1 dc in 2nd ch from hook, then work 1 dc in every ch the entire row = 66-70-74-78 (78-82) dc on row. Now insert 4 markers in piece for raglan as follows (beg mid back – NOTE: Do NOT work while inserting markers): Skip 9-10-11-12 (12-13) dc (= right back piece), insert 1 marker in next dc, skip 13 dc (= sleeve), insert 1 marker in next dc, skip 18-20-22-24 (24-26) dc (= front piece), insert 1 marker in next dc, skip 13 dc (= sleeve) and insert last marker in next dc (there are now 9-10-11-12 (12-13) dc on left back piece after last marker). READ ALL OF THE FOLLOWING SECTION BEFORE CONTINUING: READ CROCHET INFO and work next row as follows from RS: Work 1 tr in every dc but in every dc with marker work 2 tr + 2 ch + 2 tr = 78-82-86-90 (90-94) tr on row. Then work TEXTURE ROWS – see explanation above (work back and forth with 1 dc/tr in every st from previous row but on every row with dc from WS work 2 ch over the 2 ch from previous row in raglan lines). AT THE SAME TIME on 1st row from RS (i.e. row with tr) inc for raglan as follows: Work 2 tr + 2 ch + 2 tr in every ch-space in every raglan line (= 16 tr inc on row - NOTE: Work in both ch-spaces). Repeat inc on every row from RS 3-3-4-4 (5-6) more times (= 4-4-5-5 (6-7) times in total) = 142-146-166-170 (186-206) sts. REMEMBER THE CROCHET TENSION! After last inc for raglan work 1 row with dc from WS as before. Work next row as follows from RS: Work 1 tr in each of the first 19-20-23-24 (26-29) dc (= right back piece), skip the next 33-33-37-37 (41-45) dc (= sleeve), work 6-8-6-10 (10-8) ch, work 1 tr in each of the next 38-40-46-48 (52-58) dc (= front piece), skip the next 33-33-37-37 (41-45) dc (= sleeve), work 6-8-6-10 (10-8) ch and work 1 tr in each of the last 19-20-23-24 (26-29) dc (= left back piece). Sleeve caps are now done and piece is worked in the round. BODY: Put piece tog mid back with RS out and work 1 round with dc (work 1 dc in every tr from previous round and 1 dc in every ch under each sleeve – remember CROCHET INFO) = 88-96-104-116 (124-132) sts on round. Insert 1 marker in each side = 44-48-52-58 (62-66) sts on front and back piece. Continue in the round with TEXTURE ROWS. When piece measures approx. 2 cm from markers under sleeves, inc 1 st on each side of both markers - READ INCREASE TIP (= 4 sts inc). Repeat inc every 1½-2-3-3 (3-3½) cm 5-6-6-7 (8-8) more times (= 6-7-7-8 (9-9) times in total) = 112-124-132-148 (160-168) sts. When piece measures approx. 13-19-22-25 (28-31) cm from markers (finish after 1 round with tr, inc should be done), work 1 round dc AT THE SAME TIME inc 8-2-0-2 (2-0) dc evenly – READ INCREASE TIP = 120-126-132-150 (162-168) dc. Cut the yarn. Switch to off white and work 1 round dc with 1 dc in every dc from previous round. Then work Fan pattern according to diagram A.1, i.e. work as follows: ROUND 1: * 3 ch, skip 2 dc, 1 dc in next dc *, repeat from *-* the entire round and finish with 3 ch and 1 sl st in 1st ch from beg of round = 40-42-44-50 (54-56) ch-spaces. ROUND 2: Work sl sts until mid of first ch-space, 3 ch (= 1 tr), * 3 tr + 2 ch + 3 tr in next ch-space, 1 tr in next ch-space *, repeat from *-* until 1 ch-space remains, work 3 tr + 2 ch + 3 tr in last ch-space and finish with 1 sl st in 3rd ch from beg of round = 20-21-22-25 (27-28) tr-groups with 1 tr between every tr-group. ROUND 3-4: 3 ch (= 1 tr), * 3 tr + 2 ch + 3 tr in ch-space in mid of next tr-group, 1 tr in next tr *, repeat from *-* the entire round, finish with 3 tr + 2 ch + 3 tr in ch-space in mid of last tr-group and 1 sl st in 3rd ch from beg of round. ROUND 5: Work as round 3-4 but in ch-space in the mid of every tr-group work 4 tr + 2 ch + 4 tr (instead of 3 tr + 2 ch + 3 tr). Repeat 5th round until edge measures approx. 6 cm in all sizes (or desired length). Then work last round the same way but with 5 tr + 2 ch + 5 tr in ch-space in the mid of every tr-group. TWINED STRING: Cut 3 lengths off white yarn of 3 metres each. Twine the strands tog until they resist, fold the string double so that it twines again. Make a knot at each end. Thread the string up and down through a tr row, approx. 2 cm below armhole on dress, beg from mid front. BOW: Work 11 ch on hook size 3.5 mm with off white. Work first row as follows: 1 tr in 4th ch from hook, 1 tr in each of the next 7 ch = 9 tr on row. Turn piece and work TEXTURE ROWS back and forth until piece measures approx. 10 cm – finish after 1 row with dc. Fasten off. Sew short sides tog to form a ring and twine some yarn around the mid of bow to tighten it neatly in the middle. Fasten bow mid front on dress, just above string. ADJUSTING NECKLINE: For better fit work a small elevation at the back of neck. Insert 1 marker in st in each corner in neck, i.e. at beg of every raglan line and 1 marker mid front. Work on hook size 3.5 mm with powder as follows: Beg mid back, work 1 dc in every st until 1 st remains before st with marker, work 1 htr in next st, 1 tr in st with marker and 1 htr in next st, then work 1 dc in every st until 1 st remains before next st with marker, 1 htr in next st, 1 tr in st with marker and 1 htr in next st, the work 1 dc in every st until 4-4-5-5 (5-6) sts remain before marker mid front. Turn piece and work 1 dc in every dc back to mid back but at every marker work 3 dc tog, i.e. work 1 dc in htr but wait with last YO and pull through, work 1 dc in st with marker but wait with last YO and pull through, work 1 dc in next htr but now pull last YO through all 4 sts on hook (= 2 dc dec). Cut the yarn and repeat from mid back to mid front in the other side. BUTTON BAND AT THE BACK: Work along left opening mid back with powder as follows: 1 dc in every dc row and 2 dc in every tr row. Work a total of 4 rows dc back and forth, fasten off. Along right opening mid back work buttonholes as follows (beg from RS at neckline): Work 3 dc (1 dc in dc row and 2 dc in tr row). 4 ch (= 1 buttonhole), skip approx. 1 cm, work dc until approx. mid on band, 4 ch, skip approx. 1 cm, work dc until 1 cm remains on band, 4 ch and fasten with 1 dc in last st. Fasten off. Sew the buttons on to button band in the left side. NECK EDGE: Work around the neck with off white as follows: 1 dc in first st, * 2 ch, skip 2 sts, 1 dc in next st *, repeat from *-* the entire row, fasten off. FAN EDGE AROUND SLEEVE CAPS: Work with off white as follows: Work 1 dc in each of the 6-8-6-10 (10-8) sts mid under sleeve, then work fan edge around the sleeve opening as follows: * Skip approx. 2 sts, in next st work 3 tr + 2 ch + 3 tr, skip approx. 2 sts, 1 dc in next st *, repeat from *-* and finish with 1 sl st in first dc from beg of round (= approx. 5-5-6-6 (7-7) fans along sleeve cap). Fasten off. Repeat at the bottom around the other sleeve cap. |
|||||||||||||
Diagram explanations |
|||||||||||||
|
|||||||||||||
 |
|||||||||||||
 |
|||||||||||||
Have you finished this pattern?Tag your pictures with #dropspattern #bethdress or submit them to the #dropsfan gallery. Do you need help with this pattern?You'll find 12 tutorial videos, a Comments/Questions area and more by visiting the pattern on garnstudio.com. © 1982-2026 DROPS Design A/S. We reserve all rights. This document, including all its sub-sections, has copyrights. Read more about what you can do with our patterns at the bottom of each pattern on our site. |
|||||||||||||


With over 40 years in knitting and crochet design, DROPS Design offers one of the most extensive collections of free patterns on the internet - translated to 17 languages. As of today we count 325 catalogues and 12298 patterns translated into English (UK/cm). 12298
We work hard to bring you the best knitting and crochet have to offer, inspiration and advice as well as great quality yarns at incredible prices! Would you like to use our patterns for other than personal use? You can read what you are allowed to do in the Copyright text at the bottom of all our patterns. Happy crafting!
Post a comment to pattern DROPS Baby 25-16
We would love to hear what you have to say about this pattern!
If you want to leave a question, please make sure you select the correct category in the form below, to speed up the answering process. Required fields are marked *.