
Popular categories
Looking for a yarn?


Comments / Questions (37)
![]() Lynn Hanrahan wrote:
Lynn Hanrahan wrote:
So do you still do the yos in pattern on sleeves
12.12.2022 - 18:19DROPS Design answered:
Hi Lynn, Yes, The pattern on the sleeves is the same as on the body. Happy knitting!
13.12.2022 - 07:47
![]() Lynn Hanrahan wrote:
Lynn Hanrahan wrote:
Dear Judy, Lynn Hanrahan here again . I just started the sleeve and got the rib pattern completed. I am now at the part of the pattern where i changed to larger needles. So now im susposed to continue as follows: 2 sts stockette st, p1 over 52 sts, stockinette st. When the piece measures 12cm inc 1 at each side a total of 18 times alternately every 4th and 5th row = 92 sts.
10.12.2022 - 16:28DROPS Design answered:
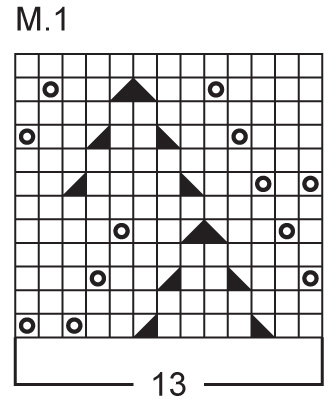
Dear Lynn, work 2 sts in stockinette stitch, repeat the pattern M.1 over 52 stitches and work the last 2 sts in stockinette stitch. Continue this way. When the piece measures 12 cm, start increasing 1 stitch at each side 18 times every 4th and 5th row alternately. That is, increase 1 st at the beginning and at the end of the row and repeat this increase every 4th and 5th row alternately. You need to work these increases 18 times (so you will have increased 36 sts after finishing all increases). 56 initial sts + 2 sts* 18 times = 92 sts. Happy knitting!
11.12.2022 - 21:16
![]() Lynn Hanrahan wrote:
Lynn Hanrahan wrote:
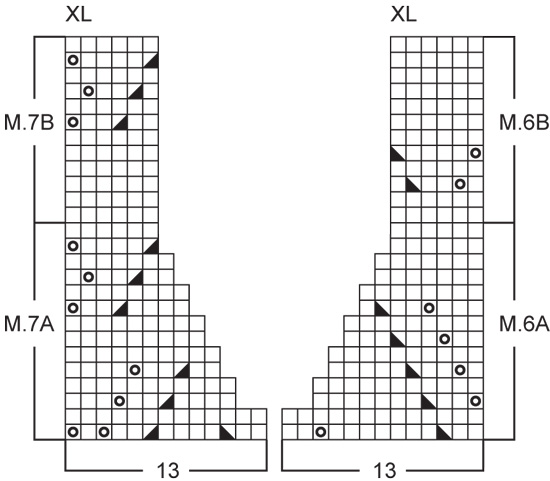
I am at the part of "when the piece measures approx 43 cm etc." How do i complete this part ? I am doing size XL
05.12.2022 - 14:56DROPS Design answered:
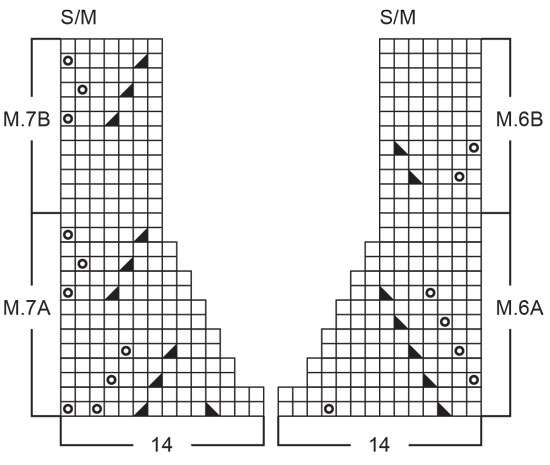
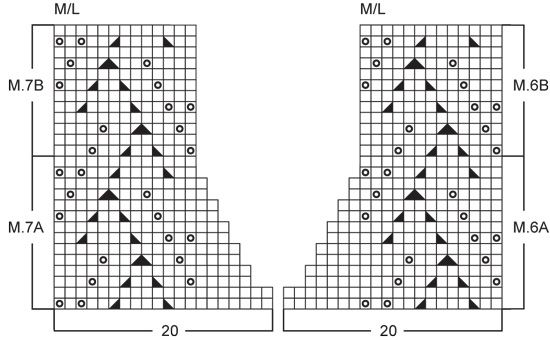
Dear Mrs Hanrahan, make sure you have finished a whole M.1 in height (work more or less cm if needed), then work: 1 st in stocking st, 26 sts in M.1, M.6A (13 sts in XL), bind off 13 sts for the neck, M.7A (13 sts in XL), work 26 sts of M.1 and 1 st in stocking stitch. Work now each shoulder separately, slip the stitches before the cast of sts (seen from RS) on a thread/st holder and work the first shoulder casting off for neck as shown in the diagram M.7/M.6. Happy knitting!
06.12.2022 - 10:35
![]() Lynn Hanrahan wrote:
Lynn Hanrahan wrote:
Can you explain to me what you do after the first row.The pattern is wisteria weaving
30.10.2022 - 20:50DROPS Design answered:
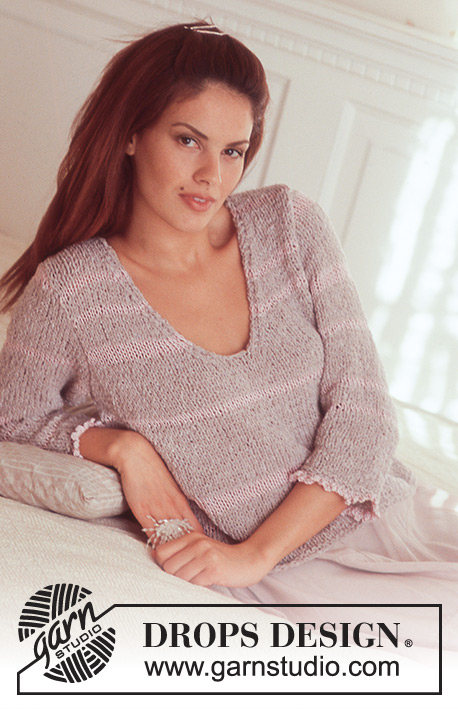
Hi Lynn, You work 6 rows of rib (K2, P4), with 1 edge stitch in garter stitch (knitted from both the right and wrong sides). After these 6 rows you change to needle size 4.5 mm and work M.1. Happy knitting!
31.10.2022 - 06:48
![]() Annette Kierkegaard Priess wrote:
Annette Kierkegaard Priess wrote:
Jeg er ved at strikke første ærme i str l/xl, og er nu færdig med at lukke af til ærmekuppel 4 x 1, 2 x 5 og 1x1, så står der at jeg videre skal lukke 2 masker af til arb måler 55 cm, er det stadig hver anden pind flere gange? Hvor mange masker ender man med, når ærmet er helt færdigt?
09.05.2022 - 15:33DROPS Design answered:
Hej Annette, ja det er på hver 2.pind til du når de 55 cm. Det gør du for at ærmekuplen skal blive afrundet. Antal masker du har tilbage er afhængig af hvor mange cm du har tilbage :)
11.05.2022 - 07:50
![]() Giorgia wrote:
Giorgia wrote:
Un'ulteriore domanda da principiante: per il modellamento del collo(taglia S/M) devo intrecciare le maglie? Sempre sul ferro rovescio per M6A, e invece per M7A sempre ad inizio ferro, quindi sul diritto del lavoro?
18.02.2022 - 09:50DROPS Design answered:
Buonasera Giorgia, deve seguire i motivo M6A e M7A per modellare il collo. Buon lavoro!
22.02.2022 - 22:43
![]() Angela wrote:
Angela wrote:
If I increase 2 stitches evenly across the first row of the pattern, then surely the subsequent pattern rows will not sit correctly above this evenly increased first row? I’m knitting the M/L size and the pattern will repeat 8 times with 2 stitches left over. Are these extra 2 stitches not meant to be edge stitches? Or should I knit an increase row and start the pattern rows after this, then I can naturally knit the extra stitches one at each end without compromising the pattern repeats?
17.02.2022 - 15:17DROPS Design answered:
Dear Angela, in the 2nd size you will work M.1 as follows: 1 edge stitch, repeat a total of 8 times the 13 stitches in the diagram M.1 and end with 1 edge stitch 1+ 8x13 + 1 =106 sts. Happy knitting!
17.02.2022 - 16:16
![]() Giorgia wrote:
Giorgia wrote:
Arrivata a 34 cm e finito interamente il Motivo1, lavoro 14 m. a m. rasata ad ogni lato del lavoro. Il successivo ferro lo lavoro tutto a rovescio. È dal 3° ferro che iniziò ad intrecciare ad ogni lato per lo scalfo? Grazie per la risposta
17.02.2022 - 12:30DROPS Design answered:
Buonasera Giorgia, può procedere in questo modo. Buon lavoro!
22.02.2022 - 22:46
![]() Giorgia wrote:
Giorgia wrote:
C'è un errore nella spiegazione delle maniche: avviare 56 m. (di cui 1 m. di vivagno a legaccio ad ogni lato). Dopo aver lavorato 10 cm a coste scrivete di passare ai ferri + grandi e lavorare come segue: "2 m. a m. rasata, il motivo 1 sulle 52 m. successive , 2 m. a m. rasata" ..per un totale quindi di 56 m. Ora le 2 maglie di vivagno da lavorare a legaccio che fine hanno fatto?
14.11.2021 - 15:35DROPS Design answered:
Buonasera Giorgia, abbiamo inoltrato la sua richiesta al settore design. Se ci saranno delle correzioni le potrà trovare direttamente online. Buon lavoro!
28.12.2021 - 16:57
![]() Bine wrote:
Bine wrote:
Wie wird das Dreieck im Diagramm gestrickt?
08.07.2021 - 12:57DROPS Design answered:
Liebe Bine, das Dreieck = das 4. Symbol (= 1 M re abheben, 1 re, die abgehobene M über die gestrickte ziehen) + das 3. Symbol (= 2 re zusammen), dh es sind 2 Abnahmen nebeneindander. Viel Spaß beim stricken!
08.07.2021 - 13:42
|
|||||||||||||
Wisteria Weaving |
|||||||||||||
|
|
|||||||||||||
DROPS Pullover in Muskat
DROPS 73-5 |
|||||||||||||
|
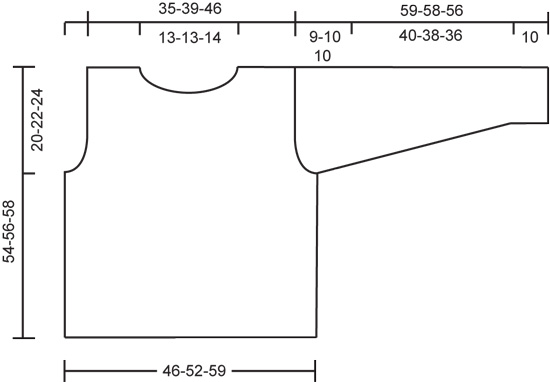
Gauge: 20 sts x 26 rows = 10 x 10 cm on larger needles in pattern. 1 repeat of Pattern 1 = 7 cm wide Rib: * K 2, P 4 *, repeat from * - *. Garter st, when knitting flat: Knit all sts, all rows. Pattern: See charts. The pattern is seen from the right side. Note: Patterns 6 and 7 (neck shaping) are different for each size - use the appropriate chart for your size. ------------------------------------------------------------------ Front: Cast on 92-104-116 sts on smaller needles. Knit 6 rows rib, but keep 1 edge st at each side knit in garter st throughout. Change to larger needles and Pattern 1, increasing 1-2-3 sts evenly distributed on the first row = 93-106-119 sts (the edge st at each side should not be knit in Pattern 1). When the piece measures approx. 34 cm - adjust to end after a complete repeat of Pattern 1 - knit the next row as follows (right side row): 14 sts stockinette st, Pattern 1 over 65-78-91 sts, 14 sts stockinette st. Continue Pattern 1 with stockinette st at each side and bind off for armhole at each side every other row: 4 sts 1 time, 2 sts 2 times and 1 st 3-5-5 times = 71-80-93 sts. Continue Pattern 1 with 3-1-1 sts stockinette st each side. When the piece measures approx. 43 cm (adjust to end after a complete repeat of Pattern 1) knit the next row as follows: 3-1-1 sts stockinette st, 13-13-26 sts of Pattern 1, Pattern 6A (use chart for your size) for 14-20-13 sts, bind off 11-12-13 sts for the neck, Pattern 7A (use chart for your size) for 14-20-13 sts, 13-13-26 sts of Pattern 1 and 3-1-1 sts stockinette st. Shape neck following Patterns 6A and 7A. When neck shaping is complete 23-27-33 sts remain on each shoulder. Continue with Patterns 6B and 7B over 7-13-6 sts to finished measurements, knit the remaining sts as before. Bind off when the piece measures 54-56-58 cm. Back: Cast on and knit the same as the front. Bind off for armhole as on front and continue until the piece measures 52-54-56 cm. Now bind off the center 23-24-25 sts for the neck. On the next row dec 1 st at each neck edge = 23-27-33 sts remain on each shoulder. Bind off when the piece measures 54-56-58 cm. Sleeve: Cast on 56-56-56 sts on smaller needles and knit rib for 10 cm, keeping 1 edge st at each side in garter st. Change to larger needles and continue as follows: 2 sts stockinette st, Pattern 1 over 52 sts, 2 sts stockinette st. When the piece measures 12 cm inc 1 st at each side a total of 10-14-18 times: Size S/M: every 10 rows. Size M/L: alternately every 6th and 7th row. Size XL: alternately every 4th and 5th row = 76-84-92 sts - knit the increased sts in stockinette st. When sleeve measures 50-48-46 cm bind off for sleeve cap at each side every other row (do not make any yo in the pattern even if sts are knit together): 4 sts 1 time, 2 sts 4-5-5 times, 1 st 2-2-1 times, then bind off 2 sts at each side until the piece measures 58-57-55 cm and then bind off 4 sts 1 time. Bind off, sleeve measures approx. 59-58-56 cm. Assembly: Sew right shoulder. Neckband: Pick up approx. 80-90 sts around the neck on smaller needles. Knit 4 rows garter st, bind off. Sew left shoulder and up along neckband. Sew in sleeves and sew sleeve and side seams using edge sts as a seam allowance. Belt: Cast on 7 sts on double-pointed needle. Knit 1 row, * push sts to right side of needle without turning the work, pull yarn tight on back side and knit 1 row from same side as previous row *. Repeat from * - *. For best results, pull yarn tight on previously knit rows as you go along. Bind off when belt measures approx. 120-150 cm. |
|||||||||||||
Diagram explanations |
|||||||||||||
|
|||||||||||||
 |
|||||||||||||
 |
|||||||||||||
 |
|||||||||||||
 |
|||||||||||||
 |
|||||||||||||
Have you finished this pattern?Tag your pictures with #dropspattern or submit them to the #dropsfan gallery. Do you need help with this pattern?You'll find 19 tutorial videos, a Comments/Questions area and more by visiting the pattern on garnstudio.com. © 1982-2026 DROPS Design A/S. We reserve all rights. This document, including all its sub-sections, has copyrights. Read more about what you can do with our patterns at the bottom of each pattern on our site. |
|||||||||||||


With over 40 years in knitting and crochet design, DROPS Design offers one of the most extensive collections of free patterns on the internet - translated to 17 languages. As of today we count 325 catalogues and 12298 patterns translated into English (UK/cm). 12298
We work hard to bring you the best knitting and crochet have to offer, inspiration and advice as well as great quality yarns at incredible prices! Would you like to use our patterns for other than personal use? You can read what you are allowed to do in the Copyright text at the bottom of all our patterns. Happy crafting!
Post a comment to pattern DROPS 73-5
We would love to hear what you have to say about this pattern!
If you want to leave a question, please make sure you select the correct category in the form below, to speed up the answering process. Required fields are marked *.