Comments / Questions (55)
![]() Linda wrote:
Linda wrote:
Hallo, ich finde das Set sehr schön, würde es aber sehr gerne mal mit zwei rechts, zwei links - zweifarbig stricken. Leider finde ich dazu keine Anleitung und auch kein Video hier gefunden. Würde mich sehr freuen, wenn sie es mir erklären könnten. Macht weiter so immer tolle Anleitungen, Garne und Hilfestellung. Vielen Dank
13.01.2019 - 19:57DROPS Design answered:
Liebe Linda, leider können wir nicht jede Anleitung nach jeder individuelle Anfrage anpassen, nehmen Sie bitte Kontakt mir Ihrem DROPS Laden auf, dort bekommen Sie weitere Hilfe - auch telefonisch oder per E-Mail. Viel Spaß beim stricken!
14.01.2019 - 12:12
![]() Mathilda wrote:
Mathilda wrote:
De halswarmer, het vraagt om 6mm naald, maar dat maakt het rommelig . Brei nu op naald 4,5 veel mooier.
05.12.2018 - 23:50
![]() Andrea wrote:
Andrea wrote:
Habe mir den Kragen und die Mütze in den Farben Camel/ Himbeere gestrickt und bin total begeistert. Sowohl vom Modell wie von der Qualität des Garns. Sooo schön warm und kuschelig und es ist unique. Danke Drops
10.01.2018 - 11:10
![]() Sidsel wrote:
Sidsel wrote:
Jeg kan ikke få den til at passe med 72 masker.. skal det ikke være et ulige antal masker? Den passer med 81 masker
18.11.2017 - 22:55DROPS Design answered:
Jo når du starter med patent skal du have taget ind til 49-55 m. God fornøjelse!
22.11.2017 - 14:44
![]() Johanna Haggstrom wrote:
Johanna Haggstrom wrote:
Thanks for the help!!
26.10.2015 - 12:12
![]() Johanna Häggström wrote:
Johanna Häggström wrote:
I'm knitting this hat and things were going well until I dropped stitches. I have tried to fix it but it seems the more I try, the worse it looks. Is there a video or something on how to fix your mistakes with this type of knitting? I really don't any to tear up the entire hat (almost done) and start over. Thanks.
26.10.2015 - 12:11
![]() Laura wrote:
Laura wrote:
May I suggest that you add this to the pattern? It seems a lot of people struggled with it, I know I did and actually knitted it up wrong. I wish I would have had this information while in the midst of the project: On rows that KNIT the YO and slip st tog, bring yarn to front (YO) before slip stitch. On rows that PURL the YO and slip st tog, pass the slip stitch before doing the YO. On purl rows, your yarn will be in front and after you slip the next stitch,
11.02.2015 - 19:17
![]() Marja Lathouwers wrote:
Marja Lathouwers wrote:
Filmpje klopt sowieso niet met patroon, de 1e nld in het filmpje wordt recht gebreid en dat is in het patroon niet zo, ik kan niks met dat filmpje daar wordt anders in gebreid zoals ik dat doe, ik kan veel beter van patroon aflezen, en dan moet ik in nld 3 idd eerst ribbelsteek en dan doe ik 1 steek av recht afhalen en dan omslag, dus net andersom als in het patroon staat dan klopt mijn breiwerk wel.
06.01.2015 - 11:12DROPS Design answered:
06.01.2015 - 16:13
![]() María wrote:
María wrote:
Gracias! No tengo problema en usar las agujas circulares, de hecho las uso siempre aún tejiendo estilo inglés. Mi problema es que al seguir las instrucciones no me sale el diseño como debiera. No se sí llevar la hebra en la mano derecha afecta a las instrucciones de "echar una hebra" o al tejer los dos puntos juntos, no consigo identificar el problema!
17.11.2014 - 15:04DROPS Design answered:
Hola Maria. Es muy difícil solucionar este problema online. Te recomendamos acudir a la tienda donde has comprado la lana. En todos casos no creo que trabajar al estilo inglés puede afectar a la realización del patrón.
20.11.2014 - 09:27
![]() María wrote:
María wrote:
Hola! Tejo estilo inglés, no continental. He intentado realizar el patrón varias veces pero no consigo que me salga. Hay que adaptar las instrucciones? Estoy muy interesada en saber como hacerlo, el modelo me parece muy bonito. Estaría muy agradecida si me pudiese ayudar. Atentamente, María.
14.11.2014 - 00:09DROPS Design answered:
Hola Maria. Puedes trabajar con ag circular al estilo inglés. Las ag circulares las usamos para tener suficiente espacio para todos los pts. De trabajar con 2 agujas tendrían que ser de doble punta y no cerradas por un lado puesto que la técnica consiste en "...mover los pts para la otra punta de la ag para tejer por el mismo lado una vez más..."
17.11.2014 - 00:11
Nina#ninaset |
|
 |
 |
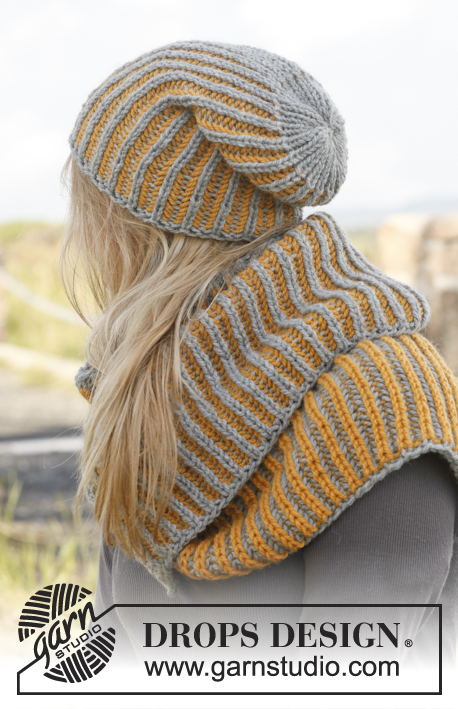
Knitted DROPS hat and neck warmer with English rib in two colours in ”Nepal”.
DROPS 149-43 |
|
|
GARTER ST (back and forth on needle): K all rows. 1 ridge = 2 rows K. ENGLISH RIB IN TWO COLOURS: ROW 1 (= WS): Worked with colour 0501, grey 1 st in garter st, * 1 YO, slip 1 st as if to P, K 1 *, repeat from *-* until 2 sts remain, 1 YO, slip 1 st as if to P, 1 st in garter st. Turn piece. ROW 2 (= RS): Worked with colour 0501, grey 1 st in garter st, * K tog YO and slipped st, 1 YO, slip 1 st as if to P *, repeat from *-* until 1 yo and 2 sts remain, K tog YO and slipped st, 1 st in garter st. Move sts back on circular needle to work from same side one more time and switch colour (read KNITTING TIP 1 and 2). ROW 3 (= RS): Worked with colour 2923, goldenrod 1 st in garter st, * 1 YO, slip 1 st as if to P, P tog YO and slipped st *, repeat from *-* until 2 sts remain, 1 YO, slip 1 st as if to P, 1 st in garter st. Turn piece. ROW 4 (= WS): Worked with colour 0501, grey 1 st in garter st, * P tog YO and slipped st, 1 YO, slip 1 st as if to P *, repeat from *-* until 1 yo and 2 sts remain, P tog YO and slipped st, 1 st in garter st. Move sts back on circular needle to work from same side one more time and switch colour. ROW 5 (= WS): Worked with colour 2923, goldenrod 1 st in garter st, * 1 YO, slip 1 st as if to P, K tog YO and slipped st *, repeat from *-* until 2 sts remain, finish with 1 YO, slip 1 st as if to P, 1 st in garter st. Turn piece. Repeat rows 2- 5. KNITTING TIP 1: No of sts is divisible with uneven number when English rib is worked. To make an English rib in stripes work back and forth on a circular needle as follows: Work 1st and 2nd row as explained below. Move all sts on circular needle to the other end of circular needle so that next row can be worked with a new colour from same side as 2nd row. Then turn piece and work the next 2 rows from the other side the same way as 2nd and 3rd row. That means that 1 row is worked with every colour from same side before turning the piece. KNITTING TIP 2: If you are in doubt, see what colour the previous row was worked with on the colour of edge st. ---------------------------------------------------------- HAT: Worked back and forth on circular needle. Cast on 72-81 sts on circular needle size 5 mm with grey. K 1 row. Work next row as follows from RS: 1 edge st in GARTER ST - see explanation above -, * P 1, P 2 tog *, repeat from *-* until 2 sts remain, finish with P 1 and 1 edge st in GARTER ST = 49-55 sts. Then work ENGLISH RIB IN TWO COLOURS - see explanation above. REMEMBER THE KNITTING TENSION! When piece measures 23-24 cm – adjust to finish after 5th row and work next row in grey as follows: 1 edge st in garter st, * K tog YO and slipped st, P 1 *, repeat from *-* until 2 sts remain, K tog YO and slipped st and 1 edge st in garter st. Turn and continue with rib K 1/P 1 with 1 edge st in garter st in each side with grey until rib measures approx. 3 cm. Work 4 rows in stocking st - AT THE SAME TIME on 2nd row from RS work sts tog 2 by 2, repeat on 4th row = 13-14 sts. Piece measures approx. 27-28 cm. Tighten tog the last sts at the top and sew hat tog mid back, garter st against garter st. ---------------------------------------------------------- NECK WARMER: Loosely cast on 161-173 sts on circular needle size 6 mm with grey and work back and forth on needle. Work ENGLISH RIB IN TWO COLOURS - see explanation above. When piece measures approx. 27-32 cm - adjust to finish after 5th row. Turn piece and work next row in grey as follows from RS: 1 edge st in garter st, * K tog YO and slipped st, P 1 *, repeat from *-* until 2 sts remain, K tog YO and slipped st and 1 edge st in garter st. On next row cast off with K over K and P over P. Cut the yarn and sew neck warmer tog with small stitches, sew in front loop of outermost st and fasten the yarn. |
|
Have you finished this pattern?Tag your pictures with #dropspattern #ninaset or submit them to the #dropsfan gallery. Do you need help with this pattern?You'll find 14 tutorial videos, a Comments/Questions area and more by visiting the pattern on garnstudio.com. © 1982-2025 DROPS Design A/S. We reserve all rights. This document, including all its sub-sections, has copyrights. Read more about what you can do with our patterns at the bottom of each pattern on our site. |
|


Post a comment to pattern DROPS 149-43
We would love to hear what you have to say about this pattern!
If you want to leave a question, please make sure you select the correct category in the form below, to speed up the answering process. Required fields are marked *.