
Popular categories
Looking for a yarn?


Comments / Questions (193)
![]() Trees wrote:
Trees wrote:
'Ga verder in patroon heen en weer tot er 1 toer overblijft voor werk 64-66-68-70-72-74 cm meet.' Wordt hier bedoeld dat de zijpanden 1 cm langer worden dan het rugpand?
14.06.2013 - 21:41DROPS Design answered:
Nee, de voorpanden worden net zo lang als het achterpand. Je plaatst bij 64-66-68-70-72-74 cm 1 markeerder op de schouder. En haakt vanaf hier door over de de 2 dstk-groepen richting hals voor de kraag.
19.06.2013 - 13:39
![]() Trees wrote:
Trees wrote:
Bij het apart verder haken van de delen eindig je aan beide zijden met een groep om de l tussen de volgende groep. 1 l en 1dbst dan tussen de 2 groepen bij begin en keren?
13.06.2013 - 20:06DROPS Design answered:
Uw vraag is ons helaas niet duidelijk. U haakt verder met dstk-groepen en u begint in patroon A.1 elke toer met l om te keren, bedoelt u dat?
21.10.2013 - 08:42
![]() Jessica wrote:
Jessica wrote:
Im almost finished with this ..which is so beautiful btw...Im having trouble with the construction of the arms..it says to count 8 tr groups in..but im not sure if thats counting down or across...
30.05.2013 - 08:01DROPS Design answered:
Dear Jessica, you will count the 8 tr group from beg / end of row (= each side), and place a marker, so that you will have 15-16 (see size) tr groups between both markers for back piece. Happy crocheting!
30.05.2013 - 09:14
![]() Angenita wrote:
Angenita wrote:
Dag, Ik heb net als Xenia de vraag over de armstukjes (kraag?). Volgens het patroon moet ik 'omhoog' haken met 2 dubbelstokjes groepen totdat het ongeveer 10 cm is boven de markeerders. Uiteindelijk moet dit vastgemaakt worden, maar klopt het dan dat aan de achterkant van de mouwtjes het waaier patroon andersom kom te zitten? Ik hoor het graag! Groetjes Angenita
15.05.2013 - 19:31DROPS Design answered:
Hoi Angenita. Dit was de reactie voor Xenia: Zie maattekening onderaan, de kraag wordt doorgehaakt nadat de voorpanden klaar zijn over de eerste st middenvoor ongeveer 10 cm tot deze st aan elkaar kunnen komen middenachter. Je sluit dan deze kraagdelen aan elkaar middenachter en naait de kraag vast aan de halslijn. Het is voor mij niet duidelijk wat je bedoelt precies met armstukjes en mouwtjes?
16.05.2013 - 13:35Xenia wrote:
I'm very excited about almost finishing this amazing vest! I'm only having a difficulty understanding the assembly of the collar pieces and it can't be seen in the photo either! So the question is how do I sew those extra 10cm in the middle back and the two fronts? Thank you!
10.05.2013 - 09:08DROPS Design answered:
Dear Xenia, look at the measurement chart below, the collar continues after the front pieces, on the first sts worked towards mid front during 10 cm until this part reach mid neck from back piece. You will then sew last rows of both collars together then sew side (= end/beg of rows) to the neckline on back piece. Happy crocheting !
10.05.2013 - 09:49
![]() Annick Menzio wrote:
Annick Menzio wrote:
Superbe! Je viens de le terminer, tres beau resultat. Petite astuce : a la place des boutons j'ai fait trois cordons en chainette de 50 mailles chacuns. Ensuite je les ai placés dans les trous du milieu pour remplacer les boutons.
01.05.2013 - 16:58
![]() Menzio wrote:
Menzio wrote:
Tres Beau modele, je suis en train de le faire, avec plaisir mais les explications ne sont pas claires , doit on faire une double bride apres la fin du rang de six groupes pour chaque cotés avant de tourner.Quelle forme a le col! On ne voit pas sur la photo.
29.04.2013 - 13:22DROPS Design answered:
Bonjour Madame Menzio, après le rang 5, chaque rang se commence par 5 ml et se termine par, je cite, "1 ml et 1 DB dans la 4ème ml du début du rang précédent". Il n'y a aucune diminution d'encolure, le col se forme en crochetant en groupes de DB comme indiqué jusqu'à atteindre le milieu encolure dos. chaque demi-col sera ensuite cousu ensemble puis cousu à l'encolure dos. Bon crochet !
29.04.2013 - 14:47Maritza wrote:
Precioso, el color, el punto y el diseño.
15.04.2013 - 23:22
![]() Annely wrote:
Annely wrote:
Palun selgitust krae kohta,kas krae heegeldatakse selja keskmise osa külge või siis mitte,eriti ei saa selgitusest aru, pilti ka pole.Ja mismoodi on mõeldud ,et heegelda krae tagant kokku.
15.04.2013 - 14:06DROPS Design answered:
Nagu alloleval joonisel näha, tehakse kraeosad mõlemal hõlmal pikemad ja siis õmmeldakse need otsad kokku ning siis ühendadatakse terve krae seljaosa külge.
29.08.2013 - 15:57
![]() Elly wrote:
Elly wrote:
Goedenavond, Graag wil ik weten of ik bij het achterpand en de voorpanden ter hoogte van de armsgaten aan het einde van de toeren (bij de armsgaten) een losse en een dstk moet haken of dat ik moet eindigen met een dstkgroep? maat M. m.vr.gr. Elly
11.04.2013 - 20:32DROPS Design answered:
Hoi Elly. Je haakt volgens A.1, dus begin met 4 lossen en eindig met 1 dstk om een mooie rand te krijgen.
03.05.2013 - 16:15
|
||||||||||||||||
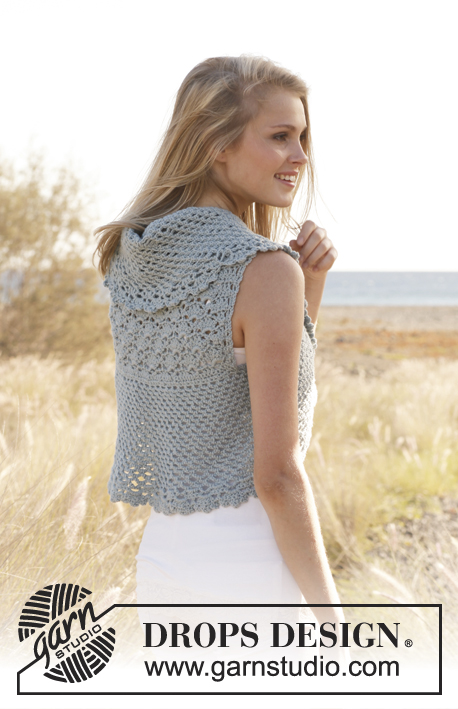
Leona#leonavest |
||||||||||||||||
 |
 |
|||||||||||||||
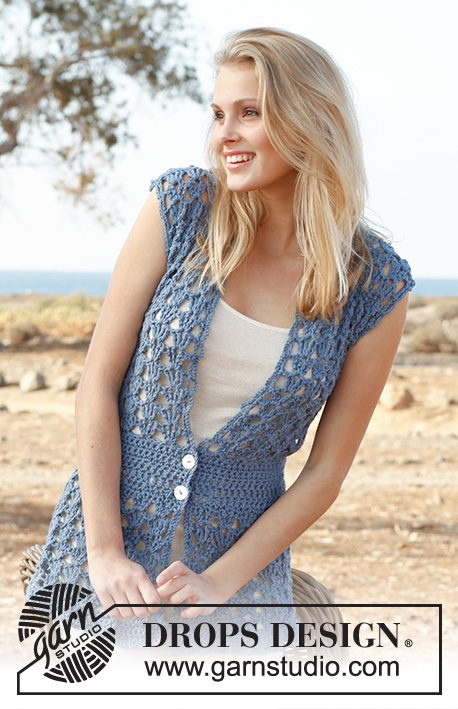
Crochet DROPS vest with fan pattern in ”Paris”. Size S-XXXL.
DROPS 145-4 |
||||||||||||||||
|
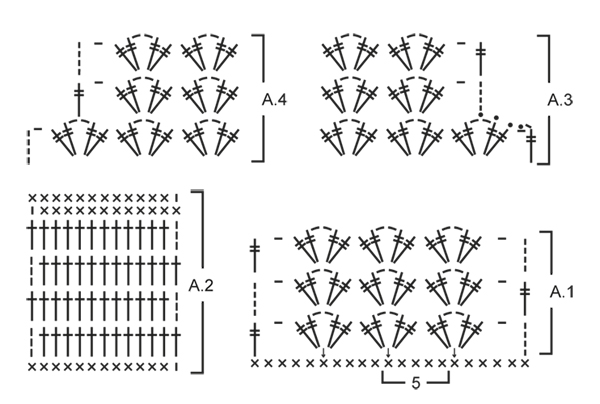
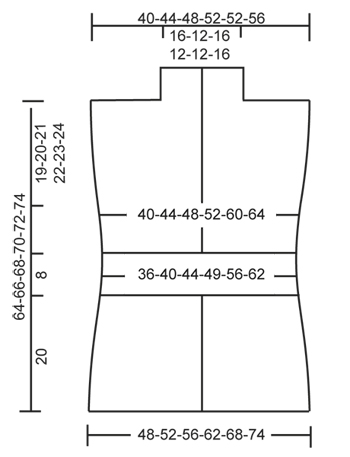
PATTERN: See diagrams A.1 and A.2 (diagrams A.3 and A.4 show dec for armhole in size XXL + XXXL). INCREASE TIP: Inc 1 dc by working 2 dc in same st. DECREASE TIP (dec 1 dc): Work 1 dc but wait with last pull through (= 2 sts on hook), then work next dc but on last pull through, pull thread through all sts on hook = 1 dc dec. ---------------------------------------------------------- VEST: Worked back and forth from mid front. Work 189-204-219-242-264-287 ch on hook size 6 mm with Paris, turn. ROW 1: 1 dc in 2nd ch from hook, * skip 1 ch, 1 dc in each of the next 2 ch *, repeat from *-* until 4-4-4-3-4-3 ch remain, skip next ch and finish with 1 dc in each of the last 3-3-3-2-3-2 ch = 126-136-146-161-176-191 dc on row, turn piece. ROW 2: 1 ch, then work 1 dc in every dc from previous row = 126-136-146-161-176-191 dc, turn piece. ROW 3: Work as 2nd row. ROW 4: Then work pattern according to diagram A.1, i.e. work 5 ch (= 1 dtr + 1 ch), * skip 4 dc, in next dc work 2 dtr + 2 ch + 2 dtr *, repeat from *-* until 5 dc remain, skip 4 dc and finish with 1 ch and 1 dtr in last dc = 24-26-28-31-34-37 dtr-groups, turn piece. ROW 5: 5 ch, in ch-loop in every dtr-group work 2 dtr + 2 ch + 2 dtr, finish row with 1 ch and 1 dtr in 4th ch on beg of previous row = 24-26-28-31-34-37 dtr-groups, turn piece. Repeat 5th row until piece measures approx. 16 cm. Work next row as follows: 4 ch (= 1 dtr), in ch-loop in the middle of every dtr-group work 2 dtr + 1 ch (instead of 2 ch) + 2 dtr, finish row with 1 dtr in 4th ch from beg of previous row = 24-26-28-31-34-37 dtr-groups, turn piece. Work 1 ch, 1 dc in same st, then work 1 dc in every dtr the entire row, finish with 1 dc in 4th ch from beg of previous row, turn piece = 98-106-114-126-138-150 dc. Continue to work as follows: ROW 1: Work pattern according to diagram A.2, i.e. work 1 ch, then work 1 dc in every dc the entire row AT THE SAME TIME dec 18-18-18-18-14-14 dc evenly – READ DECREASE TIP = 80-88-96-108-124-136 dc, turn piece. ROW 2: 3 ch (= 1 tr), then work 1 tr in every dc the entire row = 80-88-96-108-124-136 tr on row. ROW 3-5: Work as 2nd row = 80-88-96-108-124-136 tr. ROW 6: Work 1 dc in every tr AT THE SAME TIME adjust no of sts as follows: Size S + M + L + XL + XXL: Inc 5-9-5-5-5 dc evenly – READ INCREASE TIP. Size XXXL: Dec 3 sts evenly – READ DECREASE TIP = 85-97-101-113-129-133 dc, turn piece. ROW 7: 1 ch, 1 dc in same st, then work 1 dc in every dc from previous row = 85-97-101-113-129-133 dc, turn piece. ROW 8: 5 ch, * skip 3 dc, in next dc work 2 dtr + 2 ch + 2 dtr *, repeat from *-* until 4 dc remain on row, skip 3 dc and finish with 1 ch and 1 dtr in last dc on row = 20-23-24-27-31-32 dtr-groups on row, turn piece. ROW 9: Then work pattern according to diagram A.1 again, i.e. work 5 ch, in ch-loop in the middle of every dtr-group work 2 dtr + 2 ch + 2 dtr, finish row with 1 ch and 1 dtr in 4th ch on beg of previous row = 20-23-24-27-31-32 dtr-group. Repeat 9th row upwards. AT THE SAME TIME when piece measures 45-46-47-48-49-50 cm, divide for markers as follows: Insert 1 marker after 5-6-6-7-8-8 dtr-groups in from each side (= 10-11-12-13-15-16 dtr-groups between markers on back piece). Finish each part separately. BACK PIECE: = 10-11-12-13-15-16 dtr-groups. Continue back and forth with dtr-groups as shown in A.1. AT THE SAME TIME on 1st row dec for armholes in each side in size XXL + XXXL as follows: Dec 1 dtr-group on beg of row as shown in A.3, work as before until 1 dtr-group remains on row, finish row as shown in A.4 (do not dec in the other sizes) = 10-11-12-13-13-14 dtr-groups remain on row. Continue pattern back and forth until 1 row remains before piece measures 64-66-68-70-72-74 cm. Now work 1 row with dtr-groups only over the outermost 3-4-4-5-5-5 dtr-groups in the one side of piece: 5 ch, * in ch-loop in the middle of next dtr-group work 2 dtr + 2 ch + 2 dtr *, repeat from *-* 3-4-4-5-5-5 times in total, finish with 1 dtr in last dtr in same dtr-group, turn piece. Now work 1 row dc as follows: 1 ch, 1 dc in same st, * 1 dc in each of the first 2 dtr, 1 dc in ch-loop in the middle of dtr-group, 1 dc in each of the next 2 dtr *, repeat from *-* 3-4-4-5-5-5 times in total, finish with 1 dc in last ch and 1 dc in 4th ch from beg of previous row = 18-23-23-28-28-28 dc on row. Cut and fasten the thread. Repeat on the other shoulder (i.e. do not work over the middle 4-3-4-3-3-4 dtr-groups = neck.) RIGHT FRONT PIECE: = 5-6-6-7-8-8 dtr-groups. Continue back and forth with dtr-groups as on back piece. AT THE SAME TIME on 1st row dec for armhole in the side in size XXL + XXXL as shown in A.4 (do not dec in the other sizes) = 5-6-6-7-7-7 dtr-groups. Continue pattern back and forth until piece measures approx. 64-66-68-70-72-74 cm – adjust so that same no of rows with dtr-groups has been worked as on back piece. Now work 1 row dc as on back piece only over the outermost 3-4-4-5-5-5 dtr-groups on shoulder (i.e. do not work over the 2 dtr-groups towards the neck = collar) = 18-23-23-28-28-28 dc. Cut and fasten the thread. Insert 1 marker on the shoulder. Now work dtr-groups back and forth over collar as follows: 5 ch, in ch-loop in first dtr-group work 2 dtr + 2 ch + 2 dtr, in ch-loop in next dtr-group work 2 dtr + 2 ch + 2 dtr, work 1 ch and finish with 1 dtr in last dtr in same dtr-group. Continue back and forth like this until collar measures approx. 10-8-10-8-8-10 cm from marker on shoulder. Then work 1 row dc as follows: 1 ch, 1 dc in same st, 1 dc in next ch, 1 dc in each of the first 2 dtr, 1 dc in ch-loop in the middle of dtr-group, 1 dc in each of the next 2 dtr *, repeat from *-* 2 times in total, finish with 1 dc in last ch and 1 dc in 4th ch from beg of previous row = 14 dc, cut the thread. LEFT FRONT PIECE: Work as right front piece but reversed. When dec for armhole in size XXL + XXXL, dec 1 dtr-group as shown in A.3. ASSEMBLY: Sew shoulder seams edge to edge to avoid a chunky seam. Sew collar tog mid back (sew edge to edge) and sew it on to neck line at the back of neck. Sew on buttons on right front piece – see picture. Button through the crochet edge explained below. CROCHET EDGE: Work a finishing edge around the entire opening on vest and around both armholes as follows: 1 dc in first st, * 5 ch, skip approx. 2½ cm, 1 dc in next st/loop *, repeat from *-* the entire round and finish with 5 ch and 1 sl st in dc from beg of round. |
||||||||||||||||
Diagram explanations |
||||||||||||||||
|
||||||||||||||||
 |
||||||||||||||||
 |
||||||||||||||||
Have you finished this pattern?Tag your pictures with #dropspattern #leonavest or submit them to the #dropsfan gallery. Do you need help with this pattern?You'll find 8 tutorial videos, a Comments/Questions area and more by visiting the pattern on garnstudio.com. © 1982-2026 DROPS Design A/S. We reserve all rights. This document, including all its sub-sections, has copyrights. Read more about what you can do with our patterns at the bottom of each pattern on our site. |
||||||||||||||||


With over 40 years in knitting and crochet design, DROPS Design offers one of the most extensive collections of free patterns on the internet - translated to 17 languages. As of today we count 324 catalogues and 12267 patterns translated into English (UK/cm). 12267
We work hard to bring you the best knitting and crochet have to offer, inspiration and advice as well as great quality yarns at incredible prices! Would you like to use our patterns for other than personal use? You can read what you are allowed to do in the Copyright text at the bottom of all our patterns. Happy crafting!
Post a comment to pattern DROPS 145-4
We would love to hear what you have to say about this pattern!
If you want to leave a question, please make sure you select the correct category in the form below, to speed up the answering process. Required fields are marked *.