
Popular categories
Looking for a yarn?


Comments / Questions (24)
![]() Illy wrote:
Illy wrote:
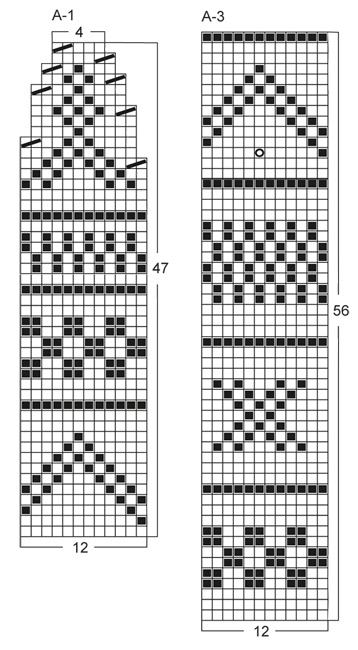
Für die Mützen Anleitung Diagramm A1 symbols = 1 M li in Hin-R, 1 M re in Rück-R Wenn es in Runden gestrickt wird dann gibt es keine hin und rück reihen?
14.01.2025 - 18:35DROPS Design answered:
Liebe Illy, ja genau, bei der Mütze strickt man nur Hinreihen, dh jede Reihe A.1 lesen Sie rechts nach links, entweder rechts (weisses Kästchen) oder links (schwarzes Kästchen). Viel Spaß beim Stricken!
15.01.2025 - 08:28
![]() Johane Champagne wrote:
Johane Champagne wrote:
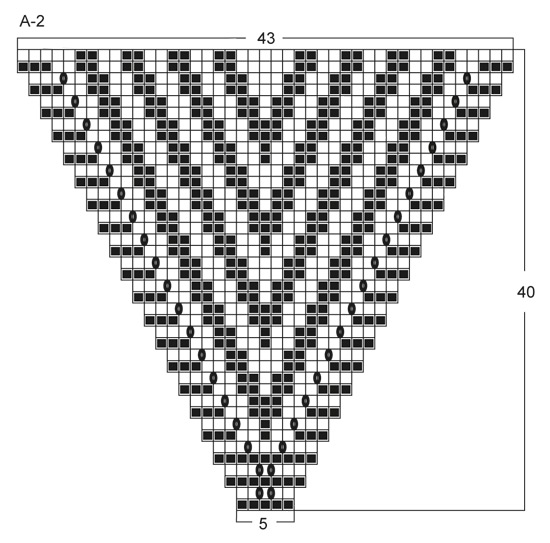
Bonjour, j’ai une question toute simple Je ne comprends pas ce que vous voulez dire par1er rang = sur l’envers pour l’écharpe Est-ce que les 5 premières mailles du début représentent l’endroit ou l’envers Merci beaucoup
30.12.2024 - 20:16DROPS Design answered:
Bonjour Mme Champagne, dès que vous avez monté les mailles, tricotez le 1er rang de A.2 sur l'envers = lisez le diagramme de gauche à droite, puis tricotez le 2ème rang de A.2 sur l'endroit (lisez le diagramme de droite à gauche). Ainsi, les jetés se font sur l'endroit. Bon tricot!
02.01.2025 - 15:07
![]() Mary-Lou wrote:
Mary-Lou wrote:
In Veronica mittens: when we begin the increases (YO) on each side of the thumb stitch, this decreases the following stitches by one. Now the 12 stitch pattern becomes 11 stitches, losing the first (thumb) stitch. Is there something I'm missing in these instructions?
21.10.2024 - 00:20DROPS Design answered:
Dear Mary-Lou, you work the stitches increased in stocking stitch, so that the pattern will "break" at the place of the thumb but should continue (and be lined up) over all remaining stitches. Happy knitting!
21.10.2024 - 09:28
![]() Anne wrote:
Anne wrote:
Bonjour, pourriez-vous préciser quelle est la forme générale de l'écharpe ? Est-ce que c'est un losange ? J'aimerais ajouter le fil de Kid-Silk au fil de Nepal et tricoter l'écharpe avec ces deux fils. Combien il en faut à peu près (Kid-Silk) ? Merci beaucoup pour tous vos jolis modèles.
27.12.2022 - 12:12DROPS Design answered:
Bonjour Anne, l'écharpe commence par un triangle (on passe de 5 à 43 mailles), puis on continue sans augmenter jusqu'à la moitié de la longueur de l'écharpe - on fait une 2ème partie identique et on assemble ces 2 pièces entre elles, vous avez ainsi un long rectangle se terminant en point de chaque côté. Bon tricot!
02.01.2023 - 09:53
![]() Agnes wrote:
Agnes wrote:
Hej! När jag stickat 6 cm av A1 och ska sätta tummaskorna på en tråd, då är ju tråden vid startmaskan som är mitt på tummen . Vart ska jag göra av tråden? Ska jag avbryta mitt i och börja med ny tråd 5 maskor fram eller hur gör jag? Det blir ju ojämnt om den ena sidan av startmaskan stickas en gång till.
27.04.2022 - 19:13
![]() Hetty Stok wrote:
Hetty Stok wrote:
I have made one mitten, which is much too short for my hand. I don’t believe I have exceptionally long fingers. I unpicked down to the start of the decrease and added 11 rows! Can this be a mistake of the pattern?
11.04.2020 - 13:25DROPS Design answered:
Dear Mrs Stok, did your tension in height also match? You should have 23 rows stocking stitch = 10 cm. Happy knitting!
14.04.2020 - 11:03
![]() Michèle Bourdin.D wrote:
Michèle Bourdin.D wrote:
MERCI JE VAIS CHERCHER POUR LES COLORIS ET ESSAYER - BRAVO A VOUS ET L EQUIPE
25.02.2019 - 13:36
![]() Ida wrote:
Ida wrote:
Hej, jeg har svært ved at forstå hvad i mener med at jeg skal fortsætte med diag A-1 (=3 rapporter rundt). Mvh Ida
26.11.2018 - 18:42DROPS Design answered:
Hei Ida. Du skal gjenta diagrammet rundt hele omgangen (= 3 ganger) slik at du får det samme mønsteret rundt hele votten. Antall rapporter betyr hvor mange ganger diagrammet skal gjentas. 1 rapport = diagrammet strikkes 1 gang. God fornøyelse
03.12.2018 - 08:44
![]() Myriam wrote:
Myriam wrote:
Ik heb de muts volgens patroon gebreid maar die is wel heel kort! De breedte is wel goed,maar de hoogte is die van een kindermuts. Klopt het patroon wel?
27.05.2017 - 14:53DROPS Design answered:
Hallo Myriam, Het patroon klopt. Vanaf hier kan ik helaas niet goed kijken wat er eventueel mis is gegaan tijdens het breien. Heb je een proeflapje gemaakt? En komt de stekenverhouding overeen? Lees eventueel nog eens goed de beschrijving door; misschien ontdek je waar het evt. mis is gegaan.
29.05.2017 - 13:23
![]() Lina Thorne wrote:
Lina Thorne wrote:
Bonjour, je viens de commencer le bonnet donc je suis dans le motif A1... Si je me fis au patron, ça ne vas pas avec la photo... À partir de la ligne 13 c'est comme si la 14 et la 15e se tricotais aussi à l'envers mais sur la photo c'est à l'endroit... et ça semble être une erreur dans les motifs A3 aussi. Est-ce que vous pourriez vérifier ? Merci beaucoup :)
19.12.2016 - 03:05DROPS Design answered:
Bonjour Mme Thorne, le bonnet se tricote en rond, ainsi au rang 13 de A.1, on tricote toutes les mailles à l'envers (= cases noires), et aux 2 rangs suivants, on tricote toutes les mailles à l'endroit (= cases blanches), puis on continue par un petit damier de 2 m end/2 m env sur 2 rangs 3 fois au total. Les 2 diagrammes sont tout à fait correct. Bon tricot!
19.12.2016 - 10:01
|
||||||||||||||||
Veronica#veronicaset |
||||||||||||||||
 |
 |
|||||||||||||||
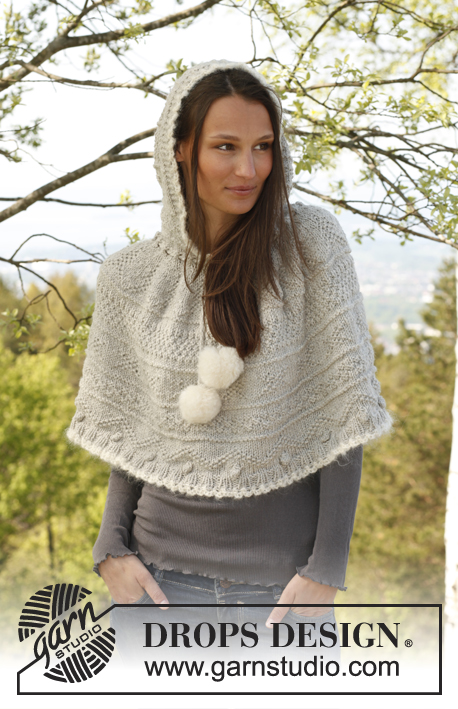
Knitted DROPS mittens, hat and scarf with textured pattern in "Nepal", pompoms in "Vienna".
DROPS 141-23 |
||||||||||||||||
|
PATTERN: See diagram A-1 for hat and mittens, and A-2 and A-3 for scarf. Diagrams show 1 repetition of pattern. ---------------------------------------------------------- HAT: Worked in the round. Cast on 84 sts on circular needle size 3.5 mm with Nepal. K 1 round, then work 6 rounds rib = K 2/P 2. Switch to circular needle size 4.5 mm, then work diagram A-1 (= 7 repetitions on the round). REMEMBER THE KNITTING TENSION! When A-1 has been worked, 28 sts remain on needle, work 1 round where all sts are K tog 2 by 2 = 14 sts. Cut the thread and pull it through the remaining sts and tighten tog. POMPOM: Make 1 large, dense pompom with Vienna with an approx. diameter of 10 cm. Sew the pompom at the top of the hat. ---------------------------------------------------------- SCARF: Worked in 2 parts back and forth on needle and sewn tog in the middle when finished. Cast on 5 sts on needle size 5.5 mm with Nepal. Work and inc according to diagram A-2 (1st row = WS). When A-2 has been worked, there are 43 sts on needle and piece measures approx. 20 cm. Continue as follows (1st row = WS): 3 sts in garter st, A-3 three times in breadth, then work first st in A-3 one more time and work the last 3 sts in garter st. REMEMBER THE KNITTING TENSION! Repeat A-3 until piece measures approx. 75 cm – finish after one whole pattern border, then K 2 rows over all sts. Put piece aside and knit another part. ASSEMBLY: Sew the 2 parts tog with grafting/kitchener sts. POMPOMS: Make 2 large, dense pompoms with Vienna with an approx. diameter of 8 cm. Fasten 1 pompom in each end of scarf. ---------------------------------------------------------- MITTEN: Worked in the round on double pointed needles. Cast on 36 sts on double pointed needles size 3.5 mm with Nepal, K 1 round then work rib = K 2/P 2 for 10 cm. Work next round as follows: * K 2 tog, 1 YO *, repeat from *-* the rest of round. Switch to double pointed needles size 4.5 mm, then work diagram A-1 (= 3 repetitions on the round). REMEMBER THE KNITTING TENSION! Insert a marker in first st on round (= thumb st). When A-1 has been worked for 2 cm, beg inc for thumb gusset. Inc on each side of thumb st by making 1 YO, on next round K YOs twisted. Repeat inc every other round 3 more times - inc on each side of all thumb sts every time, i.e. next time inc on each side of 3 sts, then 5 sts etc. – work the inc sts in stocking st. After all inc, there are 9 thumb sts and 44 sts in total. When A-1 has been worked for 6 cm, slip the 9 thumb sts on a stitch holder and cast on 1 new st over stitch holder = 36 sts. Work until A-1 is finished, 12 sts now remain on needle. Work 1 round where all sts are K tog 2 by 2 = 6 sts. Cut the thread and pull it through the remaining sts and tighten tog. THUMB: Slip sts from stitch holder over thumb gusset on double pointed needles size 4.5 mm and knit in addition up 3 sts along the edge behind the thumb = 12 sts. Work in stocking st for 5 cm, then K all sts tog 2 by 2 = 6 sts. Cut the thread and pull it through the remaining sts and tighten tog. Knit another mitten. |
||||||||||||||||
Diagram explanations |
||||||||||||||||
|
||||||||||||||||
 |
||||||||||||||||
 |
||||||||||||||||
Have you finished this pattern?Tag your pictures with #dropspattern #veronicaset or submit them to the #dropsfan gallery. Do you need help with this pattern?You'll find 9 tutorial videos, a Comments/Questions area and more by visiting the pattern on garnstudio.com. © 1982-2026 DROPS Design A/S. We reserve all rights. This document, including all its sub-sections, has copyrights. Read more about what you can do with our patterns at the bottom of each pattern on our site. |
||||||||||||||||


With over 40 years in knitting and crochet design, DROPS Design offers one of the most extensive collections of free patterns on the internet - translated to 17 languages. As of today we count 324 catalogues and 12267 patterns translated into English (UK/cm). 12267
We work hard to bring you the best knitting and crochet have to offer, inspiration and advice as well as great quality yarns at incredible prices! Would you like to use our patterns for other than personal use? You can read what you are allowed to do in the Copyright text at the bottom of all our patterns. Happy crafting!
Post a comment to pattern DROPS 141-23
We would love to hear what you have to say about this pattern!
If you want to leave a question, please make sure you select the correct category in the form below, to speed up the answering process. Required fields are marked *.