
Popular categories
Looking for a yarn?


Comments / Questions (91)
![]() Belinda Lance wrote:
Belinda Lance wrote:
I did a long tail cast on of 94 I wrote it out so I could understand and because I am not working in rounds for the first part so I refer to back and forth in rows. Row 1: Knit Row 2: Knit 6, K2, P2 (20 times =80), K2, knit 6 Row 3: knit 6, P2, K2 (20 times) P2, knit 6 Is this how I would start out on the hat for the first couple of rows? I would greatly appreciate any assistance. Thanks:)
10.01.2017 - 22:03DROPS Design answered:
Dear Mrs Lance, you should have rib K2/P2 with 6 sts in garter st on each side of row. When working rib from WS K over K and P over P (continue the 6 sts in garter st on each side). Happy knitting!
11.01.2017 - 09:22
![]() Annette Guay wrote:
Annette Guay wrote:
Merci bcp ,,pour les explications.😊
04.01.2017 - 16:36
![]() Annette wrote:
Annette wrote:
Je ne comprends pas comment faire les diminutions pour le bonnet repartir..5 fois 12 diminutions tous les 3 tours,j,ai 80 mailles merci..
02.01.2017 - 16:59DROPS Design answered:
Bonjour Annette, tricotez 1 tour en répartissant 12 diminutions (= il reste 68 m, tricotez 2 tours sans diminuer, répétez ces 3 tours encore 4 fois, il reste 20 m. Cliquez ici pour calculer comment répartir les diminutions. Bon tricot!
02.01.2017 - 17:03
![]() Asma wrote:
Asma wrote:
Bonjour, je tricote le diagramme en rond ainsi; rang 1 : 1m end, 1 m env, pareil pour le deuxième rang, rang 3 tout à l'endroit et rang 4 tout à l'envers, est-ce correct? Un grand merci.
16.11.2016 - 08:12DROPS Design answered:
Bonjour Asma, c'est tout à fait correct. Bon tricot!
16.11.2016 - 09:19
![]() Diana wrote:
Diana wrote:
The structure of the two pieces in the picture are different. It seems like the neck warm has the wrong side out. When I cast on the neck warmer, it says knit wrong side, then 6 garter stitches, K2, *P2, K2* on right side. When I did this for a few rows, it looks like the WS is the RS (as in the picture) Do I have to knit 2 rows in the beginning, then start the RS?
18.10.2016 - 22:09DROPS Design answered:
Dear Diana, at the beg of neck warmer, the first row is worked K from WS, then work in rib 6 sts in garter st, K2, (P2,K2) until 6 sts remain, work these 6 sts in garter st. Continue like this, ie work the 6 sts on each side in garter st and K over K and P over P until piece measures 4 cm. Then work from RS: 6 sts in garter st, repeat A.1 and finish with 6 sts in garter st. Happy knitting!
19.10.2016 - 09:34
![]() Catherine Mireault wrote:
Catherine Mireault wrote:
Bonjour est ce que je tricote en aller retour seulement pour les côtes et après je tricote en rond??? Les explications ne sont pas claires!!
16.10.2016 - 02:31DROPS Design answered:
Bonjour Mme Mireault, on tricote d'abord en allers et retours, puis, à 8 cm de hauteur totale, on rabat les 6 premières m et on tricote A.1, en rond, sur toutes les mailles = 80-88 m. Bon tricot!
17.10.2016 - 09:49
![]() Chantelle wrote:
Chantelle wrote:
Hello, can you please explain in written form, how to read the pattern of the 4 rows that are continued. Starting off on right side. THANK YOU!
30.09.2016 - 00:48DROPS Design answered:
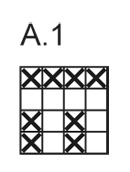
Dear Chantelle, from RS when working in the round work A.1 as follows: Round 1+2 = k1,P1,k1,P1 - Round 3= K - Round 4 = P. Happy knitting!
30.09.2016 - 08:52
![]() Valy wrote:
Valy wrote:
Ciao, è la prima volta che provo a realizzare uno dei vostri modelli e leggendo il modello 140-40 nello schema per il cappello non mi è chiaro cosa si intende con: Lavorare 1 f. a diritto sul rovescio del lavoro, potete fornirmi maggiori dettagli? Grazie
10.12.2015 - 16:09DROPS Design answered:
Buonasera Valy. La prima parte del berretto viene lavorata in ferri di andata e ritorno; solo in un secondo momento si lavora in tondo. Dopo aver avviato le m, lavora tutte le m del primo ferro a dir. Mentre lavora questo ferro, la parte del lavoro che è rivolta verso di lei, è la parte rovescia del lavoro, quindi la parte che rimane all'interno del berretto, non quella che sarà la parte visibile (il diritto del lavoro, la parte esterna) del berretto. Buon lavoro!
10.12.2015 - 21:39
![]() Aisha wrote:
Aisha wrote:
Hi I am new knitter,my friend send me Nepal yarn which is very lovely,I wanted to make this pattern but can you please write the pattern step by step ,I dont understand how to read it the way it is written.I will really help me.thanks
28.11.2015 - 05:51DROPS Design answered:
Dear Aisha, Read more about diagrams here: read from the right towards the left every round (= from RS), and when working in rows, read the RS rows from the right towards the left and the WS rows from the left towards the right. You can also get individual assistance from our DROPS store, even per mail or telephone. Happy knitting!
30.11.2015 - 10:21
![]() Giulia wrote:
Giulia wrote:
Buonasera, avrei una domanda per la misura S/M del cappello per quanto riguarda le 12 diminuzioni ogni 3 giri potete spiegarmi come posso sistemare dei segnapunto in modo da poter diminuire alla destra e alla sinistra di essi fino alla fine in modo da avere un lavoro pulito?
25.10.2015 - 20:56DROPS Design answered:
Buongiorno Giulia. Potrebbe p.es inserire i segnapunti dopo la 6a, 13a, 19a, 26a, 33a, 40a, 47a, 53a, 60a, 67a, 73a, 80a m. Buon lavoro!
26.10.2015 - 13:36
|
|||||||
Bliss#blissset |
|||||||
|
|
|||||||
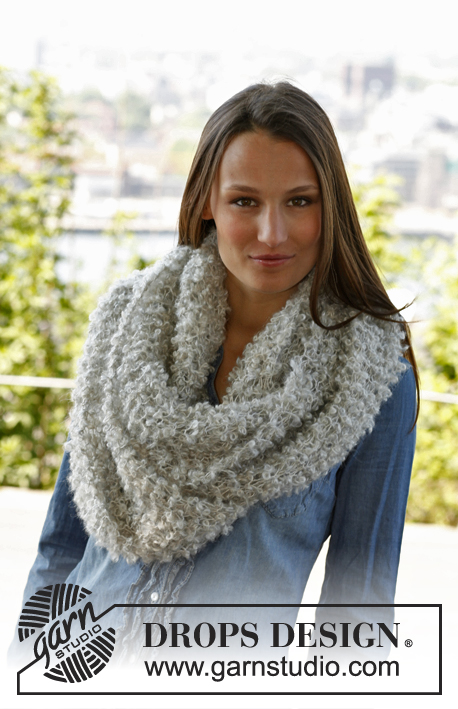
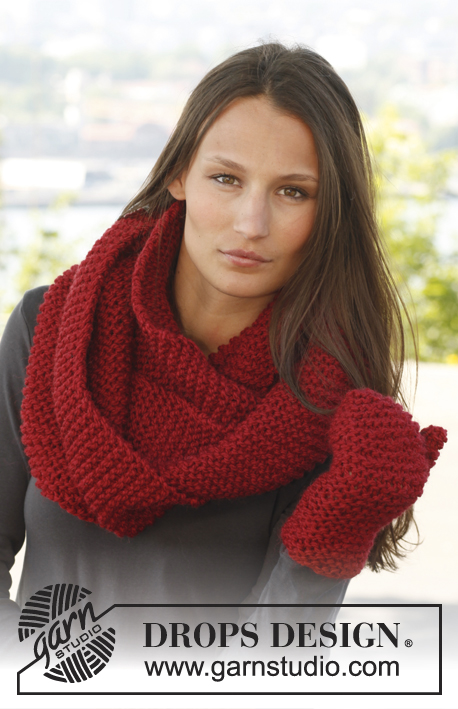
Knitted DROPS neck warmer and hat with pattern in ”Nepal”.
DROPS 140-40 |
|||||||
|
GARTER ST (back and forth on needle): K all rows. 1 ridge = 2 rows K. GARTER ST (in the round on circular needle): 1 ridge = 2 rounds * K 1 round and P 1 round *, repeat from *-*. PATTERN: See diagram A.1. Diagram shows all rows in pattern from RS. ---------------------------------------------------------- HAT: Piece is first worked back and forth on circular needle and then in the round. Cast on 86-94 sts with Nepal on circular needle size 4 mm. K 1 row from WS, then work as follows: 6 sts in GARTER ST - see explanation above, * K 2, P 2 *, repeat from *-*, finish with K 2 and 6 sts in garter st. Continue rib and in garter st in each side until piece measures 4 cm. Switch to circular needle size 5 mm. Now work as follows: 6 sts in garter st, A.1 over the next 74-82 sts and finish with 6 sts in garter st. When piece measures 8 cm, cast off the first 6 sts on needle, then work in the round with A.1 over all sts = 80-88 sts. When piece measures 20-21 cm, work in GARTER ST - see explanation above - until finished measurements. Work in garter st, AT THE SAME TIME dec 12 sts evenly every 3rd round a total of 5 times = 20-28 sts remain on round. Work the remaining sts tog 2 by 2, cut the thread and pull it through the remaining sts. Tighten tog and fasten. The hat measures approx. 25-26 cm vertically. Sew 2 buttons on to flap at the bottom of hat, sew through both layers. ---------------------------------------------------------- NECK WARMER: Worked back and forth on needle. Cast on 62 sts on circular needle size 4 mm with Nepal. K 1 row from WS, then work as follows - from RS: 6 sts in garter st, K 2, * P 2, K 2 *, repeat from *-* and finish with 6 sts in garter st. Continue like this. When piece measures 4 cm, switch to circular needle size 5 mm and continue as follows: 6 sts in garter st, A.1 over the next 50 sts and finish with 6 sts in garter st. When piece measures 20 cm, cast off 6 sts in each side = 50 sts. Cut the thread. Put piece aside. Knit another part the same way. Cast on 6 sts on circular needle size 5 mm, work sts from one part back on needle, work sts from the other part back on needle and cast on 6 sts at end of row = 112 sts. Worked back and forth on needle as follows: 6 sts in garter st (band), A.1 over the next 100 sts, 6 sts in garter st (band). Continue like this until piece measures 34 cm. Switch to circular needle size 4 mm, then work as follows – AT THE SAME TIME on first row inc 2 sts evenly. 6 sts in garter st, K 2, * P 2, K 2 *, repeat from *-* and finish with 6 sts in garter st = 114 sts. Work rib for 4 cm, then cast off with K over K and P over P. Place bands on top of each other and sew on 4 buttons through both layers. |
|||||||
Diagram explanations |
|||||||
|
|||||||
 |
|||||||
Have you finished this pattern?Tag your pictures with #dropspattern #blissset or submit them to the #dropsfan gallery. Do you need help with this pattern?You'll find 7 tutorial videos, a Comments/Questions area and more by visiting the pattern on garnstudio.com. © 1982-2026 DROPS Design A/S. We reserve all rights. This document, including all its sub-sections, has copyrights. Read more about what you can do with our patterns at the bottom of each pattern on our site. |
|||||||


With over 40 years in knitting and crochet design, DROPS Design offers one of the most extensive collections of free patterns on the internet - translated to 17 languages. As of today we count 324 catalogues and 12267 patterns translated into English (UK/cm). 12267
We work hard to bring you the best knitting and crochet have to offer, inspiration and advice as well as great quality yarns at incredible prices! Would you like to use our patterns for other than personal use? You can read what you are allowed to do in the Copyright text at the bottom of all our patterns. Happy crafting!
Post a comment to pattern DROPS 140-40
We would love to hear what you have to say about this pattern!
If you want to leave a question, please make sure you select the correct category in the form below, to speed up the answering process. Required fields are marked *.