
Popular categories
Looking for a yarn?


Comments / Questions (53)
![]() Marjan wrote:
Marjan wrote:
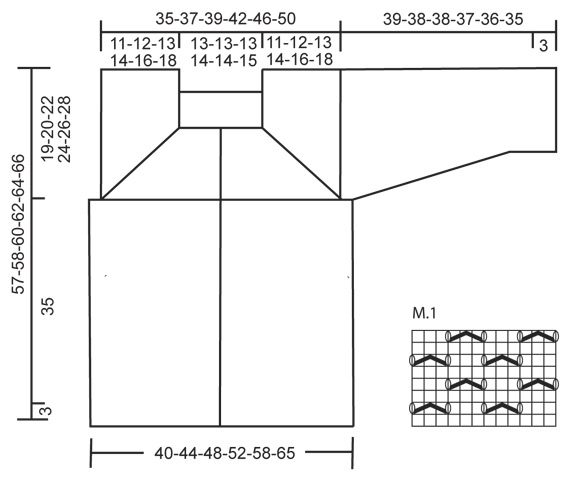
Bei dem Muster M1, werden da die Rückreihen glatt links gestrickt, oder auch mit M1?
18.12.2014 - 13:05DROPS Design answered:
Im Muster M.1 sind alle R eingezeichnet. Sie stricken also immer abwechselnd 1 Hin-R mit Umschlägen + Abnahme und 1 Rück-R glatt re, d.h. li.
21.12.2014 - 23:07
![]() Silvia wrote:
Silvia wrote:
Salve , ho bisogno di fare questo modello di 2 taglie in meno come devo regolarmi con i conteggi ? grazie silvia
06.10.2014 - 20:02DROPS Design answered:
Buongiorno, 2 taglie in meno vuol dire una maglia per un bambino perché la S è una 40/42. E' un top-down e potrebbe avviare 8 maglie in meno rispetto alla S. Si deve però regolare con le diminuzioni e aumenti da sola avendo 8 maglie in meno.
09.10.2014 - 12:48Laura wrote:
Hello If I am a 12 UK size, what size am I here (Large or XL?)? Looking forward to your response! Kind regards, Laura
22.03.2014 - 14:37DROPS Design answered:
Dear Laura, you will find all finished measurement in cm in the chart at the end of the pattern, these measurements are taken flat from side to side. Compare them to one similar garment you like the shape to find the matching size. Happy knitting!
23.03.2014 - 18:10
![]() Ines wrote:
Ines wrote:
Felicidades por presentar modelos en top-down (de arriba para abajo). Podriais publicar la próxima colección otoño-invierno algún modelo en nórdico y algún modelo en trenzado o indicar al realizar el modelo la posibilidad de realizar los nórdicos o los trenzados con la técnia de top-donw indicando los puntos del inicio de la labor y la distribución entre delantero, espalda y mangas? Gracias. Un saludo.
20.03.2014 - 14:52DROPS Design answered:
Hola Inés! Me alegro de que encuentres patrones a tu gusto. Pasaré tu sugerencia al departamento de diseño a ver que les parece. Un saludo.
21.03.2014 - 09:03Marica wrote:
Hi, the diagram is worked on 12 sts, but when you work the bodoni, then umbre of sta is not a multiple of 12. Thanks Marica
20.03.2014 - 10:53DROPS Design answered:
Dear Marica, repeat diagram M.1 on indicated sts, and start again diagram from 1st row on the last sts. Happy knitting!
23.03.2014 - 16:58
![]() Marica wrote:
Marica wrote:
Salve, mi sembra che il n delle m del motivo che si ripete è 12, ma quando si arriva a lavorarlo il n di m non è in un multiplo di 12. Forse mi sfugge qualcosa? Grazie Marìca
20.03.2014 - 10:47DROPS Design answered:
Buongiorno Marìca. Il diagramma riporta 12 m, ma di fatto il motivo si lavora su gruppi di 3 m e il numero delle m che ha sui ferri è un numero divisibile per 3 (tolte le m dei bordi). Non dovrebbe pertanto riscontrare grosse difficoltà nella lavorazione, ma ci riscriva se è ancora in difficoltà. Buon lavoro!
20.03.2014 - 13:46
![]() Angela wrote:
Angela wrote:
Hallo, ich möchte diese tolle Jacke gerne stricken, allerdings in Größe L mit einer Länge von 66 cm. Ist das problemlos machbar?
01.03.2014 - 09:34DROPS Design answered:
Liebe Angela, ja, das ist problemlos möglich, da das Rumpfteil gerade geschnitten ist (ohne Ab- und Zunahmen). Sie stricken also die Jacke nach Größe L, bis Sie zu der Stelle gelangen, an der Sie zu Nadel 4 wechseln und mit M1 beginnen (die Jacke wird nun ab hier weitergemessen). Sie stricken nun nicht 35 cm, sondern 41 cm, dann noch die 3 cm kraus re, damit kommen Sie auf eine Gesamtlänge von 66 cm. Viel Spaß beim Stricken!
01.03.2014 - 12:10
![]() Strickrodt wrote:
Strickrodt wrote:
Eine Frage zum Ärmel: wie gelingt die Abnahme bei dem Muster. es ist unklar wie die Abnahme da zu integrieren ist. Nett wäre es bald eine Antwort zu bekommen, denn ich bin mitten im stricken der Ärmel und unzufrieden mit der Abnahme
17.02.2014 - 15:33DROPS Design answered:
Liebe Frau Strickrodt, wenn abgenommen werden muss und es dann nicht mehr möglich ist, an der Stelle das Muster zu stricken, stricken Sie stattdessen einfach glatt rechts. Wichtig ist, dass Sie beim restlichen Ärmel trotz der Abnahmen weiterhin im Rhythmus des Musters bleiben. Viel Spaß beim Weiterstricken!
17.02.2014 - 15:50
![]() Anna wrote:
Anna wrote:
Beim Stricken der Ärmel ist von ZUnahmen die Rede - die Anleitung macht aber nur dann Sinn, wenn es sich hierbei um ABnahmen handelt....?
07.02.2013 - 22:44DROPS Design answered:
Liebe Anna, vielen Dank für den Hinweis, das ist völlig richtig. Wir werden es korrigieren.
08.02.2013 - 07:46
![]() Anita R. Andersen wrote:
Anita R. Andersen wrote:
Jeg lurer på om jeg skal strikke kastene vridd eller ikke i mønsteret?
22.01.2013 - 15:22DROPS Design answered:
Du skal ikke strikke kastene vridd. Hvis du gör det, saa faar du ingen huller og derfor intet mönster.
23.01.2013 - 19:14
|
|||||||
Waves#wavescardigan |
|||||||
|
|
|||||||
Knitted DROPS jacket in garter st and with lace pattern, worked top down in ”Cotton Light”. Size: S - XXXL
DROPS 137-9 |
|||||||
|
GARTER ST (back and forth on circular needle): K all rows. 1 ridge = 2 rows K. GARTER ST (in the round on double pointed needles): * K 1 round and P 1 round *, repeat from *-*. PATTERN: See diagram M.1, diagram shows pattern from RS. BUTTON HOLES: Cast off for button holes on right band from WS. 1 button hole = cast off 4th and 5th st from mid front and cast on 2 new sts on next row over these sts. Cast off for button holes when piece measures: Size S, M and L: 2 and 10 cm. Size XL, XXL and XXXL: 2 and 12 cm. -------------------------------------------------------- JACKET: Worked top down. Worked back and forth on a circular needle from mid front to make room for all the sts. Remember BUTTON HOLES on right band - see explanation above. Cast on 116-124-124-136-136-140 sts (incl 5 band sts in each side towards mid front) on circular needle size 3.5 mm with Cotton Light (cast on evenly and not too loose, this is the neck edge). K 1 row from WS. Insert 4 markers in the corner sts as follows (from RS): 1st marker i the 19th-19th-19th-20th-20th-21st st, 2nd marker in the 45th-49th-49th-54th-54th-55th st, 3rd marker in the 72nd-76th-76th-83rd-83rd-86th st and 4th marker in the 98th-106th-106th-117th-117th-120th st, 18-18-18-19-19-20 sts remain after last marker (sts up to 1st marker = left front piece, sts between 1st and 2nd marker and 3rd and 4th marker = sleeves, sts between 2nd and 3rd marker = back piece and sts after 4th marker = right front piece). READ ALL OF THE FOLLOWING SECTION BEFORE CONTINUING! Work in GARTER ST back and forth on needle – AT THE SAME TIME on 1st row (= RS), inc 1 st on each side of the 4 sts with markers – inc by making 1 YO (= 8 inc). On next row K YOs twisted to avoid holes (i.e. work in back loop of st instead of front). REMEMBER THE KNITTING TENSION! Repeat inc every other row a total of 23-25-27-29-34-38 times = 300-324-340-368-408-444 sts. K 1 row from WS after last inc, cut the thread. Slip the first 42-44-46-49-54-59 sts (incl 1st marker) on stitch holder 1 (= left front piece), slip the next 71-79-83-91-101-109 sts on stitch holder 2 (= sleeve), keep the next 74-78-82-88-98-108 sts (incl 2nd and 3rd marker) on needle for back piece, slip the next 71-79-83-91-101-109 sts on stitch holder 3 (= sleeve) and slip the last 42-44-46-49-54-59 sts (incl 4th marker) on stitch holder 4 (= right front piece). BACK PIECE: = 74-78-82-88-98-108 sts. To avoid a deep neck line at the back work 4 cm in garter st back and forth down the back piece sts (finish after 1 row from WS), cut the thread. BODY: Work sts from stitch holder 1 (= 42-44-46-49-54-59 sts) on to needle – while AT THE SAME TIME inc 2-4-5-7-7-9 sts evenly by making YOs (do not inc over the first 10 sts (= band), cast on 6-6-8-8-10-10 new sts under sleeve, work sts over back piece (= 74-78-82-88-98-108 sts) – while AT THE SAME TIME inc 5-8-12-14-14-20 sts evenly, cast on 6-6-8-8-10-10 new sts under the other sleeve and work sts from stitch holder 4 (= 42-44-46-49-54-59 sts) on to needle – while AT THE SAME TIME inc 2-4-5-7-7-9 sts evenly (do not inc over the last 10 sts (= band) = 179-194-212-230-254-284 sts in total. NOW MEASURE PIECE FROM HERE! Switch to circular needle size 4 mm. Then work diagram M.1 (1st row = WS) with 10 band sts in each side towards mid front in garter st until finished measurements. When piece measures approx. 35 cm (finish after 1 row from WS), switch back to circular needle size 3.5 mm. Work in garter st for 3 cm, LOOSELY cast off (use circular needle size 4 mm when casting off to avoid a tight cast off edge). SLEEVE: Work sts from stitch holder 2 on to double pointed needles size 4 mm (= 71-79-83-91-101-109 sts), then knit up 8 sts at the end of row along the outermost 4 cm in garter st worked extra on back piece, then knit up 1 st in each of the 6-6-8-8-10-10 sts cast on under sleeve on body = 85-93-99-107-119-127 sts. NOW MEASURE PIECE FROM HERE! K 1 round while AT THE SAME TIME dec 11-13-13-9-15-17 sts evenly = 74-80-86-98-104-110 sts. Insert a marker mid under sleeve (i.e. in the middle of sts knitted up under sleeve on body). Continue with diagram M.1 – but work 1 st on each side of marker mid under sleeve in stocking st. AT THE SAME TIME when piece measures 1 cm, dec 1 st on each side of marker. Repeat dec every cm a total of 2-4-4-8-8-13 times and then every 3-3-3-2-2-2 cm a total of 7-8-8-10-10-8 times – NOTE: Work sts that do not fit diagram M.1 in stocking st when dec. After all dec are done, 56-56-62-62-68-68 sts remain on needle. When sleeve measures 36-35-35-34-33-32 cm (shorter measurements in the larger sizes because of broader shoulder width), switch to double pointed needles size 3.5 mm and continue in GARTER ST in the round – see explanation above, for 3 cm. Then LOOSELY cast off. Sleeve measures approx. 39-38-38-37-36-35 cm. ASSEMBLY: Sew on buttons. |
|||||||
Diagram explanations |
|||||||
|
|||||||
 |
|||||||
Have you finished this pattern?Tag your pictures with #dropspattern #wavescardigan or submit them to the #dropsfan gallery. Do you need help with this pattern?You'll find 12 tutorial videos, a Comments/Questions area and more by visiting the pattern on garnstudio.com. © 1982-2026 DROPS Design A/S. We reserve all rights. This document, including all its sub-sections, has copyrights. Read more about what you can do with our patterns at the bottom of each pattern on our site. |
|||||||


With over 40 years in knitting and crochet design, DROPS Design offers one of the most extensive collections of free patterns on the internet - translated to 17 languages. As of today we count 324 catalogues and 12267 patterns translated into English (UK/cm). 12267
We work hard to bring you the best knitting and crochet have to offer, inspiration and advice as well as great quality yarns at incredible prices! Would you like to use our patterns for other than personal use? You can read what you are allowed to do in the Copyright text at the bottom of all our patterns. Happy crafting!
Post a comment to pattern DROPS 137-9
We would love to hear what you have to say about this pattern!
If you want to leave a question, please make sure you select the correct category in the form below, to speed up the answering process. Required fields are marked *.