
Popular categories
Looking for a yarn?


Comments / Questions (68)
Larala wrote:
Really pretty pattern, but not well written. I'm doing the XL size. At 45 cm, there are 223 st. If I bind off as indicated, by the time I get to 47 cm, I have only 199 st left. But the pattern shows 50+103+50=203. It doesn't make sense, as I would have to bind off every over row instead of every row to get there. At what point does the 50/103 st count starts? If that takes into account the armhole decrease, shouldn't the markers be at 55 on each side between 45 and 47 cm. Please clarify.
21.02.2016 - 22:29DROPS Design answered:
Dear Larala, when piece measures 45 cm you start dec for neckline on both sides (see under right front piece, ie: 8 sts 1 time + 2 sts 3 times, 1 st 3 times ..x 2 sides), when you bind off for armholes, you will have already bound off/dec for neckline on both front pieces, that's why you have less sts. Happy knitting!
22.02.2016 - 11:10
![]() Jacinthe Marcoux wrote:
Jacinthe Marcoux wrote:
Vers la fin des explications: Dos et devant: à 45 cm de hauteur total.... Et ensuite on dit, à 46 cm de hauteur pour la taille Large que j'utilise, tricoter le rang suivant ainsi : tricoter... C'est comme s'il faut faire un tour complet, alors qu'on a deja commencer à rabatre selon le modele du devant droit???????
16.02.2016 - 15:19DROPS Design answered:
Bonjour Mme Marcoux, à 45 cm, vous commencez à former l'encolure comme expliqué sous le devant droit, mais vous continuez à tricoter sur toutes les mailles (formez bien l'encolure sur chacun des 2 devants), et, à 46 cm, rabattez les mailles des emmanchures et continuez chaque pièce séparément. Bon tricot!
16.02.2016 - 15:56
![]() BORGNIEZ Jeanine wrote:
BORGNIEZ Jeanine wrote:
Bonjour, j'ai réalisé ce gilet pour ma fille Amélie et il est magnifique !
26.11.2015 - 09:54Johanna Dalsant wrote:
Muss man auf beiden Seiten Abketten oder macht man das nur auf der Vorderseite?
03.02.2015 - 16:31
![]() Johanna Dalsant wrote:
Johanna Dalsant wrote:
Tut mir Leid, ich hab gestern die falsche Sprache erwischt... Hab meine Frage glaub ich inzwischen selbst geklärt, danke trotzdem :-)
09.01.2015 - 17:23Johanna Dalsant wrote:
Muss man auf beiden Seiten Abketten oder macht man das nur auf der Vorderseite?
09.01.2015 - 17:19DROPS Design answered:
Bitte beschreiben Sie etwas genauer, welche Stelle Sie meinen.
11.01.2015 - 16:06Johanna Dalsant wrote:
Muss man auf beiden Seiten Abketten oder macht man das nur auf der Vorderseite?
08.01.2015 - 22:06Johanna Dalsant wrote:
Do I have to decrease starting at 5 cm of the total work? If so, I've got something wrong ;-)
23.12.2014 - 18:00DROPS Design answered:
Dear Mrs Dalsant, that's correct decrease start when piece measures a total of 5 cm from cast on edge. Happy knitting!
23.12.2014 - 19:11Rekha wrote:
Can u plz buy the pattern setp by setp..that pattern is i'dont undersant.your pattern is so pretty.plz help me and reply me thank you
22.10.2014 - 17:09DROPS Design answered:
Dear Mrs Rehka, for any individual assistance, please contact your DROPS store or feel free to ask here your question. Happy knitting!
23.10.2014 - 09:34
![]() Marleen Staessens wrote:
Marleen Staessens wrote:
En dan hebben we het toch over de verticale "herhaling " ? Dan zou men beter het woord 'breien' ipv 'herhalen' gebruiken
29.01.2014 - 15:29DROPS Design answered:
Hoi Marleen. De herhaling kan in de hoogte (verticaal) of in de breedte zijn. Als het in de hoogte, is, gebruiken we de term verticaal herhaling en niet breien.
30.01.2014 - 11:33
|
|||||||||||||||||||||||||||||||
Misty vines |
|||||||||||||||||||||||||||||||
 |
 |
||||||||||||||||||||||||||||||
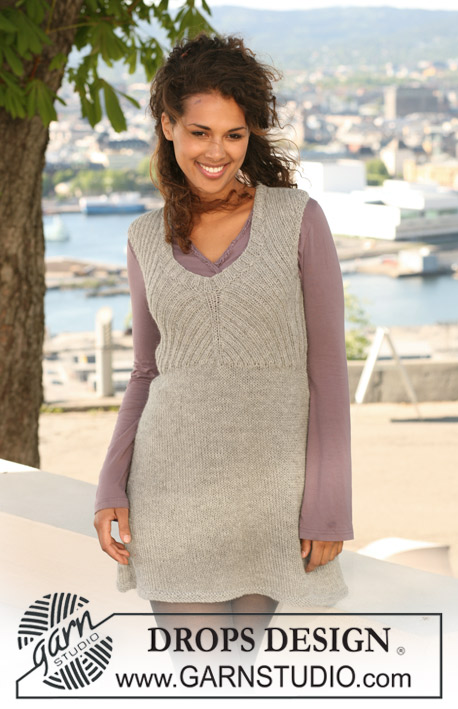
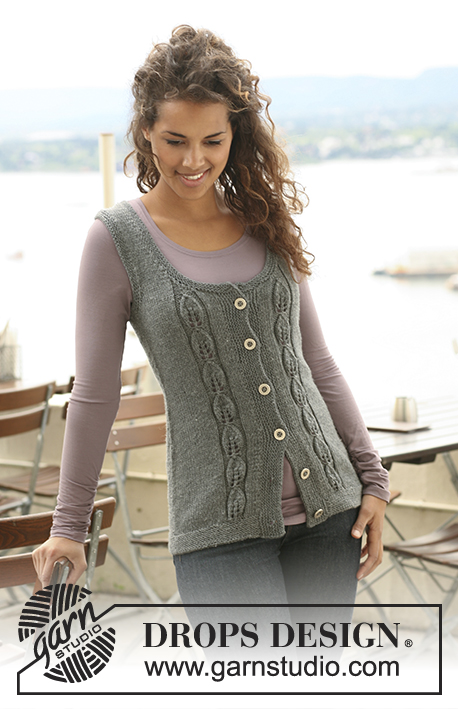
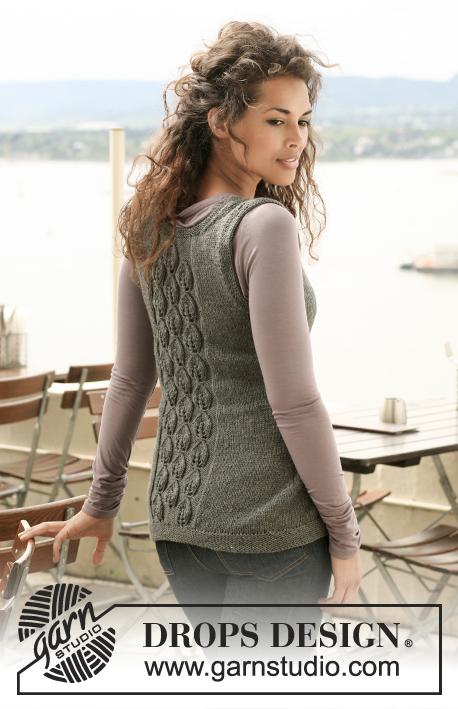
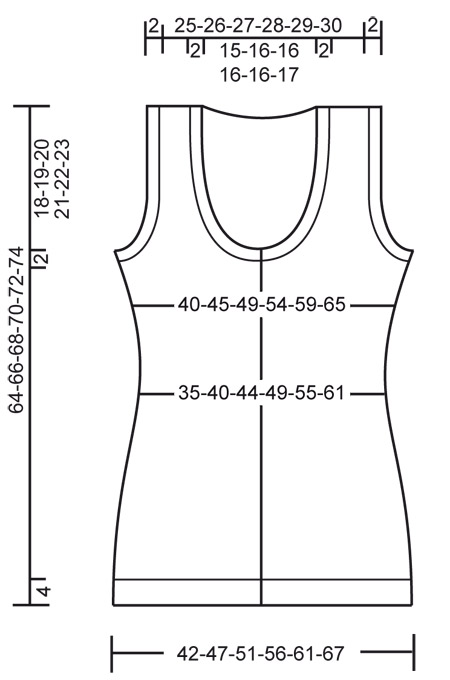
Knitted DROPS sleeveless top with leaf pattern in ”Karisma”. Size S - XXXL.
DROPS 125-2 |
|||||||||||||||||||||||||||||||
|
GARTER ST (back and forth on needle): K all rows. GARTER ST (in the round): K 1 round, P 1 round. DECREASING TIP (applies to the side on body piece): Make all dec from RS. Beg 2 sts before marker: K2 tog, slip 1 st as if to K, K1, psso. INCREASING TIP (applies to the side on body piece): Make all inc from RS. Inc 1 st by picking up st from previous row and K this. PATTERN: See diagram M.1 and M.2. Diagram shows the pattern from RS and row 1 in diagram = RS. -------------------------------------------------------- SLEEVELESS TOP: Worked back and forth on circular needle from mid front. BODY PIECE: Cast on 173-193-209-231-255-277 sts on circular needle size 3.5 mm with Karisma. Work GARTER ST back and forth on needle – see above. When piece measures 4 cm change to circular needle size 4 mm. Now insert 2 markers 42-47-51-57-63-68 sts in from each side = 89-99-107-117-129-141 sts between markers on back piece. Work next row as follows from RS: 1 edge st in garter st, 5-5-6-7-8-8 stocking sts, M.1 (= 9 sts), 62-72-79-89-100-111 stocking sts, M.2A (= 19 sts), 62-72-79-89-100-111 stocking sts, M.1 (= 9 sts), 5-5-6-7-8-8 stocking sts and 1 edge st in garter st. Continue pattern like this – NOTE: After 1 vertical repeat of M.2A, continue in M.2B, work 8-8-8-8-9-9 vertical repeats of M.2B, then work 1 repeat of M.2C and then continue in reverse stocking st on the 19 sts in M.2 up to neckline dec. Work 7 vertical repeats of M.1 for all sizes, then continue in reverse stocking st on the 9 sts in M.1 up to neckline dec. REMEMBER THE KNITTING TENSION! AT THE SAME TIME When piece measures 5 cm dec 1 st each side of both markers (= 4 dec sts) – See DECREASING TIP! Repeat the dec on every 3-3-3.5-3.5-3.5-4. cm a total of 8-8-7-7-7-6 times = 141-161-181-203-227-253 sts. When piece measures 31-32-31-31-32-31 cm inc 1 st each side of both markers (= 4 inc sts) – See INCREASING TIP! Repeat the inc on every 2-2-3-3-4-4.5 cm a total of 6-6-5-5-4-4 times = 165-185-201-223-243-269 sts. Note! When piece measures 45 cm dec for the neck is starting on all sizes. See explanation under right front piece. When piece measures 44-45-46-47-48-49 cm work next row as follows: work 36-41-44-50-54-60 sts as before (= front piece), cast off 8-8-10-10-12-12 sts for armhole (i.e. 4-4-5-5-6-6 sts each side of marker), work 77-87-93-103-111-125 sts (= back piece), cast off 8-8-10-10-12-12 sts for armhole and work the remaining 36-41-44-50-54-60 sts as before (= front piece). Complete each piece separately. BACK PIECE: = 77-87-93-103-111-125 sts. Continue as before in stocking st and M.2 on the middle 19 sts AT THE SAME TIME cast off for armhole at the beg of every row each side as follows: 3 sts 0-0-0-1-1-2 times, 2 sts 3-5-6-7-8-10 times and 1 st 5-5-5-4-5-4 times = 55-57-59-61-63-65 sts (includes 1 edge st each side). Continue pattern as before. When piece measures 61-63-64-66-68-69 cm cast off the middle 31-33-27-29-29-31 sts for neck and complete each shoulder separately. Cast off for neckline at the beg of every row from neck: 2 sts 1-1-2-2-2-2 times and 1 st 2-2-3-3-3-3 times = 8-8-9-9-10-10 sts left on shoulder. Cast off when piece measures 64-66-68-70-72-74 cm. RIGHT FRONT PIECE: = 36-41-44-50-54-60 sts. Continue as before in stocking st and M.1, AT THE SAME TIME cast off for armhole at the beg of every row from the side (i.e. on every row from WS) as described for back piece. AT THE SAME TIME when piece measures 45 cm for all sizes cast off 6-6-7-8-9-9 sts towards mid front, i.e. from RS for neck. Cast off to shape the neckline at the beg of every row from mid front as follows: 2 sts 3 times and 1 st 3 times, then cast off at the beg of every other row from mid front: 1 st 2-3-2-3-2-2 times. After all dec for armhole and neckline are complete there 8-8-9-9-10-10 sts left on needle. Cast off as described for back piece. LEFT FRONT PIECE: Like right front piece, but mirrored, i.e. cast off for armhole on every row from RS and cast off for neck from WS. ASSEMBLY: Sew shoulder seams. SLEEVE EDGE: Pick up from RS approx 84-106 sts round armhole inside 1 edge st on circular needle size 3.5 mm. Work GARTER ST in the round – see above. When edge measures approx 2 cm cast off. Repeat round the other armhole. RIGHT FRONT BAND: Pick up from RS approx 86-102 sts along right front piece inside 1 edge st on circular needle size 3.5 mm with Karisma. Work garter st back and forth on needle. After 2.5 cm make 6 buttonholes evenly distributed – place the top buttonhole approx 1 cm from neckline and the bottom one 2-3 cm from bottom edge. 1 BUTTONHOLE = cast off 1 st and cast on 1 new st on next row. Cast off when front band measures 4 cm. LEFT FRONT BAND: Like right front band but without buttonholes. Sew buttons on left front band. NECKLINE: Pick up from RS approx 140 –170 sts round neck (also pick up on front bands) on circular needle size 3.5 mm. Work garter st back and forth on needle until neckline measures approx 2 cm and cast off. |
|||||||||||||||||||||||||||||||
Diagram explanations |
|||||||||||||||||||||||||||||||
|
|||||||||||||||||||||||||||||||
 |
|||||||||||||||||||||||||||||||
 |
|||||||||||||||||||||||||||||||
Have you finished this pattern?Tag your pictures with #dropspattern or submit them to the #dropsfan gallery. Do you need help with this pattern?You'll find 20 tutorial videos, a Comments/Questions area and more by visiting the pattern on garnstudio.com. © 1982-2026 DROPS Design A/S. We reserve all rights. This document, including all its sub-sections, has copyrights. Read more about what you can do with our patterns at the bottom of each pattern on our site. |
|||||||||||||||||||||||||||||||


With over 40 years in knitting and crochet design, DROPS Design offers one of the most extensive collections of free patterns on the internet - translated to 17 languages. As of today we count 325 catalogues and 12298 patterns translated into English (UK/cm). 12298
We work hard to bring you the best knitting and crochet have to offer, inspiration and advice as well as great quality yarns at incredible prices! Would you like to use our patterns for other than personal use? You can read what you are allowed to do in the Copyright text at the bottom of all our patterns. Happy crafting!
Post a comment to pattern DROPS 125-2
We would love to hear what you have to say about this pattern!
If you want to leave a question, please make sure you select the correct category in the form below, to speed up the answering process. Required fields are marked *.