
Popular categories
Looking for a yarn?


Comments / Questions (35)
![]() Val wrote:
Val wrote:
Thank you so very much for the pattern. I can't wait to start.
23.04.2018 - 01:51
![]() Susanne Hesselberg wrote:
Susanne Hesselberg wrote:
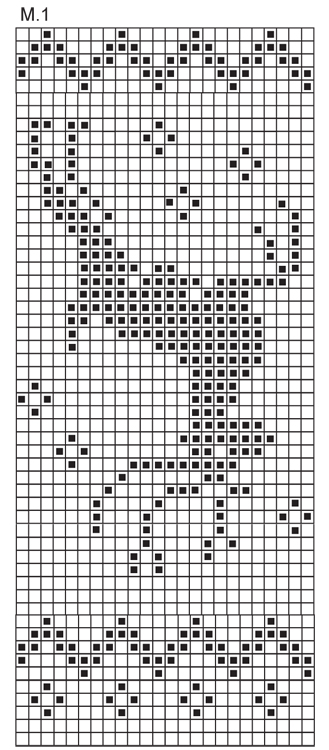
Hei, har et spørsmål vedr mønster M 1, skal hjorten strikkes oppned? Slik jeg leser oppskriften blir dyret oppned på strømpen. Min mann har funnet oppskriften på nettet og nå er jeg igang med strikkingen, men har stoppet opp ved M1. Mvh Susanne Hesselberg
01.02.2017 - 22:04DROPS Design answered:
Hej Susanne. Du strikker diagrammet nedefra og op (se her hvordan du laeser vores diagrammer) og siden du strikker sokken oppefra og ned, kommer rensdyret til at staa paa sokken som paa billedet
02.02.2017 - 13:49
![]() Daniela wrote:
Daniela wrote:
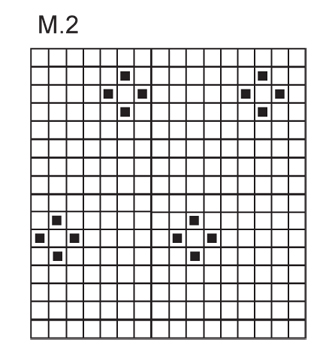
Hallo zusammen, bin gerade bei den M2 Muster, da ist mir aufgefallen das es in der Breite 16 Maschen pro Nadel sind!! ich habe aber nach der Anleitung ( GLEICHZEITIG gleichmässig verteilt 8 M. abn. = 88 M. also /4 = 22 Maschen pro nadel!!!) Stricke Größe 38-40. jetzt weis ich nicht wo mein Fehler ist, könnt ihr mir bitte weiterhelfen? lg daniela
12.11.2015 - 11:59DROPS Design answered:
Es ist richtig, dass Sie 88 M haben und damit 22 M pro Nadel, wenn Sie sie gleichmäßig verteilen. Das Muster ist ja unabhängig davon, wie viele M Sie auf den einzelnen Nadeln haben. Das Muster passt 5,5x pro Runde in die 88 M, Sie stricken also 5x alle 16 M und dann noch 1x die ersten 8 M des Musters. Sie könnten die M wie folgt aufteilen: auf der ersten Nadel 16 M und auf den letzten 3 Nadeln je 24 M, dann haben Sie immer eine durch 8 teilbare M-Zahl auf den Nadeln.
13.11.2015 - 21:12
![]() Marco wrote:
Marco wrote:
M1 steht auf dem Kopf, das ist so nicht richtig, oder??
29.12.2014 - 09:49DROPS Design answered:
Doch, das ist richtig, denn Sie stricken die Socken ja von oben nach unten, ab dem Schaft. Wenn Sie das Diagramm umdrehen würden, würde dann hinterher das arme Rentier am Socken auf dem Kopf stehen. :-)
29.12.2014 - 10:35
![]() Kate wrote:
Kate wrote:
Hi, Love the pattern and I just have a question regarding the first set of decreasing stitches. The problem I am having is this: for the US size 7½/9, that on four needles there are 29 stitches from the total 116 sts. When I am decreasing from 116 to 96 stitches or on each needle 29 stitches to 24 stitches, it never comes out right. Any guidance would be very appreciative.
27.10.2014 - 20:27DROPS Design answered:
Dear Kate, in 2nd size, you have 29 sts on 4 needle = 116 sts, to dec a total of 20 sts you dec 5 sts per needle, 24 sts remain on each needle (24x 4 sts = 96 sts), then continue working M.1. Happy knitting!
28.10.2014 - 08:45
![]() Tesca wrote:
Tesca wrote:
I've read through the pattern, but could not spot where the DROPS ALPACA from Garnstudio 100 g for all sizes colour no 618m eco light beige listed in the requirements is used.... Am I missing something obvious?
28.02.2014 - 10:28DROPS Design answered:
Dear Tesca, Alpaca light beige is used instead of "dark beige" written in pattern. Typo will be corrected soon. Thank you. Happy knitting!
28.02.2014 - 10:58
![]() Sara wrote:
Sara wrote:
Hallo ihr Lieben, eine wirklih sehr schöne Anleitung und M1 ging auch sehr einfach von der Hand. Leider kann ich mir überhaupt nicht vorstellen, wie die Abnahmen in M2 aussehen, ohne dass sich das Muster verschiebt. Heißt das, dass es hinten auch schön bleibt oder wird es einfach hinten "krumm"? Gibt es dazu vllt noch eine detailliertere Anleitung, in der man die Abnahmen, so wie in anderen Anleitungen aufgezeigt bekommt? Danke für die Hilfe.
22.01.2014 - 01:44DROPS Design answered:
Liebe Sara, das Muster in M2 darf sich nicht verschieben, es sitzt übereinander wie gehabt, lediglich hinten trifft es anders aufeinander. Die Abnahmen werden durch rechts bzw. verschränkt rechts zusammenstricken gemacht, das sind die beiden ersten Videos in der Liste.
22.01.2014 - 08:11
![]() Caroline wrote:
Caroline wrote:
Guten Tag. Was ist mit "Den Anfang der R. markieren (= hinten in der Mitte)" genau gemeint? Am Anfang der 1. Nadel oder zwischen der 2. + 3. Nadel? Danke für Ihre Hilfe.
20.01.2014 - 13:42DROPS Design answered:
Liebe Caroline, die Rd beginnt hinten in der Mitte, es ist also am Anfang der 1. Nadel.
21.01.2014 - 08:17
![]() Joce wrote:
Joce wrote:
J'ai besoin d'un conseil pour le démarrer. En effet mon échantillon de 10 cm tricoté en 2.5 fait 8 à 8.5cm . J'ai recommencé avec des aiguilles de 3, mais mon échantillon est toujours plus petit en ajoutant 4 rangs sur la longueur je n'obtient que 9 cm de hauteur et je préfère l'échantillon tricoté en 2.5. Puis-je pour une pointure de 38cm passer sur la formule 41/43cm. Je voudrais éviter de travailler avec de grosses aiguilles. Merci pour vos conseils. Joce
04.12.2012 - 08:24DROPS Design answered:
Bonjour Madame Joce, ce modèle est conçu pour un échantillon de 26 m = 10 cm, vous pouvez en modifier la façon de faire, nous ne pouvons toutefois garantir le résultat. N'hésitez pas à vous faire aider par votre magasin Drops ou le forum. Bon tricot !
04.12.2012 - 11:37
![]() Trine wrote:
Trine wrote:
Disse skla prøves bare i en annen variant
06.02.2012 - 10:21
|
|||||||
Oh Deer Socks!#ohdeersocks |
|||||||
|
|
|||||||
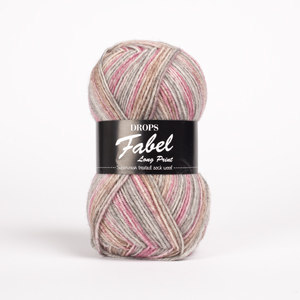
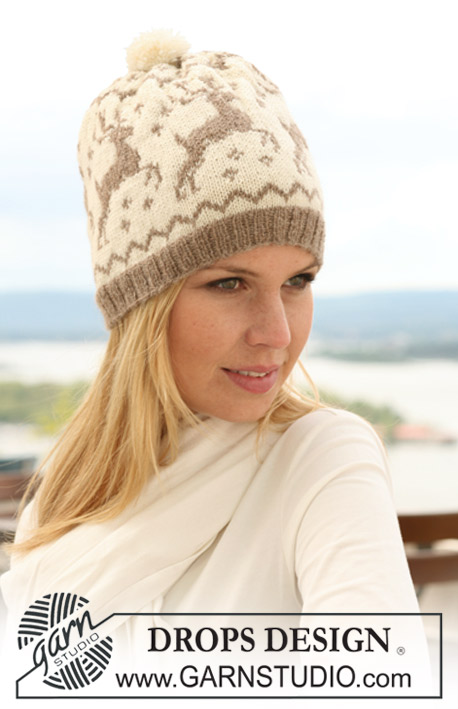
Knitted DROPS socks with reindeer in ”Fabel” and ”Alpaca”.
DROPS 122-17 |
|||||||
|
PATTERN: See diagram M.1 and M.2 - diagrams worked in stocking st. DECREASING TIP: Dec as follows before marker: K2 tog. Dec as follows after marker: K2 tog into back of loop. HEEL DECREASES: Row 1 (= RS): Work row until 9-10-10 sts remain, K2 tog into back of loop, turn piece. Row 2 (= WS): Work row until 9-10-10 sts remain, P2 tog, turn piece. Row 3 (= RS): Work row until 8-9-9 sts remain, K2 tog into back of loop, turn piece. Row 4 (= WS): Work row until 8-9-9 sts remain, P2 tog, turn piece. Continue dec like this with 1 less st before each dec until there are 14-14-16 sts left on needle. -------------------------------------------------------- SOCKS: Worked in the round. Cast on 112-116-120 sts on double pointed needles size 2.5 mm with light beige. Work rib, K2/P2 for 8 cm. Change to off-white, work 1 round stocking st – AT THE SAME TIME dec 16-20-24 sts evenly = 96 sts for all sizes. Continue in M.1. REMEMBER THE KNITTING TENSION! After M.1 piece measures approx 24 cm. Work 1 round stocking st in off-white – AT THE SAME TIME dec 8 sts evenly = 88 sts. Insert a marker at beg of round (= mid back). Continue in M.2 and work 3 vertical repeats, now complete piece in off-white. AT THE SAME TIME when piece measures 26 cm dec 1 st each side of marker – SEE DECREASING TIP, repeat the dec on every 4-5-6 round a total of 14-12-10 times = 60-64-68 sts on needle (make sure not to shift pattern in M.2 as you dec). When piece measures 43-44-46 cm keep the first 15-16-17 sts on needle for heel, slip the next 30-32-34 sts on a stitch holder (= mid upper foot) and keep the last 15-16-17 sts on needle for heel. Continue in stocking st back and forth on the 30-32-34 heel sts for 5-5.5-6 cm - insert a marker. Now work HEEL DECREASES – see above. After heel dec pick up 13-14-16 sts each side of heel and slip the 30-32-34 sts from stitch holder back on needle = 70-74-82 sts. Insert a marker each side of the 30-32-34 sts on upper foot. Continue in stocking st in the round, AT THE SAME TIME dec each side as follows: K tog into back of loop the last 2 sts BEFORE first marker on upper foot and K 2 tog the first 2 sts AFTER last marker on upper foot. Repeat the dec on every other round a total of 9-9-11 times = 52-56-60 sts. Continue until piece measures 18-19-22 cm from marker on heel (= approx 4-5-5 cm remain). Insert a marker each side with 26-28-30 sts on upper foot and under foot. Continue in stocking st, AT THE SAME TIME dec for toes each side of both markers as follows: Work round until 3 sts before marker, K2 tog, K2 (marker sits mid between these 2 sts), K2 tog into back of loop. Repeat the dec on every other round a total of 4-5-5 times and then on every round 7-7-8 times = 8 sts left on needle. Cut the thread, pull it through remaining sts, tighten tog and fasten. |
|||||||
Diagram explanations |
|||||||
|
|||||||
 |
|||||||
 |
|||||||
Have you finished this pattern?Tag your pictures with #dropspattern #ohdeersocks or submit them to the #dropsfan gallery. Do you need help with this pattern?You'll find 17 tutorial videos, a Comments/Questions area and more by visiting the pattern on garnstudio.com. © 1982-2026 DROPS Design A/S. We reserve all rights. This document, including all its sub-sections, has copyrights. Read more about what you can do with our patterns at the bottom of each pattern on our site. |
|||||||


With over 40 years in knitting and crochet design, DROPS Design offers one of the most extensive collections of free patterns on the internet - translated to 17 languages. As of today we count 324 catalogues and 12267 patterns translated into English (UK/cm). 12267
We work hard to bring you the best knitting and crochet have to offer, inspiration and advice as well as great quality yarns at incredible prices! Would you like to use our patterns for other than personal use? You can read what you are allowed to do in the Copyright text at the bottom of all our patterns. Happy crafting!
Post a comment to pattern DROPS 122-17
We would love to hear what you have to say about this pattern!
If you want to leave a question, please make sure you select the correct category in the form below, to speed up the answering process. Required fields are marked *.