
Popular categories
Looking for a yarn?


Comments / Questions (68)
Maria wrote:
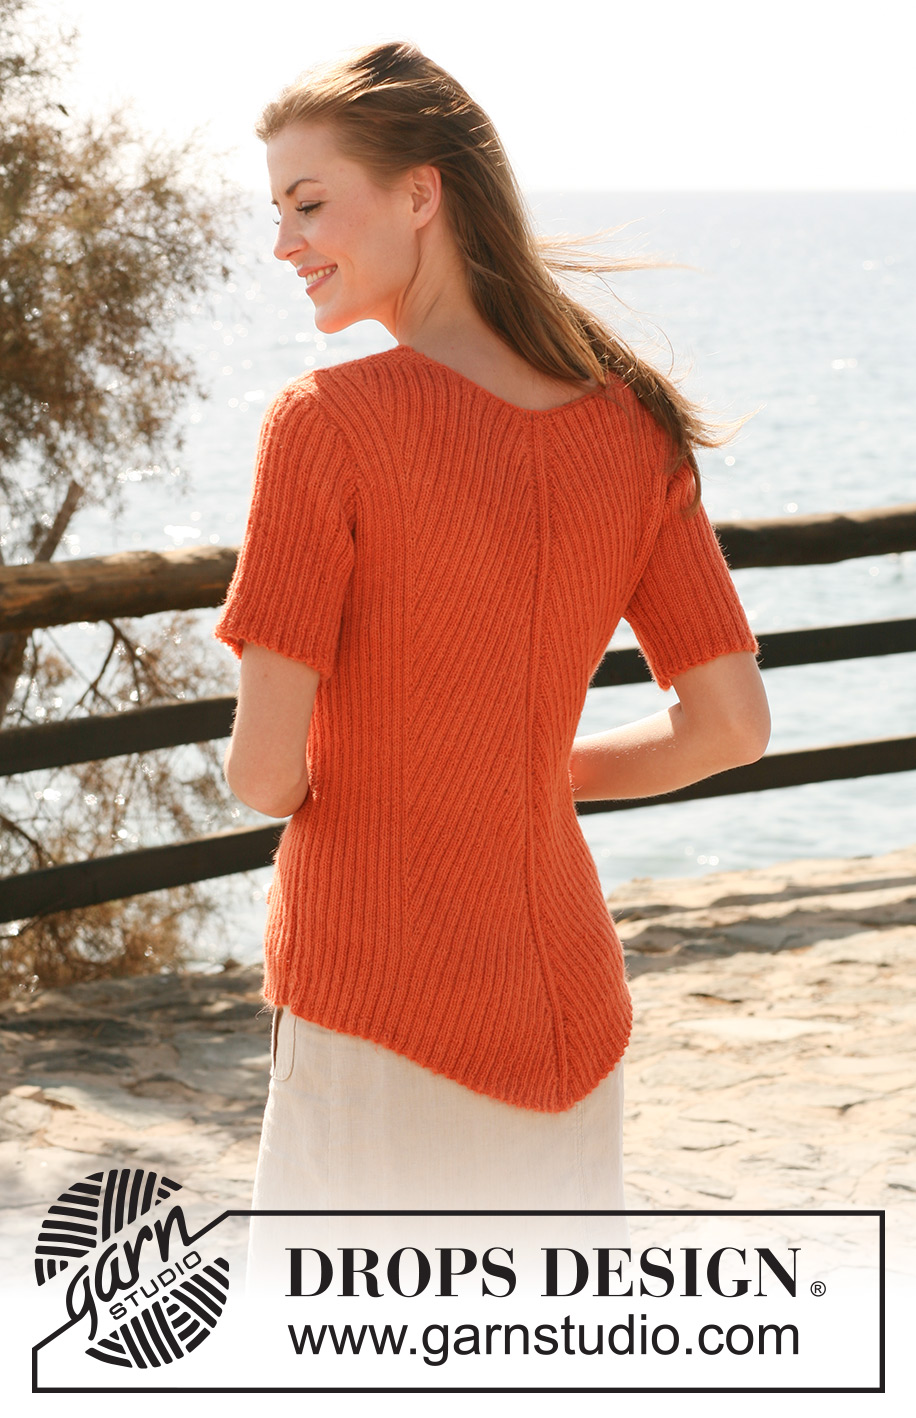
You missed the big "V" on the back
06.04.2013 - 20:33
![]() Jocelyn wrote:
Jocelyn wrote:
I started this sweater, but after a few inches realized it was way too big. Switched to Drops pattern 111-27. Same size has just over 1/2 the stitches, similar gauge. What did I miss in 119-3?
04.04.2013 - 23:25DROPS Design answered:
Hi Jocelyn! At first Alpaca is much thinner yarn. And for Rib you need much more stitches than for other pattern. It might seem very wide at the beginning but as work progresses, rib will shrink the piece and it's not wide anymore. You could make size smaller as well to have lovely flattering sweater!
12.04.2013 - 16:08
![]() Bianca wrote:
Bianca wrote:
Hej! In der deutschen Übersetzung der Anleitung hat sich ein Fehler eingeschlichen. Beim rechten Vorderteil heißt es in der Übersetzung "Nach dem 1. Markierungsfaden aufnehmen und NACH dem 2. Markierungsfaden abn. " m. E. müßte es aber heißen "Nach dem 1. Markierungsfaden aufnehmen und VOR dem 2. Markierungsfaden abn." (steht auch in der engl. Übersetzung). Vll. kann das bitte jemand prüfen? Danke!
23.06.2010 - 22:39
![]() Irene wrote:
Irene wrote:
This is wonderfull!! And I agree with Marie Walker - I would like to see it with long sleeves. Your collections are so inspirational.!
24.02.2010 - 20:19
![]() Åsa Sedin wrote:
Åsa Sedin wrote:
Snyggt med en spännande rygg. Vill ha den som många andra i lång arm, blir mer användbar då.
22.02.2010 - 14:22
![]() Anna-leena wrote:
Anna-leena wrote:
Hieno istuva malli
31.01.2010 - 17:11
![]() Ingelise Börstou wrote:
Ingelise Börstou wrote:
Denna vill jag väldig gärna sticka. Giller när der "händer" lite på backstycket !
28.01.2010 - 16:59
![]() DROPS Deutsch wrote:
DROPS Deutsch wrote:
Hier werden die Blendenmaschen ins Muster eingestrickt (d.h. die 9 Blendenm sind die Maschen die sich vorne überlappen). Zum zusammenstricken von Maschen finden Sie unter „Helpdesk“ ein Video.
28.01.2010 - 08:22
![]() Ute P. wrote:
Ute P. wrote:
Ich komme nicht klar mit der Anleitung. Wo kommen 9 Maschen Bündchen denn nun hin? Ich kann nur 3 Rippen in der Mitte erkennen. Wie strickt man die re. Maschen vor dem Markierungsfaden zusammen?
27.01.2010 - 14:40
![]() Drops Design wrote:
Drops Design wrote:
Hej. Den aller yderste m strikkes i retstrik og de andre i rib. God fornøjelse!
25.01.2010 - 14:23
|
|
Back To Me#backtomecardigan |
|
 |
 |
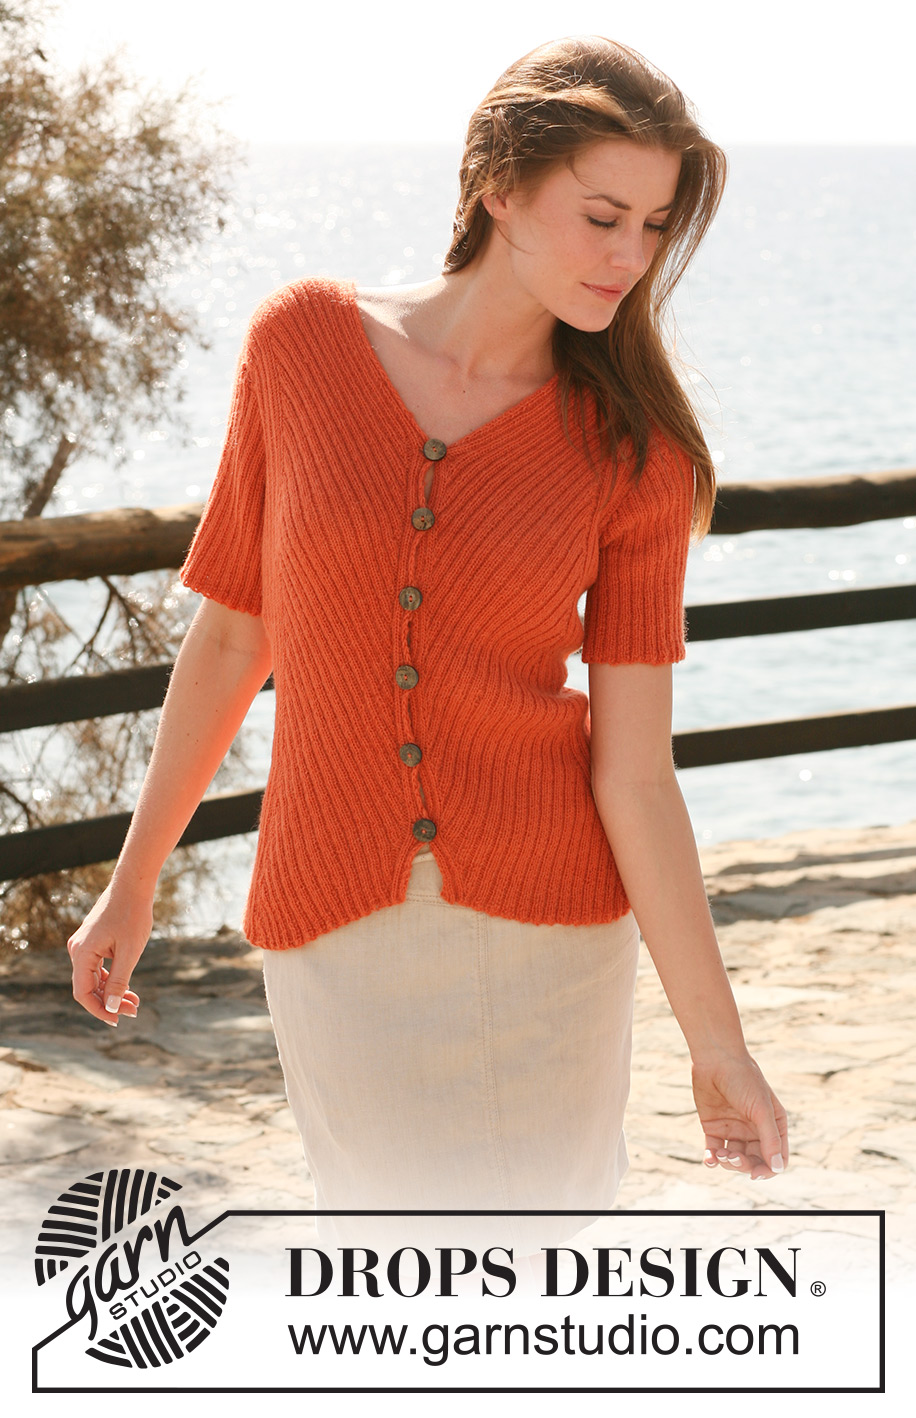
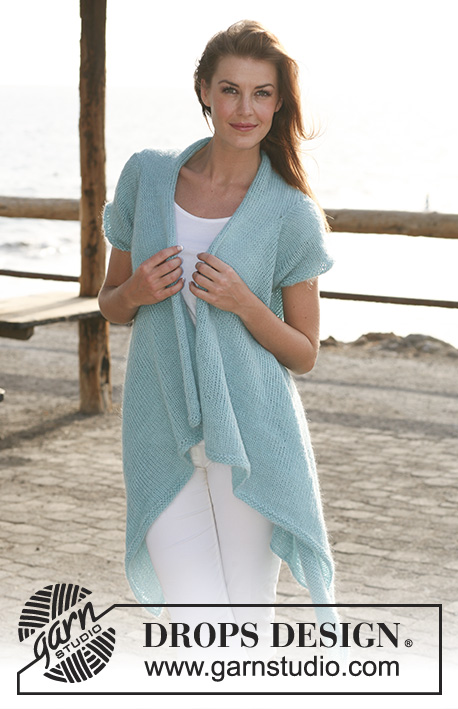
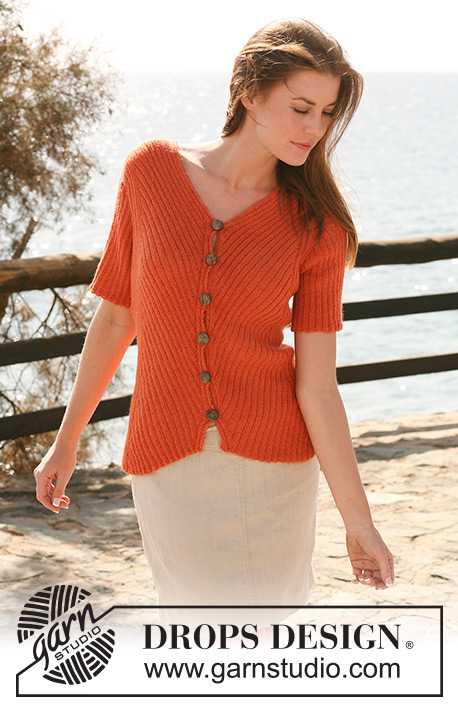
DROPS jacket in rib with short sleeves in ”Alpaca”. Size S-XXXL
DROPS 119-3 |
|
|
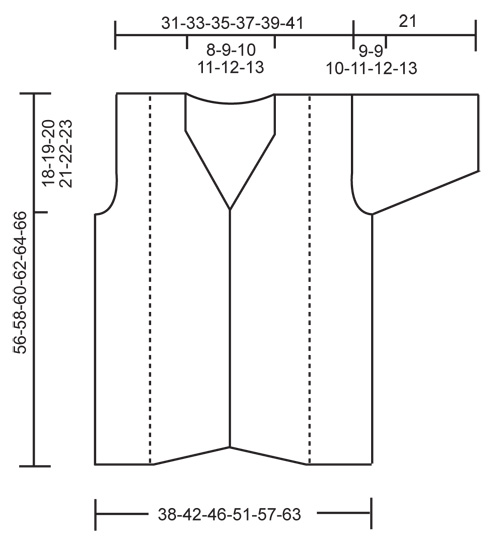
GARTER ST (back and forth on needle): K all rows. BUTTONHOLES: Make buttonholes on right front band. 1 buttonhole = cast off 4th and 5th st from mid front (= P2) and cast on 2 new sts on next row. Make buttonholes when piece measures: SIZE S + M: 6, 12, 18, 24, 30 and 36 cm. SIZE L + XL: 7, 13, 19, 25, 31 and 37 cm. SIZE XXL + XXXL: 7, 13, 20, 26, 33 and 39 cm. -------------------------------------------------------- -------------------------------------------------------- LEFT FRONT PIECE: Cast on 87-95-103-115-127-139 sts (includes 1 edge st at the side and 9 front band sts towards mid front) on needle size 3 mm with Alpaca. Work first row as follows from RS: 1 edge st, K1, * P2, K2 *, repeat from *-* and finish with 1 GARTER ST - see above. Work return row with K over K and P over P. On next row from RS insert 2 markers in piece: marker-1 after 30-34-38-46-54-62 sts and marker-2 after 78-86-94-106-118-130 sts (9 sts after marker-2 = front band). Continue in rib as before. AT THE SAME TIME dec 1 st on every row from RS by P2 tog after marker-1 and inc 1 st on every row from RS by making 1 YO before marker-2. Work YO into back of loop on return row and incorporate inc sts in rib as you go along. When piece measures 37-37-38-38-40-40 cm (measured at the side) shape the neck by continue dec as before but discontinue inc. Do this a total of 20-24-24-28-28-32 times. Now continue with dec and inc inside the 9 front band sts as before. AT THE SAME TIME when piece measures 38-39-40-41-42-43 cm (measured at the side) cast off 4 sts at beg of row from RS for armhole and cast off to shape the armhole at beg of every row from RS: 2 sts 5-7-9-13-17-21 times and 1 st 1 time. When dec are complete work st on armhole in garter st until finished measurements. When all dec for armhole and neck are complete there are 52-52-56-56-60-60 sts on needle. When piece measures 54-56-58-60-62-64 cm K 1 row from RS on all sts, AT THE SAME TIME dec 25-23-26-25-27-27 sts evenly = 27-29-30-31-33-33 sts. Continue in garter st on all sts until piece measures 56-58-60-62-64-66 cm. Cast off loosely. RIGHT FRONT PIECE: Like left front piece, but mirrored. i.e. work first row from RS as follows: 1 GARTER ST - see above, * K2, P2 *, repeat from *-* and finish with K1 and 1 edge st. Insert marker-1 after 9 sts (= front band), and marker-2 after 57-61-65-69-73-77 sts (= 48-52-56-60-64-68 sts between markers). Inc after marker-1 and dec before marker-2. REMEMBER BUTTONHOLES - see above. BACK PIECE: Cast on 190-206-222-246-270-294 sts (includes 1 edge st each side) on needle size 3 mm with Alpaca. Work first row from RS as follows: 1 edge st, K1, * P2, K2 *, repeat from *-* and finish with P2, K1 and 1 edge st. Work return row with K over K and P over P. Insert 4 markers in piece as follows: marker-1 after 30-34-38-46-54-62 sts, marker-2 after 92-100-108-120-132-144 sts, marker-3 after 98-106-114-126-138-150 sts and marker-4 after 160-172-184-200-216-232 sts (= 30-34-38-46-54-62 sts after marker-4) READ ALL OF THE FOLLOWING SECTION BEFORE CONTINUING! Continue in rib as before. AT THE SAME TIME dec 2 sts on every row from RS as follows: P2 tog before marker-2 and P2 tog after marker-3. Repeat this dec a total of 14 times = 162-178-194-218-242-266 sts on needle. Now continue in rib as before and continue dec as before, AT THE SAME TIME also inc 2 sts on every row from RS as follows: Make 1 YO after marker-1 and 1 YO before marker-4. Work YO into back of loop on return row and incorporate inc sts in rib as you go along. Continue like this until piece measures 38-39-40-41-42-43 cm (measured at the side and adjust to front piece). Now cast off 4 sts each side for armhole (NOTE! continue inc/dec as before). Cast off to shape the armhole each side at the beg of every row: 2 sts 5-7-9-13-17-21 times and 1 st 1 time = 132-140-148-156-164-172 sts. When dec are complete work st on armhole in garter st until finished measurements. Continue in rib and dec/inc as before. When piece measures 54-56-58-60-62-64 cm K 1 row from RS on all sts, AT THE SAME TIME dec 58-60-64-68-70-74 sts evenly = 74-80-84-88-94-98 sts. K 1 row from WS and now complete piece in garter st. AT THE SAME TIME on next row cast off the middle 18-20-22-24-26-30 sts for neck and complete each shoulder separately. Cast off 1 st on neckline on next row = 27-29-30-31-33-33 sts left on shoulder. Continue until piece measures 56-58-60-62-64-66 cm and cast off loosely. SLEEVE: Cast on 114-118-122-126-130-134 sts (includes 1 edge st each side) on needle size 3 mm with Alpaca. Work rib K2/ P2 with 1 edge st each side until piece measures 12-12-11-10-9-8 cm (less for the larger sizes because of longer sleeve cap and wider shoulder). Now cast off 5 sts each side and cast off to shape the sleeve cap each side at the beg of every row: 2 sts until piece measures 20 cm, now cast off 5 sts each side 1 time and cast off remaining sts. Piece measures approx 21 cm. ASSEMBLY: Sew shoulder seams. Set in sleeves inside 1 edge st. Sew sleeve and side seams inside 1 edge st. Sew on buttons. |
|
 |
|
Have you finished this pattern?Tag your pictures with #dropspattern #backtomecardigan or submit them to the #dropsfan gallery. Do you need help with this pattern?You'll find 18 tutorial videos, a Comments/Questions area and more by visiting the pattern on garnstudio.com. © 1982-2026 DROPS Design A/S. We reserve all rights. This document, including all its sub-sections, has copyrights. Read more about what you can do with our patterns at the bottom of each pattern on our site. |
|


With over 40 years in knitting and crochet design, DROPS Design offers one of the most extensive collections of free patterns on the internet - translated to 17 languages. As of today we count 324 catalogues and 12260 patterns translated into English (UK/cm). 12260
We work hard to bring you the best knitting and crochet have to offer, inspiration and advice as well as great quality yarns at incredible prices! Would you like to use our patterns for other than personal use? You can read what you are allowed to do in the Copyright text at the bottom of all our patterns. Happy crafting!
Post a comment to pattern DROPS 119-3
We would love to hear what you have to say about this pattern!
If you want to leave a question, please make sure you select the correct category in the form below, to speed up the answering process. Required fields are marked *.