
Popular categories
Looking for a yarn?


Comments / Questions (140)
![]() Karen wrote:
Karen wrote:
I can't print your patterns without them cutting off lines and parts of the diagrams. Also, for some strange reason, it's imbedding "(x-apple-data-detectors://20)" in multiple locations throughout the instructions. What is going on? I format for US Letter size, what is your page format? Thank You.
27.09.2016 - 19:15DROPS Design answered:
Dear Karen, if you are printing from chrome, you have to try printing from another browser, because there is an error in the last update of chrome that we cannot fix, chrome has to. Happy knitting!
28.09.2016 - 08:39Lana MacDonald wrote:
The gauge called for 4.5 mm needles on the pattern, but 5 mm on the yarn itself. I wondered why my gauge was tight as I usually knit true to pattern.
24.11.2015 - 14:44DROPS Design answered:
Dear Mrs MacDonald, remember you have to get the tension, ie 17 sts x 22 rows in stocking st = 10 x 10 cm - adjust the needle size, you may require smaller or larger needle. Happy knitting!
24.11.2015 - 15:18
![]() SANDRINE wrote:
SANDRINE wrote:
Vous dites diminuer 3 mailles dans chaque torsade par 2 m ens à l'endroit cela fait qu'une maille diminuée et pas 3 mailles en moins?
09.11.2015 - 09:32DROPS Design answered:
Bonjour Sandrine, tricotez toutes les mailles de la torsade ens à l'end 2 par 2 = 3 diminutions. Bon tricot!
09.11.2015 - 11:11Diane wrote:
I have just read your FAQ's regarding reading a diagram. I didn't realise that it's read from the lower right hand corner. That may solve the query regarding the open work. Is the lace pattern mentioned about the armholes a continuation of the yo w/o cable?
21.02.2015 - 00:19DROPS Design answered:
Dear Diane, that's correct, the lace pattern after armhole is the part of diagrams with YOs but without cables (that are cast off at this point). Happy knitting!
21.02.2015 - 09:36Diane wrote:
I'm asking about the openwork on the inside edge (stocking st side) of the cable. My interpretation of the yo is that it is done after the first set of garter sts and before the M.1 and after the M.2, and then the instructions state to use stocking st on all increased sts. That would put the openwork on the outside/seam side of the cable. Also, what is the lace pattern? referred to when knitting the body.
20.02.2015 - 21:37DROPS Design answered:
Dear Diane, the eyelet are included in M1 and M2 they are done with the YOs at the end of M1 and at the beg of M2. When you will have cast off sts for armhole, only the first sts in M3/last sts in M4 remain = ie YOs and dec. Happy knitting!
21.02.2015 - 09:31Diane wrote:
On the inside edge of the cables, there is an open "eyelet" before the stocking stitch. I can't seem to see this step within the instructions. There is also mention of continuing with the "lace pattern"after the 2 garter sts towards the armhole as before". What is the lace pattern and where is the step on each row that makes the open "eyelet". Thanks for your attention.
20.02.2015 - 11:00DROPS Design answered:
Dear Diane, the "eyelet" you are thinking about may be the yo in M.1 and M.2 and the first 2 sts in M.3/last 2 sts in M.4, when you have cast off sts for armhole, only the last first 2 sts in M.3/the last 2 sts in M4 remain, ie the eyelets. Happy knitting!
20.02.2015 - 13:45
![]() Lida Van Wersch wrote:
Lida Van Wersch wrote:
Volgens mij klopt er iets niet bij het stekenaantal Je zet voor het rechtervoorpand 17 steken op. Het patroon gaat echter over 16 steken.Zie ik iets over het hoofd of hebben jullie de kantsteek vergeten te vermelden.
30.05.2013 - 16:19DROPS Design answered:
Hoi Lida. Lees het patroon: Zet 17 st op met Alaska en nld 4.5 mm. Brei 2 nld RIBBELST – zie boven! Ga verder als volgt (aan de goede kant): 2 ribbelst, 2 st recht in iedere van de volgende 3 st (dus 3 st recht wordt 6 st recht), 2 ribbelst, 6 tricotst en 4 voorbies st in ribbelst = 20 st.... Brei de volgende nld als volgt: 2 ribbelst, M.1 (= 8 st), tricotst tot er 4 voorbies st over zijn, brei deze in ribbelst. Ga zo verder...
04.06.2013 - 16:23Doris Gonzalez wrote:
A mi criterio es mejor hacer reveses a la par de la trensa para que realce mejor que punto musgo.No encontré en los videos tutoriales una disminución sin que se marque mucho. Habrá otro método. Gracias y los felicito por este sitio es una maravilla me ha hecho feliz.
27.01.2013 - 02:28
![]() Brenda wrote:
Brenda wrote:
I've now finished this garment and added 2 inches on the length when I put the three pieces together. It has been very successful and looks much better than my first attempt.
04.12.2012 - 23:04
![]() Brenda wrote:
Brenda wrote:
Thank you for your reply. I have started it now so will continue and experiment. Thought I would add an inch or two when I get the three pieces all together and then start the shaping. As I am not young and slim don't think it will matter too much.
13.11.2012 - 14:21
|
||||||||||||||||||||||
Miss Enid#missenidvest |
||||||||||||||||||||||
 |
 |
|||||||||||||||||||||
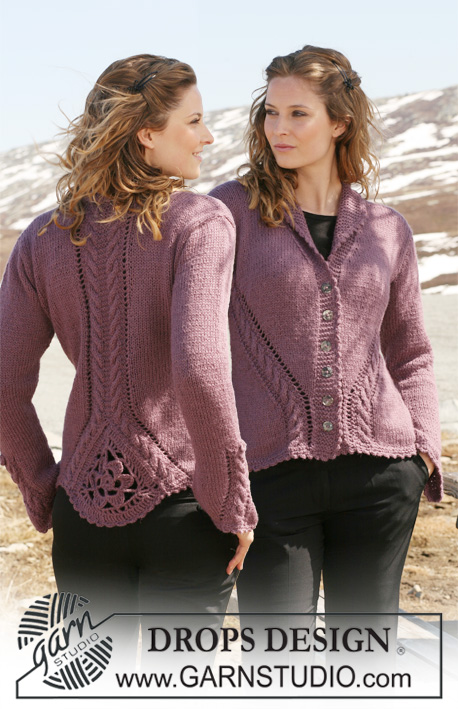
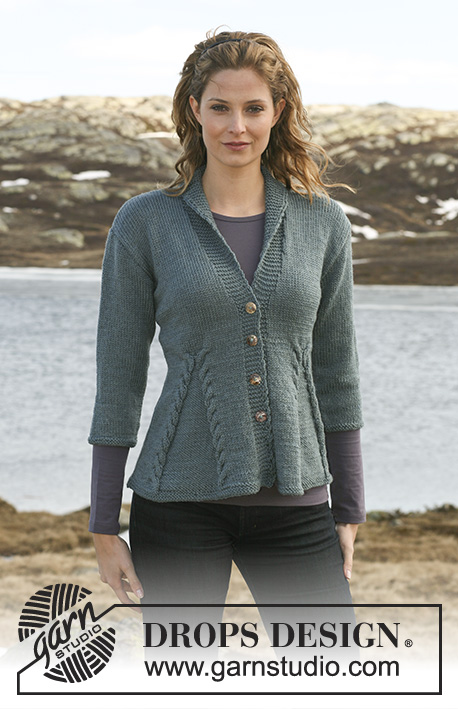
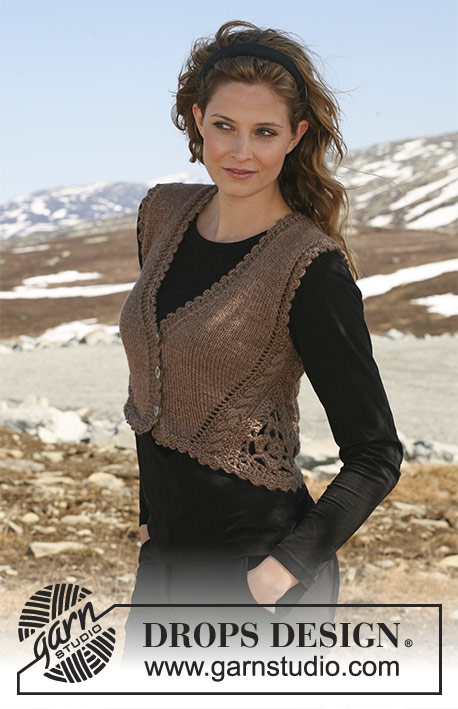
DROPS short waistcoat in ”Alaska” with crochet triangles at the sides. Size XS to XXL.
DROPS 117-3 |
||||||||||||||||||||||
|
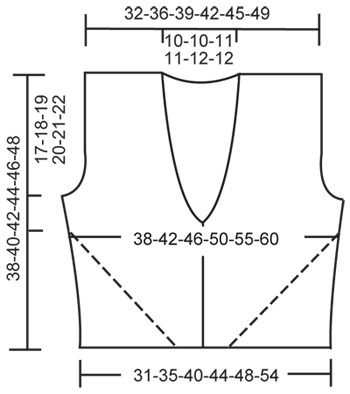
PATTERN: See diagram M.1 to M.4 – diagram is seen from RS and shows 1 pattern repeat. GARTER ST (back and forth on needle): K all rows. DECREASING TIP (neckline): Make all dec from RS. Dec as follows before 4 front band-sts in garter st: K2 tog. Dec as follows after 4 front band-sts in garter st: slip 1 st as if to K, K1, psso. -------------------------------------------------------- WAISTCOAT: First crochet 2 triangles, then work front piece and back piece before sewing all parts tog. CROCHET TRIANGLE: Crochet 6 ch with Alaska on crochet hook size 4.5 mm and form a ring with 1 sl st in first ch. ROUND 1: 3 ch (= 1 tr), 11 tr in ring, finish with 1 sl st in 3rd ch from beg of round (= 12 tr). ROUND 2: 3 ch (= 1 tr), * 5 ch, skip 1 tr, 1 tr in next tr *, repeat from *-* a total of 5 times and finish with 5 ch and 1 sl st in 3rd ch from beg of round (= 6 ch-loops on round). ROUND 3: Crochet as follows in each ch-loop: 1 dc, 1 ch, 1 htr, 1 ch, 1 tr, 1 ch, 2 dtr, 1 ch, 1 tr, 1 ch, 1 htr, 1 ch and 1 dc. Finish with 1 sl st in first dc from beg of round (= 6 leaves). ROUND 4: 5 ch (= 1 triple-tr = corner), 7 ch, 1 dc at the top of next leaf (between the 2 dtr), 5 ch, 1 dc at the top of next leaf, 7 ch, 1 triple-tr between the 2 dc between the next 2 leaves, * 7 ch, 1 dc at the top of next leaf, 8 ch, 1 dc at the top of next leaf, 7 ch, 1 triple-tr between the 2 dc between the next 2 leaves *, repeat from *-* 1 more time along the last side, but finish with 1 sl st in 5th ch from beg of round (instead of 1 triple-tr between 2 leaves) = 9 ch-loops round flower with 1 triple-tr in each corner – one side (= towards bottom edge) is slightly shorter than the 2 other sides. ROUND 5: In triple-tr in corner crochet as follows: 3 ch (= 1 tr), 2 ch, 1 dtr, 2 ch and 1 tr. Along the first side crochet as follows: In first ch-loop crochet: 1 ch, 1 tr, 1 ch, 1 tr, 1 ch, 1 tr (= a total of 3 tr), in next ch-loop crochet: 1 ch, 1 tr, 1 ch and 1 tr (= a total of 2 tr), in the last ch-loop crochet: 1 ch, 1 tr, 1 ch, 1 tr, 1 ch, 1 tr, (= a total of 3 tr), * in triple-tr in corner crochet: 1 ch, 1 tr, 2 ch, 1 dtr, 2 ch and 1 tr, then crochet as follows in all 3 ch-loops: 1 ch, 1 tr, 1 ch, 1 tr, 1 ch, 1 tr (= a total of 3 tr) *, repeat from *-* one more time along the last side, finish with 1 ch and 1 sl st in 3rd ch from beg of round. ROUND 6 : 3 ch, 1 tr in first ch-loop, in dtr in each corner crochet as follows: 1 tr, 2 ch, 1 dtr, 2 ch and 1 tr, then crochet 1 tr in each tr and 1 tr in each ch-loop from previous round. Finish round with 1 sl st in 3rd ch from beg of round. Along the shorter side there are now 23 tr and along the 2 other sides there are 25 tr (dtr in corners not included). Cut the thread. Triangle measures approx 15 cm along the shorter side and 18 cm along the 2 other sides. Crochet 1 more triangle in the same way. LEFT FRONT PIECE: Worked back and forth on needle. Cast on 17-20-24-27-31-36 sts with Alaska on needle size 4.5 mm. Work 2 rows GARTER ST – see above! Continue as follows (from RS): 2-2-3-4-5-6 garter sts, K2 in each of the next 3 sts (i.e. K3 will be K6), 2 garter sts, 6-9-12-14-17-21 stocking sts and 4 front band sts in garter st = 20-23-27-30-34-39 sts. Work 1 row with K over K, P over P and garter st over garter st. Work next as follows: 2-2-3-4-5-6 garter sts, M.1 (= 8 sts), stocking st until 4 front band sts remain, work these in garter st. Continue like this (on every row from RS inc 1 st in M.1 acc to diagram – work this st in stocking st). When there are a total of 19 inc sts in M.1, put piece aside (finish after 1 row from RS). There are now 39-42-46-49-53-58 sts on needle and piece measures approx 18 cm. RIGHT FRONT PIECE: Like left front piece, but mirrored, i.e. work first row after garter st as follows: 4 front band sts in garter st, 6-9-12-14-17-21 stocking sts, 2 garter sts, K2 in each of the next 3 sts and 2-2-3-4-5-6 garter sts. Work 1 row with K over K, P over P and garter st over garter st. Work next row as follows: 4 front band sts in garter st, 6-9-12-14-17-21 stocking sts, M.2 (= 8 sts) and 2-2-3-4-5-6 garter sts. Continue like this and complete piece as described for left front piece. BACK PIECE: Worked back and forth on needle. Cast on 26-33-40-47-55-64 sts with Alaska on needle size 4.5 mm. Work 2 rows garter st. Work next row as follows from RS: 2-2-3-4-5-6 garter sts, K2 in each of the next 3 sts (i.e. K3 will be K6), 2 garter sts, 12-19-24-29-35-42 stocking sts, 2 garter sts, K2 in each of the next 3 sts and 2-2-3-4-5-6 garter sts = 32-39-46-53-61-70 sts. Work 1 row with K over K, P over P and garter st over garter st. Work next as follows: 2-2-3-4-5-6 garter sts, M.1 (= 8 sts), 12-19-24-29-35-42 stocking sts, M.2 (= 8 sts) and 2-2-3-4-5-6 garter sts. Continue like this (on every row from RS inc 1 st in M.1 and M.2 acc to diagram, work these sts in stocking st). When there are a total of 19 inc sts each side, put piece aside (finish after 1 row from RS). There are now 70-77-84-91-99-108 sts on needle. BODY PIECE: Worked back and forth on circular needle in order to fit in all sts. Slip the 3 pieces on the same circular needle size 4.5 mm as follows: right front piece (= 39-42-46-49-53-58 sts), back piece (= 70-77-84-91-99-108 sts) and left front piece (= 39-42-46-49-53-58 sts) = a total of 148-161-176-189-205-224 sts. Work 1 row from WS with K over K, P over P and garter st over garter st. READ ALL OF THE FOLLOWING SECTION BEFORE CONTINUING! PATTERN: Continue as follows: 4 front band sts in garter st, 23-26-29-31-34-38 stocking sts, M.3 (make sure there are the same no of rows between each cable-row), 4-4-6-8-10-12 garter sts, (insert a marker in the middle of these sts = the side) M.4, 46-53-58-63-69-76 stocking sts, M.3, 4-4-6-8-10-12 garter sts (insert a marker in the middle of these sts = the side), M.4, 23-26-29-31-34-38 stocking sts and 4 front band sts in garter st. NECKLINE: AT THE SAME TIME on next row from RS dec 1 st each side for neckline – SEE DECREASING TIP. Repeat the dec on every other row a total of 8-8-9-9-9-10 times and then on every 4th row a total of 4-4-4-4-5-5 times. ARMHOLE: When piece measures 21-22-23-24-25-26 cm from cast on row work K2 tog on sts on all cables (i.e. 3 dec sts on each cable). On next row cast off the 4-4-6-8-10-12 sts between cables at the sides (i.e. 2-2-3-4-5-6 sts each side of marker each side) and complete each piece separately. RIGHT FRONT PIECE: Continue in garter st on 5 sts towards armhole and lace pattern on the next 2 sts as before. Continue dec for neck, AT THE SAME TIME cast off for armhole at the side: 1 st on every other row a total of 3 times. Now continue with 2 garter sts + lace pattern towards armhole as before. When all dec for armhole and neckline are complete there are 19-22-24-26-28-31 sts left on shoulder. Continue as before until piece measures 38-40-42-44-46-48 cm, cast off. LEFT FRONT PIECE: Like right front piece, but mirrored. BACK PIECE: = 60-67-72-77-83-90 sts. Cast off for armhole each side as described for front piece = 54-61-66-71-77-84 sts. Continue in stocking st and 2 garter sts + lace pattern each side as before. When piece measures 36-38-40-42-44-46 cm work 4 rows garter st on the 24-25-26-27-29-30 middle sts (with remaining sts as before). On next row cast off the middle 16-17-18-19-21-22 sts for neck = 19-22-24-26-28-31 sts left on each shoulder. Continue on shoulder sts as before with 4 garter sts towards neckline until piece measures 38-40-42-44-46-48 cm, cast off. ASSEMBLY: Sew 1 crochet triangle to opening each side, make sure the shorter side is towards bottom edge. Sew edge to edge and make sure seam is even. Sew shoulder seams. CROCHET BORDER: Crochet with Alaska on crochet hook size 4.5 mm – beg mid back, continue down along left front piece, along bottom edge, up along right front piece and finish mid back. Crochet as follows: 1 dc in first st, * 4 ch, 1 tr in the first ch (= 1 picot), skip approx 1.5 cm, 1 dc in next st *, repeat from *-*. Crochet a similar border round armholes. Sew buttons to left front piece with approx 6 cm between each - use picots on right front piece as buttonholes. |
||||||||||||||||||||||
Diagram explanations |
||||||||||||||||||||||
|
||||||||||||||||||||||
 |
||||||||||||||||||||||
 |
||||||||||||||||||||||
Have you finished this pattern?Tag your pictures with #dropspattern #missenidvest or submit them to the #dropsfan gallery. Do you need help with this pattern?You'll find 25 tutorial videos, a Comments/Questions area and more by visiting the pattern on garnstudio.com. © 1982-2026 DROPS Design A/S. We reserve all rights. This document, including all its sub-sections, has copyrights. Read more about what you can do with our patterns at the bottom of each pattern on our site. |
||||||||||||||||||||||


With over 40 years in knitting and crochet design, DROPS Design offers one of the most extensive collections of free patterns on the internet - translated to 17 languages. As of today we count 324 catalogues and 12260 patterns translated into English (UK/cm). 12260
We work hard to bring you the best knitting and crochet have to offer, inspiration and advice as well as great quality yarns at incredible prices! Would you like to use our patterns for other than personal use? You can read what you are allowed to do in the Copyright text at the bottom of all our patterns. Happy crafting!
Post a comment to pattern DROPS 117-3
We would love to hear what you have to say about this pattern!
If you want to leave a question, please make sure you select the correct category in the form below, to speed up the answering process. Required fields are marked *.