
Popular categories
Looking for a yarn?


Comments / Questions (151)
![]() Aurélie wrote:
Aurélie wrote:
Bonsoir Je pensais avoir tout bien fait mais le motif torsadé ne se place pas au milieu des jambes. En effet, j'ai rejoint les 2 jambes (soit 116 mailles), augmenté de 4 soit 120 (modèle 12/18) Du coup j'ai 60 environ de chaque côté de mon marqueur qui indique le milieu de l'entrejambe. Si je fais 24 mailles avant de commencer le motif, le motif se crée sur le côté de l'ouvrage et pas au milieu de l'entrejambe. Qu'est ce que je fais mal ? Merci par avance
18.06.2024 - 00:33DROPS Design answered:
Bonjour Aurélie, lorsque vous commencez à tricoter en rond, les tours commencent sur le côté gauche, au milieu des 58 mailles de la jambe ainsi vous avez: 29 m de la 1ère jambe, 58 m de la 2ème jambe et 29 m de la 1ère jambe; ainsi, la torsade va être centrée: 24 m jersey, 10 m (avec des augmentations pour les torsades) et 24 m jersey = devant (soit la moitié de la 1ère jambe + la moitié de la 2ème jambe); terminez le tour (les 58 dernières mailles) en jersey. Bon tricot!
18.06.2024 - 07:58
![]() Janni Platz Sthyr wrote:
Janni Platz Sthyr wrote:
Hej hvordan skal jeg forsætte når jeg skal til bukserne jeg forstår det ikke
05.04.2024 - 11:22
![]() Kerstin Debor wrote:
Kerstin Debor wrote:
In der Anleitung wird leider nicht erklärt, dass die Beine schon geschlossen gestrickt werden müssen, in Runden also. Bitte um Rückmeldung.
04.04.2024 - 10:29DROPS Design answered:
Liebe Frau Debor, bei diesem Modell werden die Beinen nicht zusammen gestrickt, da es eine Öffnung mit Knöpfe bei den Beinen gibt, so haben Sie beide Beine "frei" und nicht zusammen wie beim Video (im Video sind die Beinen in Runden gestrickt, nicht bei diesem Anzug). Viel Spaß beim Stricken!
04.04.2024 - 15:23
![]() Kerstin Debor wrote:
Kerstin Debor wrote:
Wie stricke ich beide hosenbeine zusammen ? Die Anleitung ist leider nicht sehr verständlich. Welches Hosenbein kommt zuerst auf die Nadel, stricke ich in Runden.
03.04.2024 - 20:48DROPS Design answered:
Liebe Frau Debora, stricken Sie die Maschen vom 1. Bein (beide sind gleich) und stricken Sie dann sofort die Maschen vom 2. Bein, dann stricken Sie bis die Hälfte vom 1. Bein, hier beginnen jetzt die Runden. In diesem Video zeigen wird wie man 2 Beine zusammen strickt, sie sind im Video in der Runde gestrickt, zusammenstricken wird das gleiche sein. Viel Spaß beim Stricken!
04.04.2024 - 08:23
![]() Rajshree Tandon wrote:
Rajshree Tandon wrote:
.Please help with . Work next round as follows: 18-21-24 (27-30) stocking sts, P2, M.1, P2, M.2, P2 and work remaining sts in stocking st. Continue like this until piece measures 38-46-54 (59-66) cm. .This means we are increasing the stitches.So how much should be the stitches after completing the length.
10.12.2023 - 16:47DROPS Design answered:
Dear Rajshree, there are no increases. M.1 refers to the chart for the cables, which can be found next to the measurements chart after the pattern instructions. As you can see, before this round you have 96-108-120 (132-144) sts. And when you divide for the front and back when the piece measures 38-46-54 (59-66) cm you will have 50-56-62 (68-74) sts for the front piece + 46-52-58 (64-70) sts for the back piece, which adds up to the 96-108-120 (132-144) sts before. Happy knitting!
10.12.2023 - 21:04
![]() Mary wrote:
Mary wrote:
Pattern little lamb drops baby 16-2..I forgot to put that info in my question about the body once joining both legs, do you join in the round..I’m thinking NOT, BECAUSE you say to do stockinette stitch..but then the cable pattern doesn’t came out in the right place on the front
11.11.2023 - 20:21DROPS Design answered:
Dear Mary, yes, after joining the legs you work in the round: you can still work in stocking stitch in the round. Simply knit all rounds. You should start the round in the left side of the body, that is, in the marker inserted in the left side of the body. Happy knitting!
12.11.2023 - 21:14
![]() Mary wrote:
Mary wrote:
When it says K2P2 in the next 2 stitches(=4) are we increasing two stitches here somehow…
07.11.2023 - 02:04DROPS Design answered:
Hi Mary, You purl 2, then knit 2 in each of the next 2 stitches (so 2 stitches become 4), then purl 2, knit 2 in each of the next 2 stitches, purl 2, then work stocking stitch. Hope this helps and happy knitting!
07.11.2023 - 06:44
![]() Guneet Guram wrote:
Guneet Guram wrote:
Hi, So after putting both legs on 1 needle I have got 116 stitches(12-18 mths size). Now it says knit 24 and then increase as per instructions.Then it says knit remaining 120 stitches. There were only 116 stitches to begin with. We have already knit 24 stitches and then 10 stitches increased to 14. We only have 84 stitches left. So?? Please clarify. Sorry if u have already answered this in some other language. Thanks
03.10.2023 - 07:20DROPS Design answered:
Dear Mrs Guram, after increasing you will have 120 sts. Just increase the 4 sts as explained in the pattern and knit the remaining stitches of the round. The "=" here means "there are now 120 sts on needle". Happy knitting!
03.10.2023 - 08:15
![]() Uschi wrote:
Uschi wrote:
Beine Gr 50/56: Zu Rundstricknadel Nr. 4,5, wechseln und glatt mit 4 M. Kraussrippe auf beiden Seiten weiter stricken – GLEICHZEITIG nach 6 cm innerhalb der 4 M. Kraussrippe je 1 M. aufnehmen und bei jeder 3.-3.-4. (4.-4.) R. total 9-10-11 (12-13) Mal wiederholen = 54-60-66 (72-78) M. Soll innerhalb der 4 Krausre M zugenommen werden? Oder danach in gl re M? Sonst hätte ich ja 13 M Blende, das sieht auf den Fotos anders aus... Wie stimmt?
13.04.2023 - 15:40DROPS Design answered:
Liebe Uschi, die Zunahmen sind gleichzeitg innerhalb 4 Maschen gestrickt, dh so: die 4 ersten Maschen kraus rechts stricken, 1 Masche zunehmen, dann stricken bis 4 Maschen übrig sind, 1 Masche zunehmen, die letzten 4 Maschen stricken. Die Zunahmen werden glatt rechts gestrickt (es sind immer noch 4 Maschen kraus rechts beidseitig). Viel Spaß beim stricken!
13.04.2023 - 16:39
![]() Ruth Strehle wrote:
Ruth Strehle wrote:
Zur Baskenmütze: nachdem ich nach den Zunahmen 130 M auf der Nadel habe, beziehen sich dann die 7 cm auf die Gesamtlänge, ab Anfang oder ab dem Bündchen von 2cm ?
28.01.2023 - 22:25DROPS Design answered:
Liebe Frau Strehle, die 7,5 cm messen Sie ab der Anschlagskante. Viel Spaß beim stricken!
30.01.2023 - 09:12
|
||||||||||
Little Lamb#littlelambset |
||||||||||
|
|
||||||||||
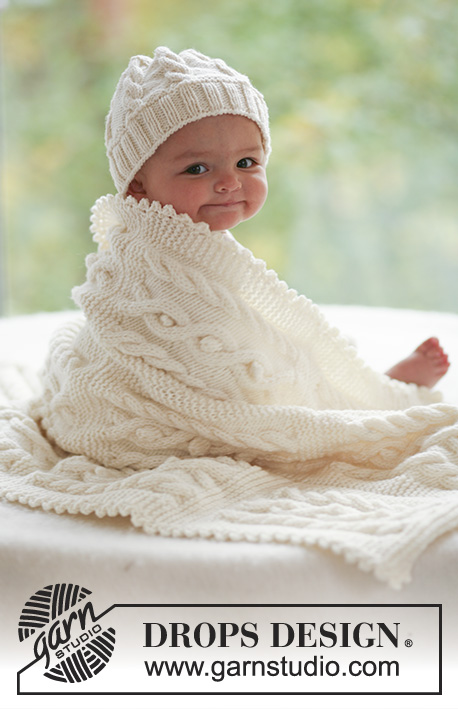
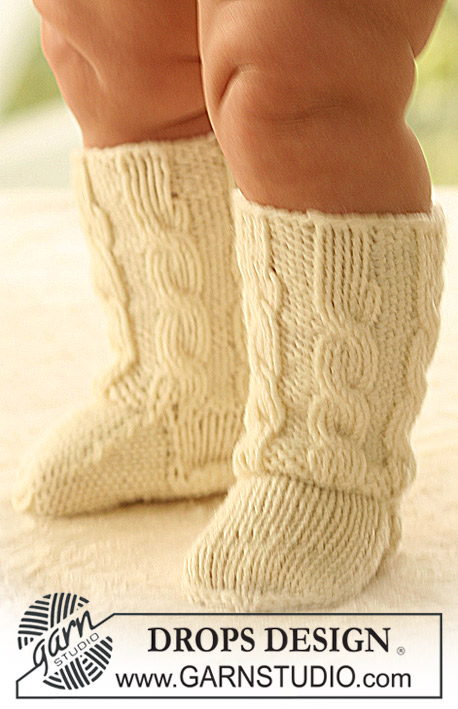
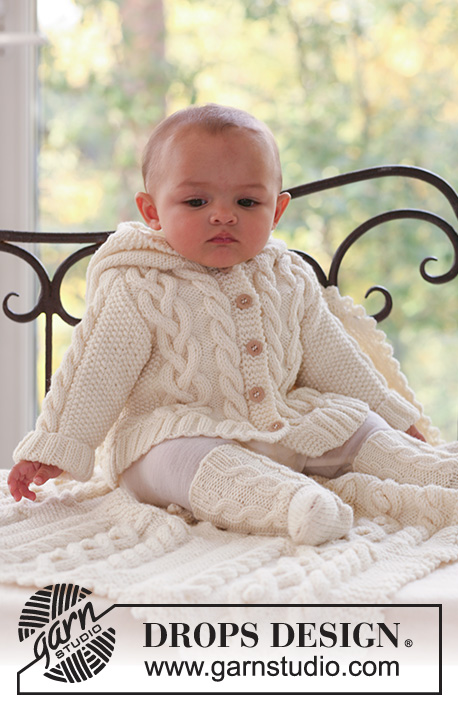
Set of beret hat and onesie with cables for baby in DROPS Merino Extra Fine
DROPS Baby 16-2 |
||||||||||
|
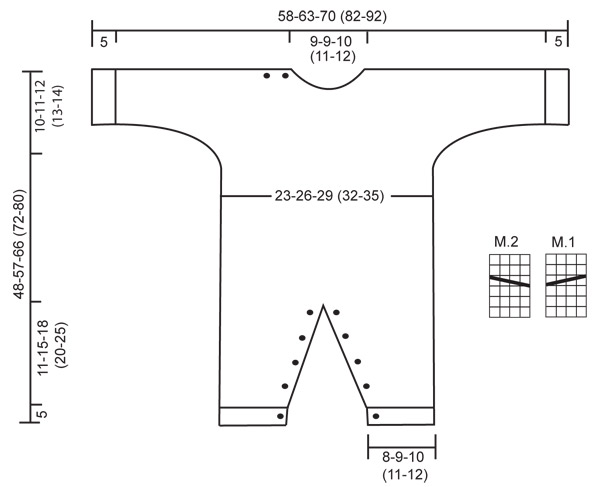
JUMPSUIT: GARTER ST (back and forth on needle): K all rows. PATTERN: See diagram M.1 and M.2. The diagrams show the pattern from the RS. BUTTONHOLES: Make buttonholes on buttonhole edge on front of leg. On right leg make buttonholes from RS and on left leg make buttonholes from WS. 1 buttonhole = K tog 2nd and 3rd st from edge and make 1 YO. Make buttonholes when leg measures: SIZE 1/3 months: 2, 5, 8, 11 and 14 cm. SIZE 6/9 months: 2, 6, 10, 14 and 18 cm. SIZE 12/18 months: 2, 6, 11, 16 and 21 cm. SIZE 2 years: 2, 6, 10, 14, 18 and 23 cm. SIZE 3/4 years: 2, 7, 12, 17, 22 and 28 cm. ---------------------------------------------------------- RIGHT LEG: Worked back and forth on circular needle. Cast on 47-53-53 (59-65) sts on circular needle size 3.5 mm with Merino Extra Fine. P 1 row from WS and continue as follows from RS: 4 garter sts (buttonhole edge) rib K3/P3, on the next 36-42-42 (48-54) sts and finish row with K3 and 4 garter sts (= buttonhole edge). Continue in rib with 4 garter sts each side, AT THE SAME TIME when piece measures 2 cm make buttonhole – SEE ABOVE. When piece measures 5 cm K 2 rows on all sts, AT THE SAME TIME dec 11-13-9 (11-13) sts evenly on first row = 36-40-44 (48-52) sts. Change to needle size 4.5 mm and continue in stocking st with 4 garter sts each side. AT THE SAME TIME when piece measures 6 cm inc 1 st each side inside the 4 garter sts on every 3-3-4 (4-4) row a total of 9-10-11 (12-13) times = 54-60-66 (72-78) sts. REMEMBER THE KNITTING TENSION! When piece measures 16-20-23 (25-30) cm cast off 4 sts each side = 46-52-58 (64-70) sts. Put piece aside and knit the other leg. LEFT LEG: Like right leg, but make buttonholes on the opposite side. BODY PIECE: Slip both legs on the same circular needle = 92-104-116 (128-140) sts. Insert 1 marker each side = 46-52-58 (64-70) sts between markers. Work next round as follows – beg on the left side of piece: 18-21-24 (27-30) stocking sts, P2, K2 in each of the next 2 sts (= K4), P2, K2 in each of the next 2 sts (= K4), P2 and work remaining sts in stocking st = 96-108-120 (132-144) sts. Work next round as follows: 18-21-24 (27-30) stocking sts, P2, M.1, P2, M.2, P2 and work remaining sts in stocking st. Continue like this until piece measures 38-46-54 (59-66) cm. Now divide the piece by markers at sides and complete front and back pieces separately – NOTE: Make sure to divide piece so that the cable row in M.1 and M.2 sits on the RS. FRONT PIECE: = 50-56-62 (68-74) sts. Continue in stocking st with cables as before, AT THE SAME TIME cast on new sts each side for sleeves. Cast on at the end of every row at the sides: 4 sts 2-1-1 (1-1) times, 6 sts 0-1-1 (2-1) times, 8 sts 1-1-1 (1-2) times and 9-9-13 (16-21) sts 1 time = 100-110-124 (148-168) sts – work inc sts in stocking st. When piece measures 44-53-61 (67-75) cm K2 tog on the 2 cables = 96-106-120 (144-164) sts. On next row slip the middle 10-10-12 (14-16) sts on a stitch holder for neck and complete each side separately. RIGHT SHOULDER/SLEEVE: Continue as before, AT THE SAME TIME cast off to shape the neckline at the beg of every row from mid front: 2 sts 1 time and 1 st 2 times = 39-44-50 (61-70) sts left on shoulder/sleeve. AT THE SAME TIME when piece measures 46-55-64 (70-78) cm work garter st on the first 12-13-14 (15-16) sts from mid front (work remaining sts as before). After 4 rows garter st make 2 buttonholes as follows from RS: K2 tog, 1 YO, work 5-6-7 (8-9) sts, K2 tog, 1 YO, work remaining sts on row. Continue in stocking st with garter st on the first 12-13-14 (15-16) sts from mid front until piece measures 48-57-66 (72-80) cm, cast off. LEFT SHOULDER/SLEEVE: Like right shoulder/sleeve, but mirrored = 39-44-50 (61-70) sts on shoulder/sleeve. Continue in stocking st until piece measures 48-57-66 (72-80) cm, cast off. BACK PIECE = 46-52-58 (64-70) sts. Cast on new sts each side for sleeves as described for front piece = 96-106-120 (144-164) sts. When piece measures 46-55-64 (70-78) cm cast off the middle 16-16-18 (20-22) sts for neck and complete each side separately. RIGHT SHOULDER/SLEEVE: = 40-45-51 (62-71) sts. Cast off 1 st on neckline on next row = 39-44-50 (61-70) sts. When piece measures 48-57-66 (72-80) cm cast off the first 27-31-36 (46-54) sts from sleeve edge towards shoulder. Work another 1.5 cm stocking st with 1 garter st each side on the remaining 12-13-14 (15-16) sts (= buttonhole edge). K 1 row from WS and cast off all sts from RS LEFT SHOULDER/SLEEVE: Continue and cast off as described for right shoulder/sleeve, but mirrored = 39-44-50 (61-70) sts left on shoulder/sleeve. Continue in stocking st until piece measures 48-57-66 (72-80) cm, cast off. ASSEMBLY: Sew upper arm seams, edge to edge to avoid a chunky seam – on right shoulder only sew seam up to buttonhole edge. CUFF: Pick up 38-44-50 (50-56) sts on needle size 3.5 mm along sleeve edge. K 2 rows and continue in rib, K3/P3, with 1 edge st each side. Cast off when rib measures 5 cm. Repeat along the other sleeve edge. Sew seams under arms inside 1 edge st. NECK: Pick up approx 48 to 64 sts round neckline (incl sts on stitch holders) on needle size 4.5 mm. K 3 rows and cast off. Sew tog buttonhole edges at the top of the front of legs and sew tog the buttonhole edges at the top of the back of legs. Sew on buttons to fit buttonholes on legs and shoulder. ---------------------------------------------------------- BASQUE HAT: Head circumference: 40/42 - 44/46 - 46/48 (48/50 - 50/52) cm INCREASING TIP: Inc 1 st by making 1 YO. Work YO into back of loop on return row to avoid a hole. ---------------------------------------------------------- HAT: Worked back and forth on pointed needles. Cast on 90-92-94 (96-98) sts on needle size 4 mm with Merino Extra Fine. Work 2 cm rib, K1/P1. Continue in garter st – SEE ABOVE – AT THE SAME TIME dec 5-7-4 (6-3) sts evenly on first row = 85-85-90 (90-95) sts. Insert 5 markers in piece as follows from RS: First marker after 1 st, and the remaining 4 markers with 17-17-18 (18-19) sts between each = 16-16-17 (17-18) sts left after the last marker. On next row from RS inc 1 st to the left of all markers – SEE INCREASING TIP – and repeat the inc on every other row a total of 6-7-8 (9-10) times = 115-120-130 (135-145) sts. REMEMBER THE KNITTING TENSION! When piece measures 6.5-7-7.5 (8-8.5) cm dec 1 st to the left of all markers by K2 tog, and repeat the dec on every other row a total of 18-19-20 (21-22) times = 25-25-30 (30-35) sts. Now K2 tog across the row. Cut the thread, pull through remaining sts and fasten. Sew hat tog mid back in outer loops of sts. Hat measures approx 15-16-17 (18-19) cm. |
||||||||||
Diagram explanations |
||||||||||
|
||||||||||
 |
||||||||||
Have you finished this pattern?Tag your pictures with #dropspattern #littlelambset or submit them to the #dropsfan gallery. Do you need help with this pattern?You'll find 16 tutorial videos, a Comments/Questions area and more by visiting the pattern on garnstudio.com. © 1982-2026 DROPS Design A/S. We reserve all rights. This document, including all its sub-sections, has copyrights. Read more about what you can do with our patterns at the bottom of each pattern on our site. |
||||||||||


With over 40 years in knitting and crochet design, DROPS Design offers one of the most extensive collections of free patterns on the internet - translated to 17 languages. As of today we count 324 catalogues and 12245 patterns translated into English (UK/cm). 12245
We work hard to bring you the best knitting and crochet have to offer, inspiration and advice as well as great quality yarns at incredible prices! Would you like to use our patterns for other than personal use? You can read what you are allowed to do in the Copyright text at the bottom of all our patterns. Happy crafting!
Post a comment to pattern DROPS Baby 16-2
We would love to hear what you have to say about this pattern!
If you want to leave a question, please make sure you select the correct category in the form below, to speed up the answering process. Required fields are marked *.