
Popular categories
Looking for a yarn?


Comments / Questions (93)
![]() Janneke wrote:
Janneke wrote:
Leuk en erg praktisch,zocht al langer naar zon patroon.
18.10.2008 - 00:42
![]() Sabine wrote:
Sabine wrote:
Das finde ich praktisch, wenn es kühler wird, zum ausfahren, im Fußsack des Kinderwagens!
17.10.2008 - 19:51
![]() Lene wrote:
Lene wrote:
Når mine to børn sov eftermiddagslur i barnevogning var det altid sovet i sådan en "pose" - helt perfekte
17.10.2008 - 16:03
|
|
Hazelnut#hazelnutbuntingbag |
|
 |
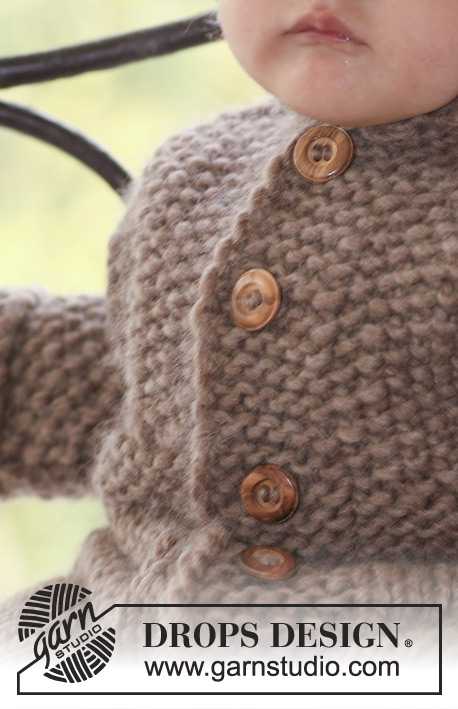 |
Knitted bunting bag in DROPS Snow, DROPS Wish or DROPS Andes
DROPS Baby 18-2 |
|
|
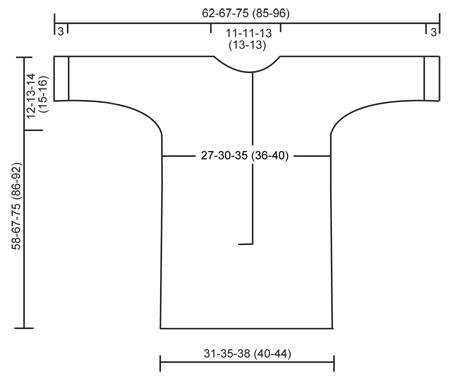
GARTER ST (back and forth on needle): K all rows. MOSS ST: Row 1: * K1, P1 *, repeat from *-*. Row 2: K over P and P over K. Repeat row 2. INCREASING TIP: Inc by making 1 YO. Work YO into back of loop on return row to avoid a hole BUTTONHOLES: Make buttonholes on right front piece. 1 buttonhole = cast off 3rd st from mid front and cast on 1 new st on return row. Cast off for buttonholes when piece measures: SIZE 1/3 months: 1, 7, 13, 19 and 25 cm SIZE 6/9 months: 1, 8, 15, 22 and 29 cm SIZE 12/18 months: 1, 7, 14, 21, 28 and 35 cm SIZE 2 years: 1, 8, 16, 24, 32 and 40 cm SIZE 3/4 years: 1, 10, 19, 28, 37 and 46 cm -------------------------------------------------------- HOLE FOR SEAT BELT IN CAR SEAT: You can make a hole on front and back piece for car seat belt. Make the first hole when back piece measures approx 16-20-23 (28-33) cm (or required measurements) by casting off the middle 4 sts on needle. On next row cast on 4 new sts over cast off sts and continue as before. Repeat on front piece when piece measure from shoulder 42-47-52 (58-59) cm. -------------------------------------------------------- KNITTING TIPS: For a nice edge along hood, front edges and sleeve edges, slip 1st st on every row starting from the edge instead of knitting it. -------------------------------------------------------- BUNTING BAG: Worked in one piece, beg at the bottom of back piece, cast on for sleeves, cast off for neck and finish at the bottom of front piece. To fit in all sts work piece back and forth on circular needle. BACK PIECE: Cast on 36-40-44 (46-50) sts (includes 1 edge st each side) on needle size 8 mm with Snow, Wish or Andes. Work 6 rows garter st – SEE ABOVE! Continue in stocking st until piece measures 37-45-52 (62-67) cm – AT THE SAME TIME dec 4 sts evenly on the last row = 32-36-40 (42-46) sts. REMEMBER THE KNITTING GAUGE! Work 6 rows garter st on all sts and now continue in moss st – SEE ABOVE. When piece measures 46-54-61 (71-76) cm cast on new sts each side for sleeves at the end of every row: 4 sts 1 time, 5 sts 1-1-1 (2-2) times and 9-10-12 (12-16) sts 1 time = 68-74-82 (94-106) sts. Incorporate inc sts in moss st as you go along. NOTE! After the last inc work 3 sts each side (= sleeve edges) in garter st. When piece measures 54-63-71 (82-88) cm continue as follows: 3 garter sts, 19-22-25 (31-37) moss st, 24-24-26 (26-26) garter sts (= mid back), 19-22-25 (31-37) moss sts, 3 garter sts. After 6 rows garter st mid back cast off the middle 12-12-14 (14-14) sts for neck and complete each side separately. Slip sts on the right side on a stitch holder. LEFT FRONT PIECE: = 28-31-34 (40-46) sts. Continue in moss st with 6 garter sts towards neckline and 3 garter sts towards sleeve edge. When piece measures 58-67-75 (86-92) cm insert a marker = mid shoulder – NOW MEASURE PIECE FROM HERE! Continue as before. When piece measures 1-1-2 (2-2) cm inc 1 st towards neckline inside 6 garter sts on next row from RS – SEE INCREASING TIP. Work return row and repeat the inc on next row from RS. Work return row and now cast on 7-7-8 (8-8) new sts at the end of row towards mid front = 37-40-44 (50-56) sts. Work 2 rows garter st on the 6-7-8 (8-8) new sts, work remaining sts as before. Continue in moss st with 6 garter sts towards mid front (= front band) and 3 garter sts at sleeve edge as before. When piece measures 9-10-11 (11-12) cm cast off sleeve sts at the side at beg of row as follows: 9-10-12 (12-16) sts 1 time, 5 sts 1-1-1 (2-2) times and 4 sts 1 time = 19-21-23 (24-26) sts. Continue in moss sts with 6 garter sts on front band until piece measures approx 18-19-20 (21-22) cm (fold piece by marker on shoulder to make sure there is an equal amount of moss st rows on front and back piece). Work 6 rows garter st on all sts and continue in stocking st with 6 garter sts on front band. AT THE SAME TIME on first row inc 2 sts evenly (do not inc on front band) = 21-23-25 (26-28) sts. When piece measures approx 35-41-46 (52-56) cm slip sts on a stitch holder – adjust so that next row is from RS. RIGHT FRONT PIECE: Slip sts from stitch holder on shoulder back on needle = 28-31-34 (40-46) sts, and work like left front piece, but mirrored. AT THE SAME TIME cast off for buttonholes on front band – SEE ABOVE. When piece measures 35-41-46 (52-56) cm – adjust to left front piece – slip sts from left front piece in on the same needle = 42-46-50 (52-56) sts. On next row (= RS) work front band sts tog as follows: Work stocking st on the first 15-17-19 (20-22) sts, slip 6 front band sts from right front piece on cable needle in front of piece, * work tog 1 st from cable needle and 1 st from left front band *, repeat from *-* 6 times = 6 dec sts. Work remaining sts on row in stocking st = 36-40-44 (46-50) sts. Continue in stocking st on all sts. When piece measures approx 55-64-72 (83-89) cm (fold piece double by marker on shoulder to measure front piece to back piece) work 6 rows garter st on all sts and cast off loosely. ASSEMBLY: Fold piece double by shoulder and sew under arm and side seams inside 1 edge st. Sew cast on row to cast off row at bottom of bag, sew in outer loops of sts to avoid a chunky seam. HOOD: Pick up 37-39-41 (45-47) sts on needle size 8 mm round neckline from RS (beg mid front). Work moss back and forth on needle. When hood measures 18-20-22 (24-26) cm work 2 rows garter st on all sts and cast off loosely. Sew hood tog at the top. Sew on buttons. |
|
 |
|
Have you finished this pattern?Tag your pictures with #dropspattern #hazelnutbuntingbag or submit them to the #dropsfan gallery. Do you need help with this pattern?You'll find 12 tutorial videos, a Comments/Questions area and more by visiting the pattern on garnstudio.com. © 1982-2026 DROPS Design A/S. We reserve all rights. This document, including all its sub-sections, has copyrights. Read more about what you can do with our patterns at the bottom of each pattern on our site. |
|


With over 40 years in knitting and crochet design, DROPS Design offers one of the most extensive collections of free patterns on the internet - translated to 17 languages. As of today we count 324 catalogues and 12245 patterns translated into English (UK/cm). 12245
We work hard to bring you the best knitting and crochet have to offer, inspiration and advice as well as great quality yarns at incredible prices! Would you like to use our patterns for other than personal use? You can read what you are allowed to do in the Copyright text at the bottom of all our patterns. Happy crafting!
Post a comment to pattern DROPS Baby 18-2
We would love to hear what you have to say about this pattern!
If you want to leave a question, please make sure you select the correct category in the form below, to speed up the answering process. Required fields are marked *.