
Popular categories
Looking for a yarn?


Comments / Questions (29)
![]() Aneta wrote:
Aneta wrote:
Mgiełka
19.01.2023 - 13:08
![]() Zia wrote:
Zia wrote:
My fair hoodie
19.01.2023 - 03:02
![]() Rosa G wrote:
Rosa G wrote:
Light sweatshirt
18.01.2023 - 17:23
![]() Sheena wrote:
Sheena wrote:
Morning beach stroll
18.01.2023 - 03:05
![]() Małgorzata wrote:
Małgorzata wrote:
Wata cukrowa
18.01.2023 - 00:40
![]() Rita wrote:
Rita wrote:
Der richtige pullover für laue Sommerabende am Meer oder auf dem campingplatz, gefält mir sehr wegen des V-Ausschnittes und der Kaputze
17.01.2023 - 19:21
![]() Maria Grassl wrote:
Maria Grassl wrote:
Snowbear soft ⭐️
17.01.2023 - 17:00
![]() Kristy wrote:
Kristy wrote:
Summer Nights Hoodie
17.01.2023 - 15:50
![]() Charlaibe wrote:
Charlaibe wrote:
Écume marine
17.01.2023 - 15:03
|
||||
Ever Ready#everreadysweater |
||||
 |
 |
|||
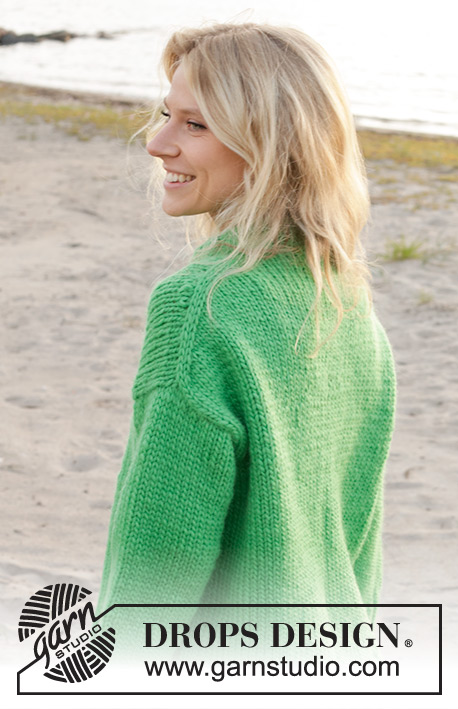
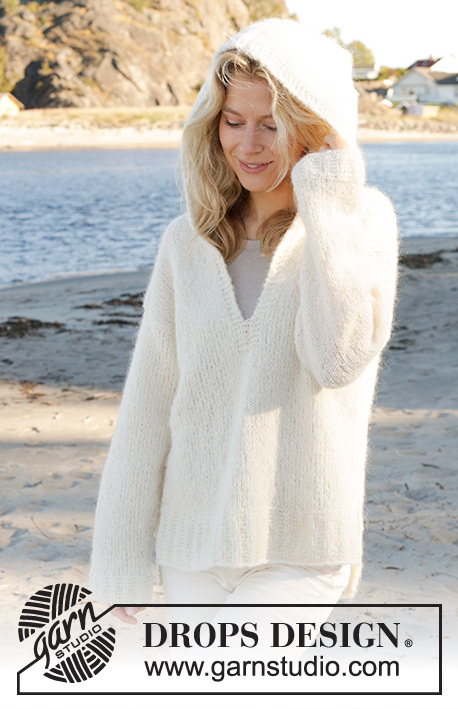
Knitted jumper in DROPS Melody. The piece is worked bottom up with sewn-in sleeves, split neck and hood. Sizes S - XXXL.
DROPS 239-6 |
||||
|
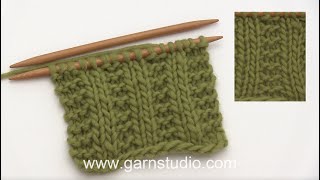
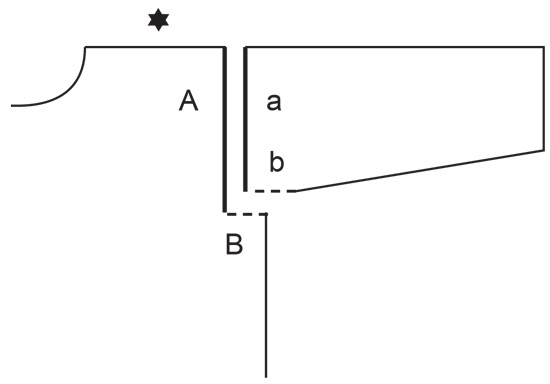
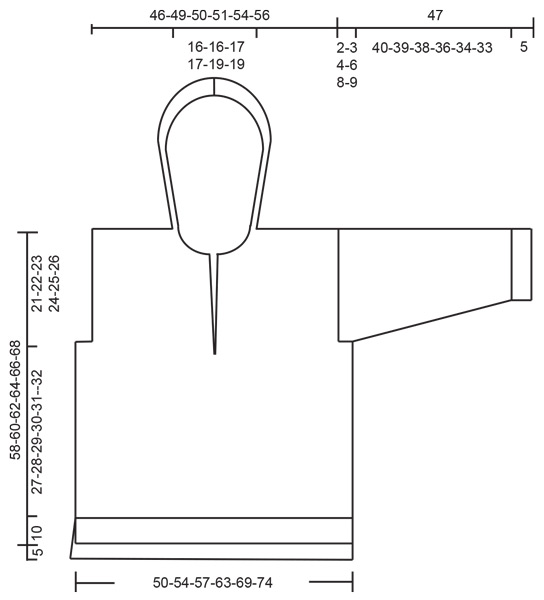
------------------------------------------------------- EXPLANATIONS FOR THE PATTERN: ------------------------------------------------------- RIDGE/GARTER STITCH (worked back and forth): Knit all rows. 1 ridge = knit 2 rows. INCREASE TIP (for sleeves): Increase by making 1 yarn over inside the 2 stitches on each side, which are worked twisted on the next row to avoid holes. ------------------------------------------------------- START THE PIECE HERE: ------------------------------------------------------- JUMPER – SHORT OVERVIEW OF THE PIECE: The back, front and sleeves are worked separately back and forth on circular needle, bottom up. Stitches are picked up around the neck and the hood is worked back and forth on circular needle. The back piece is 5 cm longer than the front. BACK PIECE: Cast on 84-92-96-108-116-124 stitches with circular needle size 4.5 mm and DROPS Melody. Purl 1 row from the wrong side, then work rib as follows from the right side: 3 stitches in GARTER STITCH – read description above, * knit 2, 2 stitches in garter stitch *, work from *-* until there are 5 stitches left, knit 2 and 3 stitches in garter stitch. Continue this rib until piece measures 10 cm. Change to circular needle size 6 mm. Continue with stocking stitch and 3 stitches in garter stitch on each side, AT THE SAME TIME, on the first row decrease 14-16-16-20-20-20 stitches evenly over the stocking stitches = 70-76-80-88-96-104 stitches. REMEMBER THE KNITTING TENSION! Continue with stocking stitch and 3 garter stitches on each side until the piece measures 42-43-44-45-46-47 cm from the cast-on edge. Cast off 3-4-5-8-10-13 stitches for the armholes at the beginning of the next 2 rows = 64-68-70-72-76-78 stitches. Continue with stocking stitch to finished length. When the piece measures 61-63-65-67-69-71 cm, cast off the middle 20-20-22-22-24-24 stitches for the neck and finish each shoulder separately. At the beginning of the next row from the neck cast off 1 stitch = 21-23-23-24-25-26 stitches. Cast off when the piece measures 63-65-67-69-71-73 cm from the cast-on edge. Work the other shoulder in the same way. FRONT PIECE: Cast on and work in the same way as the back piece until the front measures 31-33-34-36-37-39 cm. Work the middle 8 stitches in garter stitch, continuing as before over the other stitches. When the piece measures 32-34-35-37-38-40 cm, divide for the split in the neck as follows: Work 35-38-40-44-48-52 stitches as before and place the remaining stitches on a thread for the other shoulder. Continue back and forth (with now 4 garter stitches by the neck and 3 garter stitches by the side) until the piece measures 37-38-39-40-41-42 cm. Cast off 3-4-5-8-10-13 stitches for the armhole at the beginning of the next row from the side = 32-34-35-36-38-39 stitches. Continue with stocking stitch and 4 garter stitches by the neck. When the piece measures 52-54-55-57-58-60 cm, place the outermost 7-7-8-8-9-9 stitches by the neck on a thread; to avoid cutting the strand work the stitches first. Then cast off for the neck as follows: 2 stitches 1 time and 1 stitch 2 times = 21-23-23-24-25-26 stitches. Continue with stocking stitch until the piece measures 58-60-62-64-66-68 cm. Cast off. Place the 35-38-40-44-48-52 stitches from the thread back on circular needle size 6 mm and work in the same way as the first shoulder. SLEEVES: Cast on 52-52-56-56-60-60 stitches with circular needle size 4.5 mm and DROPS Melody. Purl 1 row from the wrong side, then work rib as follows from the right side: 1 stitch in garter stitch, * knit 2, 2 garter stitches *, work from *-* until there are 3 stitches left, knit 2 and 1 garter stitch. Continue this rib for 5 cm. Change to circular needle size 6 mm. Continue with stocking stitch and 1 stitch in garter stitch on each side. AT THE SAME TIME, on the first row decrease 12-10-12-12-14-14 stitches evenly spaced = 40-42-44-44-46-46 stitches. When the piece measures 8 cm, increase 1 stitch inside 2 stitches on each side – read INCREASE TIP. Increase like this every 4-3½-3-2½-2½-2 cm a total of 10-11-11-13-13-14 times on each side = 60-64-66-70-72-74 stitches. Cast off when the sleeve measures 47 cm in all sizes. Insert 1 marker on each side of the sleeve, 2-3-4-6-8-9 cm from the cast-off edge – they are used when sewing in the sleeves. Work the other sleeve in the same way. ASSEMBLY: Sew the shoulder seams. Sew the sleeve seams inside the 1 edge stitch, as far as the markers. Sew the top of the sleeve to the armhole inside the 1 edge stitch. The last cm from the markers is sewn to the cast-off edge on the front and back pieces. See sketch. Sew the side seams in the outermost loop of the outermost stitch so the seam is flat, leaving a 10 cm split at the bottom of the front piece. Sew the split together at the bottom of the neck (3-4 cm or to desired length), sewing in the outermost loop of the outermost stitch. HOOD: Start from the right side. Place the stitches from the threads back on circular needle size 6 mm and knit up 40 to 50 stitches between these 2 sets of stitches = 54 to 68 stitches. Purl 1 row from the wrong side with 4 edge stitches in garter stitch on each side. Continue with stocking stitch and 4 edge stitches in garter stitch on each side, AT THE SAME TIME on the first row increase to 84-84-90-90-94-94 stitches. Work until the hood measures 31 cm. Work short rows to shape the top of the hood; insert a marker in the middle of the row with 42-42-45-45-47-47 stitches on each side. ROW 1 (right side): Work until there are 2 stitches left before the marker, turn. ROW 2 (wrong side): Work back, turn. ROW 3: Work until there are 4-4-5-5-6-6 stitches left before the marker, turn. ROW 4: Work back, turn. ROW 5: Work until there are 6-6-7-7-8-8 stitches left before the marker, turn. ROW 6: Work back, turn. ROW 7: Work all stitches (to avoid holes where you turned, you can pick up the strand between the stitches and place it twisted on the left needle before knitting it together with the next stitch), turn. ROW 8: Work until there are 2 stitches left before the marker, turn. ROW 9: Work back, turn. ROW 10: Work until there are 4-4-5-5-6-6 stitches left before the marker, turn. ROW 11: Work back, turn. ROW 12: Work until there are 6-6-7-7-8-8 stitches left before the marker, turn. ROW 13: Work back, turn. ROW 14: Work all stitches (to avoid holes where you turned, you can pick up the strand between the stitches and place it twisted on the left needle before purling it together with the next stitch). Cast off with knit from the right side. The hood measures approx. 36 cm mid-front and 31 cm mid-back. ASSEMBLY: Fold the hood so the side edges are together. Sew the cast-off edge together, using grafting stitches from the right side. |
||||
Diagram explanations |
||||
|
||||
|
||||
|
||||
Have you finished this pattern?Tag your pictures with #dropspattern #everreadysweater or submit them to the #dropsfan gallery. Do you need help with this pattern?You'll find 31 tutorial videos, a Comments/Questions area and more by visiting the pattern on garnstudio.com. © 1982-2025 DROPS Design A/S. We reserve all rights. This document, including all its sub-sections, has copyrights. Read more about what you can do with our patterns at the bottom of each pattern on our site. |
||||


With over 40 years in knitting and crochet design, DROPS Design offers one of the most extensive collections of free patterns on the internet - translated to 17 languages. As of today we count 314 catalogues and 11821 patterns translated into English (UK/cm). 11821
We work hard to bring you the best knitting and crochet have to offer, inspiration and advice as well as great quality yarns at incredible prices! Would you like to use our patterns for other than personal use? You can read what you are allowed to do in the Copyright text at the bottom of all our patterns. Happy crafting!
Post a comment to pattern DROPS 239-6
We would love to hear what you have to say about this pattern!
If you want to leave a question, please make sure you select the correct category in the form below, to speed up the answering process. Required fields are marked *.