
Popular categories
Looking for a yarn?


Comments / Questions (94)
![]() Steffi wrote:
Steffi wrote:
Hallo,\r\nich stricke den Pulli in Größe M. Wenn ich nach der Halsblende 96 Maschen habe und dann 3x 8 also 24 Maschen zunehme, erhalte ich 120 Maschen für Größe M für die Passe. Nicht wie beschrieben 128. Das ist meines Erachtens ein Fehler in der Anleitung. Können Sie den bitte korrigieren oder gibt es bereits eine Korrektur? \r\nAm Ende der Halsblende stimmt die Rechnung für Größe M auch nicht. Da bekommt man nur 96 Maschen, wenn man die Zunahmen von L nimmt.
20.04.2023 - 21:50DROPS Design answered:
Liebe Steffi, es werden 4 Mal 8 Maschen bei dem Halsauschnitt zugenommen, so haben Sie: 96 Maschen + (8 Zunahmen x 4 Mal) = 128 Maschen. Viel Spaß beim stricken!
21.04.2023 - 08:40
![]() Malin wrote:
Malin wrote:
Halsringningen: Det står att man ska öka raglan även från avigsidan, men mellan vilka maskor. Ska jag först sticka omtagningen från rätsidan och sedan göra ett omtag? Jag får det inte till att ökningen blir 8 X4 annars. alltså 8 maskor på varje varv. Jag har tittat på hjälpvideon men där ökas det inte från avigsidan, därav min fråga.
17.04.2023 - 15:41DROPS Design answered:
Hej Malin, jo når du starter fra retten på forstykket, starter du med udtagning til raglan på hver side af alle 4 raglanovergangen, da får du 8 udtagninger, vend ifølge opskriften :)
18.04.2023 - 11:14
![]() Ellen wrote:
Ellen wrote:
I afsnittet Halsudskæring er det ikke helt klart, hvordan der tages ud 8 gange også på vrangsiden? De udtagne masker fra retsiden før og efter markørerne skal jo strikkes specielt for at undgå hul. Skal udtagninger på vrangsiden laves mellem disse og selve markøren? Forstår desværre ikke jeres svar til Maja om samme emne, og i videoen tages der IKKE ud på vrangsiden, så desværre ingen hjælp der heller :-)
30.03.2023 - 17:44DROPS Design answered:
Hej Ellen, jo du tager ud med omslag og strikker de nye masker i glatstrik (drejet) :)
13.04.2023 - 10:20
![]() Didde-Marie wrote:
Didde-Marie wrote:
Jeg er færdig med afsnittet “Dobbelt halskant” og skal i gang med vendepinde, afsnittet “Halsudskæring”. I skriver sådan her: “ Start fra retsiden, 2 masker før masken med 3.mærke”. Men jeg er midt bagpå mellem 4. og 1. mærke og har klippet tråden. Hvordan starter jeg omme ved mærke 3? Skal jeg blot strikke ret dertil fra hvor jeg er?
29.03.2023 - 14:14DROPS Design answered:
Hej Didde-Marie, du har klippet tråden (og kan starte hvor som helst) du skal starte 2 masker før masken med 3.mærke ifølge opskriften :)
13.04.2023 - 09:26
![]() Kirsten wrote:
Kirsten wrote:
Hei, jeg sliter litt med å forstå hvordan og når jeg skal bytte over til rundpinne 5, når en skal starte på raglan (steg: HALSRINGNING). Skal en gjøre dette før en starter på raglan, eller underveis.
27.03.2023 - 23:31DROPS Design answered:
Hei Kirsten, Du bytter til rundpinne 5 før du begynner Halsringning (strikk de forkortede pinner med nye pinnestørrelse og la de andre maskene hvile på gamle pinnen fram til de er også strikket. God fornøyelse!
28.03.2023 - 06:58
![]() Guihal wrote:
Guihal wrote:
Bonjour, je suis rendue à faire des augmentations 1 8 fois pour le dos et le devant et 9 fois pour les manches (taille s) . Je ne sais pas ( quand vous parlez du dos et devant) si vous augmentez à l'intérieur des marqueurs dos ou devant . Peut on augmenter que d'un côté du marqueur! Merci de votre réponse
18.03.2023 - 23:37DROPS Design answered:
Bonjour Mme Guihal, en taille S on n'augmente que 2 fois tous les 2 tours, c'est en taille M que l'on va augmenter 8 fois. Vous devez augmenter de chaque côté = avant + après les mailles avec un marqueur - cf RAGLAN + Tricoter les jetés ainsi sur l’endroit: ainsi: faites 1 jeté, tricotez la maille avec le marqueur, faites 1 jeté. Quand on n'augmente que pour le dos/le devant, on augmente avant le marqueur à la fin du dos/devant et après le marqueur au dos/devant, la fois suivante, augmentez comme avant (dos et manches); et répétez ces 2 augmentations. Bon tricot!
20.03.2023 - 09:01
![]() Toni wrote:
Toni wrote:
Desweiteren ist mir nicht klar, wie ich bei dem Abschnitt „Halsausschnitt“ sowohl in den Hinreihen als auch in den Rückreihen Raglanzunahmen arbeiten soll. Für die Rückreihen würden das bedeuten, dass ich den Umschlag stricke und zusätzlich neue Umschläge nehme. Im dem Video „Raglanzunahme mit verkürzten Reihen“ wird in den Rückreihen nicht zugenommen, daher hilft das Video bei dieser Frage mir leider nicht weiter. Ich bin sehr dankbar für Hilfe.
08.03.2023 - 11:54DROPS Design answered:
Liebe Toni, die Raglanzunahmen enstehen wie unter RAGLANZUNAHMEN: dann wie unter In Hin-Reihen... für das Rumfpteil/für die Ärmel erklärt, dh es wird immer gleichzeitig jeder Masche mit einer Markierung zugenommen (bei Hin- sowie Rückreihen). Viel Spaß beim stricken!
08.03.2023 - 13:37
![]() Toni wrote:
Toni wrote:
Hallo, ich habe eine Frage zu den allgemeinen Raglanhinweisen am Anfang der Anleitung. Hier ist von Hin-und Rückreihen am Rumpfteil die Rede. Aber hin-und Rückreihen werden doch nur am Halsausschnitt gestrickt und dort werden an jeder Markierung 4 Maschen zugenommen. Der Rest wir meinem Verständnis nach in Runden gestrickt wobei es keine Hin- und Rückreihen gibt. Wann brauche ich die detaillierten Anweisungen zu den 1. und 3. & 2. und 4. Maschen? Vielen Dank!
08.03.2023 - 09:27DROPS Design answered:
Liebe Toni, wenn man die verkürzten Reihen für den Halsausschnitt strickt, wird man diese Umschläge entweder bei den Hin- und auch bei den Rückreihen stricken (es sind jeweils 8 Maschen zugenommen bei jeder Reihe vom Halsausschnitt), so wird es erklärt, wie man diese Umschläge bei der nächsten Reihe stricken soll, ob diese Reihe einen Rück- oder einen Hinreihe wird. Dieses Video zeigt, wie diese Zunahmen gestrickt werden. Viel Spaß beim stricken!
08.03.2023 - 13:28
![]() Amanda Allorge wrote:
Amanda Allorge wrote:
BONJOUR, Pour réaliser ce pull en taille s, de combien aurais je besoin de pelotes ? Merci
02.03.2023 - 11:16DROPS Design answered:
Bonjour Amanda, 350 g de laine = 7 pelotes de DROPS Air. Bon tricot!
02.03.2023 - 11:18
![]() Agnieszka wrote:
Agnieszka wrote:
Czy w dekolcie dodaje się 8 oczek na reglan w każdym rzędzie? Czy co 2? Jeśli w każdym , to opis jak dodawać oczka w reglanie jest nieprawidłowy
28.02.2023 - 10:06DROPS Design answered:
Witaj Agnieszko, na dekolcie (podczas wykonywania rzędów skróconych) dodajemy oczka na reglan w każdym rzędzie. Gdy odnosimy się tutaj do REGLANU, chodzi nam o sam sposób dodawania oczek, a nie o częstotliwość ich dodawania. Pozdrawiamy!
28.02.2023 - 11:38
|
|
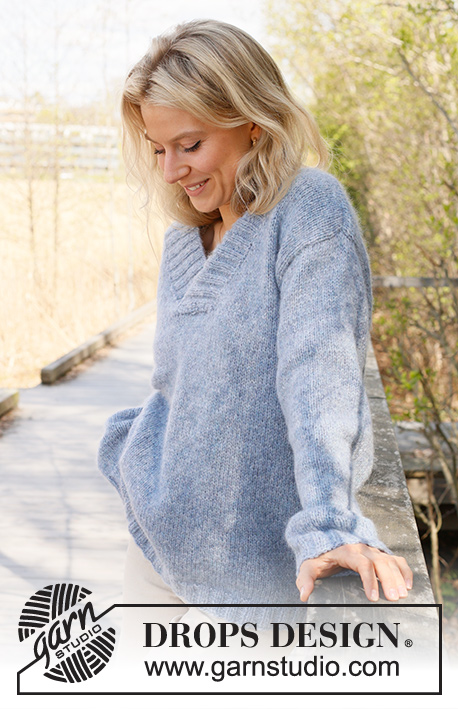
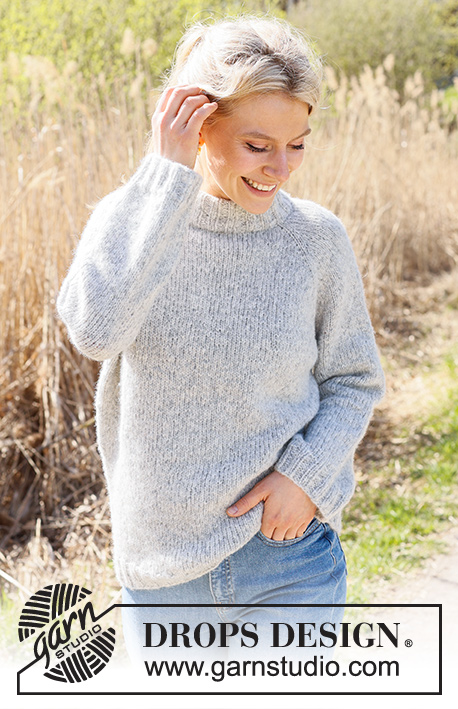
Early Moorning Mist#earlymoorningmistsweater |
|
 |
 |
Knitted jumper in DROPS Air. The piece is worked top down with stocking stitch, double neck and raglan. Sizes S - XXXL.
DROPS 236-16 |
|
|
------------------------------------------------------- EXPLANATIONS FOR THE PATTERN: ------------------------------------------------------- RAGLAN: All increases before/after 1 stitch in stocking stitch (the stitch with the marker). Increase for the body before markers 1 and 3 and after markers 2 and 4 when working from the right side/after markers 1 and 3 and before markers 2 and 4 when working from the wrong side. Increase for the sleeves after markers 1 and 3 and before markers 2 and 4 when working from right side / before marker 1 and 3 and after marker 2 and 4 when working from wrong side. Increase 1 stitch by making 1 yarn over. The yarn overs are worked as follows from the wrong side: BEFORE MARKER: Purl the back loop. No hole. AFTER MARKER: Slip the yarn over off the left needle and place it back twisted (insert the left needle from the back when replacing it). Purl the front loop. No hole. The yarn overs are worked as follows from the right side: BEFORE MARKER: Slip the yarn over off the left needle and place it back twisted (insert the left needle from the back when replacing it). Knit the front loop; the stitch twists to the right. No hole. AFTER MARKER: Knit the back loop (the stitch twists to the left). No hole. DECREASE TIP (for sleeves): Start 3 stitches before the marker, knit 2 together, knit 2 (marker sits between these 2 stitches), slip 1 stitch as if to knit, knit 1 and pass the slipped stitch over the knitted stitch. ------------------------------------------------------- START THE PIECE HERE: ------------------------------------------------------- JUMPER – SHORT OVERVIEW OF THE PIECE: The neck and yoke are worked in the round with circular needle, from mid back and top down. The yoke is divided for body and sleeves and the body is continued in the round with circular needle. The sleeves are worked with short circular needle/double pointed needles. DOUBLE NECK: Cast on 88-92-96-100-104-108 stitches with short circular needle size 5 mm and DROPS Air. Change to circular needle size 4 mm. Work rib in the round (knit 2, purl 2) for 13 cm. On the next round insert 4 markers at the same time as you increase 4 stitches on the round as follows – the markers are used when increasing for raglan: Knit 10-12-12-14-14-16 and increase 1 stitch (half back piece), insert marker-1 in the next stitch, knit 21 (sleeve), insert marker-2 in the next stitch, knit 21-23-25-27-29-31 and increase 2 stitches evenly spaced (front piece), insert marker-3 in the next stitch, knit 21 (sleeve), insert marker-4 in the next stitch, knit the last 11-11-13-13-15-15 stitches and increase 1 stitch (half back piece) = 92-96-100-104-108-112 stitches. Cut the strand. NECKLINE: Change to circular needle size 5 mm and work the neckline with short rows AT THE SAME TIME as increasing to raglan as follows: Start from the right side, 2 stitches before marker-3 (left front of neck when the garment is worn). Work stocking stitch, increase to RAGLAN – read description above, on each side of the 4 marker-stitches and until you have worked 2 stitches past marker-2 (right front of neck – 8 stitches increased for raglan). Turn, tighten the strand, work back from the wrong side, increase for raglan to 2 stitches past the beginning of the short rows by marker-3 (8 stitches increased for raglan). Turn, tighten the strand, work back from the right side, increase for raglan to 2 stitches past where you turned last time by marker-2 (8 stitches increased for raglan). Turn, tighten the strand, work back from the wrong side, increase for raglan to 2 stitches past marker-3 (8 stitches increased for raglan). Cut the strand. YOKE: = 124-128-132-136-140-144 stitches. Now work in the round as follows: SIZES S, M, L and XL: Start mid-back, work stocking stitch and increase for raglan on the body and sleeves (on each side of all 4 marker-stitches) every 2nd round 2-8-10-11 times = 140-192-212-224 stitches. Continue to increase but now every 2nd increase is only on the body (4 stitches increased); you are now increasing every 2nd round on the body and every 4th round on the sleeves. Increase like this 18-15-14-16 times on the body (9-7-7-8 times on the sleeves). A total of 24-27-28-31 times on the body and 15-19-21-23 times on the sleeves = 248-280-296-320 stitches. Go to ALL SIZES. SIZES XXL and XXXL: Start mid-back, work stocking stitch and increase for raglan every round on the body 2-6 times and every 2nd round on the sleeves 1-3 times = 152-180 stitches. Then increase on both the body and sleeves every 2nd round (on each side of all 4 marker-stitches) 10-7 times = 232-236 stitches. Continue to increase, but now every 2nd increase is only on the body (4 stitches increased); you are now increasing every 2nd round on the body and every 4th round on the sleeves. Increase like this 18-22 times on the body (9-11 times on the sleeves). A total of 34-39 times on the body and 24-25 times on the sleeves = 340-368 stitches. Go to ALL SIZES. ALL SIZES. = 248-280-296-320-340-368 stitches. Continue working without further increases until the yoke measures 21-23-25-27-29-31 cm measured mid-front after the rib on the neck. Divide for the body and sleeves as follows: Work 37-42-43-48-51-58 stitches (half back piece), place the next 49-57-61-65-67-69 stitches on a thread for the sleeve, cast on 6-6-8-8-10-10 stitches (in side under sleeve), work 75-83-87-95-103-115 stitches (front piece), place the next 49-57-61-65-67-69 stitches on a thread for the sleeve, cast on 6-6-8-8-10-10 stitches (in side under sleeve), work 38-41-44-47-52-57 stitches (half back piece). The body and sleeves are finished separately. The piece is now measured from here! BODY: = 162-178-190-206-226-250 stitches. Continue with stocking stitch in the round for a further 26 cm. Knit 1 round and increase 18-22-22-26-26-34 stitches evenly spaced = 180-200-212-232-252-284 stitches. Change to circular needle size 4 mm. Work rib (knit 2, purl 2) for 5 cm. Cast off a little loosely with knit over knit and purl over purl. The jumper measures approx. 58-60-62-64-66-68 cm from the shoulder down. SLEEVES: Place the 49-57-61-65-67-69 stitches from the thread on the one side of the piece on short circular needle/double pointed needles size 5 mm and knit up 1 stitch in each of the new stitches cast on under the sleeve = 55-63-69-73-77-79 stitches. Insert a marker in the middle of the new stitches under the sleeve; allow the marker to follow your work onwards, it is used when decreasing under the sleeve. Continue with stocking stitch in the round for 4 cm. Now decrease 2 stitches mid-under the sleeve – read DECREASE TIP. Decrease like this every 7-4-3-2½-2-2 cm a total of 5-8-10-11-12-12 times = 45-47-49-51-53-55 stitches. Continue working until the sleeve measures 39-38-36-35-33-31 cm from the division (or to desired length. There is approx. 5 cm left). Knit 1 round and increase 7-5-7-5-7-5 stitches evenly spaced = 52-52-56-56-60-60 stitches. Change to double pointed needles size 4 mm and work rib (knit 2, purl 2) for 5 cm. Loosely cast off with knit over knit and purl over purl. The sleeve measures approx. 44-43-41-40-38-36 cm from the division. Work the other sleeve in the same way. . ASSEMBLY: Fold the neck double to the inside and fasten with a stitch in each raglan-line. |
|

|
|
Have you finished this pattern?Tag your pictures with #dropspattern #earlymoorningmistsweater or submit them to the #dropsfan gallery. Do you need help with this pattern?You'll find 31 tutorial videos, a Comments/Questions area and more by visiting the pattern on garnstudio.com. © 1982-2025 DROPS Design A/S. We reserve all rights. This document, including all its sub-sections, has copyrights. Read more about what you can do with our patterns at the bottom of each pattern on our site. |
|


With over 40 years in knitting and crochet design, DROPS Design offers one of the most extensive collections of free patterns on the internet - translated to 17 languages. As of today we count 314 catalogues and 11820 patterns translated into English (UK/cm). 11820
We work hard to bring you the best knitting and crochet have to offer, inspiration and advice as well as great quality yarns at incredible prices! Would you like to use our patterns for other than personal use? You can read what you are allowed to do in the Copyright text at the bottom of all our patterns. Happy crafting!
Post a comment to pattern DROPS 236-16
We would love to hear what you have to say about this pattern!
If you want to leave a question, please make sure you select the correct category in the form below, to speed up the answering process. Required fields are marked *.