
Popular categories
Looking for a yarn?


Comments / Questions (33)
![]() Sue wrote:
Sue wrote:
Hi, is there a video tutorial on how to start the sleeves for this pattern? I have watched your video on how to pick up stitches on a garter edge, but this pattern calls for picking up stitches along the garter edge from the right (stockinette) side. Also, by picking up alternating two and one stitch between every two knots gives too many stitches. Do you have any advice or other videos to help?
18.10.2022 - 10:14DROPS Design answered:
Dear Sue, pick up stitches inside the edge stitch in garter stitch as shown in this video, ie pick up 23-25-26-28-30-31 stitches along the 17-18-19-20-21-22 cm along the armhole up to the shoulder (and down after the 2 sts slipped aside). Should you pick up more/less stitch, just adjust to the required number of stitches on first row from WS by decreasing/increasing. Happy knitting!
18.10.2022 - 16:00
![]() Marta wrote:
Marta wrote:
Dziękuję ślicznie za odpowiedź. Czyli dekolt zszywamy w miejscu początku okrążenia? Czy tak?
25.08.2022 - 10:17DROPS Design answered:
Dokładnie tak. Miłej pracy nad robótką!
25.08.2022 - 10:41
![]() Marta wrote:
Marta wrote:
Piszą Państwo, że na początku drugiego okrążenia po ściągaczu francuskim od razu za pierwszym oczkiem umieszczamy marker 1, wyznaczający oczko na rękaw. Czyli jeden rękaw wypada na początku okrążenia. Czyli pęknięcie między brzegu, które trzeba będzie zszyć też wypada w tym miejscu. Jednocześnie wg instrukcji szycie brzegu ma być na środku tyłu. Proszę o wyjaśnienie, bo opis jest niestety niejasny. Dziękuję!
24.08.2022 - 22:52DROPS Design answered:
Witaj Marto, pęknięcie na górnym brzegu swetra nie wypada na środku tyłu, tylko na początku okrążenia, tam gdzie jest umieszczony marker. Pozdrawiamy!
25.08.2022 - 10:09
![]() Sigrún Ólafsdóttir wrote:
Sigrún Ólafsdóttir wrote:
I følge bildet er denne genseren ikke strikket i riller og ikke ovenfra og ned. Kan jeg få riktig oppskrift (på islandsk, norsk eller dansk) Oppskrift 230-50
07.08.2022 - 19:56DROPS Design answered:
Hei Sigrún, Denne genseren er ikke strikket i rille (borsett fra bunnkanten) og er strikket fra bunnen oppover. Hvis du vil ha en slik oppskrift som du beskriver kan du sette stikkeord i søkeboksen. Vi har mange oppskrifter å velge i mellom. God fornøyelse!
17.08.2022 - 07:00
![]() Hilde Westegaard wrote:
Hilde Westegaard wrote:
Strikkes denne i en eller to tråder? Mvh Hilde 🤗
14.06.2022 - 20:01DROPS Design answered:
Hej Hilde, denne strikker du i en tråd DROPS Brushed Alpaca Silk :)
15.06.2022 - 15:29
![]() Dagmar wrote:
Dagmar wrote:
Wo finde ich die Angabe für die bestellmenge . Zb wird eine Menge de Größe zb 38.. 150g zugeordnet.. in der Beschreibung der Wolle .. kid Alpaka silk wird geschrieben , dass für Gr 38 mindestens 200g benötigt wird Danke
12.06.2022 - 07:20DROPS Design answered:
Liebe Dagmar, für dieses Modell brauchen Sie 125 g DROPS Brushed Alpaca Silk /25 g das Knäuel = 5 Knäuel (siehe Kopfzeilen). Wenn Sie Kid-Silk stricken möchten, benutzen Sie unseren Garnumrechner um die neue Garnmenge kalkulieren zu lassen. Viel Spaß beim stricken!
13.06.2022 - 09:25
![]() Sue wrote:
Sue wrote:
Am I doing something wrong? I'm knitting the XL. After the yoke short rows, I had 138 st (as per pattern). When the next part is knitted, I've 194 st. Under Yoke: "When you have increased 17-19-21-24-28-33 times ... there are 152-164-178-194-214-238 stitches." With 4 st increased per round, I've knitted 14 rounds to get 194 st. The pattern says you've increased 24 times. The difference between 194 st and 138 st is 56, and 56 st divided by 4 (st increased per round) is 14 rounds. ???
04.06.2022 - 03:34DROPS Design answered:
Dear Sue, the 24 times, it says "(including the short rows)". You worked 10 short rows + 14 increase rounds. Therefore, you have worked 24 times. Please remember to select “question”, instead of “comment” when posting your questions, so that we may answer you sooner. Happy knitting!
04.06.2022 - 18:02
![]() Sue wrote:
Sue wrote:
Yes, thank you. Your response to my questions helps. I greatly appreciate you answering my questions.
03.06.2022 - 05:55
![]() Sue wrote:
Sue wrote:
Thank you for your previous answers. Another question on these short rows. When it says knit 3 stitches past the marker, as you are increasing on some of the rows after the marker, does that increase stitch get included in the count of knit 3 stitches past the marker? Or is it increase after the marker (when called for), and then count 3 stitches further past the marker before turning?
30.05.2022 - 01:24DROPS Design answered:
Dear Sue, you increase the number of stitches worked, and increase as explained under INCREASE TIP (shoulders): but the increase doesn't count in the number of stitches worked "extra", this means you have to work 3 sts more after the marker (without counting the increased stitches for shoulder). Can this help?
30.05.2022 - 08:19
![]() Sue wrote:
Sue wrote:
2nd question: Under YOKE, working the short rows over one shoulder at the same time as you increase 2 st for the shoulder on each row, do you increase 1 st in each SHORT row? Or 2 st in each SHORT row? Also are the increased stitches meant to line up, or do they just come at the end of each short row just before you turn? Sorry, the instructions are unclear. So where exactly are the increases placed in this part of the pattern? Thank you.
25.05.2022 - 06:34DROPS Design answered:
Dear Sue, you increase on each time as explained under INCREASE TIP (shoulders):, this means on the first shoulder, increase from the right side after 1st marker and before 4th marker and from the wrong side after 3rd marker and before 2nd marker, the increased stitches will be lined up on each side of the shoulder sts. Happy knitting!
25.05.2022 - 07:32
|
|
Piece of Sky#pieceofskysweater |
|
 |
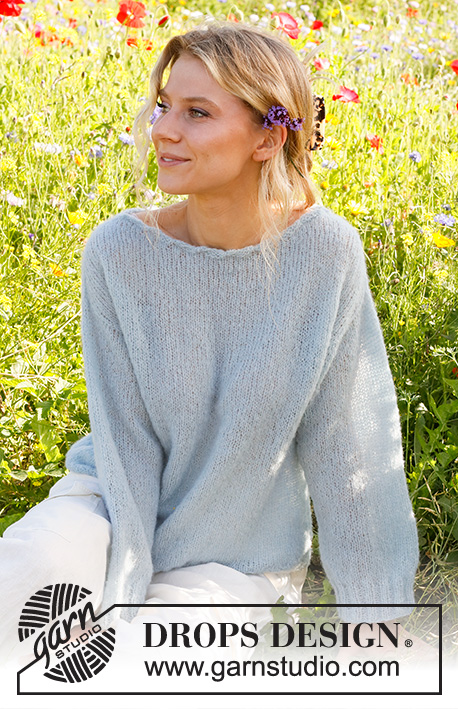 |
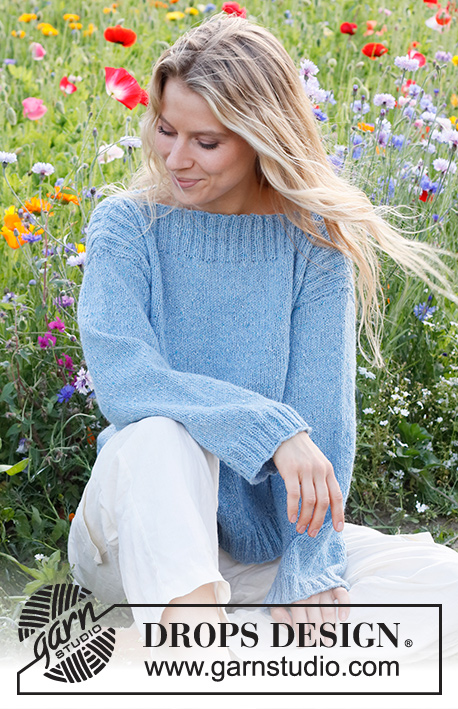
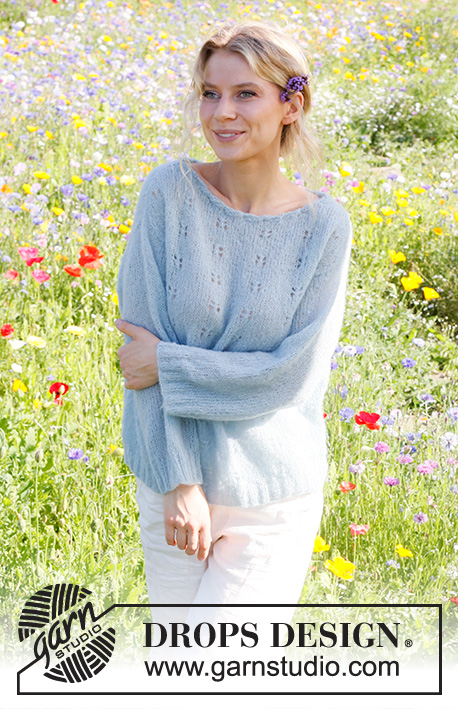
Knitted jumper in DROPS Brushed Alpaca Silk. The piece is worked top down, with increases for shoulders and decorative neck. Sizes S - XXXL.
DROPS 230-50 |
|
|
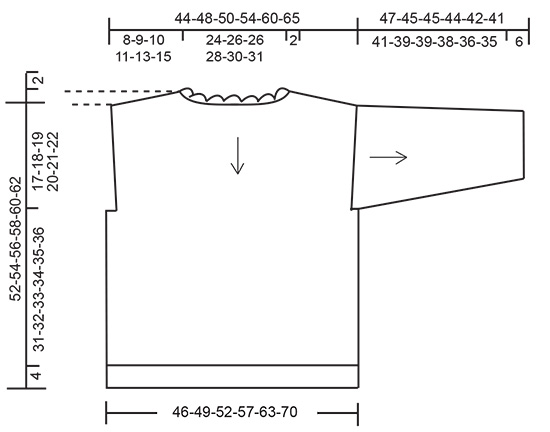
------------------------------------------------------- EXPLANATIONS FOR THE PATTERN: ------------------------------------------------------- RIDGE/GARTER STITCH (worked back and forth): Knit all rows. 1 ridge = knit 2 rows. INCREASE TIP (shoulders): RIGHT SIDE: Increase after markers 1 and 3 and before markers 2 and 4. BEFORE MARKER: The new stitch twists to the right. Use the left needle to pick up the strand between 2 stitches from the previous round/row, pick the strand up from the back and knit in the front loop. AFTER MARKER: The new stitch twists to the left. Use the left needle to pick up the strand between 2 stitches from the previous round/row, pick the strand up from the front and knit in the back loop. WRONG SIDE: Increase after markers 4 and 2 and before markers 3 and 1. BEFORE MARKER: The new stitch twists to the right. Use the left needle to pick up the strand between 2 stitches from the previous row, pick the strand up from the front and purl in the back loop. AFTER MARKER: The new stitch twists to the left. Use the left needle to pick up the strand between 2 stitches from the previous row, pick the strand up from the back and purl in the front loop. DECREASE TIP: All decreases are worked from the right side! Work 1 garter stitch, slip 1 stitch as if to knit, knit 1, pass the slipped stitch over the knitted stitch, work until there are 3 stitches left on the row, knit 2 together and 1 garter stitch. ------------------------------------------------------- START THE PIECE HERE: ------------------------------------------------------- JUMPER – SHORT OVERVIEW OF THE PIECE: The jumper is worked top down. The neck is worked back and forth, then the yoke in the round. The yoke is divided for the body and sleeves. Front and back pieces are worked separately back and forth with circular needle. The sleeves are worked back and forth with circular needle. NECK: Cast on 98-104-104-110-116-122 stitches with circular needle size 4 mm and DROPS Brushed Alpaca Silk. Work 3 RIDGES – read description above, back and forth. To create a rolling-edge work as follows from the right side: 1 edge stitch in garter stitch, knit 3, * twist the stitches on the right needle 360 degrees as follows: Take the strand to the right side and take the right needle under the piece and up to the right side, knit 6 *, work from *-* until there are 4 stitches left, knit 3 and 1 edge stitch in garter stitch. Now join the piece and continue in the round. Knit 1 round and decrease 14-16-10-12-14-16 stitches evenly spaced = 84-88-94-98-102-106 stitches. Insert 1 marker at the beginning of the round; the yoke is measured from this marker. YOKE: Change to circular needle size 5 mm. Insert 4 markers without working the stitches and insert them between 2 stitches: Count 1 stitch (shoulder-stitch), insert marker-1, count 40-42-45-47-49-51 stitches (back piece), insert marker-2, count 2 stitches (shoulder-stitches), insert marker-3, count 40-42-45-47-49-51 stitches (front piece), insert marker-4, there is 1 stitch left (shoulder-stitch). Now work short rows in stocking stitch over one shoulder AT THE SAME TIME as you increase 2 stitches for the shoulder on each row – read INCREASE TIP, as follows: Work 3 stitches past marker-1 – remember to increase on the shoulder, turn, tighten the strand and work 3 stitches past marker-4 – remember to increase, turn, tighten the strand, * work 3 stitches past the previous short row – remember to increase, turn, tighten the strand, work 3 stitches past the previous short row on the other side, turn, tighten the strand *, work from *-* until you have worked 10 short rows on each side, finish the last row at the beginning of the round (between the 2 stitches between markers 1 and 4). You have increased 10 stitches at each marker. Cut the strand. Move the start of the round to between the 2 stitches between markers 2 and 3 and work short rows here in the same way as on the first shoulder. When the short rows are finished, there are 124-128-134-138-142-146 stitches. REMEMBER THE KNITTING TENSION! Work the next round as follows (the start of the round is still between markers 2 and 3): Knit 1, increase 1 stitch for the shoulder, knit 60-62-65-67-69-71, increase 1 stitch for the shoulder, knit 2, increase 1 stitch for the shoulder, knit 60-62-65-67-69-71, increase 1 stitch for the shoulder, knit 1. Continue working and increase for the shoulders each round. The increased stitches are worked in stocking stitch. When you have increased 17-19-21-24-28-33 times (including the short rows) there are 152-164-178-194-214-238 stitches. The piece measures approx. 8-9-10-11-13-15 cm. Now divide for the front and back pieces as follows: Knit 1 stitch and place it on a thread for the sleeve, work 74-80-87-95-105-117 stitches in stocking stitch (front piece), knit 2, place these 2 stitches on a thread for the sleeve, work 74-80-87-95-105-117 stitches in stocking stitch and place these stitches on a thread for the back piece, knit 1 and place this stitch on the thread for the sleeve. Cut the strand. FRONT PIECE: = 74-80-87-95-105-117 stitches. Continue back and forth with stocking stitch and 1 edge stitch in GARTER STITCH – read description above, on each side. The front is measured from the division. When the piece measures 4 cm, decrease 1 stitch on each side – read DECREASE TIP! Decrease like this every 4 cm a total of 3-3-4-4-4-4 times = 68-74-79-87-97-109 stitches. When the piece measures 17-18-19-20-21-22 cm from the division, cast on 6 stitches at the end of the next 2 rows = 80-86-91-99-109-121 stitches. Continue with stocking stitch and 1 stitch in garter stitch on each side. When the piece measures approx. 31-32-33-34-35-36 cm from the 6 cast-on stitches, knit 1 row from the right side and increase 6-8-11-11-13-13 stitches evenly spaced = 86-94-102-110-122-134 stitches. Change to circular needle size 4 mm and work rib from the wrong side as follows: 1 garter stitch, knit 1, * purl 2, knit 2 *, work from *-* until there are 4 stitches left, purl 2, knit 1 and 1 garter stitch. Cast off when the rib measures 4 cm. BACK PIECE: Place the 74-80-87-95-105-117 stitches for the back piece on circular needle size 5 mm and work in the same way as the front piece. SLEEVES: Start at the cast-on stitches for the armhole on the back piece. Using circular needle size 5 mm, work as follows from the right side: Knit up 1 stitch in each of the 6 cast-on stitches under sleeve, knit up 23-25-26-28-30-31 stitches as far as the 2 stitches on the thread (shoulder-stitches), place these 2 stitches on the needle and knit them, knit up 23-25-26-28-30-31 stitches to the cast-on stitches under sleeve on the front piece and knit up 1 stitch in each of these 6 stitches = 60-64-66-70-74-76 stitches. Work stocking stitch back and forth, with 1 edge stitch in garter stitch on each side. When the sleeve measures 4 cm, decrease 1 stitch on each side. Decrease like this every 12-12-8-6-4-4 cm a total of 3-3-4-5-7-7 times = 54-58-58-60-60-62 stitches. When the sleeve measures 41-39-39-38-36-35 cm, knit 1 row from the right side and increase 0-0-0-2-2-0 stitches evenly spaced = 54-58-58-62-62-62 stitches. Change to circular needle size 4 mm and work rib from the wrong side as follows: 1 garter stitch, * knit 2, purl 2 *, work from *-* and 1 garter stitch. Cast off when the rib measures 6 cm. The sleeve measures approx. 47-45-45-44-42-41 cm. Work the other sleeve in the same way, but starting at the cast-on stitches for the armhole on the front piece. ASSEMBLY: Sew the sleeve and side seams in one go, inside the 1 edge stitch. Sew the neck together mid-back, inside the 1 edge stitch. |
|
|
|
Have you finished this pattern?Tag your pictures with #dropspattern #pieceofskysweater or submit them to the #dropsfan gallery. Do you need help with this pattern?You'll find 31 tutorial videos, a Comments/Questions area and more by visiting the pattern on garnstudio.com. © 1982-2025 DROPS Design A/S. We reserve all rights. This document, including all its sub-sections, has copyrights. Read more about what you can do with our patterns at the bottom of each pattern on our site. |
|


With over 40 years in knitting and crochet design, DROPS Design offers one of the most extensive collections of free patterns on the internet - translated to 17 languages. As of today we count 314 catalogues and 11820 patterns translated into English (UK/cm). 11820
We work hard to bring you the best knitting and crochet have to offer, inspiration and advice as well as great quality yarns at incredible prices! Would you like to use our patterns for other than personal use? You can read what you are allowed to do in the Copyright text at the bottom of all our patterns. Happy crafting!
Post a comment to pattern DROPS 230-50
We would love to hear what you have to say about this pattern!
If you want to leave a question, please make sure you select the correct category in the form below, to speed up the answering process. Required fields are marked *.