
Popular categories
Looking for a yarn?


Comments / Questions (25)
![]() Martha wrote:
Martha wrote:
Veldig fin jakke. En feil i oppskriften: i "DEL TIL BOL OG ERMER SLIK:" så er det like før blitt tydeliggjort at for str 1/3mnd er 202 masker på pinnene. Når man skal dele til bol og ermer så blir tallet på masker oppgitt i oppskriften til sammen 186 (str 0/1mnd). Man må da følge str 6/9 mnd når man deler bol og ermer.
13.09.2022 - 11:59
![]() Myriam wrote:
Myriam wrote:
Bonjour, désolé mais j'ai encore une question . Vous précisez qu'il faut replacer les 4 marqueurs pour l'augmentation de l'emplacement. Etant donné que les marqueurs se trouvent dans les mailles et non plus sur l'aiguille , est ce que l'on doit faire suivre le marqueur à la première et dernière maille tout en respectant les augmentations ou les faire suivre en désignant les mêmes mailles d'avant l'augmentation de l'emplacement ?
09.07.2022 - 03:54DROPS Design answered:
Bonjour Myriam, les marqueurs doivent toujours rester dans la même maille, autrement dit, faites les bien suivre au fur et à mesure, vous pourrez ainsi mieux repérer l'emplacement des augmentations (=de chaque côté de cette maille avec le marqueur). Bon tricot!
11.07.2022 - 08:52
![]() Myriam wrote:
Myriam wrote:
Bonjour , lors des augmentations des manches , si je comprends bien, il s'agit d'augmenter une mailles tricotée à l'envers avant ou apres les marqueurs désignés. Mais sur l'envers du travail faut il tricoter cette maille à l'endroit ou la tricoter à l'envers sur l'envers ?
08.07.2022 - 09:02DROPS Design answered:
Bonjour Myriam, les augmentations des manches se tricotent comme celles des épaules/manches marteau, mais vous augmentez cette fois tous les 2 rangs autrement dit tous les rangs sur l'endroit, donc comme sous AUGMENTATIONS-1 et pas -2 (je passe le message, merci d'avoir relevé ceci). Bon tricot!
08.07.2022 - 10:07
![]() Florine wrote:
Florine wrote:
Bonjour, je pense que la phrase "Décaler les 4 marqueurs pour que chaque marqueur soit désormais dans la première/dernière maille des devants/ du dos, autrement dit, on doit avoir 34-32-32-32 (34) les mailles pour les manches, entre chacune des mailles avec un marqueur" est de trop car les marqueurs sont déjà positionnés ainsi quand on arrive à cette partie de l'ouvrage. Non ? Merci
17.04.2022 - 23:20DROPS Design answered:
Bonjour Florine, auparavant les marqueurs étaient placés entre deux mailles, maintenant vous devez les placer dans une maille, autrement dit, dans la dernière maille du devant gauche, dans la 1ère et dans la dernière maille du dos et dans la première maille du devant droit. Bon tricot!
19.04.2022 - 11:19
![]() Marisa wrote:
Marisa wrote:
Non riesco a capire le indicazioni scritte nel paragrafo AUMENTI PER LO SPRONE: "Spostare i 4 segnapunti in modo che ognuno dei 4 segnapunti sia nella maglia più esterna a ogni lato dei davanti e dietro, con 34-32-32-32(34) maglie tra le maglie con il segnapunti sulle maniche." Se potete essere più chiari, grazie
10.04.2022 - 15:24DROPS Design answered:
Buonasera Marisa, deve spostare i segnapunti in modo che siano nelle ultime maglie del dietro e del davanti. Buon lavoro!
11.04.2022 - 21:30
|
|||||||||||||
Blue Pebbles Cardigan#bluepebblescardigan |
|||||||||||||
 |
 |
||||||||||||
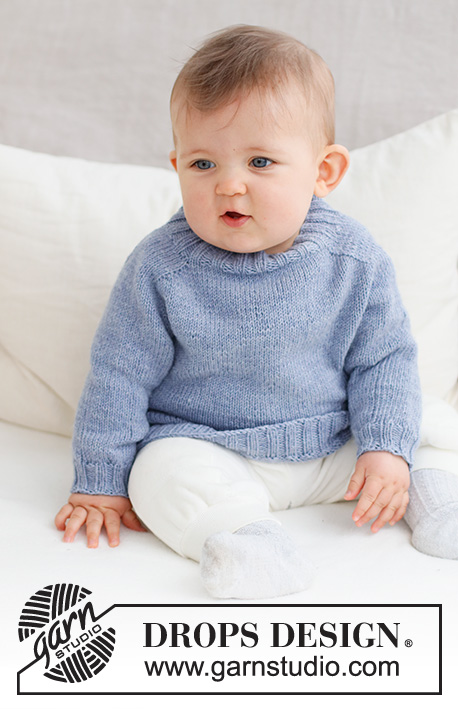
Knitted jacket for baby in DROPS BabyMerino. The piece is worked top down with saddle-shoulders. Sizes: Premature to 2 years.
DROPS Baby 43-3 |
|||||||||||||
|
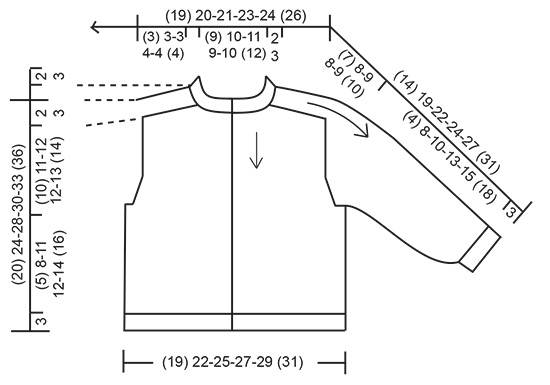
------------------------------------------------------- EXPLANATIONS FOR THE PATTERN: ------------------------------------------------------- RIDGE/GARTER STITCH (worked back and forth): Knit all rows. 1 ridge = knit 2 rows. INCREASE TIP-1 (saddle-shoulders, sleeves and yoke from the right side): BEFORE MARKER: The new stitch twists to the right. Use left needle to pick up thread between 2 stitches from row below, pick up thread from behind and knit stitch in front loop. AFTER MARKER: The new stitch twists to the left. Use left needle to pick up thread between 2 stitches from row below, pick up thread from front and knit stitch in back loop. INCREASE TIP-2 (for saddle-shoulders from the wrong side): BEFORE MARKER: The new stitch twists to the (seen from the right side). Use left needle to pick up thread between 2 stitches from row below, pick up thread from front and purl stitch in back loop. AFTER MARKER: The new stitch twists to the left (seen from the right side). Use left needle to pick up thread between 2 stitches from row below, pick up thread from behind and purl stitch in front loop. DECREASE TIP (for sleeves): Start 3 stitches left before the marker, knit 2 together, knit 2 (marker sits between these 2 stitches), slip 1 stitch as if to knit, knit 1 and pass the slipped stitch over the knitted stitch (= 2 stitches decreased). BUTTONHOLES: Work the buttonholes on the right band (when the garment is worn). Work from the right side when there are 3 stitches left: Make 1 yarn over, knit 2 together and knit 1. On the next row (wrong side) knit the yarn over to leave a hole. The first buttonhole is worked when the neck measures 1½-2 cm, the other (3) 4-5-5-5 (5) buttonholes are worked with (5) 5-5-5-5½ (6) cm between each one. ------------------------------------------------------- START THE PIECE HERE: ------------------------------------------------------- JACKET – SHORT OVERVIEW OF THE PIECE. The neck and yoke are worked back and forth with circular needle, from mid front and top down. Stitches are increased for the saddle-shoulders, sleeves and yoke. The yoke is divided for body and sleeves and the body continued back and forth. The sleeves are worked in the round with double pointed needles. NECK: Cast on (72) 76-80-84-88 (96) stitches with circular needle size 2.5 mm and DROPS Baby Merino. Purl 1 row from the wrong side. The next row is worked as follows from the right side: 5 band stitches in GARTER STITCH – read description above, * knit 2, purl 2 *, work from *-* until there are 7 stitches left, knit 2 and 5 band stitches in garter stitch. Work this rib for (2) 2-2-3-3 (3) cm – remember the BUTTONHOLES on the right band – read description above. When the rib is finished, knit 1 row from the right side where you increase (10) 14-14-18-18 (18) stitches evenly spaced (do not increase over the bands) = (82) 90-94-102-106 (114) stitches. Purl 1 row from the wrong side (the bands are knitted). YOKE: Change to circular needle size 3 mm. Insert 1 marker after the band; the yoke is measured from this marker! In addition, insert 4 other markers without working the stitches and each marker is inserted between 2 stitches; these markers are used when increasing for the shoulders and should have a different colour to the marker on the neck. Marker 1: Start mid-front and count (18) 20-21-21-22-24 stitches (front piece), insert the marker before the next stitch. Marker 2: Count (10) 10-10-14-14 (14) stitches from marker 1 (shoulder), insert the marker before the next stitch. Marker 3: Count (26) 30-32-32-34 (38) stitches from marker 2 (back piece), insert the marker before the next stitch. Marker 4: Count (10) 10-10-14-14 (14) stitches from marker 3 (shoulder), insert the marker before the next stitch. There are (18) 20-21-21-22 (24) stitches left after marker 4 (front piece). Allow these markers to follow your work onwards. INCREASES FOR SADDLE SHOULDERS: Read the next section before continuing – on the first row from the right side, increase 4 stitches for the saddle-shoulders as follows: Work stocking stitch and 5 band stitches in garter stitch on each side. Increase BEFORE markers 1 and 3 and AFTER markers 2 and 4 – read INCREASE TIP-1. You are only increasing on the front and back pieces. The number of shoulder stitches remains the same. On the next row (wrong side), increase 4 stitches as follows: Increase BEFORE markers 4 and 2 and AFTER markers 3 and 1– read INCREASE TIP-2. You are, therefore, increasing on EACH row but differently from the right and wrong side so the stitches lie neatly. Continue like this, increasing a total of (10) 10-10-12-12 (12) times = (122) 130-134-150-154 (162) stitches. REMEMBER THE KNITTING TENSION! After the last increase, the piece measures approx. (3) 3-3-4-4 (4) cm from the marker on the neck. Now increase for the sleeves as follows: INCREASES TO SLEEVES: Continue with stocking stitch and 5 band stitches in garter stitch on each side. AT THE SAME TIME, on the next row from the right side increase 4 stitches for the sleeves as follows: Increase AFTER markers 1 and 3 and BEFORE markers 2 and 4 – remember INCREASE TIP-1. You are only increasing on the sleeves and the number of stitches on the front and back pieces remains the same. Increase like this every 2nd row (each row from the right side) a total of (10) 12-11-9-9 (10) times = (162) 178-178-186-190 (202) stitches. The piece measures approx. (9) 11-10-10-10 (10) cm from the marker on the neck. Now increase for the yoke as follows. INCREASES TO YOKE: SIZE (prematur): = (162) stitches. Continue with stocking stitch but without increasing until the piece measures 10 cm from the marker on the neck. Go to ‘Divide for the body and sleeves’ below. SIZES 0/1 - 1/3 - 6/9 - 12/18 months (2 years): Move the 4 markers so each marker sits in the outermost stitch on each side of the back and front pieces, with 34-32-32-32 (34) stitches between the marker-stitches on the sleeves. On the next row from the right side increase 8 stitches by increasing both before and after each marker-stitch – remember INCREASE TIP-1. You are now increasing on the front and back pieces as well as the sleeves. Increase like this every 2nd row (each row from the right side) a total of 1-3-4-5 (5) times = 186-202-218-230 (242) stitches. After the last increase, the piece measures approx. 11-12-12-13 (13) cm from the marker on the neck. Continue working until the piece measures 11-12-12-13 (14) cm from the marker. DIVIDE FOR THE BODY AND SLEEVES: Work the first (26) 29-32-34-36 (38) stitches, place the next (34) 40-42-46-48 (50) stitches on a thread for the sleeve, cast on (4) 4-6-6-8 (8) stitches (in side under sleeve), work (42) 48-54-58-62 (66) stitches, place the next (34) 40-42-46-48 (50) stitches on a thread for the sleeve, cast on (4) 4-6-6-8 (8) stitches (in side under sleeve), work the last (26) 29-32-34-36 (38) stitches. The body and sleeves are finished separately. The piece is now measured from here! BODY: = (102) 114-130-138-150 (158) stitches. Continue with stocking stitch and 5 band stitches in garter stitch on each side for a further (5) 8-11-12-14 (16) cm. Knit 1 row from the right side where you increase (14) 14-18-18-22 (22) stitches evenly spaced (do not increase over the bands) = (116) 128-148-156-172 (180) stitches. Change to circular needle size 2.5 mm and work as follows from the wrong side: 5 band stitches in garter stitch, * purl 2, knit 2 *, work from *-* until there are 7 stitches left, purl 2 and 5 band stitches in garter stitch. Continue this rib for 3 cm. Cast off a little loosely. The jacket measures approx. (20) 24-28-30-33 (36) cm from the shoulder down. SLEEVES: Place the (34) 40-42-46-48 (50) stitches from the thread on the one side of the piece on double pointed needles size 3 mm and knit up 1 stitch in each of the (4) 4-6-6-8 (8) stitches cast on under the sleeve = (38) 44-48-52-56 (58) stitches. Insert a marker in the middle of the (4) 4-6-6-8 (8) stitches under the sleeve. Start at the marker and work stocking stitch in the round for 1 cm. Now decrease 2 stitches under the sleeve (does not apply to sizes prematur and 0/1 month) – read DECREASE TIP. Decrease like this every 3rd round a total of (0) 2-2-3-4 (4) times = (38) 40-44-46-48 (50) stitches. Continue working until the sleeve measures (4) 8-10-13-15 (18) cm from the division. There is approx. 3 cm to finished length; try the jacket on and work to desired length. Knit 1 round where you decrease (2) 0-0-2-0 (2) stitches evenly spaced = (36) 40-44-44-48 (48) stitches. Change to double pointed needles size 2.5 mm and work rib (knit 2, purl 2) for 3 cm. Cast off a little loosely The sleeve measures approx. (7) 11-13-16-18 (21) cm from the division. Work the other sleeve in the same way. ASSEMBLY: Sew the buttons onto the left band. |
|||||||||||||
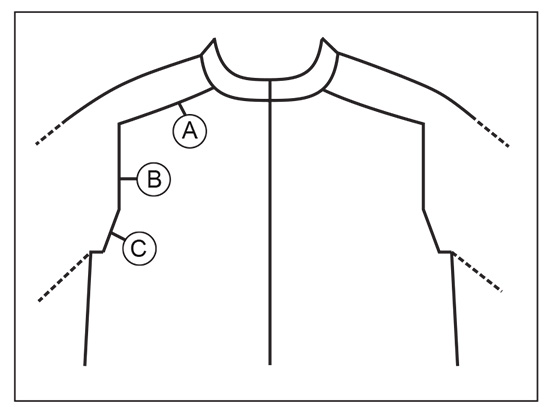
Diagram explanations |
|||||||||||||
|
|||||||||||||
|
|||||||||||||
|
|||||||||||||
Have you finished this pattern?Tag your pictures with #dropspattern #bluepebblescardigan or submit them to the #dropsfan gallery. Do you need help with this pattern?You'll find 31 tutorial videos, a Comments/Questions area and more by visiting the pattern on garnstudio.com. © 1982-2025 DROPS Design A/S. We reserve all rights. This document, including all its sub-sections, has copyrights. Read more about what you can do with our patterns at the bottom of each pattern on our site. |
|||||||||||||


With over 40 years in knitting and crochet design, DROPS Design offers one of the most extensive collections of free patterns on the internet - translated to 17 languages. As of today we count 314 catalogues and 11820 patterns translated into English (UK/cm). 11820
We work hard to bring you the best knitting and crochet have to offer, inspiration and advice as well as great quality yarns at incredible prices! Would you like to use our patterns for other than personal use? You can read what you are allowed to do in the Copyright text at the bottom of all our patterns. Happy crafting!
Post a comment to pattern DROPS Baby 43-3
We would love to hear what you have to say about this pattern!
If you want to leave a question, please make sure you select the correct category in the form below, to speed up the answering process. Required fields are marked *.