
Popular categories
Looking for a yarn?


Comments / Questions (76)
![]() Birgitte Borkowsky wrote:
Birgitte Borkowsky wrote:
Er lige påbegyndt mønstret efter de 4 pinde retstrik. Jeg er i tvivl om de omslag på retsiden i mønster A1, skal strikkes drejet vrang på vrangpinden? Eller skal der blive huller? Synes ikke det fremgår klart på foto.
14.08.2022 - 17:18DROPS Design answered:
Hei Birgitte. De skal ikke strikkes vridd vrang. Det skal bli hull = hullmønster. mvh DROPS Design
15.08.2022 - 13:17
![]() Eeva-Stiina Sallmen wrote:
Eeva-Stiina Sallmen wrote:
Ohjeen diagrammissa on virhe rivi 3 mallineule A.1.9hjeessa on :ota 1 s neulomatta, Neulo 2 oikein yhteen ja vedä nostettu s yli.Se on väärin!!! Pitää neuloa ne kaksi vain oikein EI yhteen.
29.06.2022 - 15:39
![]() Eeva-Stiina Sallmen wrote:
Eeva-Stiina Sallmen wrote:
Ohjeen diagrammissa on virhe rivi 3 mallineule A.1.9hjeessa on :ota 1 s neulomatta, Neulo 2 oikein yhteen ja vedä nostettu s yli.Se on väärin!!! Pitää neuloa ne kaksi vain oikein EI yhteen.
29.06.2022 - 15:39
![]() Kerstin wrote:
Kerstin wrote:
"Bei einer Länge von 3 cm je 1 Masche beidseitig jedes Markierungsfadens zunehmen - ZUNAHMETIPP lesen. In dieser Weise alle 2 cm insgesamt 3-3-3-4 (4-4-4) x in der Höhe zunehmen = 118-130-138-154 (162-170-182) Maschen. Bei einer Länge von 8-10-11-13 (15-18-21) cm ab der Teilung 2 KRAUSRIPPEN (= 4 Runden kraus rechts, siehe oben) über alle Maschen stricken." Das ergibt doch aber bei den Zunahmen 9 cm?
16.06.2022 - 19:35DROPS Design answered:
Liebe Kerstin, die 1. Zunahmen ensteht nach 3 cm, die 2. nach 5 cm, die 3. nach 7 cm und die 4. bei 9 cm (nur in die 3 grösseren Größen), so sind alle zunahmen fertig nach 8-10-11-13 (15-18-21) cm. Viel Spaß beim stricken!
17.06.2022 - 08:08
![]() Barbara wrote:
Barbara wrote:
Based on the instructions, I found that A2 lace pattern is not centered on the previously worked cable pattern-A1. I suggest you examine where the A2 pattern will fall and adjust before proceeding. I worked (for size 3/4) 5 k2tog at the start of A2 to shift the pattern over.
14.06.2022 - 15:38DROPS Design answered:
Dear Barbara, A.2 is not supposed to be centered over A.1, but feel free to adjust where to start the first round on A.2 if you rather get A.2 centered. Happy knitting!
14.06.2022 - 16:57
![]() Silvana wrote:
Silvana wrote:
Scusate per essere più chiara: il gettato tra le due maglie all inizio del diagramma A1 dopo i due rovesci, lo devo fare sul rovescio del lavoro o sul dritto del lavoro? Il diagramma A1 è di 15 giri (contando anche i ferri a rovescio) o di 8? Grazie mille per l' aiuto
28.05.2022 - 07:59DROPS Design answered:
Buongiorno Silvana, è sicura di aver letto il diagramma nel modo corretto? I diagrammi si leggono dal basso verso l'alto, da destra verso sinistra per i ferri di andata in un lavoro in piano e da sinistra verso destra per i ferri di ritorno. Il diagramma A.1 mostra tutti i ferri del lavoro ed è formato da 8 ferri. Buon lavoro!
29.05.2022 - 14:26
![]() Silvana wrote:
Silvana wrote:
Buongiorno, dopo il primo ferro del diagramma 1 devo fare un ferro sul rovescio lavorando come si presentano. E poi ritornare sul diagramma ? Quindi sul digramma ci sono i ferri dispari? Grazie
28.05.2022 - 07:37DROPS Design answered:
Buongiorno Silvana, il diagramma mostra tutti i ferri del motivo, sia quelli di andata che quelli di ritorno. Buon lavoro!
29.05.2022 - 14:24
![]() Rocío wrote:
Rocío wrote:
Hola, buenas tardes, no entiendo bien el patrón , una vez realizo la primera hilera del canesú la segunda no la entiendo. Me la podríais explicar? un saludo
05.05.2022 - 16:32DROPS Design answered:
Hola Rocío, la segunda fila: trabajas derecho sobre derecho y revés sobre revés, sin aumentos para el raglán. Los puntos aumentados para el raglán en la fila anterior se trabajan retorcidos. La fila 3 se trabaja según el patrón, con los aumentos para el raglán.
05.05.2022 - 22:11
![]() Tineke wrote:
Tineke wrote:
A2 diagram: do I repeat the 17 stitches so that I knit the first 6 st. as 3x2together after I knitted the last 6 st as 3x2together so that it is 6x2 st together and then the yo part of the pattern. It doesn\'t work out that way
02.05.2022 - 00:32DROPS Design answered:
Dear Tineke, diagram A.2 is worked over 17 sts like this (1st row): K2 tog, K2 tog, K2 tog, (YO, K1)x5, YO, K2 tog, K2 tog, K2 tog - see also this video. Happy knitting!
02.05.2022 - 10:32
![]() Elena Somma wrote:
Elena Somma wrote:
Estimada señora \r\nEstoy tejiendo el modelo para 1/3 meses no entiendo la nota que especifica q para dicha medida : first work the new st into A.1 then in ss which are the new stitches? También el pattern A1 una vez llegar a la octava vuelta se comienza con la primera cierto?\r\n🙏
20.04.2022 - 19:19DROPS Design answered:
Hola Elena, la nota quiere decir: En las tallas 0/1 y 1/3 meses primero tejer los nuevos puntos dentro de A.1, después tejerlos en punto jersey. Los puntos aumentados se trabajan primero en A.1 hasta completar A.1 en horizontal, y después se trabaja en punto jersey, como en el resto de las tallas. Y sí, una vez se trabaja la última vuelta del diagrama A.1, se comienza una nueva repetición desde la primera. Puedes consultar la versión en español por si te resuelve más dudas: https://www.garnstudio.com/pattern.php?id=10681&cid=23
20.04.2022 - 19:40
|
||||||||||||||||||||||
Sweet Ivy#sweetivysweater |
||||||||||||||||||||||
 |
 |
|||||||||||||||||||||
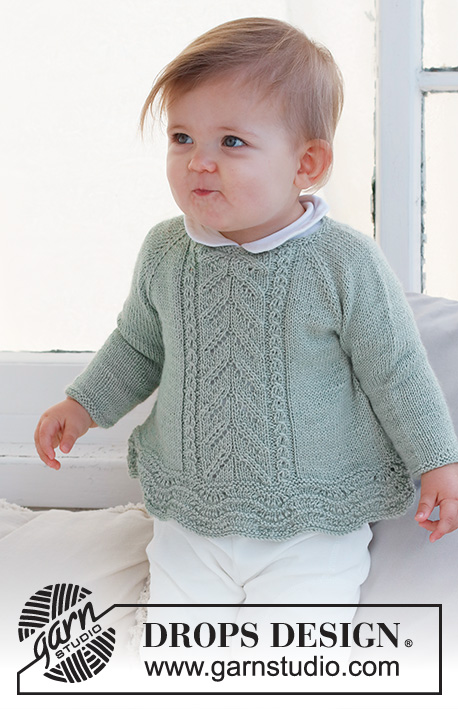
Knitted jumper for babies and children in DROPS Safran. The piece is worked top down with raglan, wave-pattern and lace-pattern. Sizes 0 - 6 years.
DROPS Baby 42-7 |
||||||||||||||||||||||
|
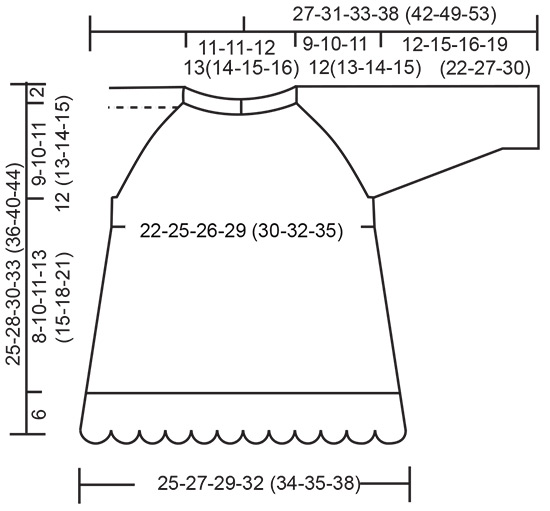
------------------------------------------------------- EXPLANATIONS FOR THE PATTERN: ------------------------------------------------------- RIDGE/GARTER STITCH (worked in the round): 1 ridge in height = 2 rounds; Knit 1 round and purl 1 round. RIDGE/GARTER STITCH (worked back and forth): Knit all rows. 1 ridge = knit 2 rows. PATTERN: See diagrams A.1 and A.2. The diagrams show all rows in the pattern from the right side. INCREASE TIP (for sides of body): Work until there are 2 stitches left before the marker, make 1 yarn over, knit 4 (marker thread sits between these 4 stitches), make 1 yarn over. On the next round work the yarn overs twisted to avoid holes. Then work the new stitches in stocking stitch. RAGLAN: Increase 1 stitch on each side of the 2 stocking stitches in each transition between body and sleeves (8 stitches increase on row/round). Increase 1 stitch by making 1 yarn over. On the next row (wrong side) purl the yarn overs twisted to avoid holes. On the next round (i.e. when working in the round) knit the yarn overs twisted to avoid holes. Then work the new stitches in stocking stitch. DECREASE TIP (sleeves): Decrease 1 stitch on either side of the marker as follows: Work until there are 3 stitches left before the marker, knit 2 together, knit 2 (marker sits between these 2 stitches), slip 1 stitch as if to knit, knit 1 and pass the slipped stitch over the knitted stitch. BUTTONHOLES: 2 buttonholes are worked on the bands at the back of the neck. Work from the right side when there are 3 stitches left on the row as follows: Make 1 yarn over, knit 2 together and knit 1. On the next row, knit the yarn over to leave a hole. The first buttonhole is worked when the neck measures 1½ cm. Then work the other buttonhole after 4 cm. ------------------------------------------------------- START THE PIECE HERE: ------------------------------------------------------- JUMPER – SHORT OVERVIEW OF THE PIECE: The piece is first worked back and forth from mid-back and top down. When the split is finished, it is continued in the round. The yoke is divided for the body and sleeves and the body continued in the round. The sleeves are worked in the round with double pointed needles. NECK: Cast on 73-77-81-85 (89-93-97) stitches with circular needle size 2.5 mm and DROPS Safran. Work 2 RIDGES back and forth – read description above. Change to circular needle size 3 mm. YOKE: READ THE NEXT SECTION BEFORE CONTINUING! The first row is worked as follows from the right side: 3 band stitches in garter stitch, 11-12-13-14 (15-16-17) stitches in stocking stitch (half back piece), 1 yarn over, 2 stitches in stocking stitch (raglan-line), 1 yarn over, 6 stitches in stocking stitch and increase 4 stitches evenly over these stitches (10 stitches on the sleeve), 1 yarn over, 2 stitches in stocking stitch (raglan-line), 1 yarn over, 0-0-0-1 (2-3-4) stitches in stocking stitch, A.1 (25-27-29-29 (29-29-29) stitches – see the start for your size in the smaller sizes, 0-0-0-1 (2-3-4) stitches in stocking stitch (= front piece), 1 yarn over, 2 stitches in stocking stitch (= raglan-line), 1 yarn over, 6 stitches in stocking stitch and increase 4 stitches evenly over these stitches (10 stitches on the sleeve), 1 yarn over, 2 stitches in stocking stitch (raglan-line), 1 yarn over, 11-12-13-14 (15-16-17) stitches in stocking stitch and 3 band stitches in garter stitch (half back piece). The first increase to RAGLAN – read description above, is now finished and there are 89-93-97-101 (105-109-113) stitches on the row. Continue with stocking stitch, A.1 and 3 band stitches in garter stitch on each side and continue to increase to raglan every 2nd row (each row from the right side) – REMEMBER THE KNITTING TENSION and the BUTTONHOLES – read description above. Increase like this every 2nd row (each row from the right side). The increased stitches are worked in stocking stitch. NOTE! In sizes 0/1 and 1/3 months first work the new stitches into A.1 then in stocking stitch. AT THE SAME TIME when the piece measures 6 cm join the piece on the next row from the right side as follows: Cast off the first 3 stitches and work to the end of the row. When the row is finished, continue in the round. You now are working stocking stitch on the back piece, stocking stitch and A.1 on the front piece. Move the beginning of the round to mid-back. Increase to raglan a total of 10-12-13-14 (15-16-18) times = 158-178-190-202 (214-226-246) stitches. Continue without further increases until the piece measures 9-10-11-12 (13-14-15) cm. Work the next round as follows: Work the first 24-27-29-31 (33-35-38) stitches, place the next 32-36-38-40 (42-44-48) stitches on a thread for the sleeve, cast on 6-6-6-8 (8-8-8) stitches (in side under sleeve), work 47-53-57-61 (65-69-75) stitches (front piece), place the next 32-36-38-40 (42-44-48) stitches on a thread for the sleeve, cast on 6-6-6-8 (8-8-8) stitches (in side under sleeve), work the last 23-26-28-30 (32-34-37) stitches. The body and sleeves are finished separately. BODY: = 106-118-126-138 (146-154-166) stitches. Insert 1 marker in each side, in the middle of the new stitches cast on under each sleeve. When the piece measures 3 cm from the division, increase 1 stitch on each side of both markers - read INCREASE TIP. Increase like this every 2 cm a total of 3-3-3-4 (4-4-4) times = 118-130-138-154 (162-170-182) stitches. When the piece measures 8-10-11-13 (15-18-21) cm from the division, work 2 ridges over all stitches. Knit 1 round where you increase 18-23-32-33 (42-34-39) stitches evenly spaced = 136-153-170-187 (204-204-221) stitches. Knit 1 round; the yarn overs are knitted twisted to avoid holes. Now work A.2 over all stitches. When A.2 has been completed in height, loosely cast off. The jumper measures approx. 25-28-30-33 (36-40-44) cm from the shoulder down. SLEEVES: Place the 32-36-38-40 (42-44-48) stitches from the thread on the one side of the piece on double pointed needles size 3 mm and knit up 1 stitch in each of the 6-6-6-8 (8-8-8) stitches cast on under the sleeve = 38-42-44-48 (50-52-56) stitches. Insert a marker in the middle of the new stitches under the sleeve. Work stocking stitch in the round. When the sleeve measures 3 cm from the division, decrease 1 stitch on each side of the marker - read DECREASE TIP! Decrease like this every 5-4-3-3 (4-5-3½) cm a total of 2-3-4-5 (5-5-7) times = 34-36-36-38 (40-42-42) stitches. When the sleeve measures 11-14-15-18 (21-26-29) cm, change to double pointed needles size 2.5 mm. Work 2 ridges over all stitches. Cast off with knit. Work the other sleeve in the same way. ASSEMBLY: Sew the buttons onto the band without buttonholes. Lay the button-band under the buttonhole-band and sew together at the bottom. |
||||||||||||||||||||||
Diagram explanations |
||||||||||||||||||||||
|
||||||||||||||||||||||

|
||||||||||||||||||||||
|
||||||||||||||||||||||
Have you finished this pattern?Tag your pictures with #dropspattern #sweetivysweater or submit them to the #dropsfan gallery. Do you need help with this pattern?You'll find 31 tutorial videos, a Comments/Questions area and more by visiting the pattern on garnstudio.com. © 1982-2025 DROPS Design A/S. We reserve all rights. This document, including all its sub-sections, has copyrights. Read more about what you can do with our patterns at the bottom of each pattern on our site. |
||||||||||||||||||||||


With over 40 years in knitting and crochet design, DROPS Design offers one of the most extensive collections of free patterns on the internet - translated to 17 languages. As of today we count 314 catalogues and 11820 patterns translated into English (UK/cm). 11820
We work hard to bring you the best knitting and crochet have to offer, inspiration and advice as well as great quality yarns at incredible prices! Would you like to use our patterns for other than personal use? You can read what you are allowed to do in the Copyright text at the bottom of all our patterns. Happy crafting!
Post a comment to pattern DROPS Baby 42-7
We would love to hear what you have to say about this pattern!
If you want to leave a question, please make sure you select the correct category in the form below, to speed up the answering process. Required fields are marked *.