
Popular categories
Looking for a yarn?


Comments / Questions (76)
![]() Ashwini wrote:
Ashwini wrote:
Hi! This is such a lovely pattern. I started working on it, however I don't understand what it means in A1 where it says this square has no stitch. I am making a 6-9m size. If I ignore that stitch and move forward I have 2 extra stitches on my needle. If I skip them I still have 2 extra. Am I supposed to k2tog? Please help!
03.03.2023 - 18:38DROPS Design answered:
Dear Ashwini, this square corresponds to the space that the decreased stitch of the previous row occupied. Since there is one less stitch in this row, compared to the previous one, there is one less symbol to be worked, which is represented by the black square. So it doesn't exist and you should ignore this symbol and pass on to the next one. If you have too many stitches in that row, you should check if you have worked correctly the decreases in the previous row. Happy knitting!
05.03.2023 - 19:26
![]() Kay Fleming wrote:
Kay Fleming wrote:
What a lovely little jumper, will enjoy knitting
15.02.2023 - 20:38
![]() Lila wrote:
Lila wrote:
Merci de m'avoir répondue 😊, j'ai mal compris au début !maintenant c'est bon
09.02.2023 - 18:08
![]() Lila wrote:
Lila wrote:
Je ne comprends pas dans A1 , au troisième rang il y'a 2 mailles diminuées, alors que au rand suivant il n ' y a qu'un seul jeté, il manque une maille non ?
08.02.2023 - 17:19DROPS Design answered:
Bonjour Lila, au 3ème rang de A.1 on ne diminue qu'une seule maille dans chacune des petites torsades de chaque côté de A.1: on glisse la 1ère maille à l'endroit, on tricote les 2 mailles suivantes à l'endroit et on passe la maille glissée par-dessus la maille tricotée, on a diminué 1 maille que l'on va "récupérer" via le jeté du rang suivant. Bon tricot!
09.02.2023 - 09:39
![]() Cindy Hansen A wrote:
Cindy Hansen A wrote:
Undrar om inte i mönster A1, rad 3,4, 7 och 8 bodde inte ha enbart 2 istället för 3 m efter eller innan start och slut bård?
27.01.2023 - 15:20DROPS Design answered:
Hej Cindy. Det ska vara 3 framkantsmaskor mot mitt bak hela tiden, dessa hamnar hela tiden ovanpå varandra. Mvh DROPS Design
31.01.2023 - 08:04
![]() Ivanka Philippi wrote:
Ivanka Philippi wrote:
Die Anleitung ist nicht korrekt. Wenn ich bei A 1 eine Masche abhebe und zwei Maschen zusammen stricke, die abgehobene drüberziehe, dann bleibt von drei Maschen eine übrig. Die Reihe darüber müsste ein Umschlag, eine rechte Masche, ein Umschlag sein, man braucht wieder drei Maschen. In der Anleitung steht eine rechte Masche, ein Umschlag, eine rechte Masche.
21.01.2023 - 17:10DROPS Design answered:
Liebe Frau Philippi, bei A.1 wird es nur 1 Masche abgenommen, so stricken Sie: 1 Masche wie zum Rechtsstricken abheben, 2 Maschen rechts stricken, die abgehobene Masche über die gestrickten (und nicht die zusammengestrickten) Maschen ziehen - eine Korrektur erfolt. Viel Spaß beim stricken!
23.01.2023 - 10:48
![]() Alina wrote:
Alina wrote:
W schemacie A.1 w trzecim rzędzie po zastosowaniu 6-ego symbolu z 3 oczek otrzymujemy 1 oczko. W następnym rzędzie schematu w tym miejscu brakuje 1 oczka. Proszę o wyjaśnienie. Wyjaśnienie dla Alexandra (20.02.22) jest mylne. z 3 oczek razem otrzymujemy 1 oczko, gdy dodamy 1 to są 2, trzeciego brakuje. Jest błąd.
02.01.2023 - 18:57DROPS Design answered:
Witaj Alino, wyjaśnienie jest poprawne. Oto wyjaśnienie dla tego symbolu: zdjąć 1 oczko jak do przerobienia na prawo, przerobić 2 oczka na prawo (nie razem na prawo) i przełożyć oczko zdjęte ponad przerobionymi oczkami > z 3 oczek zostaje 2 oczka. Podobny warkoczyk stosujemy w innych wzorach: zobacz video TUTAJ (od 3-ciej minuty) - różnica jest taka, że na tym filmie 1-sze oczko nie jest zdejmowane na prawy drut, ale przerabiane. Pozdrawiamy!
12.04.2023 - 08:12
![]() Gitti wrote:
Gitti wrote:
Wie stricke ich bei dem Sympol "keine Masche "gleich zur nächsten übergehen.Muss ich diese zusammen stricken oder wie kommt auf der anderen Seite das verdrehte Maschenbild zustande danke für die Hilfe
01.01.2023 - 12:35DROPS Design answered:
Liebe Gitti, bei dieser Reihe sind es nur noch 2 Maschen rechts übrig, diese 2 Maschen stricken Sie: 1 M rechts, 1 Umschlag, 1 Masche rechts = jetzt sind es wieder 3 Maschen. Viel Spaß beim stricken!
02.01.2023 - 14:22
![]() Tatjana wrote:
Tatjana wrote:
Hello, for sleeve the pattern says to change to 2.5 mm needle after 21 cm (for size 2 years) - do I measure from the underarm ? Thanks in advance.
18.08.2022 - 18:02DROPS Design answered:
Dear Tatjana, yes - you measure from the division, i.e. from the underarm. Happy knitting!
18.08.2022 - 18:19
![]() Birgitte Borkowsky wrote:
Birgitte Borkowsky wrote:
Tak for hurtigt svar. På side 2 skriver Kirsten Asmussen om, at der mangler 2 rækker i mønster A1. Er det korrekt? Kan ikke se at I har svaret tilbage.
15.08.2022 - 21:16DROPS Design answered:
Hei Birgitte. Design avd. har sjekket oppskriften. For at oppskriften skal stemme med alle 7 oppskrifter vil bildet (mønstret) avvike litt fra beskrivelsen, men det er ingen feil/mange. God Fornøyelse videre på genseren. mvh DROPS Design
22.08.2022 - 08:51
|
||||||||||||||||||||||
Sweet Ivy#sweetivysweater |
||||||||||||||||||||||
 |
 |
|||||||||||||||||||||
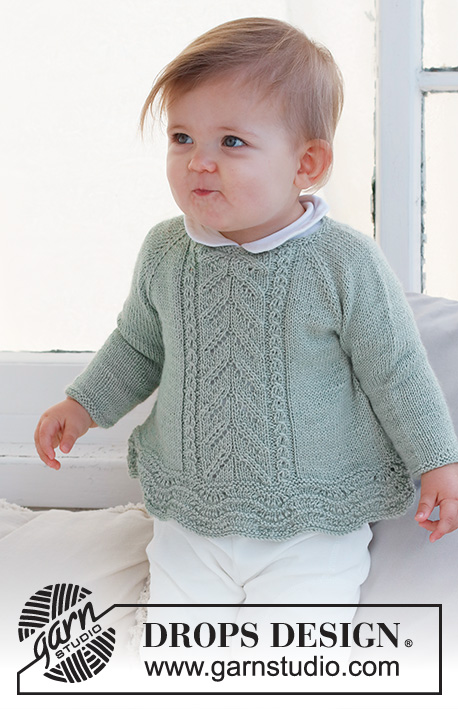
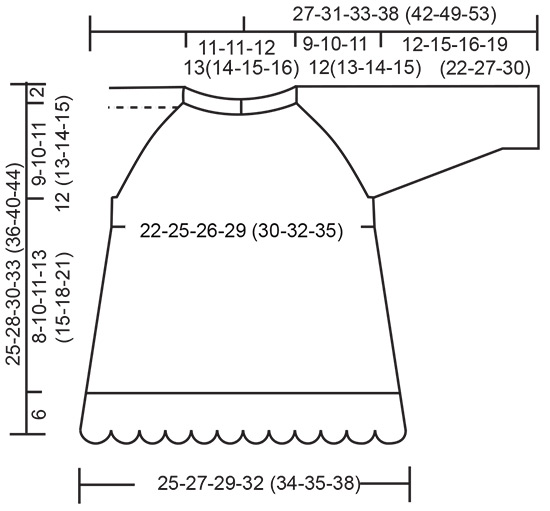
Knitted jumper for babies and children in DROPS Safran. The piece is worked top down with raglan, wave-pattern and lace-pattern. Sizes 0 - 6 years.
DROPS Baby 42-7 |
||||||||||||||||||||||
|
------------------------------------------------------- EXPLANATIONS FOR THE PATTERN: ------------------------------------------------------- RIDGE/GARTER STITCH (worked in the round): 1 ridge in height = 2 rounds; Knit 1 round and purl 1 round. RIDGE/GARTER STITCH (worked back and forth): Knit all rows. 1 ridge = knit 2 rows. PATTERN: See diagrams A.1 and A.2. The diagrams show all rows in the pattern from the right side. INCREASE TIP (for sides of body): Work until there are 2 stitches left before the marker, make 1 yarn over, knit 4 (marker thread sits between these 4 stitches), make 1 yarn over. On the next round work the yarn overs twisted to avoid holes. Then work the new stitches in stocking stitch. RAGLAN: Increase 1 stitch on each side of the 2 stocking stitches in each transition between body and sleeves (8 stitches increase on row/round). Increase 1 stitch by making 1 yarn over. On the next row (wrong side) purl the yarn overs twisted to avoid holes. On the next round (i.e. when working in the round) knit the yarn overs twisted to avoid holes. Then work the new stitches in stocking stitch. DECREASE TIP (sleeves): Decrease 1 stitch on either side of the marker as follows: Work until there are 3 stitches left before the marker, knit 2 together, knit 2 (marker sits between these 2 stitches), slip 1 stitch as if to knit, knit 1 and pass the slipped stitch over the knitted stitch. BUTTONHOLES: 2 buttonholes are worked on the bands at the back of the neck. Work from the right side when there are 3 stitches left on the row as follows: Make 1 yarn over, knit 2 together and knit 1. On the next row, knit the yarn over to leave a hole. The first buttonhole is worked when the neck measures 1½ cm. Then work the other buttonhole after 4 cm. ------------------------------------------------------- START THE PIECE HERE: ------------------------------------------------------- JUMPER – SHORT OVERVIEW OF THE PIECE: The piece is first worked back and forth from mid-back and top down. When the split is finished, it is continued in the round. The yoke is divided for the body and sleeves and the body continued in the round. The sleeves are worked in the round with double pointed needles. NECK: Cast on 73-77-81-85 (89-93-97) stitches with circular needle size 2.5 mm and DROPS Safran. Work 2 RIDGES back and forth – read description above. Change to circular needle size 3 mm. YOKE: READ THE NEXT SECTION BEFORE CONTINUING! The first row is worked as follows from the right side: 3 band stitches in garter stitch, 11-12-13-14 (15-16-17) stitches in stocking stitch (half back piece), 1 yarn over, 2 stitches in stocking stitch (raglan-line), 1 yarn over, 6 stitches in stocking stitch and increase 4 stitches evenly over these stitches (10 stitches on the sleeve), 1 yarn over, 2 stitches in stocking stitch (raglan-line), 1 yarn over, 0-0-0-1 (2-3-4) stitches in stocking stitch, A.1 (25-27-29-29 (29-29-29) stitches – see the start for your size in the smaller sizes, 0-0-0-1 (2-3-4) stitches in stocking stitch (= front piece), 1 yarn over, 2 stitches in stocking stitch (= raglan-line), 1 yarn over, 6 stitches in stocking stitch and increase 4 stitches evenly over these stitches (10 stitches on the sleeve), 1 yarn over, 2 stitches in stocking stitch (raglan-line), 1 yarn over, 11-12-13-14 (15-16-17) stitches in stocking stitch and 3 band stitches in garter stitch (half back piece). The first increase to RAGLAN – read description above, is now finished and there are 89-93-97-101 (105-109-113) stitches on the row. Continue with stocking stitch, A.1 and 3 band stitches in garter stitch on each side and continue to increase to raglan every 2nd row (each row from the right side) – REMEMBER THE KNITTING TENSION and the BUTTONHOLES – read description above. Increase like this every 2nd row (each row from the right side). The increased stitches are worked in stocking stitch. NOTE! In sizes 0/1 and 1/3 months first work the new stitches into A.1 then in stocking stitch. AT THE SAME TIME when the piece measures 6 cm join the piece on the next row from the right side as follows: Cast off the first 3 stitches and work to the end of the row. When the row is finished, continue in the round. You now are working stocking stitch on the back piece, stocking stitch and A.1 on the front piece. Move the beginning of the round to mid-back. Increase to raglan a total of 10-12-13-14 (15-16-18) times = 158-178-190-202 (214-226-246) stitches. Continue without further increases until the piece measures 9-10-11-12 (13-14-15) cm. Work the next round as follows: Work the first 24-27-29-31 (33-35-38) stitches, place the next 32-36-38-40 (42-44-48) stitches on a thread for the sleeve, cast on 6-6-6-8 (8-8-8) stitches (in side under sleeve), work 47-53-57-61 (65-69-75) stitches (front piece), place the next 32-36-38-40 (42-44-48) stitches on a thread for the sleeve, cast on 6-6-6-8 (8-8-8) stitches (in side under sleeve), work the last 23-26-28-30 (32-34-37) stitches. The body and sleeves are finished separately. BODY: = 106-118-126-138 (146-154-166) stitches. Insert 1 marker in each side, in the middle of the new stitches cast on under each sleeve. When the piece measures 3 cm from the division, increase 1 stitch on each side of both markers - read INCREASE TIP. Increase like this every 2 cm a total of 3-3-3-4 (4-4-4) times = 118-130-138-154 (162-170-182) stitches. When the piece measures 8-10-11-13 (15-18-21) cm from the division, work 2 ridges over all stitches. Knit 1 round where you increase 18-23-32-33 (42-34-39) stitches evenly spaced = 136-153-170-187 (204-204-221) stitches. Knit 1 round; the yarn overs are knitted twisted to avoid holes. Now work A.2 over all stitches. When A.2 has been completed in height, loosely cast off. The jumper measures approx. 25-28-30-33 (36-40-44) cm from the shoulder down. SLEEVES: Place the 32-36-38-40 (42-44-48) stitches from the thread on the one side of the piece on double pointed needles size 3 mm and knit up 1 stitch in each of the 6-6-6-8 (8-8-8) stitches cast on under the sleeve = 38-42-44-48 (50-52-56) stitches. Insert a marker in the middle of the new stitches under the sleeve. Work stocking stitch in the round. When the sleeve measures 3 cm from the division, decrease 1 stitch on each side of the marker - read DECREASE TIP! Decrease like this every 5-4-3-3 (4-5-3½) cm a total of 2-3-4-5 (5-5-7) times = 34-36-36-38 (40-42-42) stitches. When the sleeve measures 11-14-15-18 (21-26-29) cm, change to double pointed needles size 2.5 mm. Work 2 ridges over all stitches. Cast off with knit. Work the other sleeve in the same way. ASSEMBLY: Sew the buttons onto the band without buttonholes. Lay the button-band under the buttonhole-band and sew together at the bottom. |
||||||||||||||||||||||
Diagram explanations |
||||||||||||||||||||||
|
||||||||||||||||||||||

|
||||||||||||||||||||||
|
||||||||||||||||||||||
Have you finished this pattern?Tag your pictures with #dropspattern #sweetivysweater or submit them to the #dropsfan gallery. Do you need help with this pattern?You'll find 31 tutorial videos, a Comments/Questions area and more by visiting the pattern on garnstudio.com. © 1982-2025 DROPS Design A/S. We reserve all rights. This document, including all its sub-sections, has copyrights. Read more about what you can do with our patterns at the bottom of each pattern on our site. |
||||||||||||||||||||||


With over 40 years in knitting and crochet design, DROPS Design offers one of the most extensive collections of free patterns on the internet - translated to 17 languages. As of today we count 314 catalogues and 11820 patterns translated into English (UK/cm). 11820
We work hard to bring you the best knitting and crochet have to offer, inspiration and advice as well as great quality yarns at incredible prices! Would you like to use our patterns for other than personal use? You can read what you are allowed to do in the Copyright text at the bottom of all our patterns. Happy crafting!
Post a comment to pattern DROPS Baby 42-7
We would love to hear what you have to say about this pattern!
If you want to leave a question, please make sure you select the correct category in the form below, to speed up the answering process. Required fields are marked *.