
Popular categories
Looking for a yarn?


Comments / Questions (76)
![]() Sapine Woelk wrote:
Sapine Woelk wrote:
Liebes Drops Design Team! Das ist ein entzückender Pulli. Leider nur für Kinder. Gibt es eine Umrechnung für Erwachsene? liebe Grüße
08.10.2023 - 18:44DROPS Design answered:
Liebe Frau Woelk, das machen wir leider nicht, aber hier finden Sie alle unsere Modellen für top-down Pullover mit Lochmuster, vielleicht kann Ihnen eins davon inspirieren. Viel Spaß beim stricken!
09.10.2023 - 09:11
![]() Indigo Larsen wrote:
Indigo Larsen wrote:
Hej. Jeg strikker størrelse 12/18 . Hvad er det meningen, at trøjen skal måle ved bærestykket, når man er færdig med at udtage til raglan? Altså i omkredsen? Jeg strikker strammer end jeg strikke fasthed, så jeg ved ikke hvornår, jeg skal tage masker fra til ærmer, når I bare skriver “når arbejdet måler 12 cm”. Bærestykket måler cirka 60 cm for mig. Jeg strikker 34 masker på 10 cm.
28.09.2023 - 12:22
![]() Enni wrote:
Enni wrote:
Suomenkielisessä ohjeessa langanmenekki isoimmassa koossa poikkeaa norjan ja englanninkielisistä ohjeista. Tämä kannattaa varmaan päivittää.
14.09.2023 - 14:55
![]() Anna wrote:
Anna wrote:
Hej Svar på din fråga är att det blir inte rätt med maskorna i a1. Det saknas maskor på tredje varvet i mönstret. Jag har markörer till raglan samt ärmen.
11.09.2023 - 15:55DROPS Design answered:
Hej Anna, jo A.1 er korrekt, du starter nederst i højre hjørne og diagrammet går over de midterste 29 masker i str 6/9. De 2 masker du tager ind på 3.pind, tages ud igen på 4.pind :)
14.09.2023 - 15:28
![]() Anna wrote:
Anna wrote:
Hej Jag stickar storlek 6/9 månader. Men jag får inte rätt på A1. A1 börjar väl på samma ställe hela tiden? Dvs det ökas på vardera sida om mönstret i raglan?
04.09.2023 - 08:15DROPS Design answered:
Hei Anna. Ja, A.1 skal begynne på samme sted hele tiden. Kommer diagrammet skjevt eller? Har du riktig maskeantall, økte du jevnt fordelt etter halskanten slik det er beskrevet i oppskriften? Sett maskemarøkrer ved mønstret, og raglanlinjen, da har du bedre oversikt. mvh DROPS Design
11.09.2023 - 14:54
![]() EC wrote:
EC wrote:
Row 1, starts with 97 stitches, yet when I work through the first row I am short 16 stitches. Can you clarify row 1, as it used in many patterns (which are beautiful). Thank you. Below is how I have interpreted row 1. Col 1 = # of stitches on needle, col 2 = # of stitches on needle after knitted stitches. Stitches 97 K3 94 k17 77 K6 71 K6 65 K10 55 K2 53 K4 49 48 20 a1=29 16 K4 14 K2 8 K6 -2 K10 -4 K2 -13 K17 -16 K3
11.06.2023 - 19:17DROPS Design answered:
Hi EC, Row 1: 3 garter st, 17 stocking st, 1 yo, 2 stocking st, 1 yo, 6 stocking st (increase 4 over these ), 1 yo, 2 stocking st, 1 yo, 4 stocking st, A.1 (29 ), 4 stocking st, 1 yo, 2 stocking st 1 yo, 6 stocking st, (increase 4 over these ), 1 yo, 2 stocking st, 1 yo, 17 stocking st and 3 garter st. Increased 8 stitches for raglan and 8 stitches in addition. Without the increases: 3+17+2+6+2+4+29+4+2+6+2+17+3 = 97 stitches, so you should not have any left-over stitches. With the increases you have 113 stitches. Happy knitting!
12.06.2023 - 06:58
![]() EC wrote:
EC wrote:
How much yarn is required for largest size 3ft – 3ft3/3ft5 - 3ft3/3ft5. Pattern states 200g; but how many yards is that. How many balls of yarn I will need. Thank you.
03.06.2023 - 18:17DROPS Design answered:
Dear EC, for the three largest sizes you will need 150, 150 and 200 gr respectively of DROPS Safran. Each ball of Safran has 50gr and 175 yards. So you will need 3, 3 or 4 balls of DROPS Safran, depending on the size you are working. 150gr of Safran = 525 yards and 200gr of Safran = 700 yards. Happy knitting!
04.06.2023 - 18:20
![]() Jette wrote:
Jette wrote:
Hej, hvorfor ruller kanten forneden, jeg har lukket løst af som beskrevet.
28.04.2023 - 19:59DROPS Design answered:
Hei Jette. Prøv å fukte kanten og la den tørke flatt / i fasong. mvh DROPS Design
02.05.2023 - 09:57
![]() Jette Olesen wrote:
Jette Olesen wrote:
Når jeg strikker kanten forneden bliver det er stor flæsekant, det syntes jeg ikke det er på modellen. Hvad gør jeg?
27.04.2023 - 08:43DROPS Design answered:
Hej Jette, jo bølgemønsteret bliver til en lille flæse, hvis du vil have den lidt mindre kan du strikke med en mindre pind :)
27.04.2023 - 10:29
![]() Olga wrote:
Olga wrote:
Buongiorno, quando faccio i gettati per gli aumenti del raglan, poi nel ferro successivo li lavoro ritorti per non creare buchi. Invece per quanto riguarda i gettati dello schema A1 sono da lavorare poi normalmente per evidenziare il forellino? Grazie.
18.04.2023 - 11:29DROPS Design answered:
Buonasera Olga, per il raglan seguirà quanto riportato nel paragrafo RAGLAN, mentre per il diagramma A.1 deve seguire la legenda. Buon lavoro!
18.04.2023 - 22:19
|
||||||||||||||||||||||
Sweet Ivy#sweetivysweater |
||||||||||||||||||||||
 |
 |
|||||||||||||||||||||
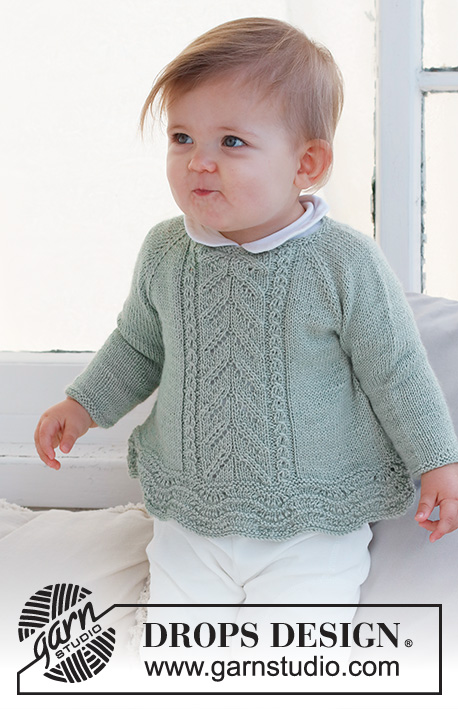
Knitted jumper for babies and children in DROPS Safran. The piece is worked top down with raglan, wave-pattern and lace-pattern. Sizes 0 - 6 years.
DROPS Baby 42-7 |
||||||||||||||||||||||
|
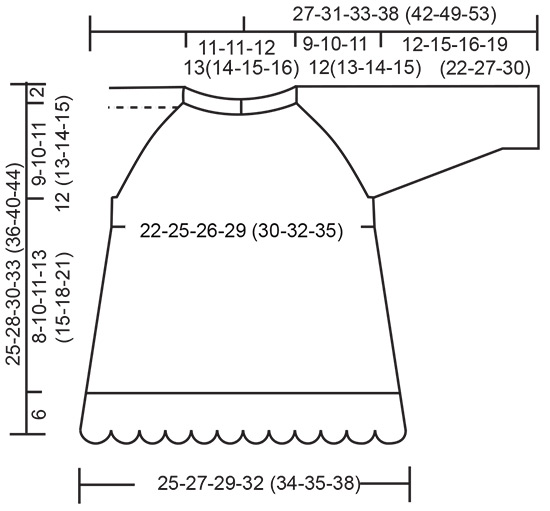
------------------------------------------------------- EXPLANATIONS FOR THE PATTERN: ------------------------------------------------------- RIDGE/GARTER STITCH (worked in the round): 1 ridge in height = 2 rounds; Knit 1 round and purl 1 round. RIDGE/GARTER STITCH (worked back and forth): Knit all rows. 1 ridge = knit 2 rows. PATTERN: See diagrams A.1 and A.2. The diagrams show all rows in the pattern from the right side. INCREASE TIP (for sides of body): Work until there are 2 stitches left before the marker, make 1 yarn over, knit 4 (marker thread sits between these 4 stitches), make 1 yarn over. On the next round work the yarn overs twisted to avoid holes. Then work the new stitches in stocking stitch. RAGLAN: Increase 1 stitch on each side of the 2 stocking stitches in each transition between body and sleeves (8 stitches increase on row/round). Increase 1 stitch by making 1 yarn over. On the next row (wrong side) purl the yarn overs twisted to avoid holes. On the next round (i.e. when working in the round) knit the yarn overs twisted to avoid holes. Then work the new stitches in stocking stitch. DECREASE TIP (sleeves): Decrease 1 stitch on either side of the marker as follows: Work until there are 3 stitches left before the marker, knit 2 together, knit 2 (marker sits between these 2 stitches), slip 1 stitch as if to knit, knit 1 and pass the slipped stitch over the knitted stitch. BUTTONHOLES: 2 buttonholes are worked on the bands at the back of the neck. Work from the right side when there are 3 stitches left on the row as follows: Make 1 yarn over, knit 2 together and knit 1. On the next row, knit the yarn over to leave a hole. The first buttonhole is worked when the neck measures 1½ cm. Then work the other buttonhole after 4 cm. ------------------------------------------------------- START THE PIECE HERE: ------------------------------------------------------- JUMPER – SHORT OVERVIEW OF THE PIECE: The piece is first worked back and forth from mid-back and top down. When the split is finished, it is continued in the round. The yoke is divided for the body and sleeves and the body continued in the round. The sleeves are worked in the round with double pointed needles. NECK: Cast on 73-77-81-85 (89-93-97) stitches with circular needle size 2.5 mm and DROPS Safran. Work 2 RIDGES back and forth – read description above. Change to circular needle size 3 mm. YOKE: READ THE NEXT SECTION BEFORE CONTINUING! The first row is worked as follows from the right side: 3 band stitches in garter stitch, 11-12-13-14 (15-16-17) stitches in stocking stitch (half back piece), 1 yarn over, 2 stitches in stocking stitch (raglan-line), 1 yarn over, 6 stitches in stocking stitch and increase 4 stitches evenly over these stitches (10 stitches on the sleeve), 1 yarn over, 2 stitches in stocking stitch (raglan-line), 1 yarn over, 0-0-0-1 (2-3-4) stitches in stocking stitch, A.1 (25-27-29-29 (29-29-29) stitches – see the start for your size in the smaller sizes, 0-0-0-1 (2-3-4) stitches in stocking stitch (= front piece), 1 yarn over, 2 stitches in stocking stitch (= raglan-line), 1 yarn over, 6 stitches in stocking stitch and increase 4 stitches evenly over these stitches (10 stitches on the sleeve), 1 yarn over, 2 stitches in stocking stitch (raglan-line), 1 yarn over, 11-12-13-14 (15-16-17) stitches in stocking stitch and 3 band stitches in garter stitch (half back piece). The first increase to RAGLAN – read description above, is now finished and there are 89-93-97-101 (105-109-113) stitches on the row. Continue with stocking stitch, A.1 and 3 band stitches in garter stitch on each side and continue to increase to raglan every 2nd row (each row from the right side) – REMEMBER THE KNITTING TENSION and the BUTTONHOLES – read description above. Increase like this every 2nd row (each row from the right side). The increased stitches are worked in stocking stitch. NOTE! In sizes 0/1 and 1/3 months first work the new stitches into A.1 then in stocking stitch. AT THE SAME TIME when the piece measures 6 cm join the piece on the next row from the right side as follows: Cast off the first 3 stitches and work to the end of the row. When the row is finished, continue in the round. You now are working stocking stitch on the back piece, stocking stitch and A.1 on the front piece. Move the beginning of the round to mid-back. Increase to raglan a total of 10-12-13-14 (15-16-18) times = 158-178-190-202 (214-226-246) stitches. Continue without further increases until the piece measures 9-10-11-12 (13-14-15) cm. Work the next round as follows: Work the first 24-27-29-31 (33-35-38) stitches, place the next 32-36-38-40 (42-44-48) stitches on a thread for the sleeve, cast on 6-6-6-8 (8-8-8) stitches (in side under sleeve), work 47-53-57-61 (65-69-75) stitches (front piece), place the next 32-36-38-40 (42-44-48) stitches on a thread for the sleeve, cast on 6-6-6-8 (8-8-8) stitches (in side under sleeve), work the last 23-26-28-30 (32-34-37) stitches. The body and sleeves are finished separately. BODY: = 106-118-126-138 (146-154-166) stitches. Insert 1 marker in each side, in the middle of the new stitches cast on under each sleeve. When the piece measures 3 cm from the division, increase 1 stitch on each side of both markers - read INCREASE TIP. Increase like this every 2 cm a total of 3-3-3-4 (4-4-4) times = 118-130-138-154 (162-170-182) stitches. When the piece measures 8-10-11-13 (15-18-21) cm from the division, work 2 ridges over all stitches. Knit 1 round where you increase 18-23-32-33 (42-34-39) stitches evenly spaced = 136-153-170-187 (204-204-221) stitches. Knit 1 round; the yarn overs are knitted twisted to avoid holes. Now work A.2 over all stitches. When A.2 has been completed in height, loosely cast off. The jumper measures approx. 25-28-30-33 (36-40-44) cm from the shoulder down. SLEEVES: Place the 32-36-38-40 (42-44-48) stitches from the thread on the one side of the piece on double pointed needles size 3 mm and knit up 1 stitch in each of the 6-6-6-8 (8-8-8) stitches cast on under the sleeve = 38-42-44-48 (50-52-56) stitches. Insert a marker in the middle of the new stitches under the sleeve. Work stocking stitch in the round. When the sleeve measures 3 cm from the division, decrease 1 stitch on each side of the marker - read DECREASE TIP! Decrease like this every 5-4-3-3 (4-5-3½) cm a total of 2-3-4-5 (5-5-7) times = 34-36-36-38 (40-42-42) stitches. When the sleeve measures 11-14-15-18 (21-26-29) cm, change to double pointed needles size 2.5 mm. Work 2 ridges over all stitches. Cast off with knit. Work the other sleeve in the same way. ASSEMBLY: Sew the buttons onto the band without buttonholes. Lay the button-band under the buttonhole-band and sew together at the bottom. |
||||||||||||||||||||||
Diagram explanations |
||||||||||||||||||||||
|
||||||||||||||||||||||

|
||||||||||||||||||||||
|
||||||||||||||||||||||
Have you finished this pattern?Tag your pictures with #dropspattern #sweetivysweater or submit them to the #dropsfan gallery. Do you need help with this pattern?You'll find 31 tutorial videos, a Comments/Questions area and more by visiting the pattern on garnstudio.com. © 1982-2025 DROPS Design A/S. We reserve all rights. This document, including all its sub-sections, has copyrights. Read more about what you can do with our patterns at the bottom of each pattern on our site. |
||||||||||||||||||||||


With over 40 years in knitting and crochet design, DROPS Design offers one of the most extensive collections of free patterns on the internet - translated to 17 languages. As of today we count 314 catalogues and 11820 patterns translated into English (UK/cm). 11820
We work hard to bring you the best knitting and crochet have to offer, inspiration and advice as well as great quality yarns at incredible prices! Would you like to use our patterns for other than personal use? You can read what you are allowed to do in the Copyright text at the bottom of all our patterns. Happy crafting!
Post a comment to pattern DROPS Baby 42-7
We would love to hear what you have to say about this pattern!
If you want to leave a question, please make sure you select the correct category in the form below, to speed up the answering process. Required fields are marked *.