
Popular categories
Looking for a yarn?


Comments / Questions (76)
![]() Stéphanie wrote:
Stéphanie wrote:
Bonjour, Je me trouve dans le bas du pull avec le diagramme A2 et je ne comprends pas cela ne ressemble pas à ce que l’on voit sur les photos. Deux fois que je recommence… Merci de votre aide. Cordialement.
28.08.2024 - 16:31DROPS Design answered:
Bonjour Stéphanie, le diagramme A.2 correspond au point de vagues, vous devez ainsi répéter les 17 mailles du diagramme (n'hésitez pas à mettre un marqueur entre chaque motif à répéter, c'est ainsi plus simple de vérifier le nombre de mailles pour chaque motif). Dans cette vidéo, nous montrons comment réaliser un diagramme similaire (notez qu'il commence par 2 rangs jersey dans la vidéo, ici vous commencez par les diminutions/jetés directement, mais sinon le reste du motif sera le même). Bon tricot!
29.08.2024 - 09:48
![]() Hanne wrote:
Hanne wrote:
Hi, als ik de eerste naald van de pas brei, meerder ik 18 steken. Ik heb 81 steken opgezet, dus kom dan op 99 steken uit. Volgens het patroon moeten het 97 steken zijn. Wat lees ik verkeerd?
15.08.2024 - 10:43DROPS Design answered:
Dag Hanne,
Je meerdert 16 steken op de eerste naald, namelijk 8 omslagen en 2 keer 4 meerderingen.
16.08.2024 - 17:09
![]() ANTONIA SERON SERRANO wrote:
ANTONIA SERON SERRANO wrote:
In A1 diagram, the motives in the sides say slip one, knit two and pass the slipped over the two knitted, so you decrease two stitches. But on the next row you only increase one. What am I reading wrong?
30.07.2024 - 16:10DROPS Design answered:
Dear Mrs Serrano, you should decrease only 1 stitch by slipping 1 stitch, knitting the next 2 stitches then pass the slipped stitch over the 2 knitted stitches, on the next round you make 1 yarn over and get 3 sts again. This create a small lace cable. Happy knitting!
31.07.2024 - 07:22
![]() Hanne Brendborg wrote:
Hanne Brendborg wrote:
Hej Ved mønster A1 er det så alle retpinde der strikkes fra højre og op på mønstret ? hvis ja hvad strikker jeg så på vrangpinden ?
17.07.2024 - 16:45DROPS Design answered:
Hei Hanne. I denna lektion kan du läsa om hur du läser ett diagram. Mvh DROPS Design
18.07.2024 - 14:05
![]() Hanne Brendborg wrote:
Hanne Brendborg wrote:
Når man så er igang med diagrammet A1, så er det på hver 2. pind, altså kun retpinden at man tager2 m ud ialt ? (på begge sider af de 2 m til raglan ærmet.) Dette fortsætter man med indtil trøjen måler 13 cm i str. 6-9 mdr ? Håber det er rigtigt forstået ? mvh Hanne
08.07.2024 - 16:44DROPS Design answered:
Hei Hanne. Ja, man øker til raglan, 8 masker pr øke omgang (hver 2.pinne / omgang) - som strikkes fra retten. Men husk å øke de 4 maskene til hvert erme på 1. pinne på bærestykket (1. pinne av A.1 strikkes da på forstykket). mvh DROPS Design
10.07.2024 - 07:35
![]() Sofi wrote:
Sofi wrote:
Bonjour, je débute un peu avec les diagrammes, d'habitude j'ai un Rang à l'endroit,1 rang à l'envers et ainsi de suite. Ici le diagrammes montrent toutes rangs vus sur l'endroit, comment dois je le lire?merci
03.07.2024 - 21:38DROPS Design answered:
Bonjour Sofi, tous les rangs sont représentés dans les diagrammes, suivez les indications des symboles sur l'endroit et sur l'envers, par ex 1 case blanche se tricote à l'endroit sur l'endroit mais à l'envers sur l'envers; 1 croix se tricote à l'envers sur l'endroit mais à l'endroit sur l'envers. Bon tricot!
04.07.2024 - 09:00
![]() Hanne Brendborg wrote:
Hanne Brendborg wrote:
Hej Tak for en meget fin opskrift. Jeg strikker str 6-9 mdr, og når jeg strikker den første række på mønsteret A1, så er der midt i rapporten et symbol ,som jeg ikke kan se nogen forklaring på. Ligner 2 00. Hvad skaaf mønsteret.l jeg gøre her ? jeg kan ikke få maskeantallet til at stemme på denne 1. række
26.06.2024 - 14:02DROPS Design answered:
Hej Hanne, det er 2 omslag ved siden af hinanden (med en maske imellem). De 3 midterste masker strikkes: 1ret, 1omslag, 1vrang, 1omslag,1ret :)
27.06.2024 - 07:44
![]() Jenny Samphier wrote:
Jenny Samphier wrote:
Hello, When you do the first set up row it says to add 4 stitches evenly across the 6 stitch sleeve section so you end up with 10 stitches in that section. Then for the next rows it says to continue with the stocking stitch, A1 and raglan increases etc. My question is, do I also add on 4 stitches to that sleeve section each time I do the raglan increases or do I just do the raglan increases so the sleeve section only grows by 2 stitches each increase round? Thank you.
23.06.2024 - 03:31DROPS Design answered:
Dear Jenny, that 4 stitch is only added at the set-up row - so that the pattern would not pull in the knitted fabric- , then you should only do the raglan-increases. Happy Knitting!
23.06.2024 - 09:16
![]() Audrey Moore wrote:
Audrey Moore wrote:
Is there a tutorial on Ravelry showing how to sew together the button-band and the buttonhole-band at the bottom? If not, can you provide instructions and/or another site that could be a resource? The sweater is beautiful - even have the buttons sewn on. Sewing the bands together at the bottom is the last step and I want it to be as perfect! Thank you.
18.04.2024 - 22:20DROPS Design answered:
Dear Audrey, all the relevant videos we have for this pattern can be found if you click on the word "Videos" on the line just below the title of the piece. Happy Knitting!
19.04.2024 - 09:37
![]() Pam wrote:
Pam wrote:
Hi , What am I doing wrong ,? A1 for second size is in chart is 26 sts.between markers . But the pattern says that size is over 27 sts.
17.04.2024 - 15:04DROPS Design answered:
Dear Pam, 1st row in A.1 in 2nd size is worked over 27 sts as follows: P1, K3, P2, K4, slip 1, k1, psso, K1, YO, P1, YO, K1, K2 tog, K4, P2, K3, P1 (=1+3+2+4+1+1+1+1+1+1+1+4+2+3+1=27sts). Happy knitting!
17.04.2024 - 15:32
|
||||||||||||||||||||||
Sweet Ivy#sweetivysweater |
||||||||||||||||||||||
 |
 |
|||||||||||||||||||||
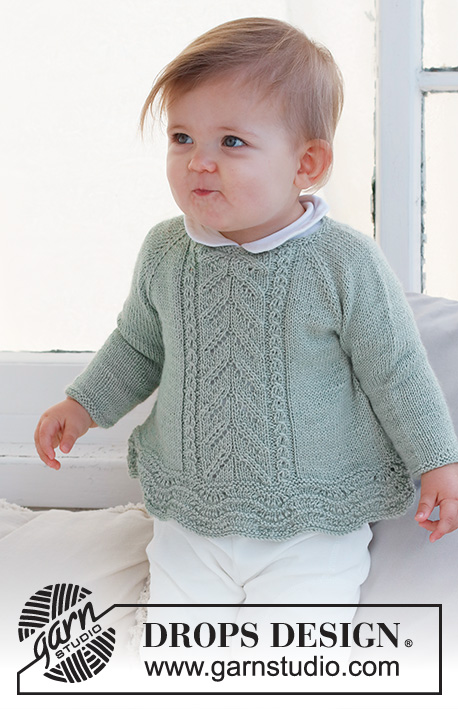
Knitted jumper for babies and children in DROPS Safran. The piece is worked top down with raglan, wave-pattern and lace-pattern. Sizes 0 - 6 years.
DROPS Baby 42-7 |
||||||||||||||||||||||
|
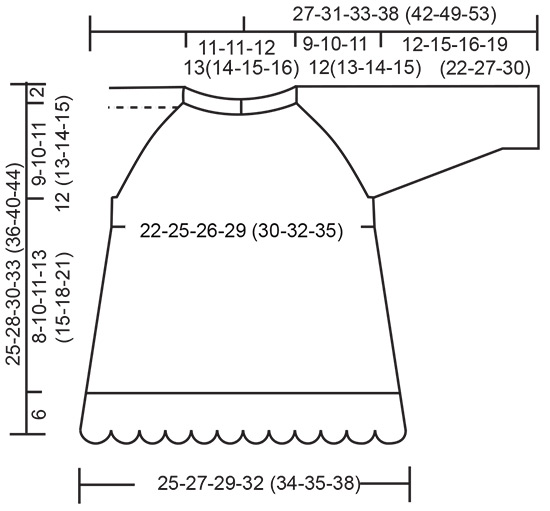
------------------------------------------------------- EXPLANATIONS FOR THE PATTERN: ------------------------------------------------------- RIDGE/GARTER STITCH (worked in the round): 1 ridge in height = 2 rounds; Knit 1 round and purl 1 round. RIDGE/GARTER STITCH (worked back and forth): Knit all rows. 1 ridge = knit 2 rows. PATTERN: See diagrams A.1 and A.2. The diagrams show all rows in the pattern from the right side. INCREASE TIP (for sides of body): Work until there are 2 stitches left before the marker, make 1 yarn over, knit 4 (marker thread sits between these 4 stitches), make 1 yarn over. On the next round work the yarn overs twisted to avoid holes. Then work the new stitches in stocking stitch. RAGLAN: Increase 1 stitch on each side of the 2 stocking stitches in each transition between body and sleeves (8 stitches increase on row/round). Increase 1 stitch by making 1 yarn over. On the next row (wrong side) purl the yarn overs twisted to avoid holes. On the next round (i.e. when working in the round) knit the yarn overs twisted to avoid holes. Then work the new stitches in stocking stitch. DECREASE TIP (sleeves): Decrease 1 stitch on either side of the marker as follows: Work until there are 3 stitches left before the marker, knit 2 together, knit 2 (marker sits between these 2 stitches), slip 1 stitch as if to knit, knit 1 and pass the slipped stitch over the knitted stitch. BUTTONHOLES: 2 buttonholes are worked on the bands at the back of the neck. Work from the right side when there are 3 stitches left on the row as follows: Make 1 yarn over, knit 2 together and knit 1. On the next row, knit the yarn over to leave a hole. The first buttonhole is worked when the neck measures 1½ cm. Then work the other buttonhole after 4 cm. ------------------------------------------------------- START THE PIECE HERE: ------------------------------------------------------- JUMPER – SHORT OVERVIEW OF THE PIECE: The piece is first worked back and forth from mid-back and top down. When the split is finished, it is continued in the round. The yoke is divided for the body and sleeves and the body continued in the round. The sleeves are worked in the round with double pointed needles. NECK: Cast on 73-77-81-85 (89-93-97) stitches with circular needle size 2.5 mm and DROPS Safran. Work 2 RIDGES back and forth – read description above. Change to circular needle size 3 mm. YOKE: READ THE NEXT SECTION BEFORE CONTINUING! The first row is worked as follows from the right side: 3 band stitches in garter stitch, 11-12-13-14 (15-16-17) stitches in stocking stitch (half back piece), 1 yarn over, 2 stitches in stocking stitch (raglan-line), 1 yarn over, 6 stitches in stocking stitch and increase 4 stitches evenly over these stitches (10 stitches on the sleeve), 1 yarn over, 2 stitches in stocking stitch (raglan-line), 1 yarn over, 0-0-0-1 (2-3-4) stitches in stocking stitch, A.1 (25-27-29-29 (29-29-29) stitches – see the start for your size in the smaller sizes, 0-0-0-1 (2-3-4) stitches in stocking stitch (= front piece), 1 yarn over, 2 stitches in stocking stitch (= raglan-line), 1 yarn over, 6 stitches in stocking stitch and increase 4 stitches evenly over these stitches (10 stitches on the sleeve), 1 yarn over, 2 stitches in stocking stitch (raglan-line), 1 yarn over, 11-12-13-14 (15-16-17) stitches in stocking stitch and 3 band stitches in garter stitch (half back piece). The first increase to RAGLAN – read description above, is now finished and there are 89-93-97-101 (105-109-113) stitches on the row. Continue with stocking stitch, A.1 and 3 band stitches in garter stitch on each side and continue to increase to raglan every 2nd row (each row from the right side) – REMEMBER THE KNITTING TENSION and the BUTTONHOLES – read description above. Increase like this every 2nd row (each row from the right side). The increased stitches are worked in stocking stitch. NOTE! In sizes 0/1 and 1/3 months first work the new stitches into A.1 then in stocking stitch. AT THE SAME TIME when the piece measures 6 cm join the piece on the next row from the right side as follows: Cast off the first 3 stitches and work to the end of the row. When the row is finished, continue in the round. You now are working stocking stitch on the back piece, stocking stitch and A.1 on the front piece. Move the beginning of the round to mid-back. Increase to raglan a total of 10-12-13-14 (15-16-18) times = 158-178-190-202 (214-226-246) stitches. Continue without further increases until the piece measures 9-10-11-12 (13-14-15) cm. Work the next round as follows: Work the first 24-27-29-31 (33-35-38) stitches, place the next 32-36-38-40 (42-44-48) stitches on a thread for the sleeve, cast on 6-6-6-8 (8-8-8) stitches (in side under sleeve), work 47-53-57-61 (65-69-75) stitches (front piece), place the next 32-36-38-40 (42-44-48) stitches on a thread for the sleeve, cast on 6-6-6-8 (8-8-8) stitches (in side under sleeve), work the last 23-26-28-30 (32-34-37) stitches. The body and sleeves are finished separately. BODY: = 106-118-126-138 (146-154-166) stitches. Insert 1 marker in each side, in the middle of the new stitches cast on under each sleeve. When the piece measures 3 cm from the division, increase 1 stitch on each side of both markers - read INCREASE TIP. Increase like this every 2 cm a total of 3-3-3-4 (4-4-4) times = 118-130-138-154 (162-170-182) stitches. When the piece measures 8-10-11-13 (15-18-21) cm from the division, work 2 ridges over all stitches. Knit 1 round where you increase 18-23-32-33 (42-34-39) stitches evenly spaced = 136-153-170-187 (204-204-221) stitches. Knit 1 round; the yarn overs are knitted twisted to avoid holes. Now work A.2 over all stitches. When A.2 has been completed in height, loosely cast off. The jumper measures approx. 25-28-30-33 (36-40-44) cm from the shoulder down. SLEEVES: Place the 32-36-38-40 (42-44-48) stitches from the thread on the one side of the piece on double pointed needles size 3 mm and knit up 1 stitch in each of the 6-6-6-8 (8-8-8) stitches cast on under the sleeve = 38-42-44-48 (50-52-56) stitches. Insert a marker in the middle of the new stitches under the sleeve. Work stocking stitch in the round. When the sleeve measures 3 cm from the division, decrease 1 stitch on each side of the marker - read DECREASE TIP! Decrease like this every 5-4-3-3 (4-5-3½) cm a total of 2-3-4-5 (5-5-7) times = 34-36-36-38 (40-42-42) stitches. When the sleeve measures 11-14-15-18 (21-26-29) cm, change to double pointed needles size 2.5 mm. Work 2 ridges over all stitches. Cast off with knit. Work the other sleeve in the same way. ASSEMBLY: Sew the buttons onto the band without buttonholes. Lay the button-band under the buttonhole-band and sew together at the bottom. |
||||||||||||||||||||||
Diagram explanations |
||||||||||||||||||||||
|
||||||||||||||||||||||

|
||||||||||||||||||||||
|
||||||||||||||||||||||
Have you finished this pattern?Tag your pictures with #dropspattern #sweetivysweater or submit them to the #dropsfan gallery. Do you need help with this pattern?You'll find 31 tutorial videos, a Comments/Questions area and more by visiting the pattern on garnstudio.com. © 1982-2025 DROPS Design A/S. We reserve all rights. This document, including all its sub-sections, has copyrights. Read more about what you can do with our patterns at the bottom of each pattern on our site. |
||||||||||||||||||||||


With over 40 years in knitting and crochet design, DROPS Design offers one of the most extensive collections of free patterns on the internet - translated to 17 languages. As of today we count 314 catalogues and 11820 patterns translated into English (UK/cm). 11820
We work hard to bring you the best knitting and crochet have to offer, inspiration and advice as well as great quality yarns at incredible prices! Would you like to use our patterns for other than personal use? You can read what you are allowed to do in the Copyright text at the bottom of all our patterns. Happy crafting!
Post a comment to pattern DROPS Baby 42-7
We would love to hear what you have to say about this pattern!
If you want to leave a question, please make sure you select the correct category in the form below, to speed up the answering process. Required fields are marked *.